2-Way Remote Start and Door Lock Transmitter Package Installation AP3
Accessories Part Number
19216164
Kit Usage
This kit is designed to add 2-way remote start with extended range and enhanced functionality. It is for vehicles equipped with remote vehicle start from the factory (vehicles with option code AP3). If the vehicle is not equipped with remote vehicle start, use a kit for vehicles equipped with option code AP8.
Qty | Description |
|---|---|
1 | Remote Control Door Lock, 2-Way Remote Start and Information Display Receiver (2-Way RCDLR) |
1 | 2-Way Remote Start and Door Lock Transmitter (With Information Display) |
1 | 2-Way Remote Start, Door Lock and Information Display Antenna |
1 | Factory Style 1-Way Transmitter |
1 | Service Part ID Label |
1 | 2-Way Advanced Remote Start Owner Manual |
1 | Felt/Flocking Tape |
Special Tools
| • | Scan Tool with capability of communicating on GMLAN |
| • | Service Programming System (SPS - TIS2WEB or equivalent) |
| • | J-46079 Tire Pressure Monitor Diagnostic Tool |
| • | Surface Cleaner (50 percent isopropyl alcohol, FS-1082 hi-flash naphtha or equivalent) |
| • | Glass Primer and Adhesion Promoter GM P/N 12378555 (Canadian P/N 88901239) |
Procedure
- Using the scan tool, perform the copy and paste TPM Information procedure. This will extract the TPM tire type information as well as the sensor data from the existing RCDLR prior to its replacement and store this information in the scan tool. After RCDLR replacement, the tire type and sensor data stored in the scan tool is written to the new RCDLR, negating the need to perform the tire type setup and sensor learn procedure. This must be performed BEFORE removing the old RCDLR. Refer to Remote Control Door Lock Receiver Programming and Setup.
- Remove the rear window shelf trim panel. Refer to Rear Window Shelf Trim Panel Replacement.
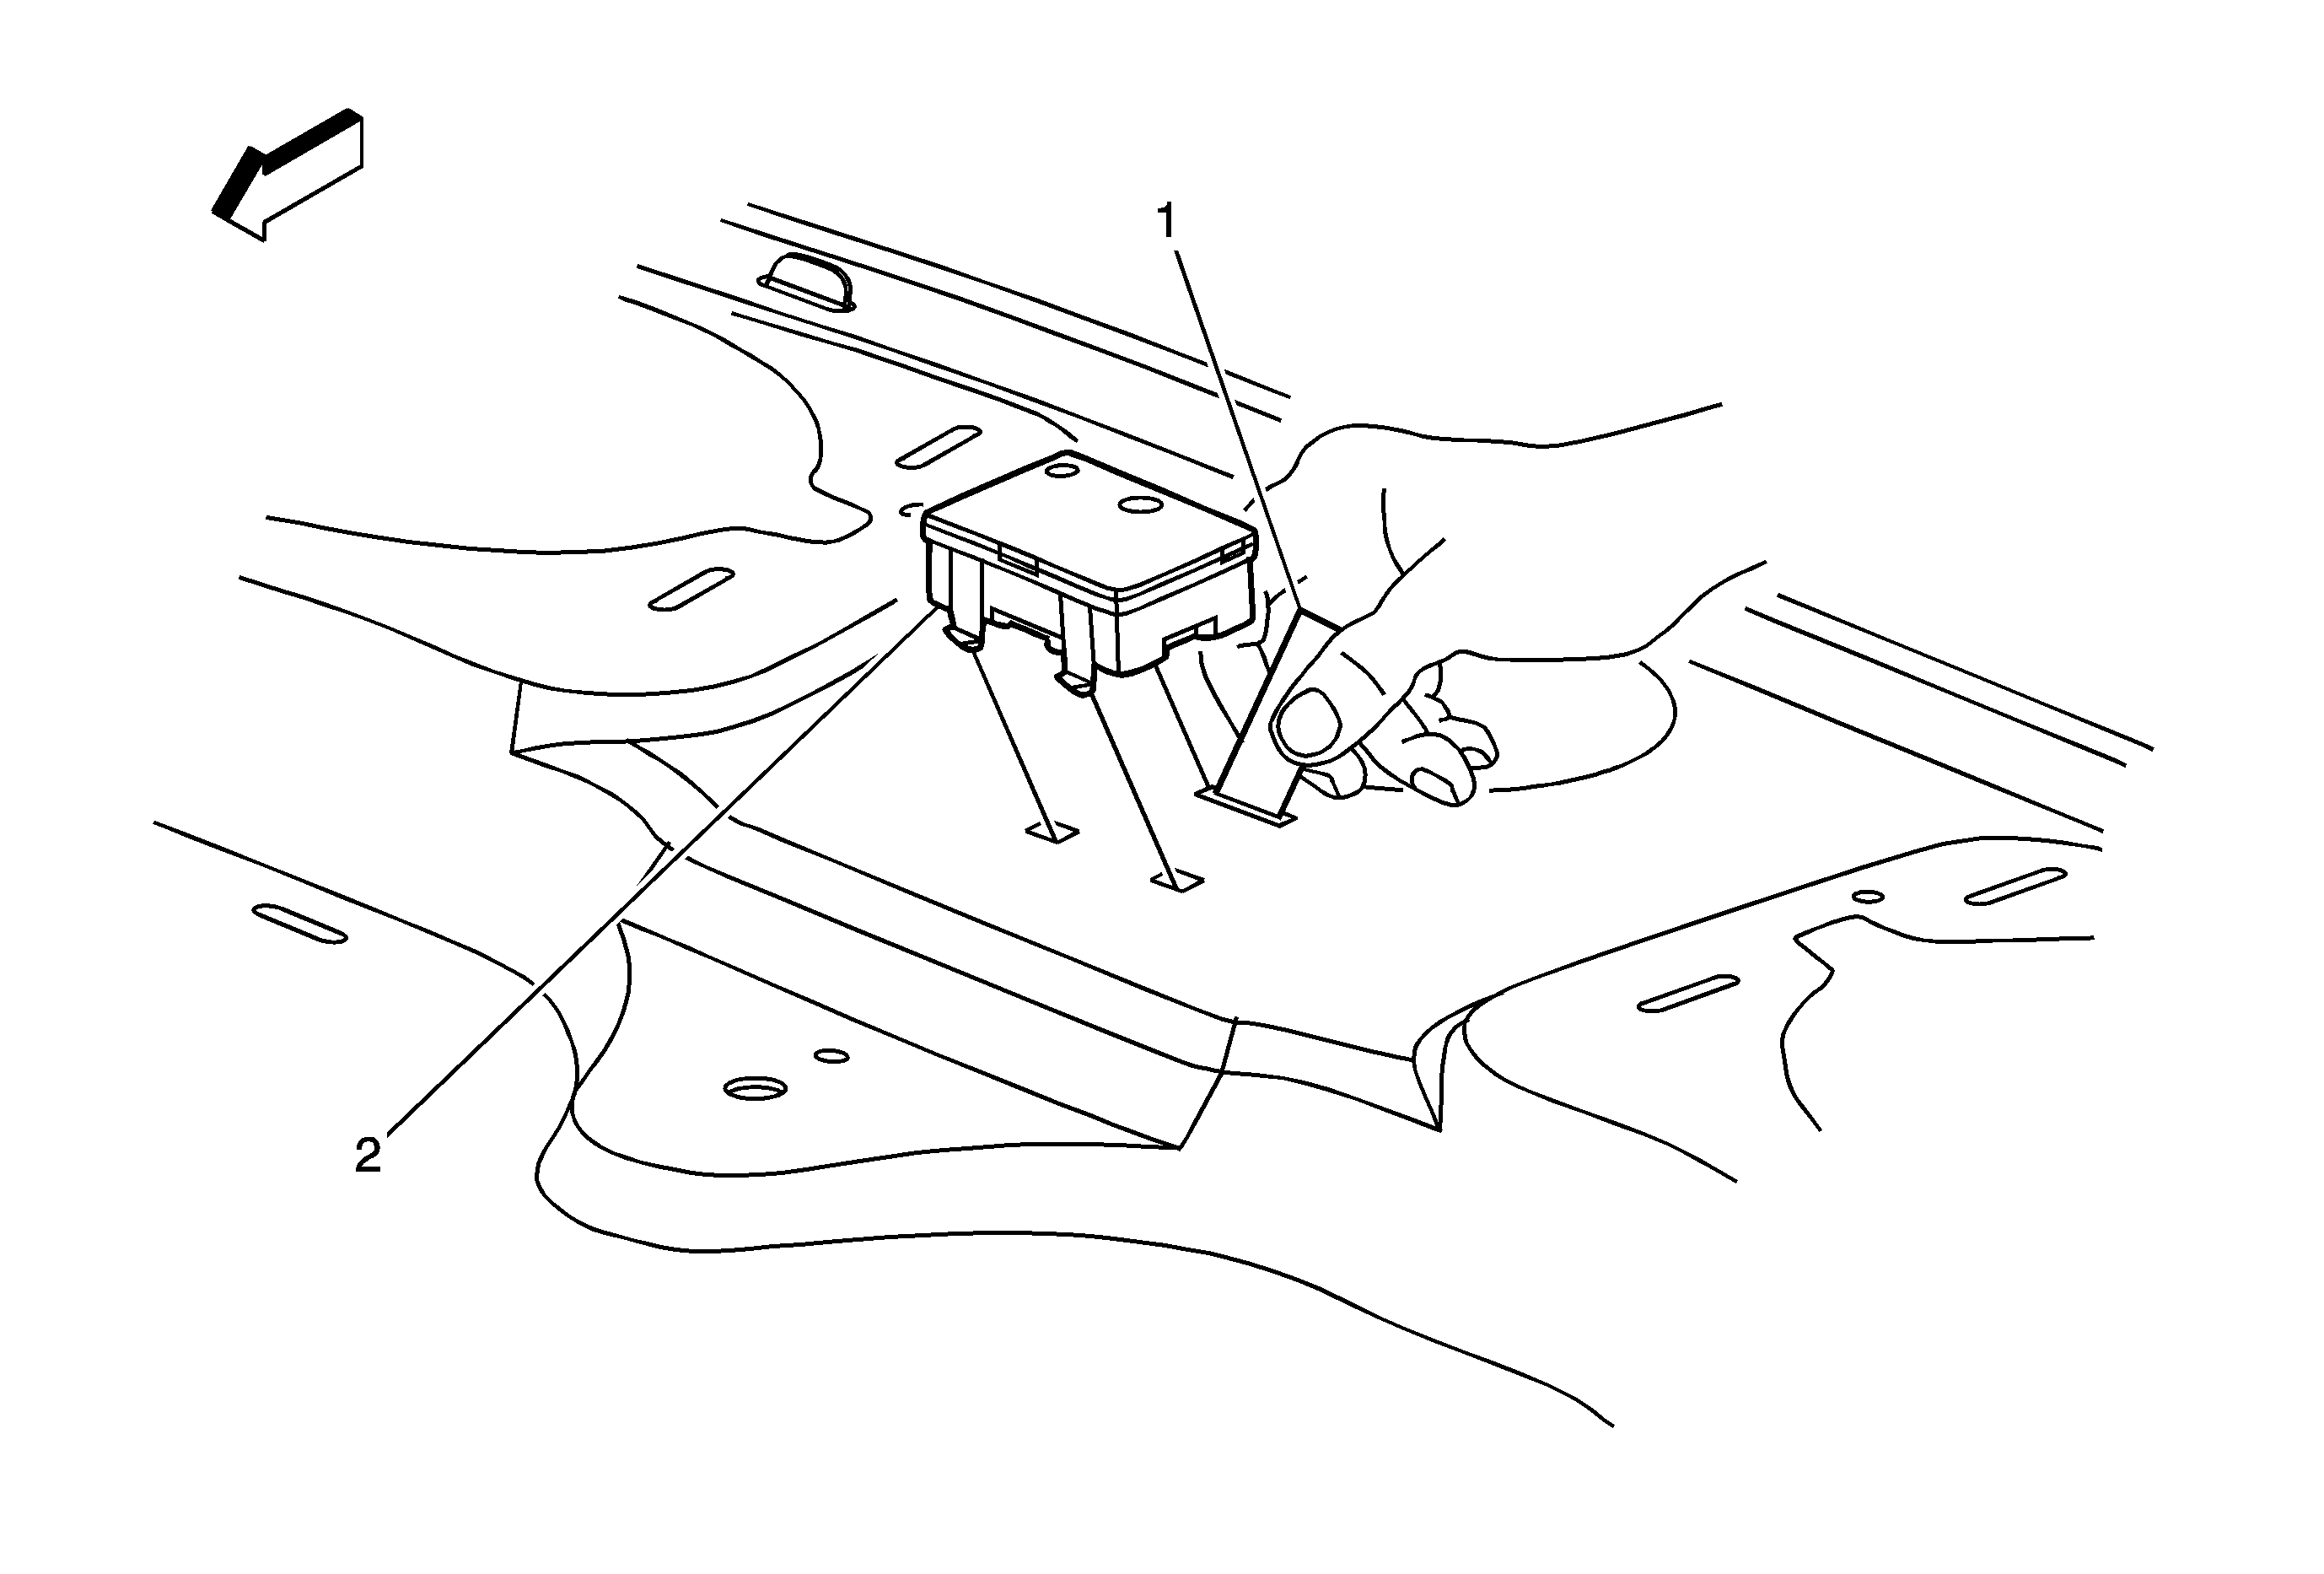
- Remove the factory RCDLR (2). Refer to Remote Control Door Lock Receiver Replacement
- Clean the sheet metal surface around the RCDLR single long (rearward) mounting slot with a surface cleaner (50 percent isopropyl alcohol, FS-1082 hi-flash naphtha or equivalent).
- Adhere the felt/flocking tape (1) to the rearward RCDLR mounting slot. Make sure the flocking tape wraps the edge of the slot.
- Install the 2-way RCDLR. Do not program or reassemble yet.
- Lower the rear of the headliner. Refer to Headlining Trim Panel Replacement.
- Clean the top blackout area on the inside of the rear window with a surface cleaner (50 percent isopropyl alcohol, FS-1082 hi-flash naptha or equivalent).
- Dry the glass thoroughly using a lint-free cloth.
- Apply adhesion promoter GM P/N 12378555 (Canadian P/N 88901239) to the rear window in the area where you will install the antenna. Follow the Glass Adhesion Promoter instructions on the product label. The antenna will be mounted at the center of the vehicle, with the bottom lined up with the bottom of the window blackout area.
- Remove the protective film from the adhesive pad on the antenna.
- Align the antenna according to the figure, centered in the vehicle, with the bottom lined up with the bottom of the rear window blackout area.
- Press firmly all along the antenna, including all four corners of the adhesive pad, in order to ensure proper adhesion to the window.
- Hold pressure on the antenna for 10-30 seconds.
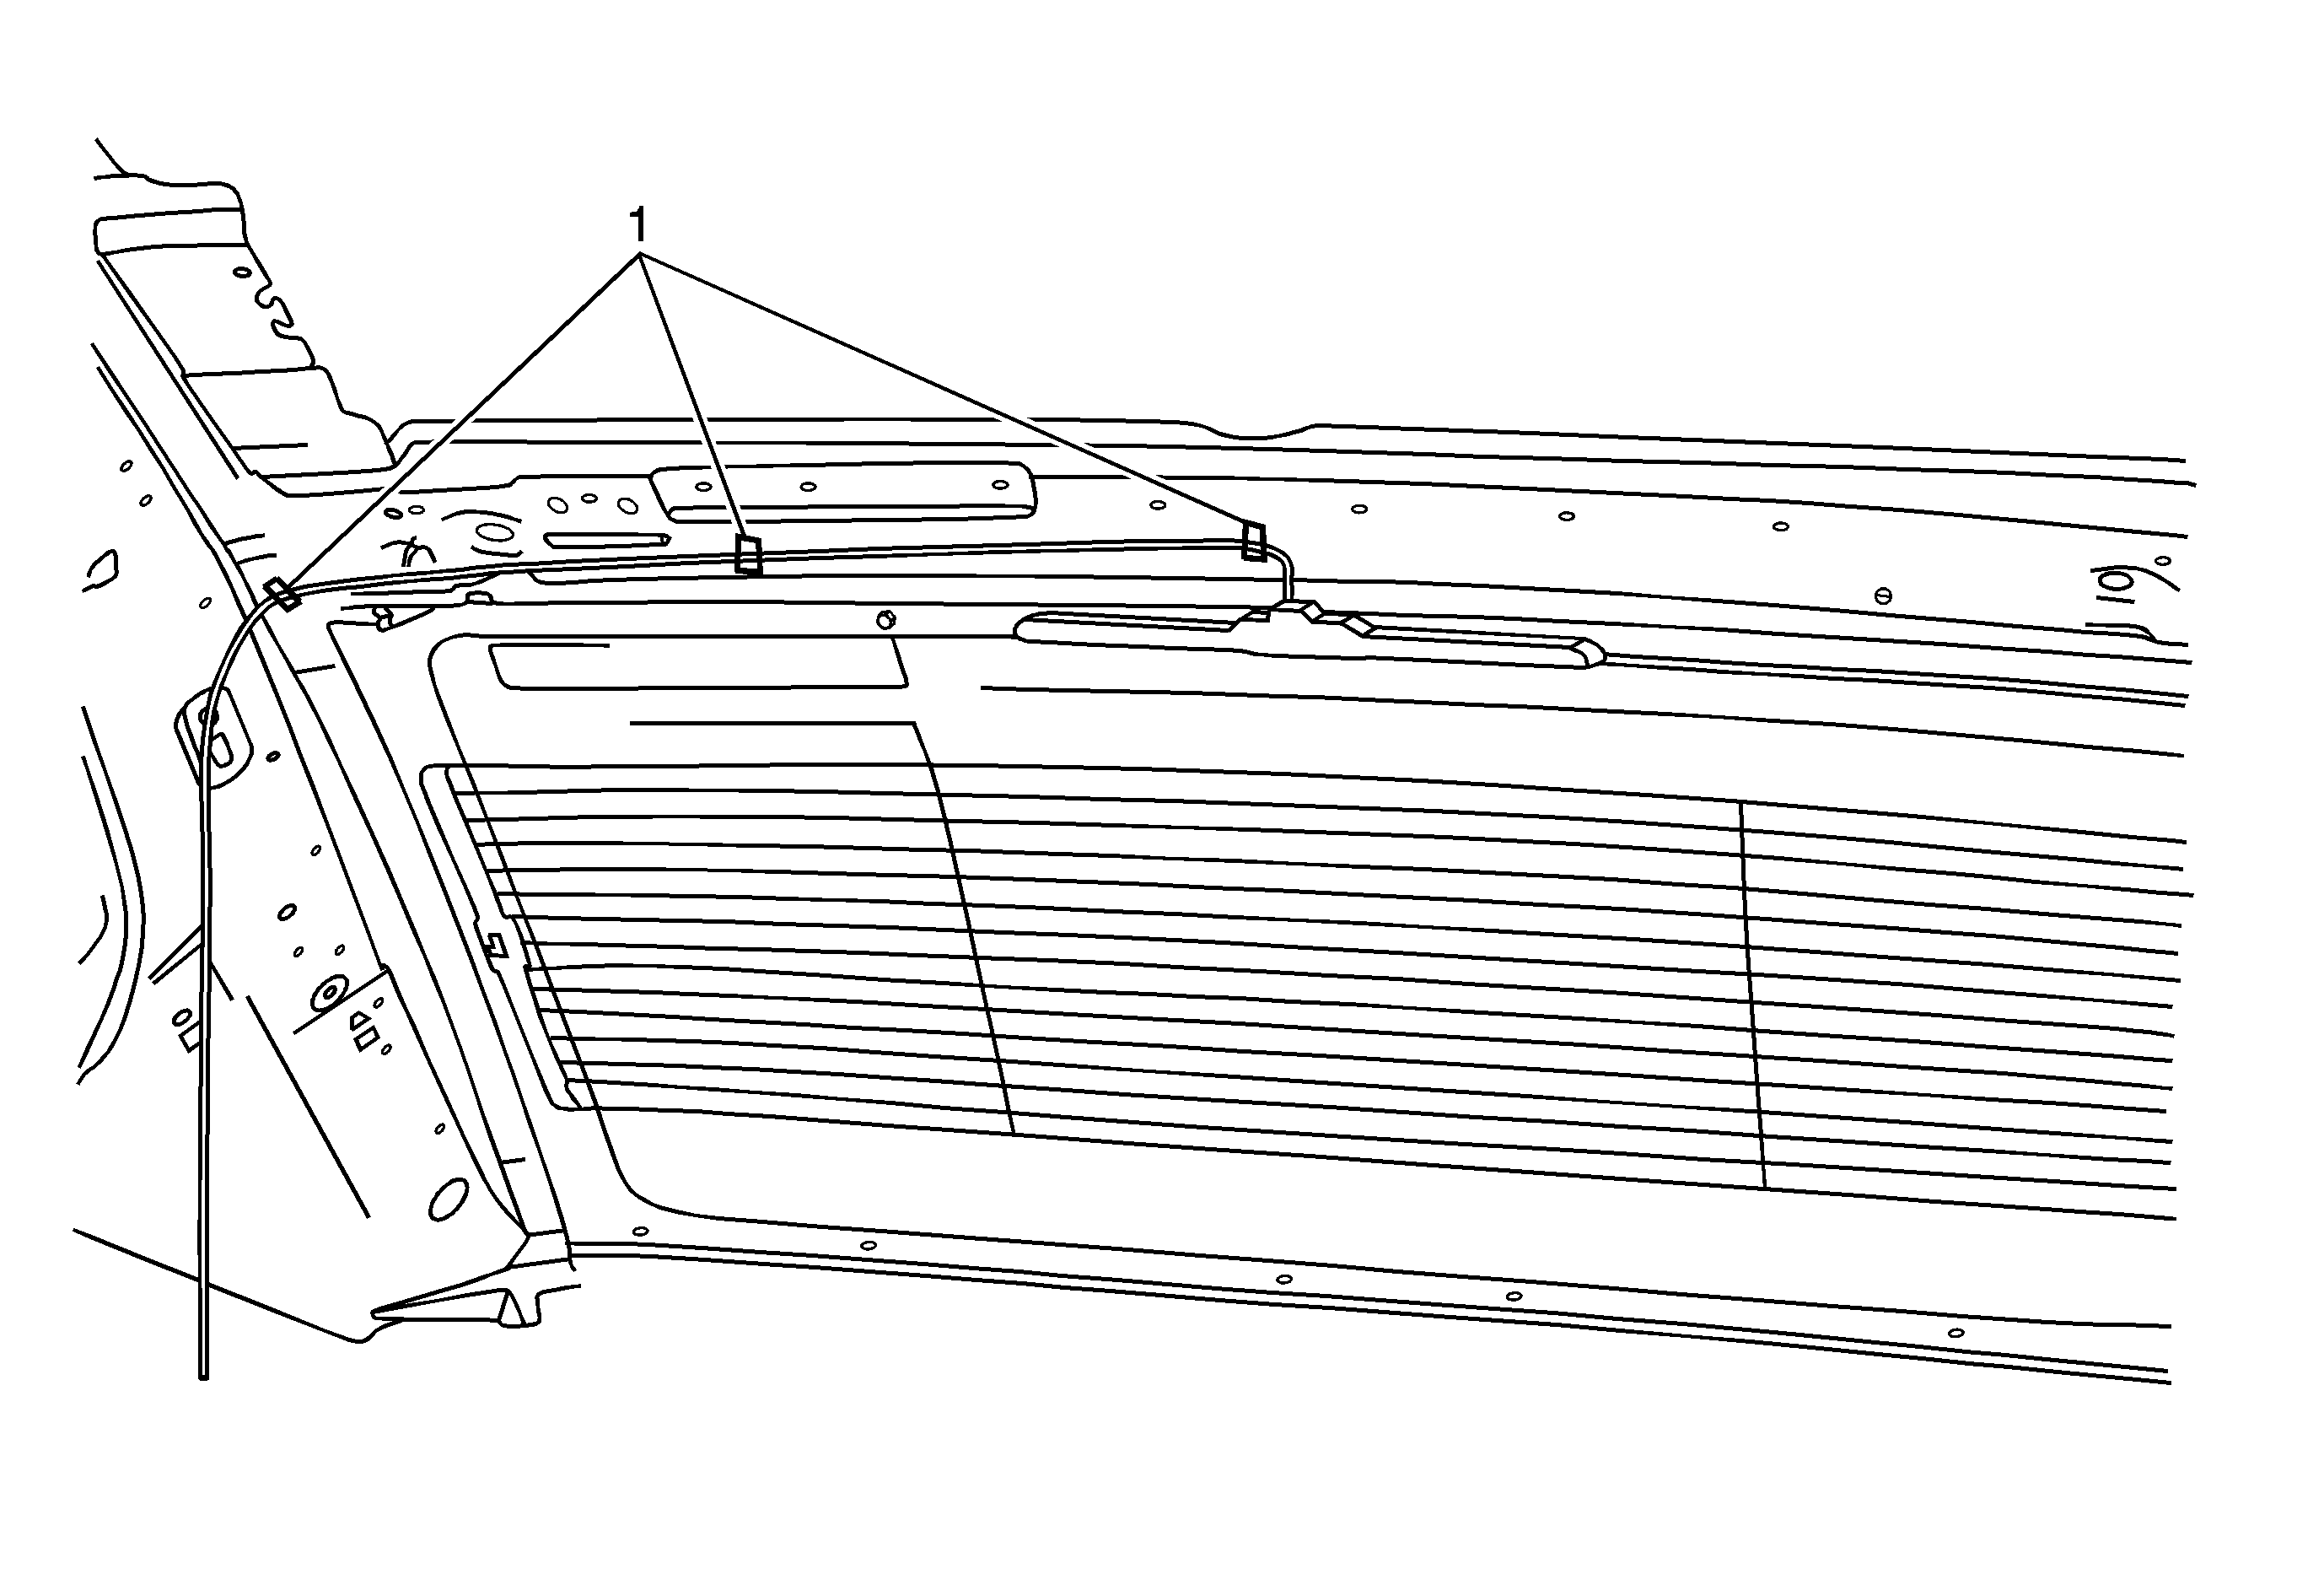
- Route the antenna cable to the passenger side, and secure the cable to the rear window upper roof structure with three adhesive wire-wraps (1).
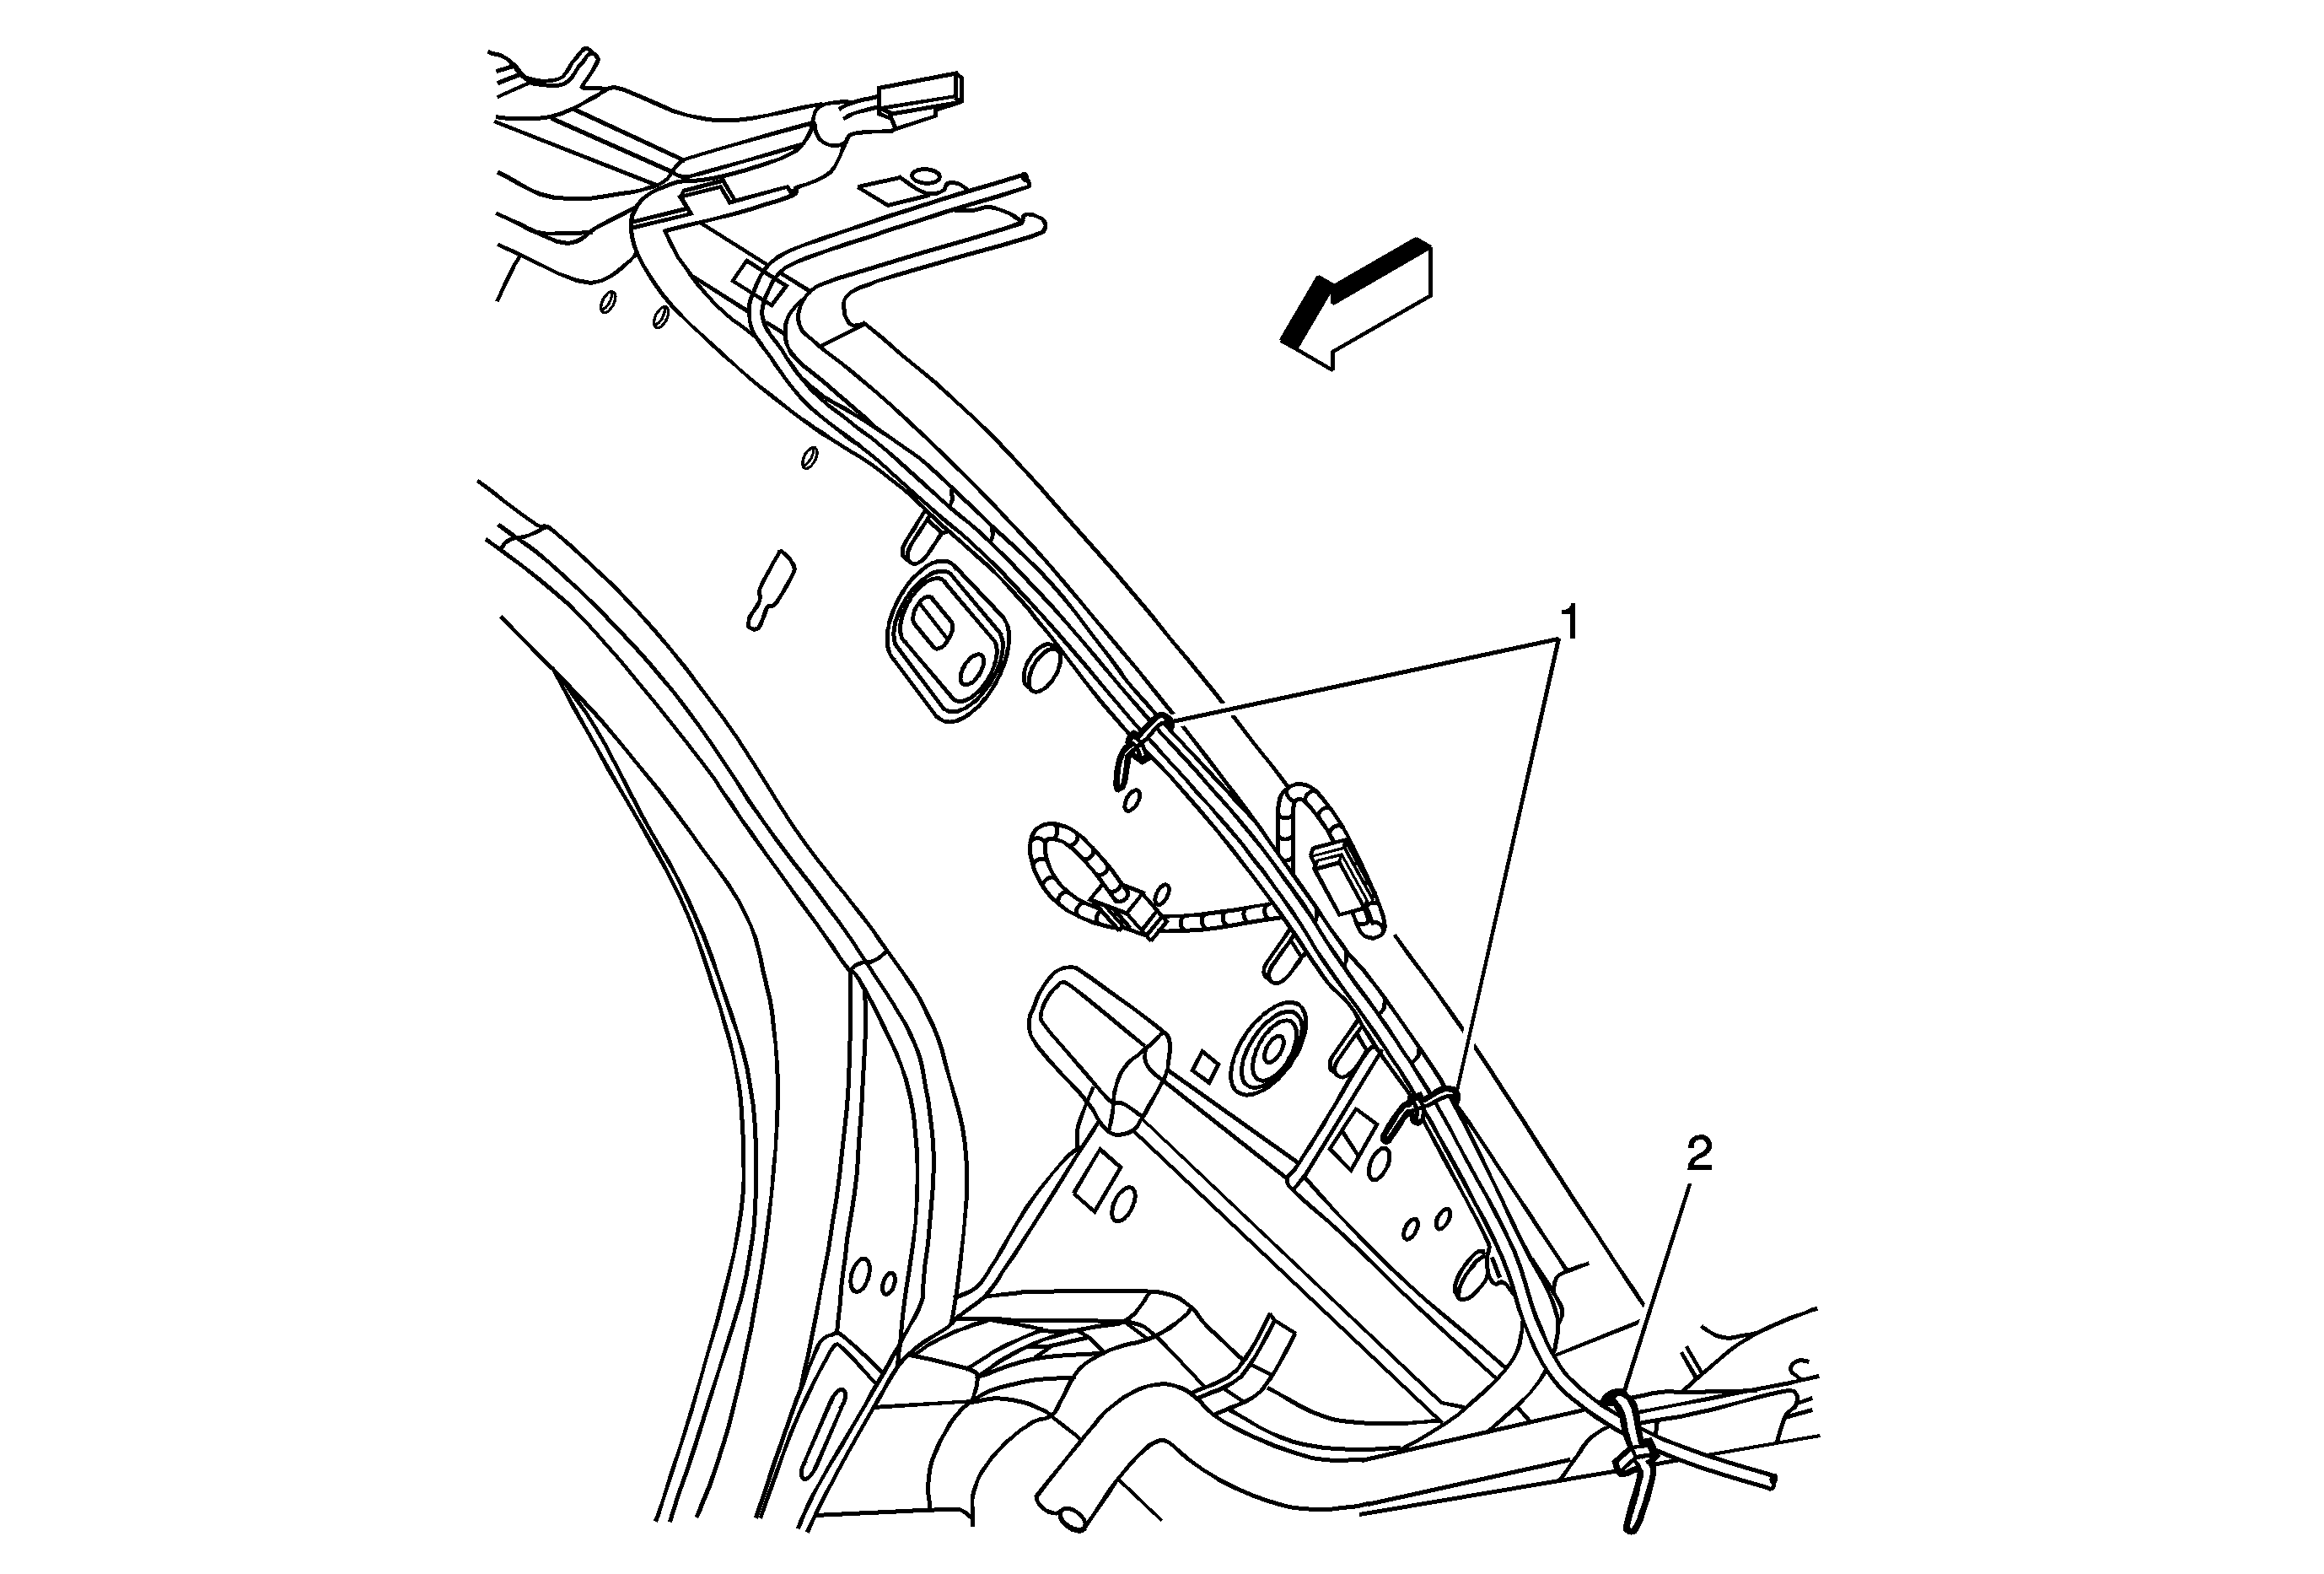
- Secure the antenna cable to the body wiring harness on the right body side inner with three tie wraps (1 and 2).
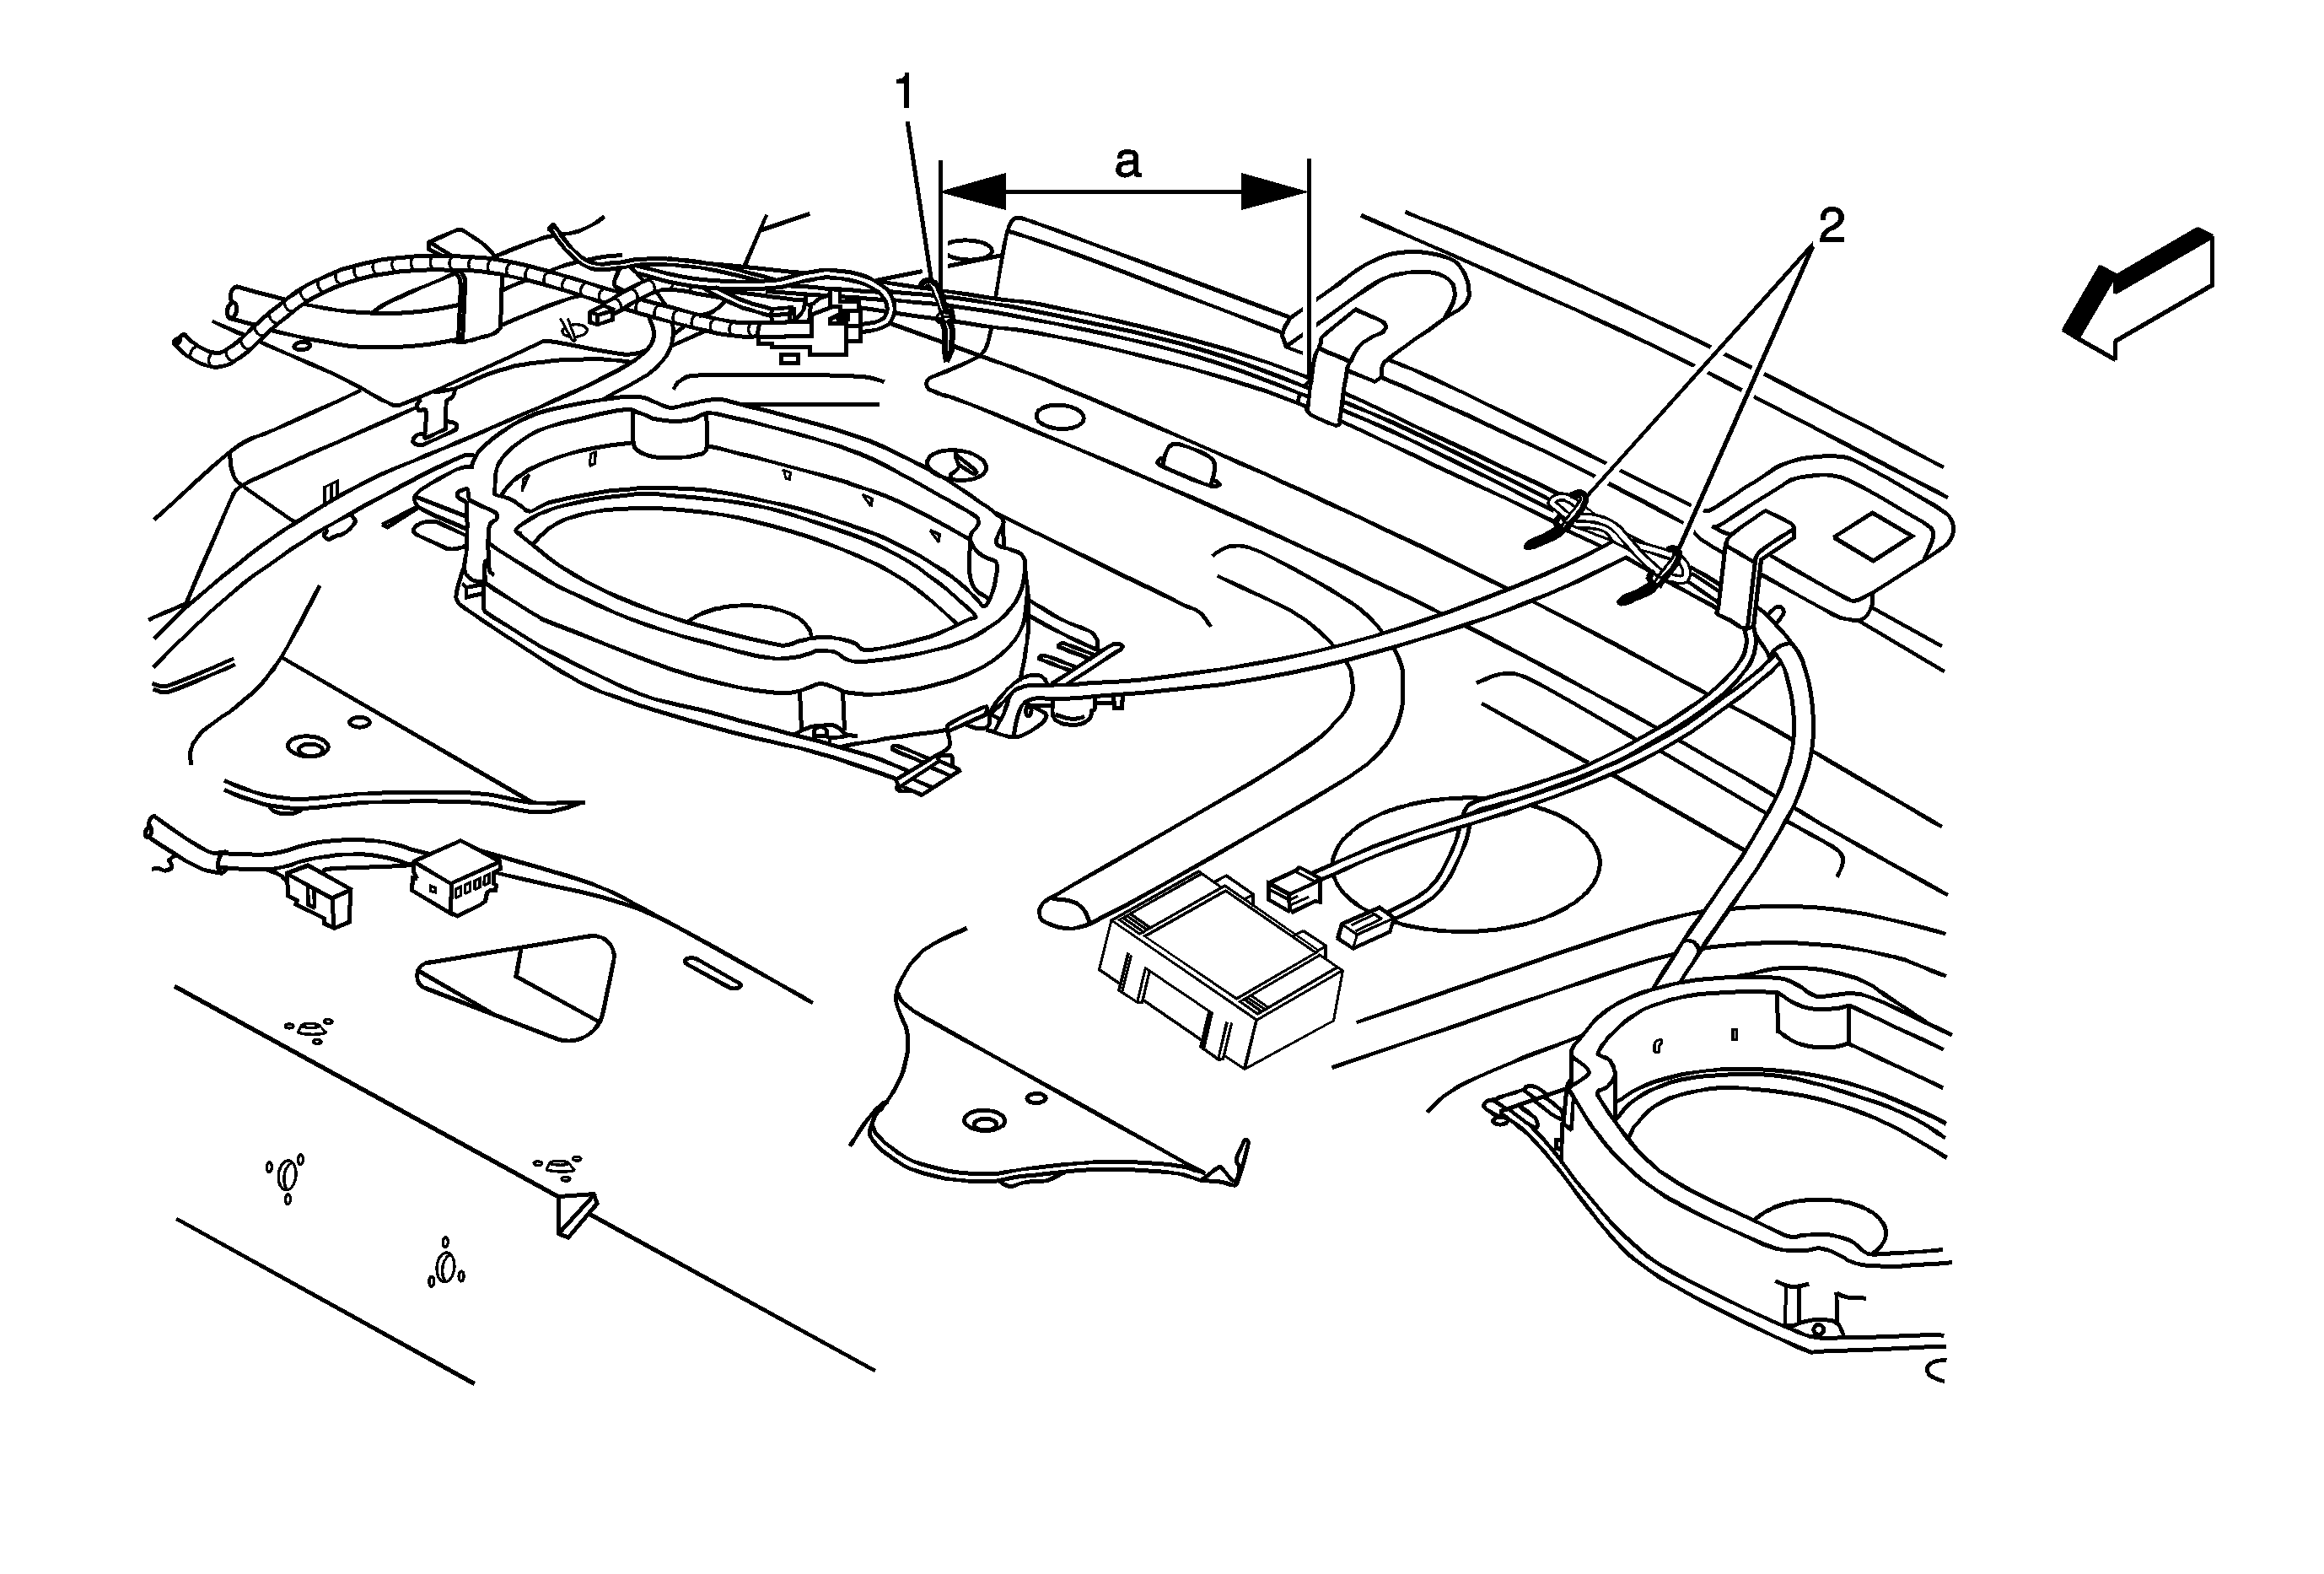
- Secure the antenna cable to the body wiring harness on the rear window panel with one tie wrap (1).
- Connect the antenna to the 2-way RCDLR.
- Loop the excess antenna cable in a "Figure 8" at least 100 mm (4 in) long and secure to the body harness with two tie wraps (2).
- Program the 2-way RCDLR. Refer to Remote Control Door Lock Receiver Programming and Setup. Program the 2-way transmitter and the factory styled 1-way transmitter included in the kit to the 2-way RCDLR.
- Turn the ignition off.
- Discard the vehicle factory transmitters, as they will no longer be functional.
- Apply the service part ID label to the bottom of the existing service parts ID label. This label is for future transmitter service part identification.
- Turn the ignition on.
- Using the scan tool, retrieve any diagnostic trouble codes (DTCs) from all of the modules.
- Clear all DTCs.
- Remove the scan tool.
- Operate the 2-way and factory style 1-way transmitters in order to verify correct system operation. Refer to Keyless Entry System Description and Operation. Press a command button with the vehicle ignition ON in order to synchronize the 2-way transmitter clock to the vehicle clock.
- Reassemble. Refer to Remote Control Door Lock Receiver Replacement, Rear Window Shelf Trim Panel Replacement Headlining Trim Panel Replacement.
- Drive the vehicle above 25 mph for at least two minutes. This is to update the tire pressure displays.
- Add the transmitters to the customer key rings.
- Place the 2-way Advanced Remote Start owner manual in instrument panel compartment.
- Keep the vehicle dry. Allow 6-8 hours, at 15°C (60°F), for the antenna adhesive to cure after installation.
Important: Please review this entire procedure before trying to perform it.
Important: Felt/flocking tape must be applied to the rearward RCDLR mounting slot to prevent rattles with rear speaker bass.

Important:
• The adhesion promoter must be used to assure adequate bonding of the antenna. • Mask off or protect areas before applying the adhesion promoter.
Important:
• Position the antenna according to the figure provided. A small change in placement will decrease the operating range of the system. • Do not touch the adhesive pad on the antenna.
Important: Excess antenna cable length must be looped in a "figure 8" no less than 100 mm (4 in) in length for the best performance of the system.
| 23.1. | The surface temperature should not be less than 65°F (21°C). |
| 23.2. | Clean the surface with a suitable solvent (50 percent isopropyl alcohol, FS-1062 hi-flash naphtha or equivalent). |
| 23.3. | Dry the surface with a clean cloth. |
| 23.4. | Peel the liner from the backside of the label, being careful not to touch the adhesive or allow dirt or any foreign material to come in contact with it. |
| 23.5. | Carefully align the label to the surface, press firmly, and smooth out. |
2-Way Remote Start and Door Lock Transmitter Package Installation AP8
Accessories Part Number
19216163
Kit Usage
This kit is designed to add 2-way remote start with extended range and enhanced functionality. It is for vehicles not equipped with but prepped for remote vehicle start from the factory (vehicles with option code AP8). If the vehicle is equipped with remote vehicle start, use a kit for vehicles equipped with option code AP3. The vehicle must also have an automatic transmission. To add remote vehicle start, the vehicle needs to be reconfigured. This is done with a service programming system. The installer needs to call the Techline Customer Support Center (TCSC). The TCSC will ask for the vehicle identification number (VIN) and the authorization code from the kit. The call and authorization code are good for only one specific VIN.
Qty | Description |
|---|---|
1 | Remote Control Door Lock, 2-Way Remote Start and Information Display Receiver (2-Way RCDLR) |
1 | 2-Way Remote Start and Door Lock Transmitter (With Information Display) |
1 | 2-Way Remote Start, Door Lock and Information Display Antenna |
1 | Factory Style 1-Way Transmitter |
1 | Service Part ID Label |
1 | Installation Addendum with an Authorization Code Label |
1 | 2-Way Advanced Remote Start Owner Manual |
1 | Felt/Flocking Tape |
Special Tools
| • | Scan Tool with capability of communicating on GMLAN |
| • | Service Programming System (SPS - TIS2WEB or equivalent) |
| • | J-46079 Tire Pressure Monitor Diagnostic Tool |
| • | Surface Cleaner (50 percent isopropyl alcohol, FS-1082 hi-flash naphtha or equivalent) |
| • | Glass Primer and Adhesion Promoter GM P/N 12378555 (Canadian P/N 88901239) |
Procedure
- Verify the vehicle has the AP8 option and an automatic transmission. Call TCSC 1-800-828-6860 (English), 800-503-3222 (French), or 248-265-0840 (Spanish) to obtain programming instructions to add the remote start feature. You must have the vehicle VIN that will be upgraded and the authorization code from the kit.
- Using the Scan Tool and SPS terminal, reconfigure the vehicle for remote start. Use the method called out by the TCSC. Refer to Service Programming System (SPS)
- Using the scan tool, perform the copy and paste TPM Information procedure. This will extract the TPM tire type information as well as the sensor data from the existing RCDLR prior to its replacement and store this information in the scan tool. After RCDLR replacement, the tire type and sensor data stored in the scan tool is written to the new RCDLR, negating the need to perform the tire type setup and sensor learn procedure. This must be performed BEFORE removing the old RCDLR. Refer to Remote Control Door Lock Receiver Programming and Setup.
- Remove the rear window shelf trim panel. Refer to Rear Window Shelf Trim Panel Replacement.
- Remove the factory RCDLR (2). Refer to Remote Control Door Lock Receiver Replacement
- Clean the sheet metal surface around the RCDLR single long (rearward) mounting slot with a surface cleaner (50 percent isopropyl alcohol, FS-1082 hi-flash naphtha or equivalent).
- Adhere the felt/flocking tape (1) to the rearward RCDLR mounting slot. Make sure the flocking tape wraps the edge of the slot.
- Install the 2-way RCDLR. Do not program or reassemble yet.
- Lower the rear of the headliner. Refer to Headlining Trim Panel Replacement.
- Clean the top blackout area on the inside of the rear window with a surface cleaner (50 percent isopropyl alcohol, FS-1082 hi-flash naphtha or equivalent).
- Dry the glass thoroughly using a lint free cloth.
- Apply adhesion promoter GM P/N 12378555 (Canadian P/N 88901239) to the rear window in the area where you will install the antenna. Follow the Glass Adhesion Promoter instructions on the product label. The antenna will be mounted at the center of the vehicle, with the bottom lined up with the bottom of the window blackout area.
- Remove the protective film from the adhesive pad on the antenna.
- Align the antenna according to the figure, centered in the vehicle, with the bottom lined up with the bottom of the rear window blackout area.
- Press firmly all along the antenna, including all four corners of the adhesive pad, in order to ensure proper adhesion to the window.
- Hold pressure on the antenna for 10-30 seconds.
- Route the antenna cable to the passenger side, and secure the cable to the rear window upper roof structure with three adhesive wire-wraps (1).
- Secure the antenna cable to the body wiring harness on the right body side inner with three tie wraps (1 and 2).
- Secure the antenna cable to the body wiring harness on the rear window panel with one tie wrap (1).
- Connect the antenna to the 2-way RCDLR.
- Loop the excess antenna cable in a "Figure 8" at least 100 mm (4 in) long and secure to the body harness with two tie wraps (2).
- Program the 2-way RCDLR. Refer to Remote Control Door Lock Receiver Programming and Setup. Program the 2-way transmitter and the factory styled 1-way transmitter included in the kit to the 2-way RCDLR.
- Turn the ignition off.
- Discard the vehicle factory transmitters, as they will no longer be functional.
- Apply the service part ID label to the bottom of the existing service parts ID label. This label is for future transmitter service part identification.
- Turn the ignition on.
- Using the scan tool, retrieve any diagnostic trouble codes (DTCs) from all of the modules.
- Clear all DTCs.
- Remove the scan tool.
- Operate the 2-way and factory style 1-way transmitters in order to verify correct system operation. Refer to Keyless Entry System Description and Operation. Press a command button with the vehicle ignition ON in order to synchronize the 2-way transmitter clock to the vehicle clock.
- Reassemble. Refer to Remote Control Door Lock Receiver Replacement, Rear Window Shelf Trim Panel Replacement and Headlining Trim Panel Replacement.
- Drive the vehicle above 25 mph for at least two minutes. This is to update the tire pressure displays.
- Add the transmitters to the customer key rings.
- Place the 2-way Advanced Remote Start owner manual in instrument panel compartment.
- Keep the vehicle dry. Allow 6-8 hours, at 15°C (60°F), for the antenna adhesive to cure after installation.
Important: Please review this entire procedure before trying to perform it.
Important: Felt/flocking tape must be applied to the rearward RCDLR mounting slot to prevent rattles with rear speaker bass.
Important:
• The adhesion promoter must be used to assure adequate bonding of the antenna. • Mask off or protect areas before applying the adhesion promoter.
Important:
• Position the antenna according to the figure provided. A small change in placement will decrease the operating range of the system. • Do not touch the adhesive pad on the antenna.
Important: Excess antenna cable length must be looped in a "figure 8" no less than 100 mm (4 in) in length for the best performance of the system.
| 25.1. | The surface temperature should not be less than 65°F (21°C). |
| 25.2. | Clean the surface with a suitable solvent (50 percent isopropyl alcohol, FS-1062 hi-flash naphtha or equivalent). |
| 25.3. | Dry the surface with a clean cloth. |
| 25.4. | Peel the liner from the backside of the label, being careful not to touch the adhesive or allow dirt or any foreign material to come in contact with it. |
| 25.5. | Carefully align the label to the surface, press firmly, and smooth out. |
