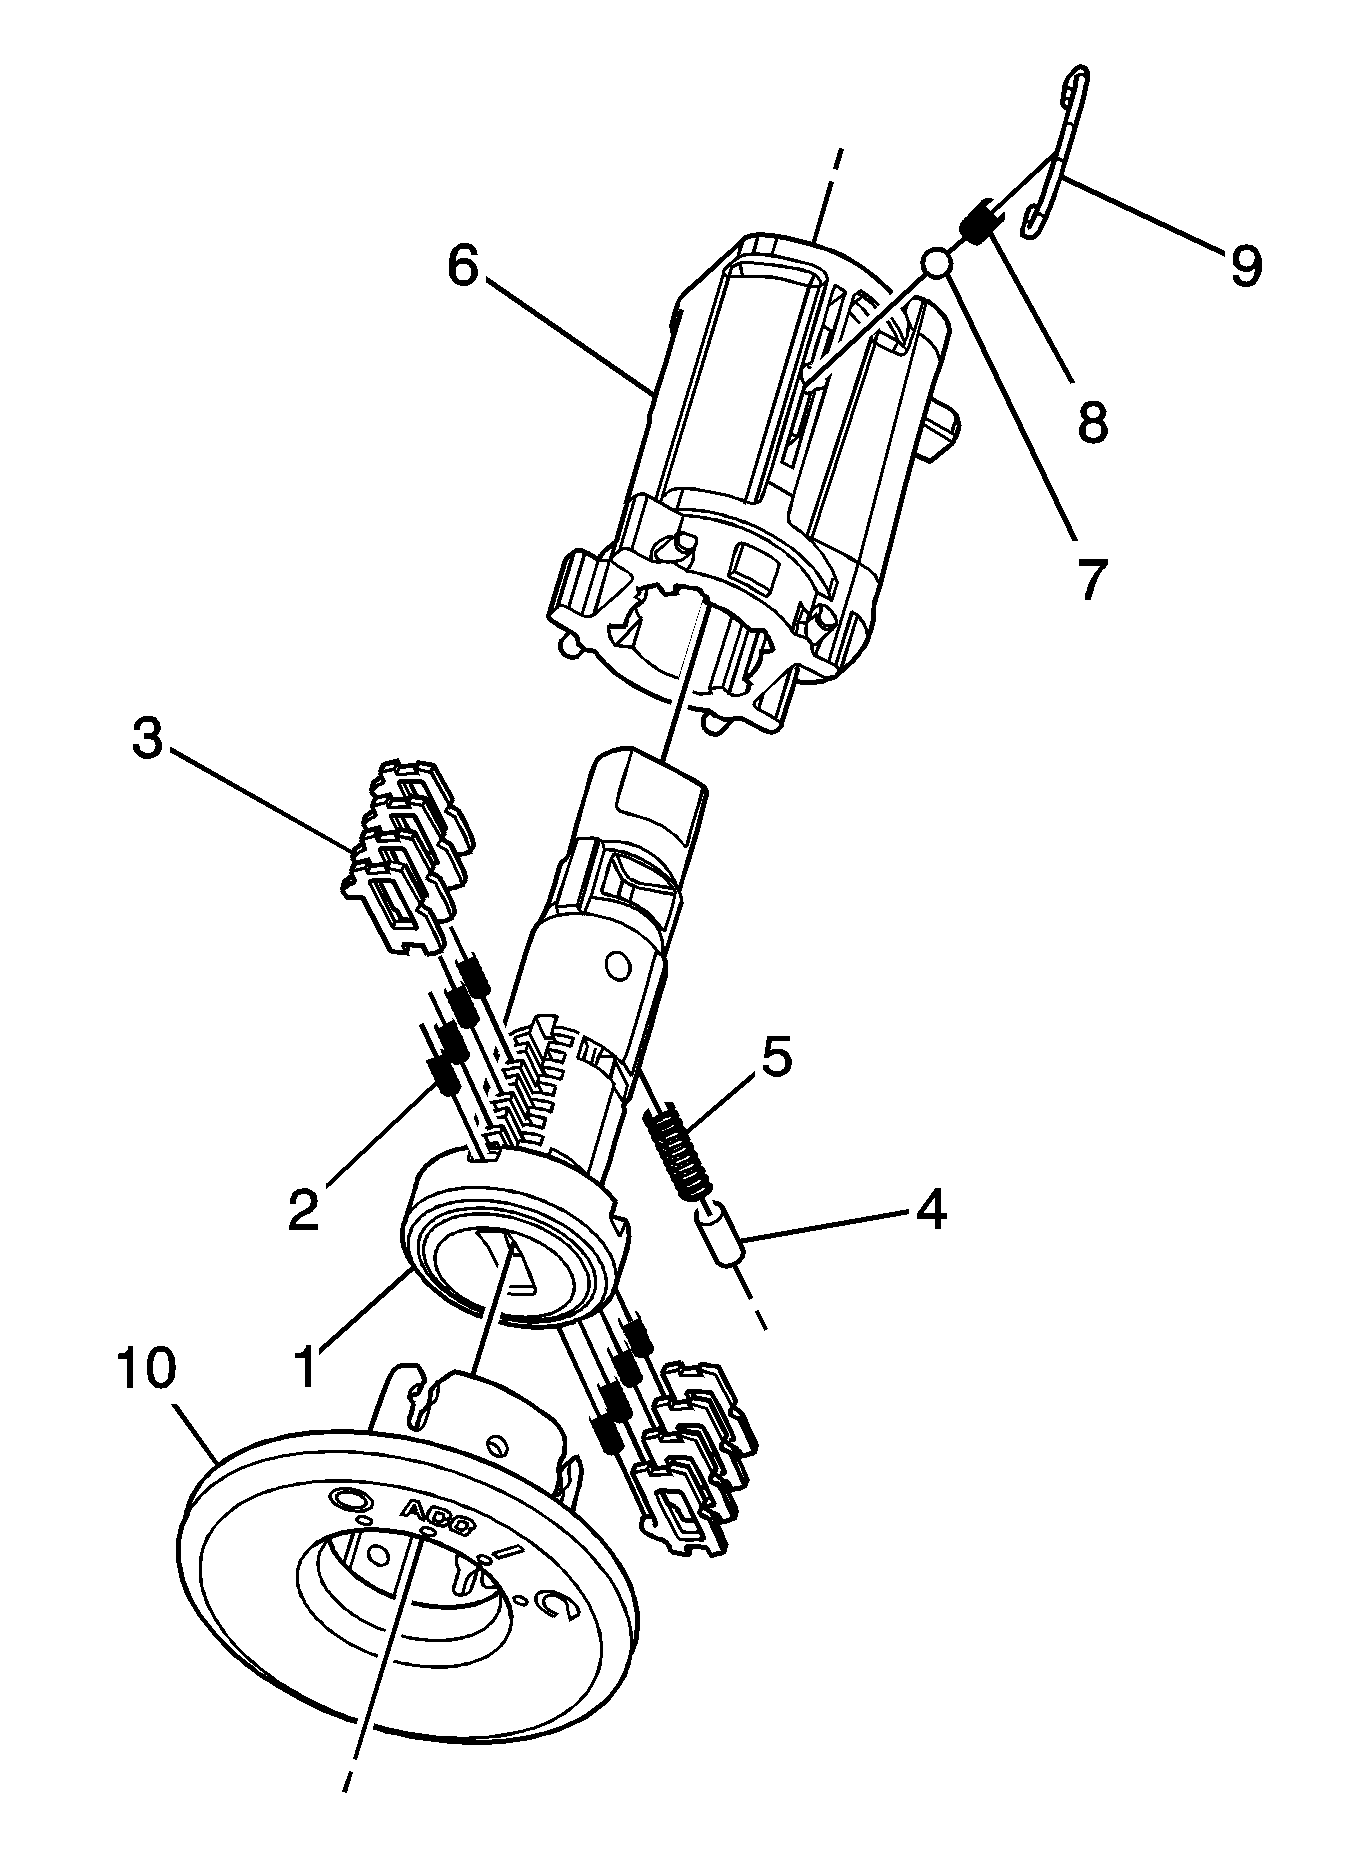
For 1990-2009 cars only
The instrument panel (I/P) ignition lock cylinder uses 8 of the 10 key cut positions, 1-8 when counting from the key head. The tumbler orientations alternate in adjacent locations from side to side with 4 on each side.
- Hold the uncoded cylinder assembly (1) positioned so the side with the retention lug is facing upward.
- Insert one tumbler spring (2) each into each of the 4 tumbler spring holes.
- The first tumbler to be loaded will be key cut position 2, the second number in the key code. Determine the cut depth at this position and install the corresponding tumbler (3) into the tumbler slot nearest the front of the cylinder assembly (1), the end where the key is inserted. It may be necessary to move the sidebar, already pre-assembled into the uncoded cylinder assembly, out slightly to fully install the tumbler into the correct slot.
- In the same manner, determine the cut depth and corresponding tumbler and install the 3 remaining tumblers (3) into the tumbler slots located at key cut positions 4, 6, and 8.
- Check for correct loading by holding the tumblers (3) in position and fully inserting the matching key into the cylinder assembly (1). All tumblers and the sidebar should be flush with the outside diameter of the cylinder assembly.
- Rotate the cylinder assembly (1) so that the side with the retaining pin (4) hole is facing upward and then remove the matching key. Remember the tumblers (3) are not self-retaining and must be held in place.
- Insert one tumbler spring (2) each into each of the 4 tumbler spring holes.
- The first tumbler to be loaded will be key cut position 1. Determine the cut depth at this position and install the corresponding tumbler (3) into the tumbler slot nearest the front of the cylinder assembly.
- In the same manner, determine the cut depth and corresponding tumbler and install the 3 remaining tumblers (3) into the slots located at key cut positions 3, 5, and 7.
- Check for correct loading by holding the tumblers (3) in position and fully inserting the matching key into the cylinder assembly (1). All tumblers and the sidebar should be flush with the outside diameter of the cylinder assembly.
- Lightly lubricate the tumbler (3) surfaces and the small detent recess on the side of the cylinder assembly (1) using the lubrication provided.
- With the matching key fully inserted into the coded cylinder assembly, rotate the cylinder so that the side with the retaining pin (4) hole is facing upward.
- Insert one retaining pin spring (5) and then one retaining pin (4) into the hole located behind the 4 tumblers. The retaining pin spring and retaining pin are not self-retaining and must be held in place until the coded cylinder is installed into the case assembly (6).
- With the matching key fully inserted into the coded cylinder assembly and the retaining pin (4) fully depressed into the cylinder, align the retaining lug on the cylinder with the groove on the inside diameter of the case assembly (6). This groove extends the full length of the case assembly.
- Install the coded cylinder assembly into the case assembly (6) being careful to hold the retaining pin spring (5) and retaining pin (4) in the cylinder until the retaining pin spring and retaining pin enter the case assembly. With the cylinder fully inserted into the case assembly, rotate the cylinder counterclockwise until the retaining pin snaps into place limiting the rotation of the cylinder assembly.
- With the coded cylinder assembly in the Off-Lock position, insert the detent ball (7), if equipped, and detent spring (8) into the hole in the side of the case assembly (6). Install the anti-rattle spring (9) into the case assembly over the detent spring. The anti-rattle spring should capture the detent ball and spring in the case assembly. Make sure both ends of the anti-rattle spring (9) are fully seated, pressed into, the case assembly.
- Remove the matching key and install the ignition cylinder bezel (10) onto the case assembly (6). Make sure the retaining clips of the ignition cylinder bezel are correctly positioned and fully snapped onto the case assembly.

Caution: Wear safety glasses in order to avoid eye damage.
Important: The ignition lock cylinder tumblers (3) are not self-retaining and must be held in place if the key is not fully inserted into the lock cylinder or until the cylinder (1) is assembled into the case assembly (6).
Caution: Wear safety glasses in order to avoid eye damage.
