Steering Gear Replacement EPS
Removal Procedure
- Turn the front wheels to the straight forward position and secure the steering wheel from moving.
- Disengage the steering linkage outer tie rods from the steering knuckles. Refer to Steering Linkage Outer Tie Rod Replacement .
- Separate the intermediate steering shaft from the steering gear. Refer to Intermediate Steering Shaft Replacement .
- Remove the transmission rear mount bolt.
- Remove the steering gear bolts, nuts, and washers from the steering gear.
- Remove the steering gear through the left front wheel opening.
- Transfer any parts as needed.
Notice: Secure the steering wheel utilizing a strap to prevent rotation. Locking of the steering column will prevent damage and a possible malfunction of the SIR system. The steering wheel must be secured
in position before disconnecting the following components:
• The steering column • The intermediate shaft • The steering gear
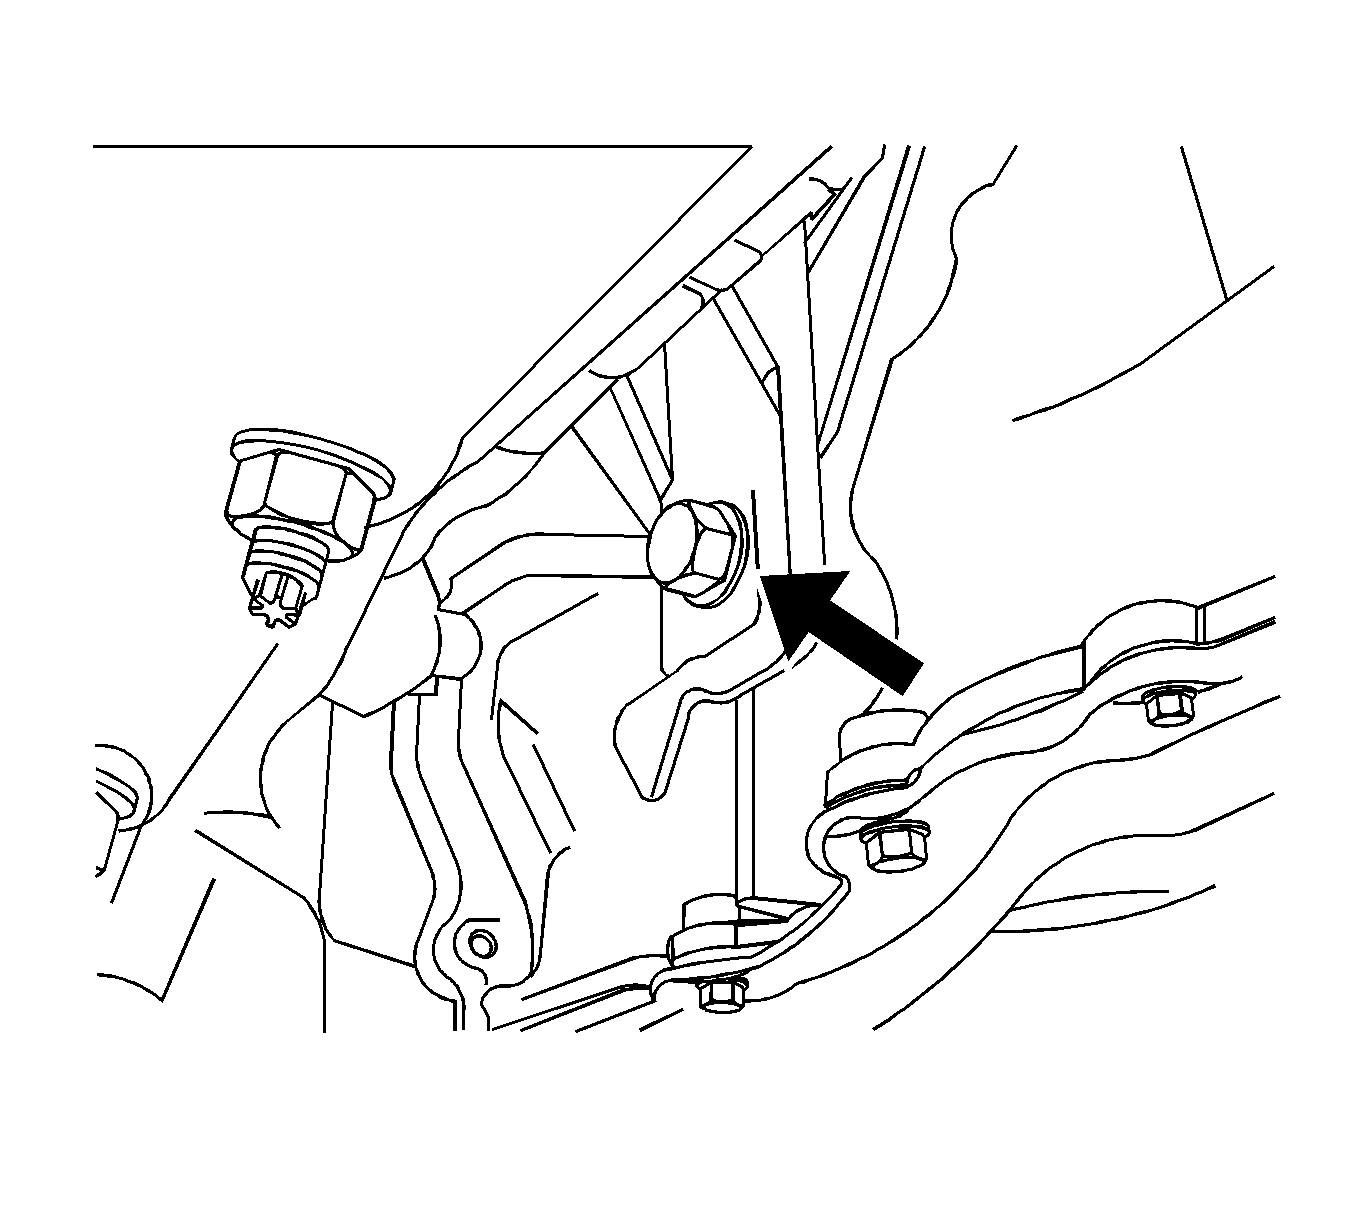
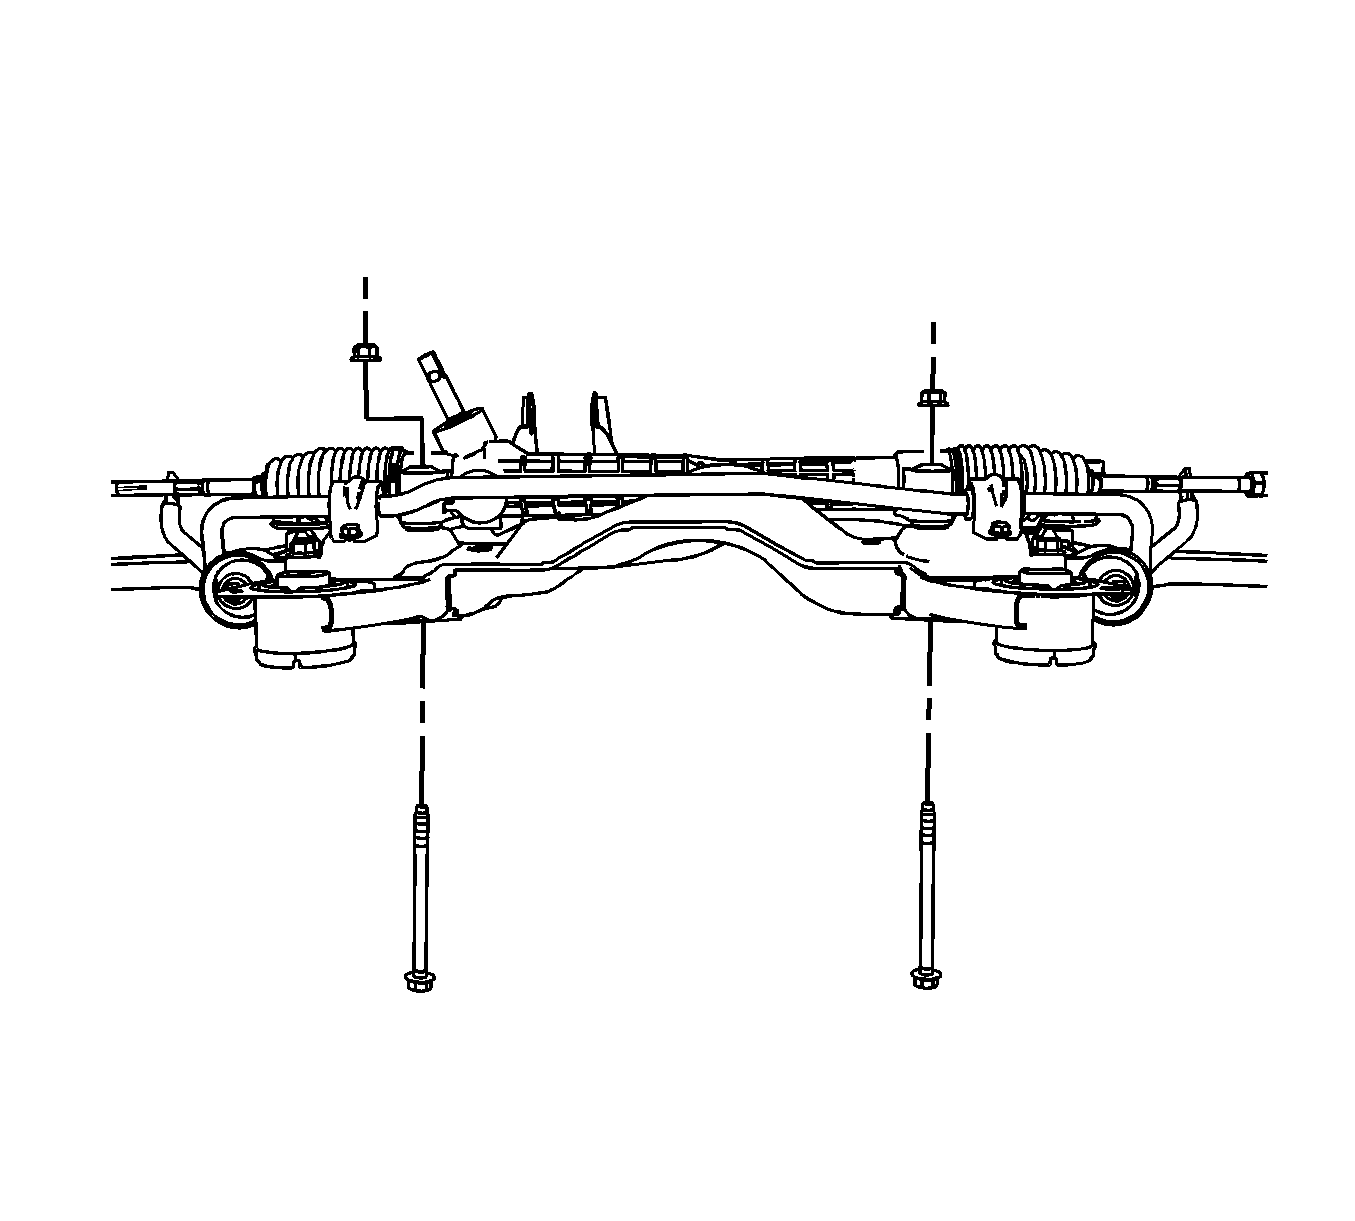
Important: The position of the steering gear will need to be manipulated to remove it through the left front wheel opening.
Installation Procedure
- Install the steering gear through the left front wheel opening.
- Install the steering gear bolts, nuts, and washers to the steering gear.
- Install the transmission rear mount bolt.
- Install the intermediate steering shaft to the steering gear. Refer to Intermediate Steering Shaft Replacement .
- Install the steering linkage outer tie rods to the steering knuckles. Refer to Steering Linkage Outer Tie Rod Replacement .
- Adjust the front toe. Refer to Front Toe Adjustment .
Notice: Refer to Fastener Notice in the Preface section.

Important: Start all of the bolts and nuts by hand before finalizing any torques.
Tighten
Tighten the bolts to 70 N·m (52 lb ft) plus an additional 90 degrees.

Tighten
Tighten the bolt to 90 N·m (66 lb ft).
Steering Gear Replacement HPS with LY7
Removal Procedure
- Turn the front wheels to the straight forward position and secure the steering wheel from moving.
- Remove as much power steering fluid from the remote power steering fluid reservoir as possible.
- Place drain pans under the vehicle as needed.
- Disengage the steering linkage outer tie rods from the steering knuckles. Refer to Steering Linkage Outer Tie Rod Replacement .
- Separate the intermediate steering shaft from the steering gear. Refer to Intermediate Steering Shaft Replacement .
- Remove the steering gear heat shield from the steering gear.
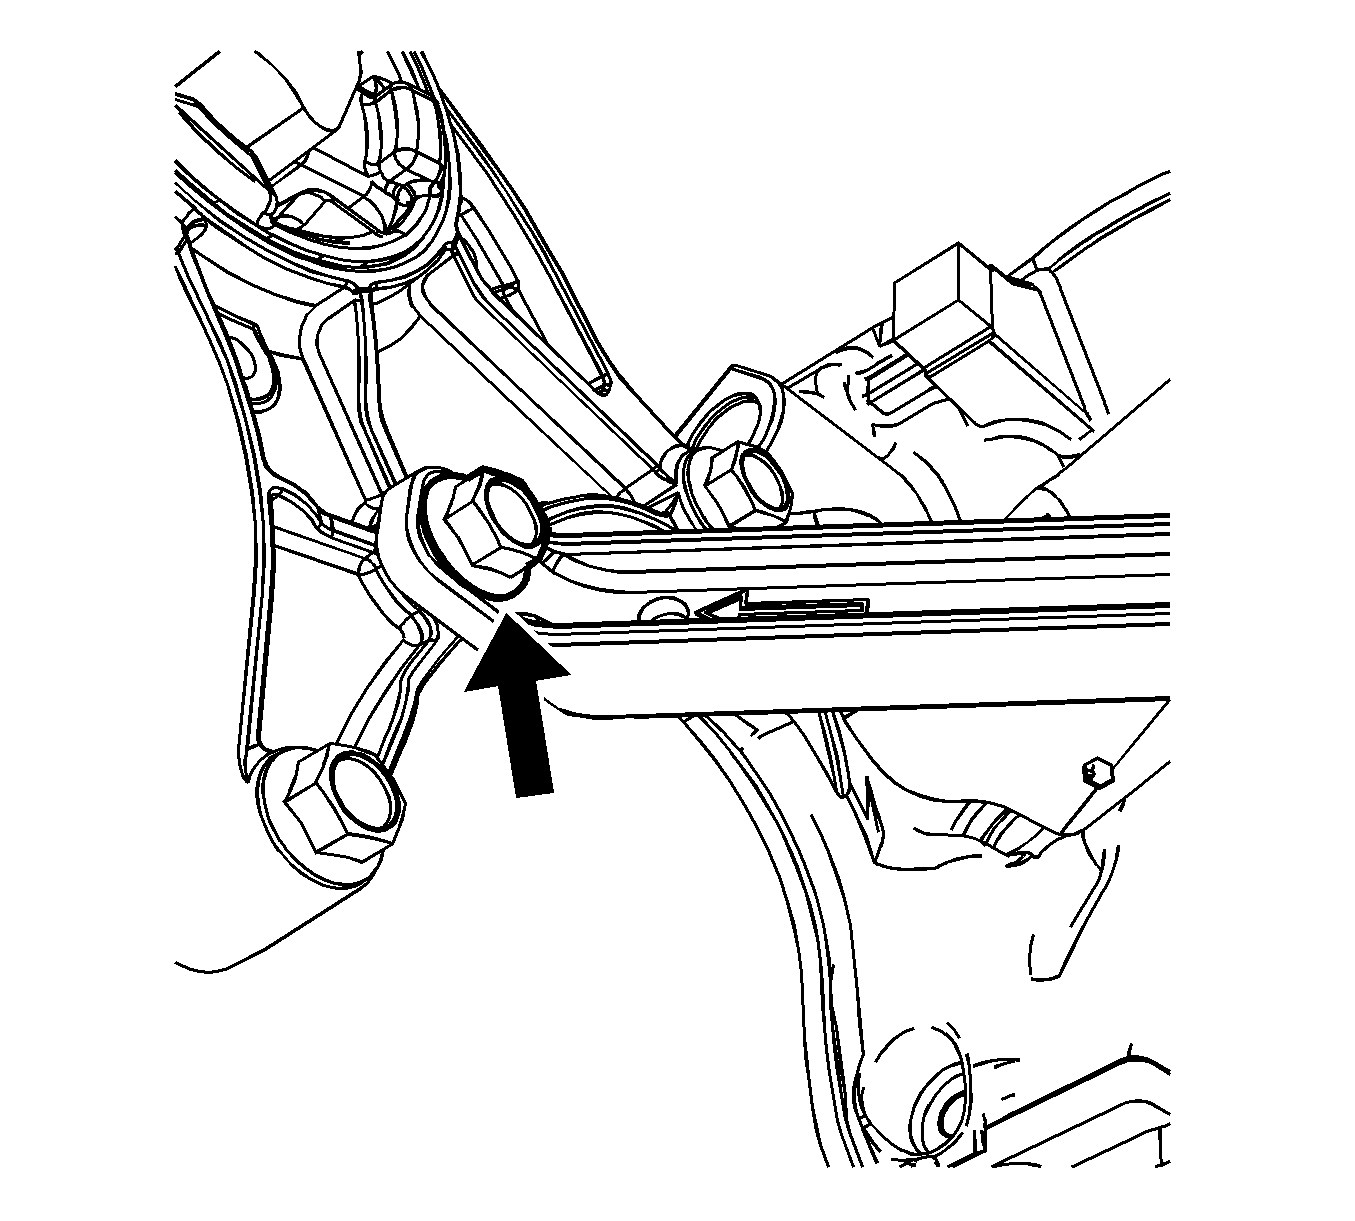
- Remove the transmission brace bolt.
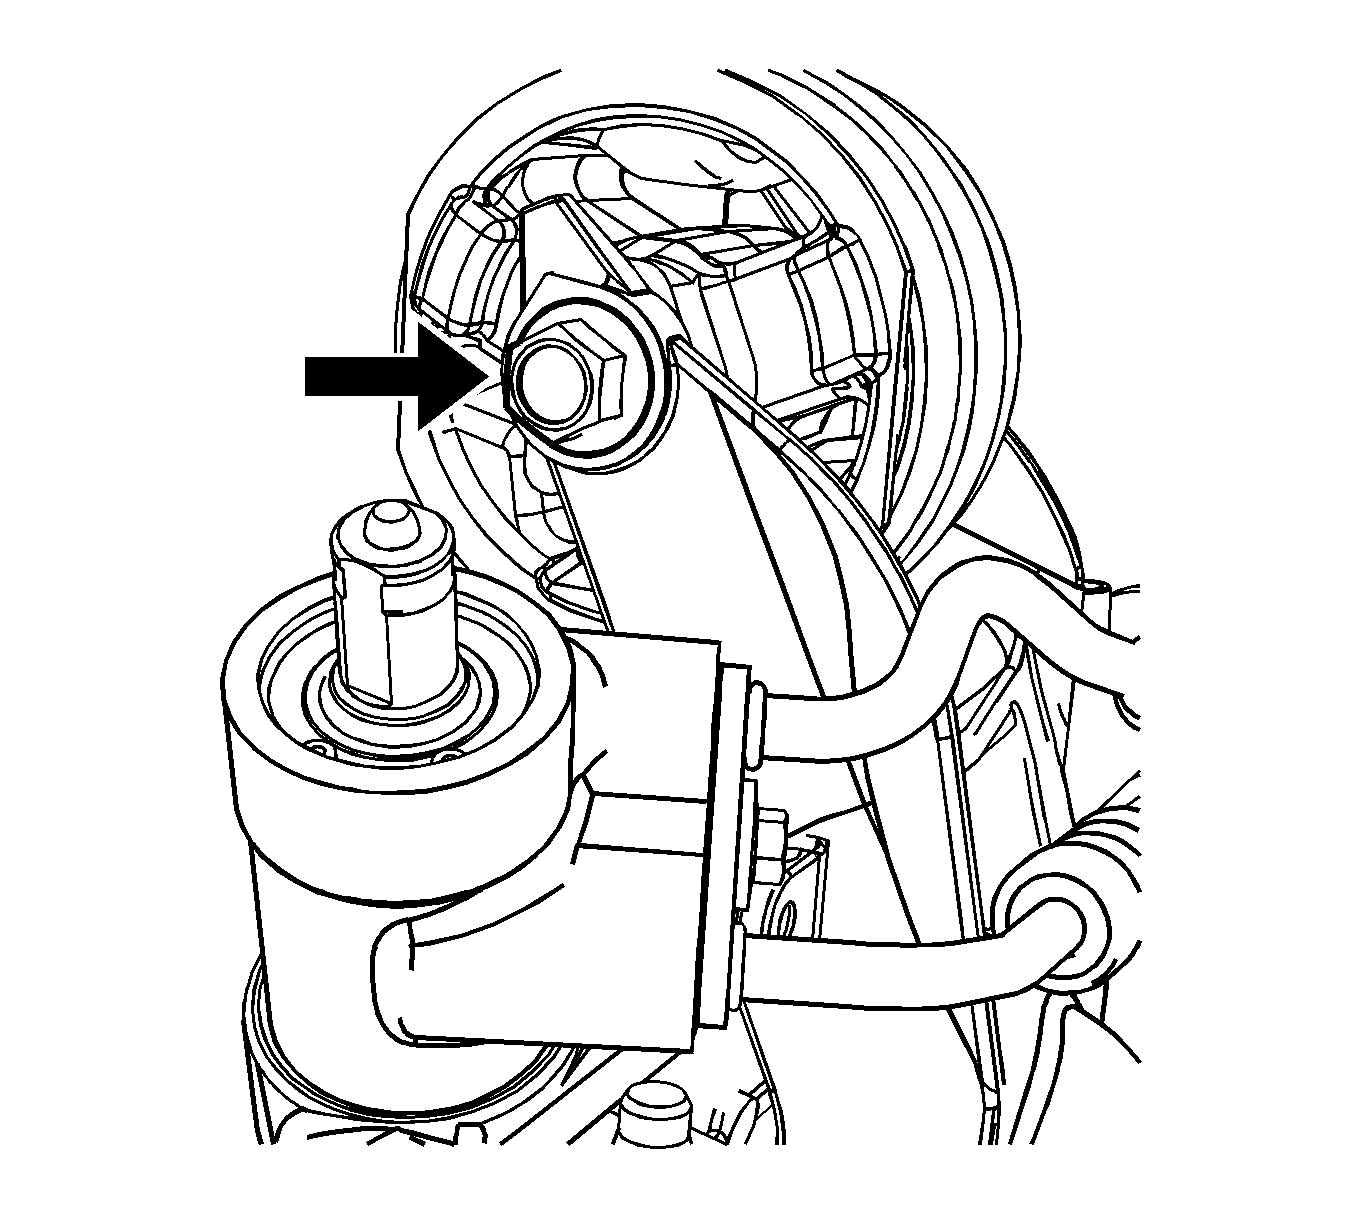
- Remove the transmission rear mount bolt and position the transmission brace aside.
- Loosen the rear transmission mount bracket bolt.
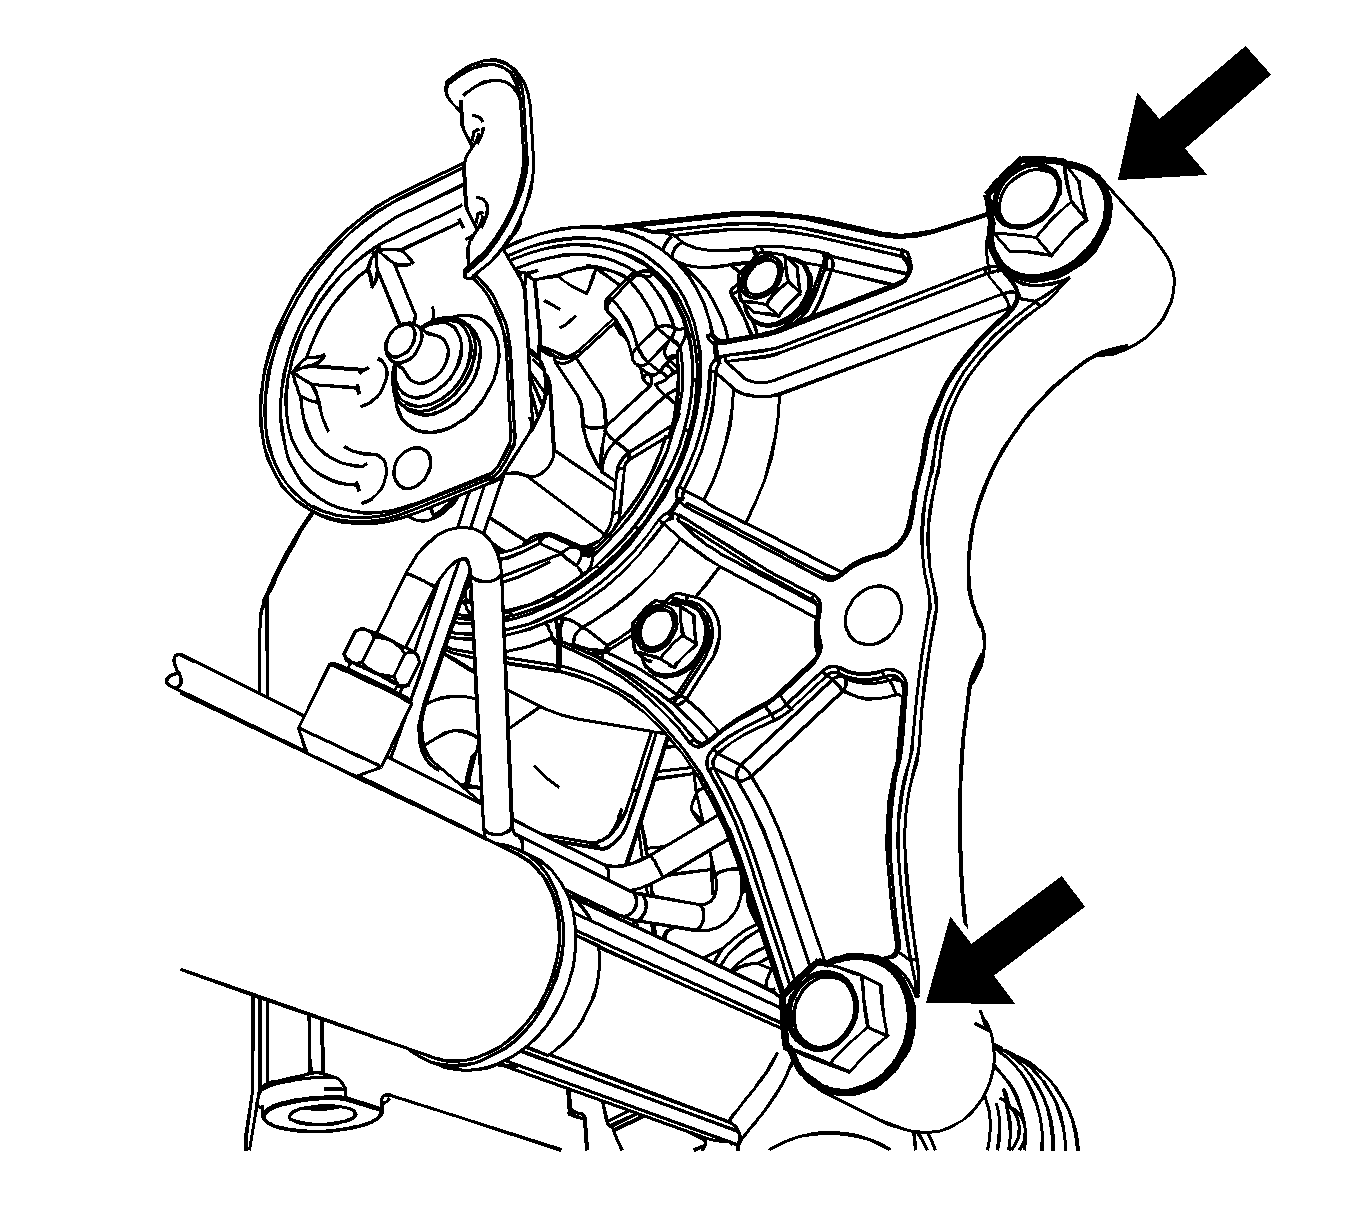
- Remove the 2 remaining transmission rear mount bolts.
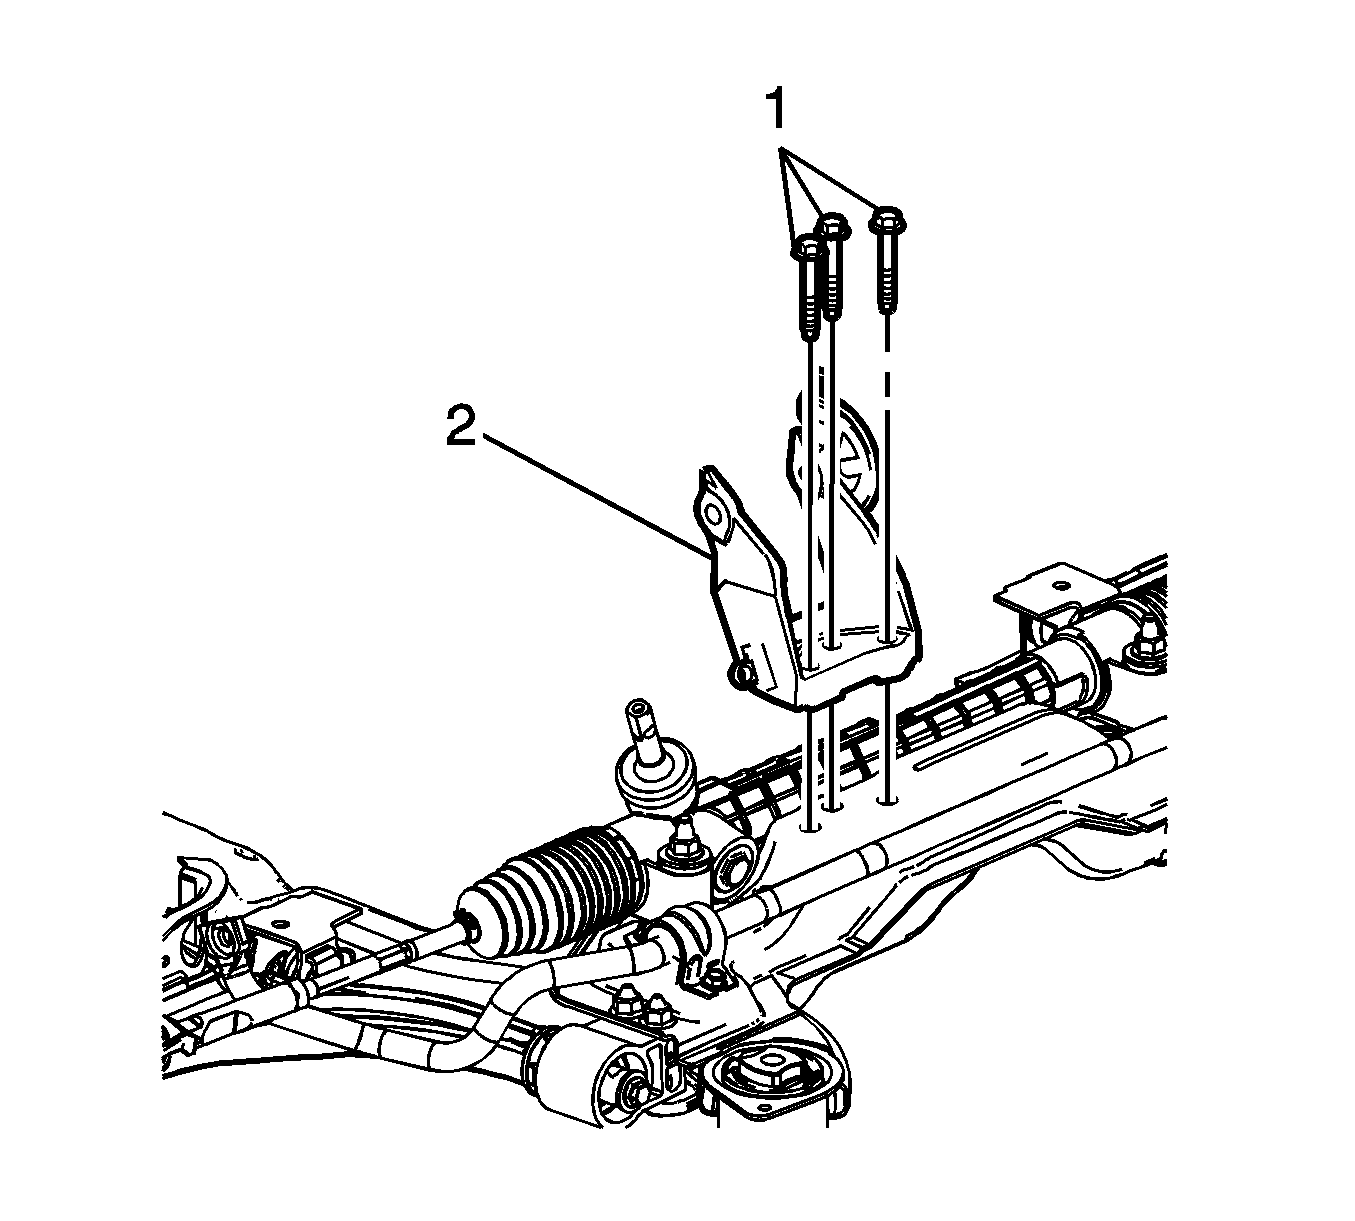
- Remove the 3 rear transmission mount bracket nuts and bolts (1).
- Position the transmission rear mount and bracket aside.
- Remove the power steering gear inlet hose bolt and disconnect the power steering gear inlet hose and the power steering gear outlet hose from the steering gear.
- Remove the steering gear bolts, nuts, and washers from the steering gear.
- Remove the steering gear through the left front wheel opening.
- Transfer any parts as needed.
Notice: Secure the steering wheel utilizing a strap to prevent rotation. Locking of the steering column will prevent damage and a possible malfunction of the SIR system. The steering wheel must be secured
in position before disconnecting the following components:
• The steering column • The intermediate shaft • The steering gear
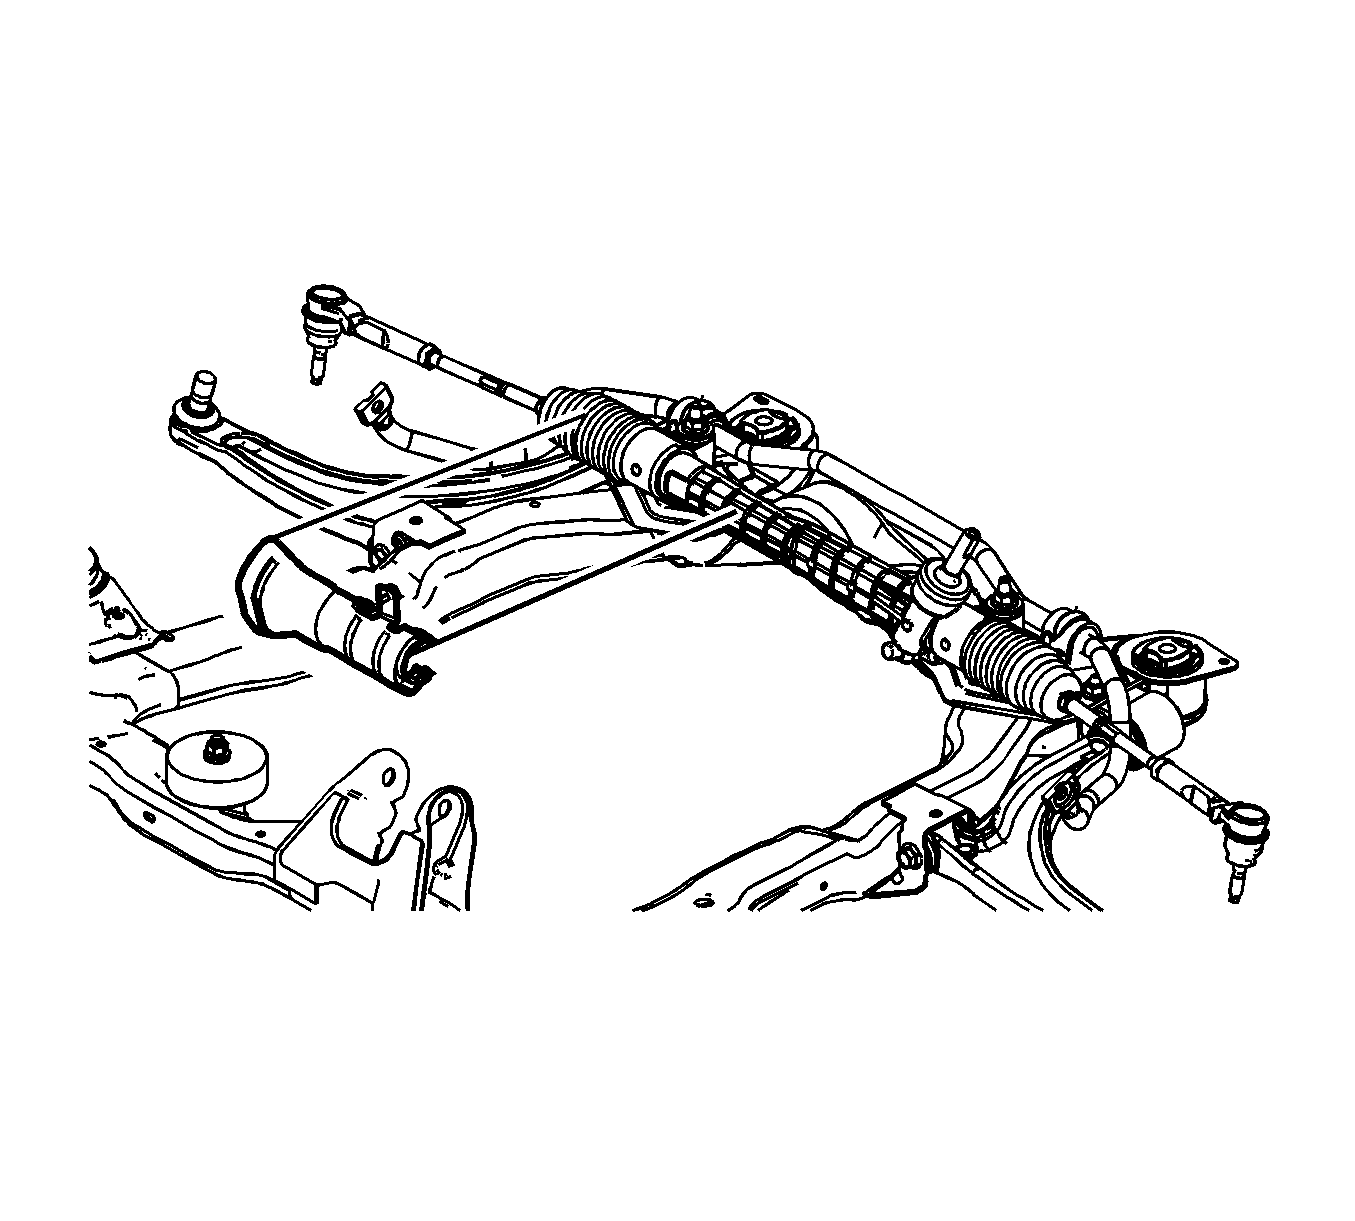
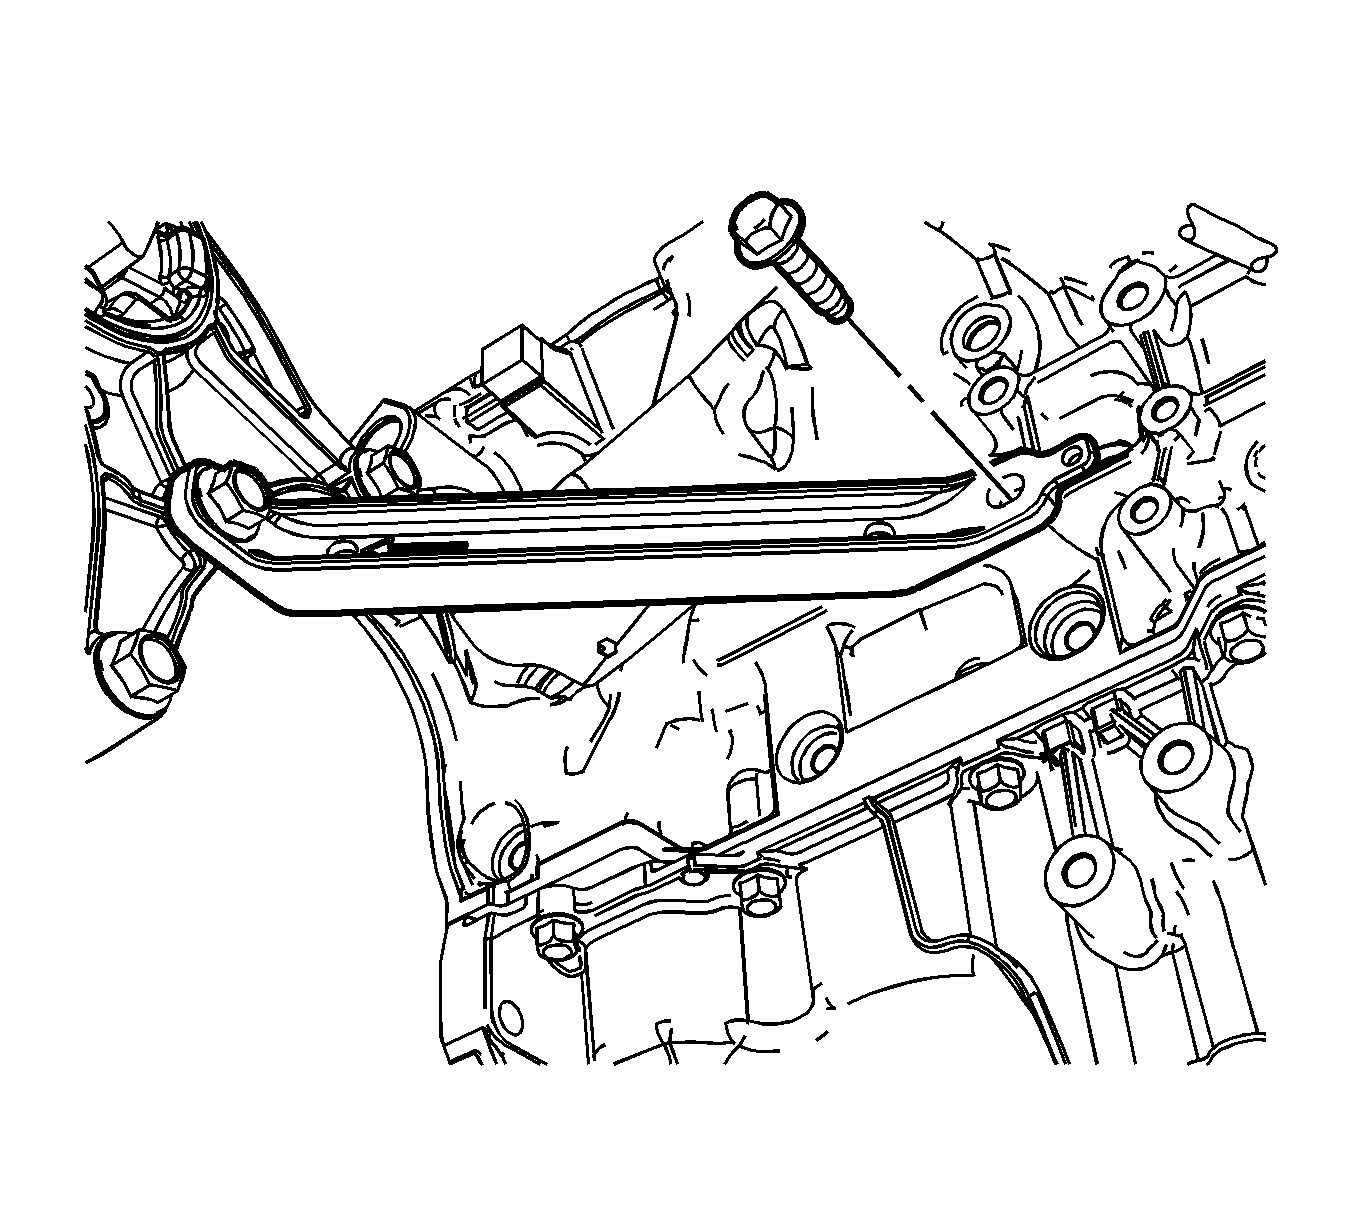
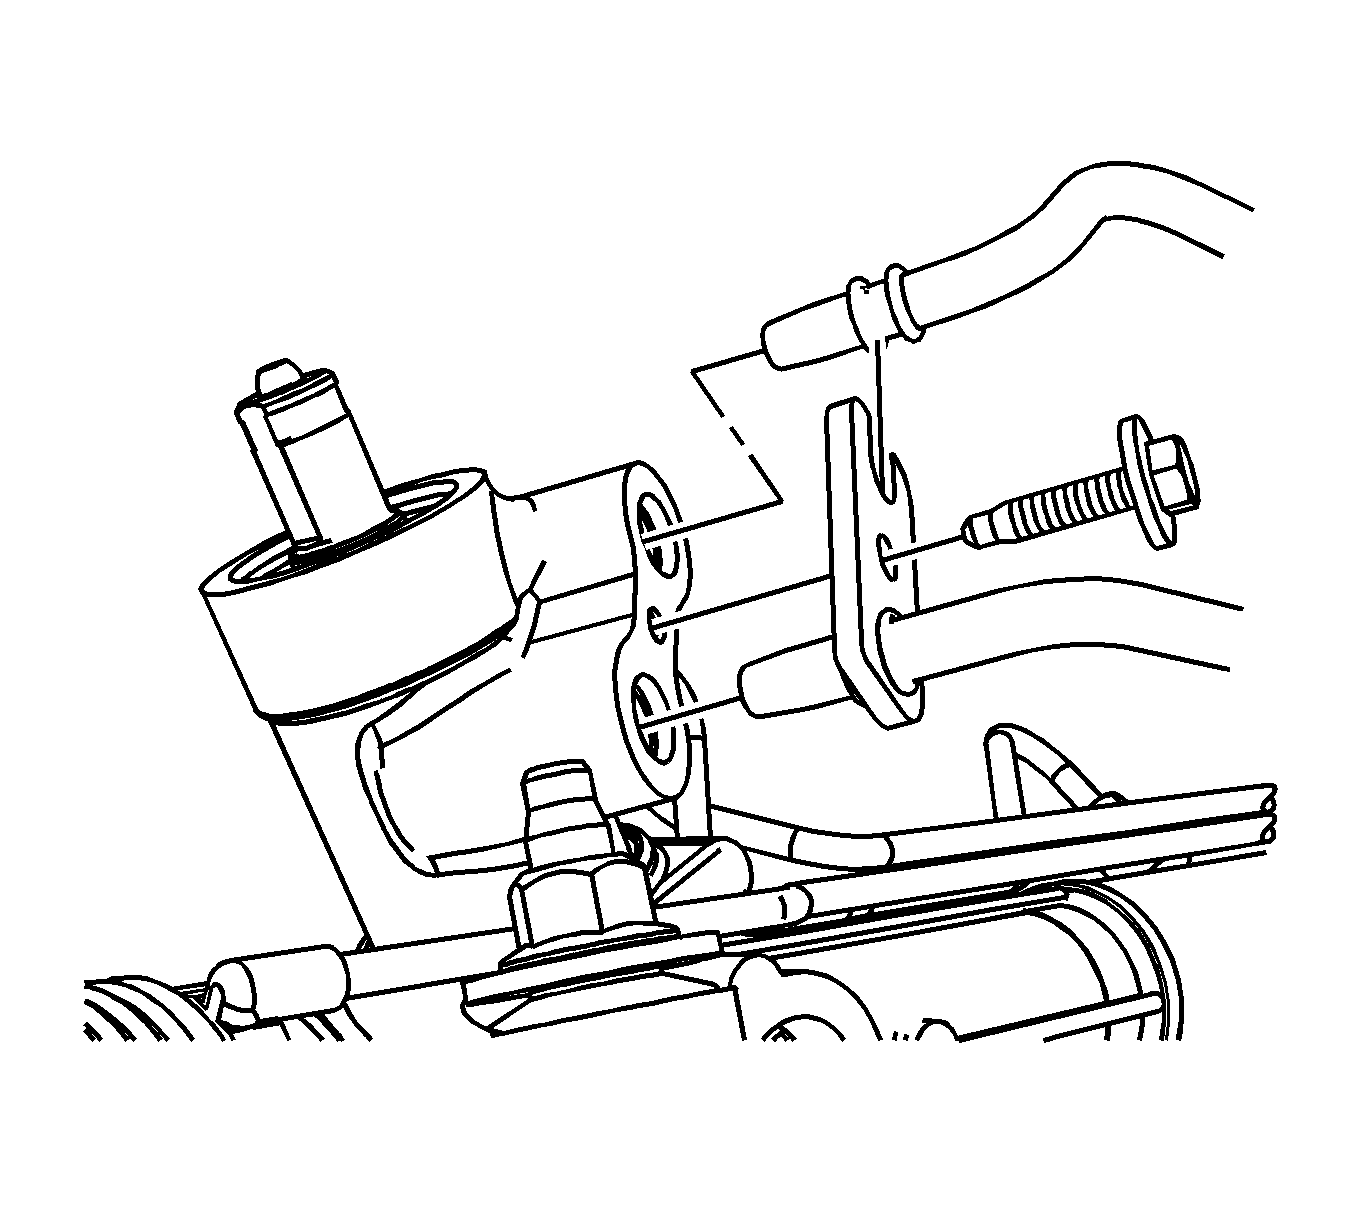
Important: The position of the steering gear will need to be manipulated to remove it through the left front wheel opening.
Installation Procedure
- Install the steering gear through the left front wheel opening.
- Install the steering gear bolts, nuts, and washers to the steering gear.
- Connect the power steering gear inlet hose and the power steering gear outlet hose to the steering gear and install the power steering gear inlet hose bolt.
- Position the transmission rear mount and bracket in place.
- Install the 3 rear transmission mount bracket bolts (1) and nuts.
- Install the 2 remaining transmission rear mount bolts.
- Position the transmission brace in place and install the transmission rear mount bolt.
- Install the transmission brace bolt.
- Tighten the rear transmission mount bracket bolt.
- Install the steering gear heat shield to the steering gear.
- Clean any excess power steering fluid from the vehicle and remove the drain pans.
- Install the intermediate steering shaft to the steering gear. Refer to Intermediate Steering Shaft Replacement .
- Install the steering linkage outer tie rods to the steering knuckles. Refer to Steering Linkage Outer Tie Rod Replacement .
- Fill and bleed the power steering system. Refer to Power Steering System Bleeding .
- Adjust the front toe. Refer to Front Toe Adjustment .
Notice: Refer to Fastener Notice in the Preface section.
Important: Start all of the bolts and nuts by hand before finalizing any torques.
Tighten
Tighten the bolts and nuts to 110 N·m (81 lb ft).

Tighten
Tighten the bolt to 27 N·m (20 lb ft).

Tighten
Tighten the nuts to 50 N·m (37 lb ft).


Tighten
Tighten the 3 bolts to 50 N·m (37 lb ft).

Tighten
Tighten the bolt to 50 N·m (37 lb ft).

Tighten
Tighten the bolt to 50 N·m (37 lb ft).

Steering Gear Replacement HPS with LZ4
Removal Procedure
- Turn the front wheels to the straight forward position and secure the steering wheel from moving.
- Remove as much power steering fluid from the remote power steering fluid reservoir as possible.
- Place drain pans under the vehicle as needed.
- Disengage the steering linkage outer tie rods from the steering knuckles. Refer to Steering Linkage Outer Tie Rod Replacement.
- Separate the intermediate steering shaft from the steering gear. Refer to Intermediate Steering Shaft Replacement.
- Loosen the rear transmission mount bracket bolt.
- Disconnect the heated oxygen sensor (HO2S) electrical connector and unclip it from the rear transmission mount bracket.
- Remove the 3 transmission rear mount bolts (1).
- Remove the 3 rear transmission mount bracket nuts.
- Position the transmission rear mount and bracket aside.
- Remove the power steering gear inlet hose bolt and disconnect the power steering gear inlet hose and the power steering gear outlet hose from the steering gear.
- Remove the power steering gear outlet hose retainer from the right side rear of the frame.
- If working on a convertible vehicle, support the rear of the front frame with a suitable jack stand.
- If working on a convertible vehicle, remove the rear front frame bolts.
- Remove the steering gear bolts, nuts, and washers from the steering gear.
- Remove the steering gear bolts, nuts, and washers from the steering gear.
- Transfer any parts as needed.
Notice: Secure the steering wheel utilizing a strap to prevent rotation. Locking of the steering column will prevent damage and a possible malfunction of the SIR system. The steering wheel must be secured
in position before disconnecting the following components:
• The steering column • The intermediate shaft • The steering gear


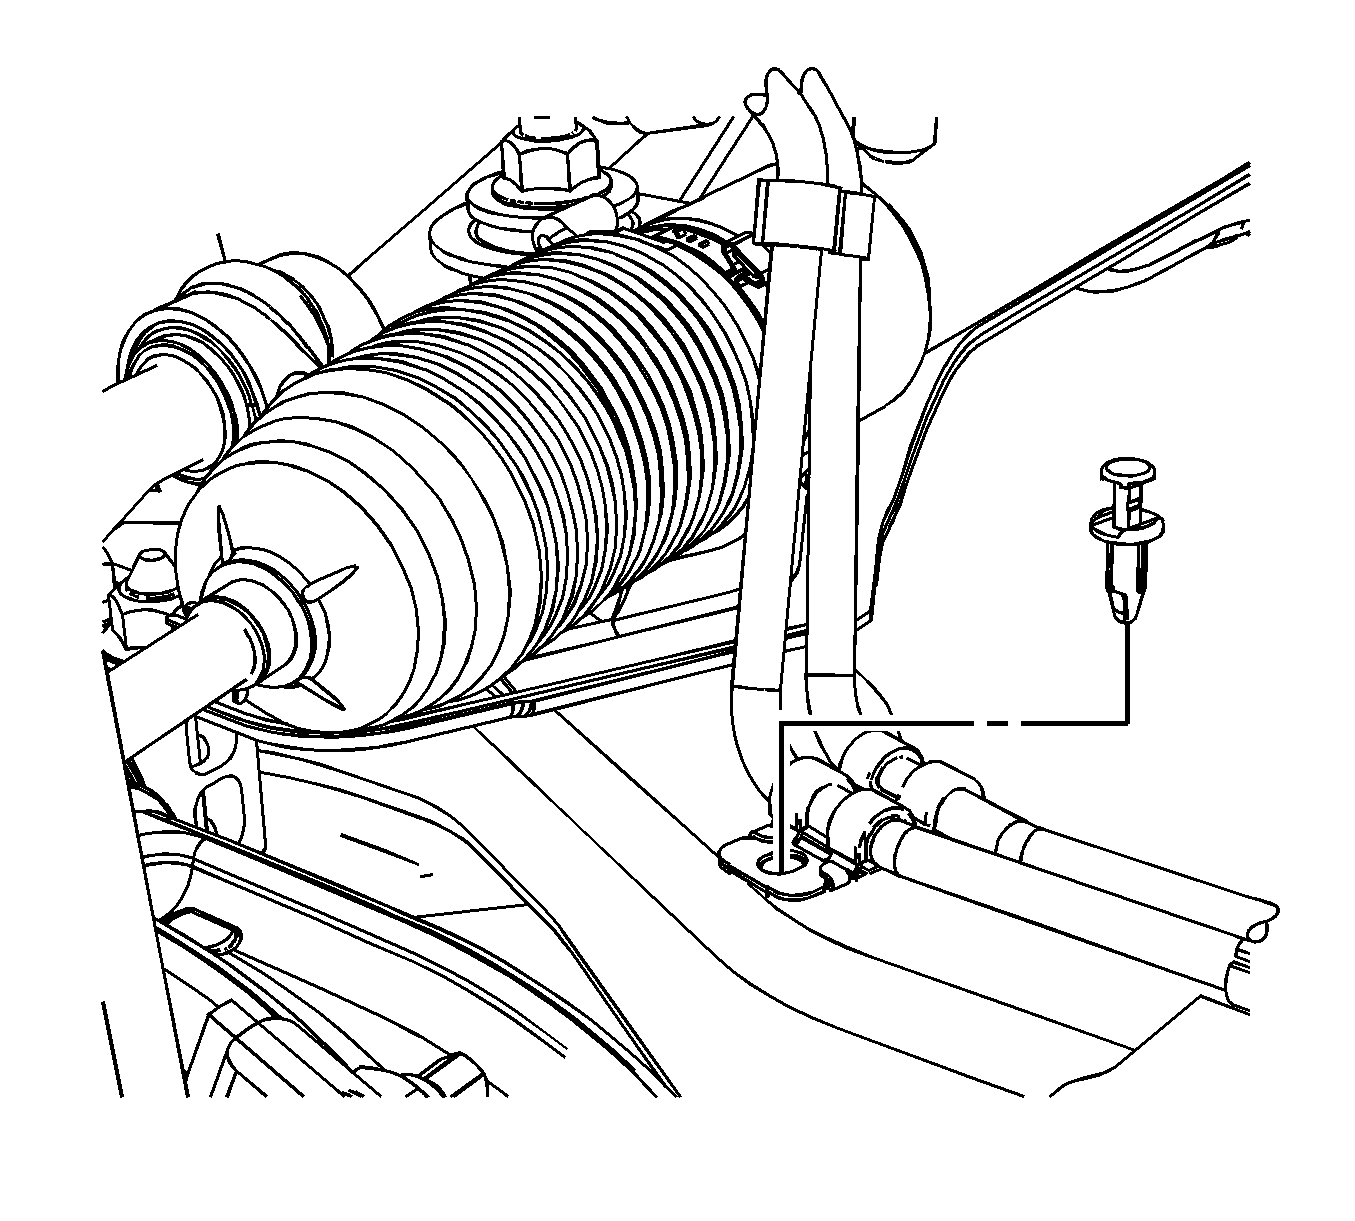
Important: Convertible vehicles utilize a cross brace that is installed by sharing the rear front frame mounting bolts. With the rear front frame bolts removed, the cross brace can be moved to gain access to the steering gear bolts.
Important: The position of the steering gear will need to be manipulated to remove it through the left front wheel opening.
Installation Procedure
- Install the steering gear through the left front wheel opening.
- Install the steering gear bolts, nuts, and washers to the steering gear.
- For convertible vehicles, install the rear front frame bolts.
- For convertible vehicles, remove the jack stand.
- Install the power steering gear outlet hose retainer to the right side rear of the frame.
- Connect the power steering gear inlet hose and the power steering gear outlet hose to the steering gear and install the power steering gear inlet hose bolt.
- Position the transmission rear mount and bracket in place.
- Install the 3 rear transmission mount bracket nuts.
- Install the 3 transmission rear mount bolts (1).
- Connect the HO2S electrical connector and clip it to the rear transmission mount bracket.
- Tighten the rear transmission mount bracket bolt.
- Clean any excess power steering fluid from the vehicle and remove the drain pans.
- Install the intermediate steering shaft to the steering gear. Refer to Intermediate Steering Shaft Replacement.
- Install the steering linkage outer tie rods to the steering knuckles. Refer to Steering Linkage Outer Tie Rod Replacement.
- Fill and bleed the power steering system. Refer to Power Steering System Bleeding.
- Adjust the front toe. Refer to Front Toe Adjustment .
Notice: Refer to Fastener Notice in the Preface section.
Important: Start all of the bolts and nuts by hand before finalizing any torques.
Tighten
Tighten the bolts and nuts to 110 N·m (81 lb ft).
Tighten
Tighten the bolts to 100 N·m (73 lb ft) plus an additional 180 degree rotation.


Tighten
Tighten the bolt to 27 N·m (20 lb ft).
Tighten
Tighten the nuts to 50 N·m (37 lb ft).

Tighten
Tighten the bolts to 90 N·m (66 lb ft).

Tighten
Tighten the bolt to 90 N·m (66 lb ft).
