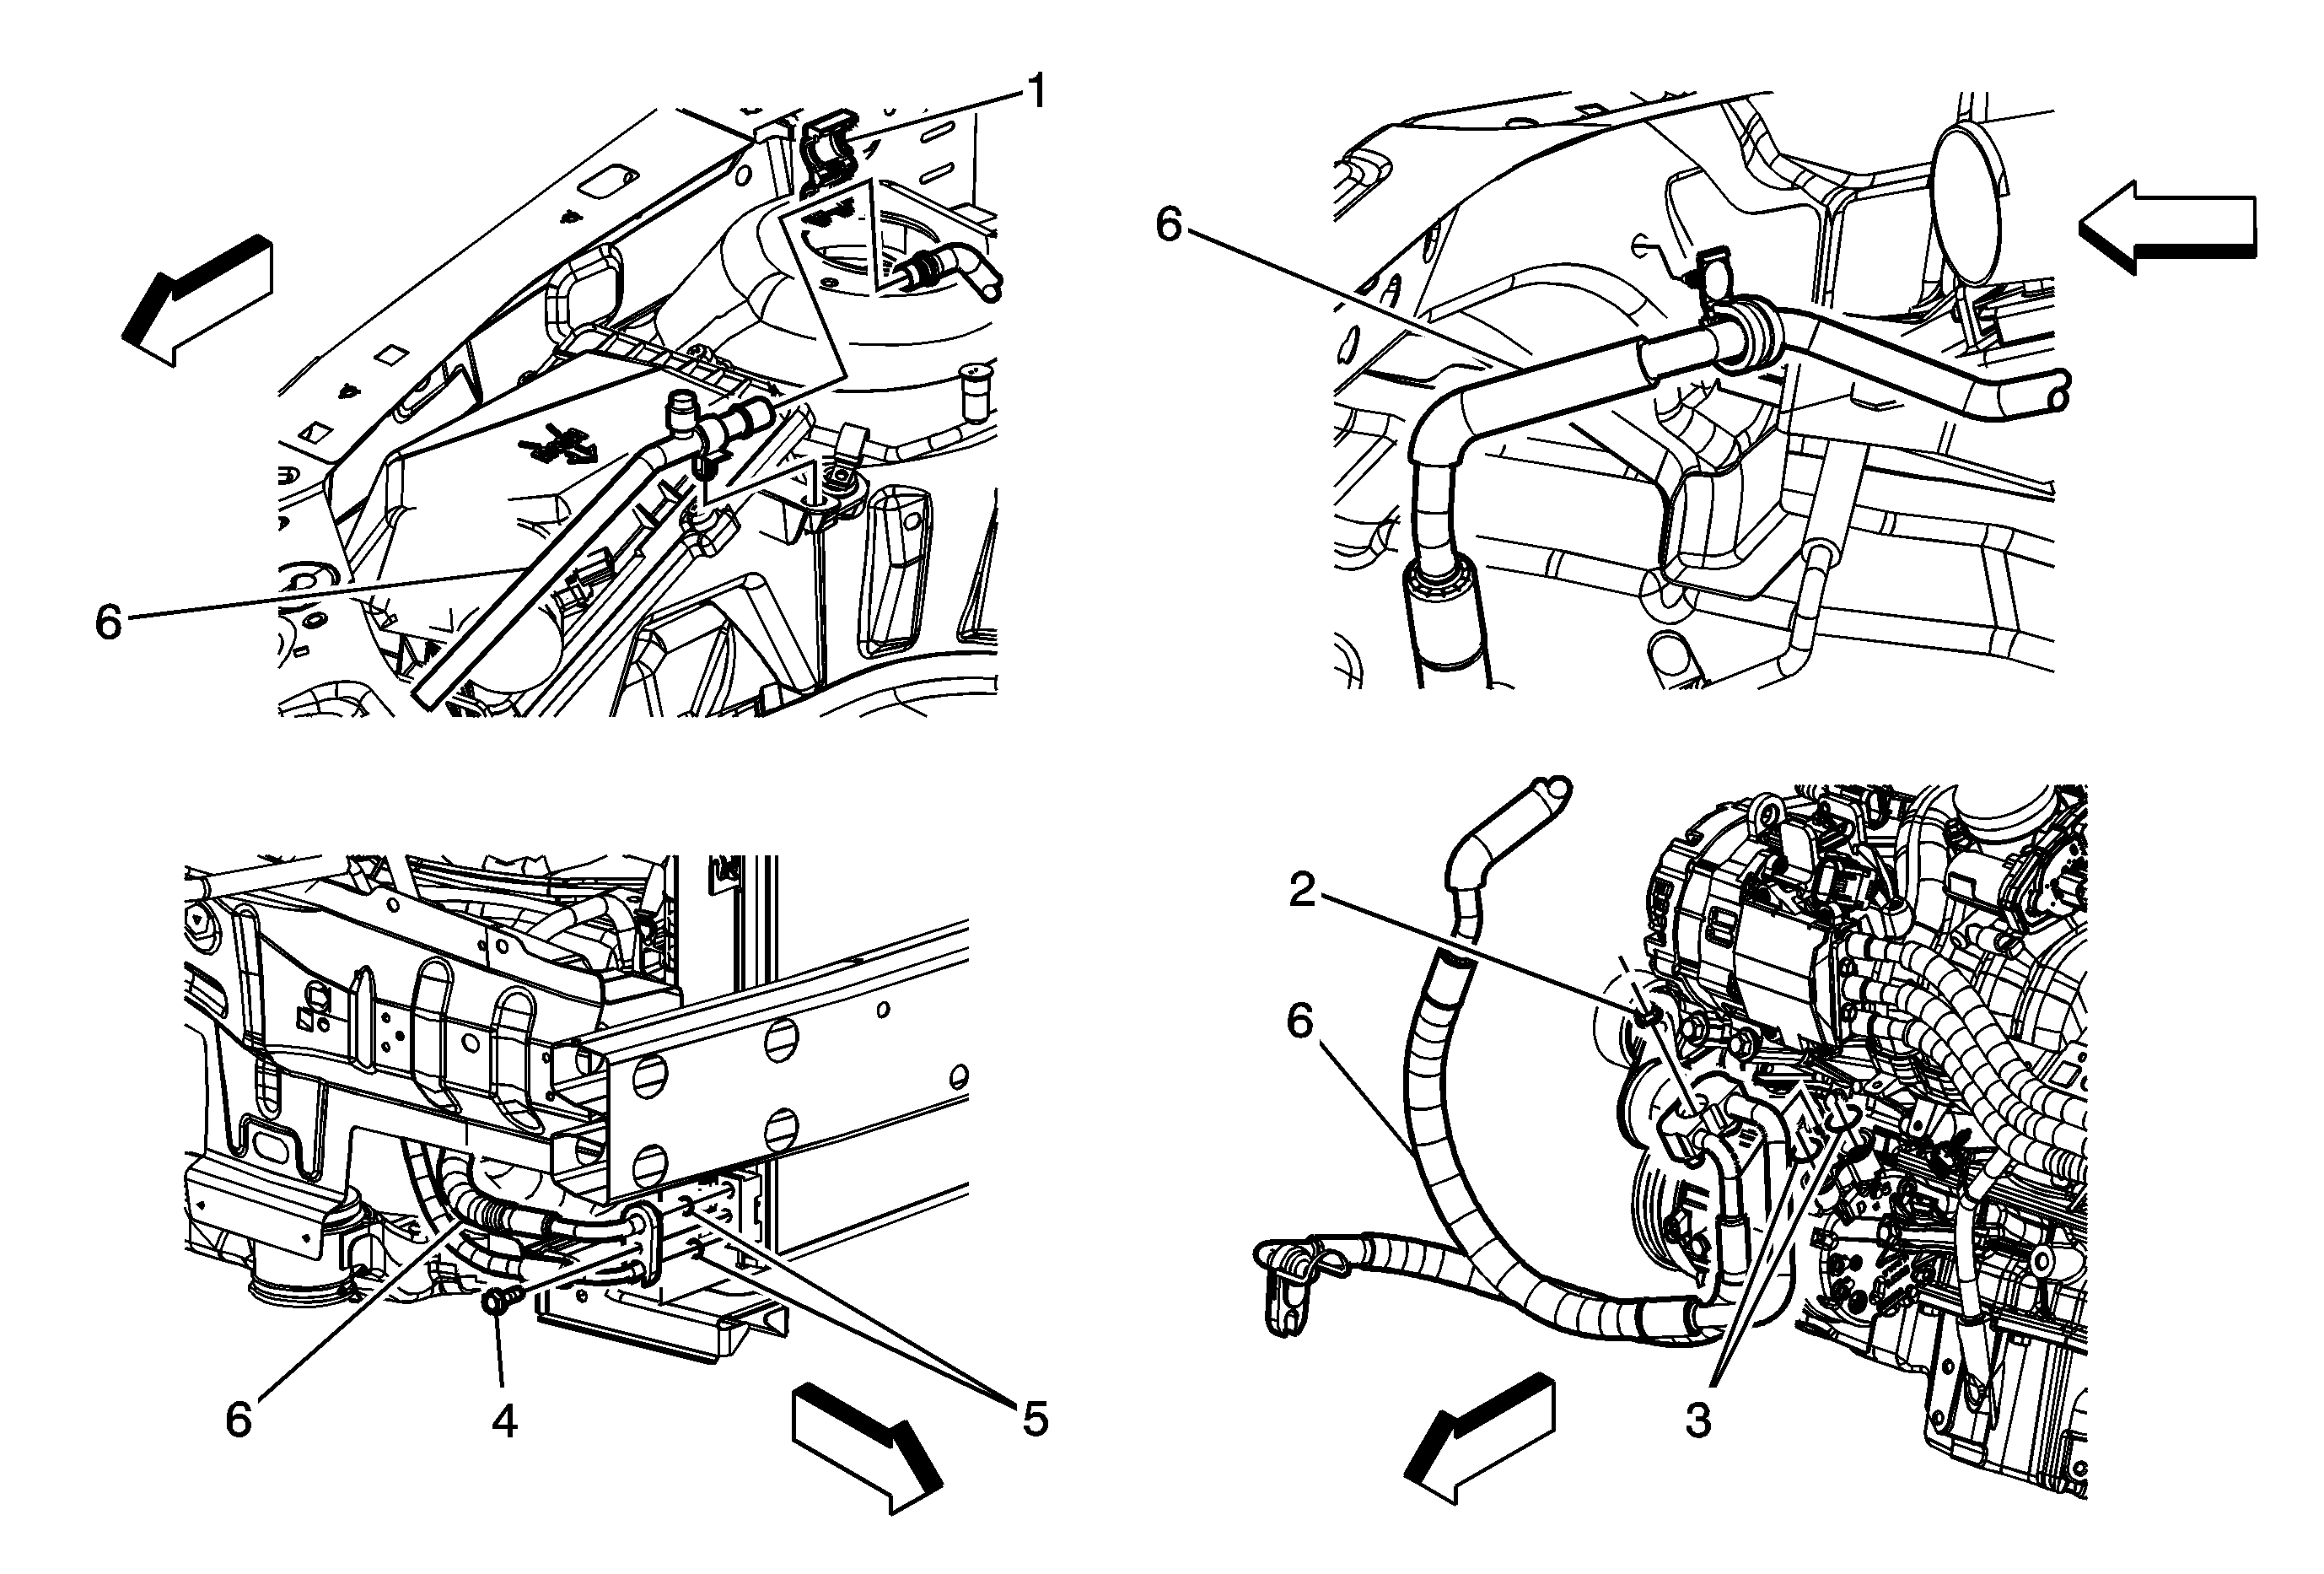
Callout
| Component Name
|
Preliminary Procedure
- Recover the refrigerant. Refer to
Refrigerant Recovery and Recharging.
- Remove the air cleaner intake duct from the air cleaner assembly. Refer to
Air Cleaner Assembly Replacement.
- Raise and support the vehicle. Refer to
Lifting and Jacking the Vehicle.
- Remove the right front fender liner. Refer to
Front Wheelhouse Panel Splash Shield Replacement.
|
1
| A/C Compressor and Condenser Connector
Procedure
- Insert 2 small screwdrivers into the 2 slots of the compressor hose and suction line connector and release locking tabs.
- Remove the A/C compressor hose from the evaporator hose assembly and discard O-rings. Refer to
O-Ring Replacement.
|
2
| A/C Compressor Hose Nut
Caution: Refer to Fastener Caution in the Preface section.
Tip
Remove the A/C compressor hose from the A/C compressor and cap hose.
Tighten
20 N·m (15 lb ft) |
3
| Sealing Washer
Tip
Remove and discard sealing washers. Refer to
Sealing Washer Replacement. |
4
| A/C Compressor Hose Bolt
Tighten
20 N·m (15 lb ft) |
5
| Sealing Washer
Tip
Remove and discard sealing washers. Refer to
Sealing Washer Replacement. |
6
| A/C Compressor Hose Assembly
Procedure
- Note routing of the A/C compressor hose to ensure proper routing.
- Using
J 39400
leak test A/C compressor hose connections.
Special ToolsJ 39400
Electronic Halogen Leak Detector
|
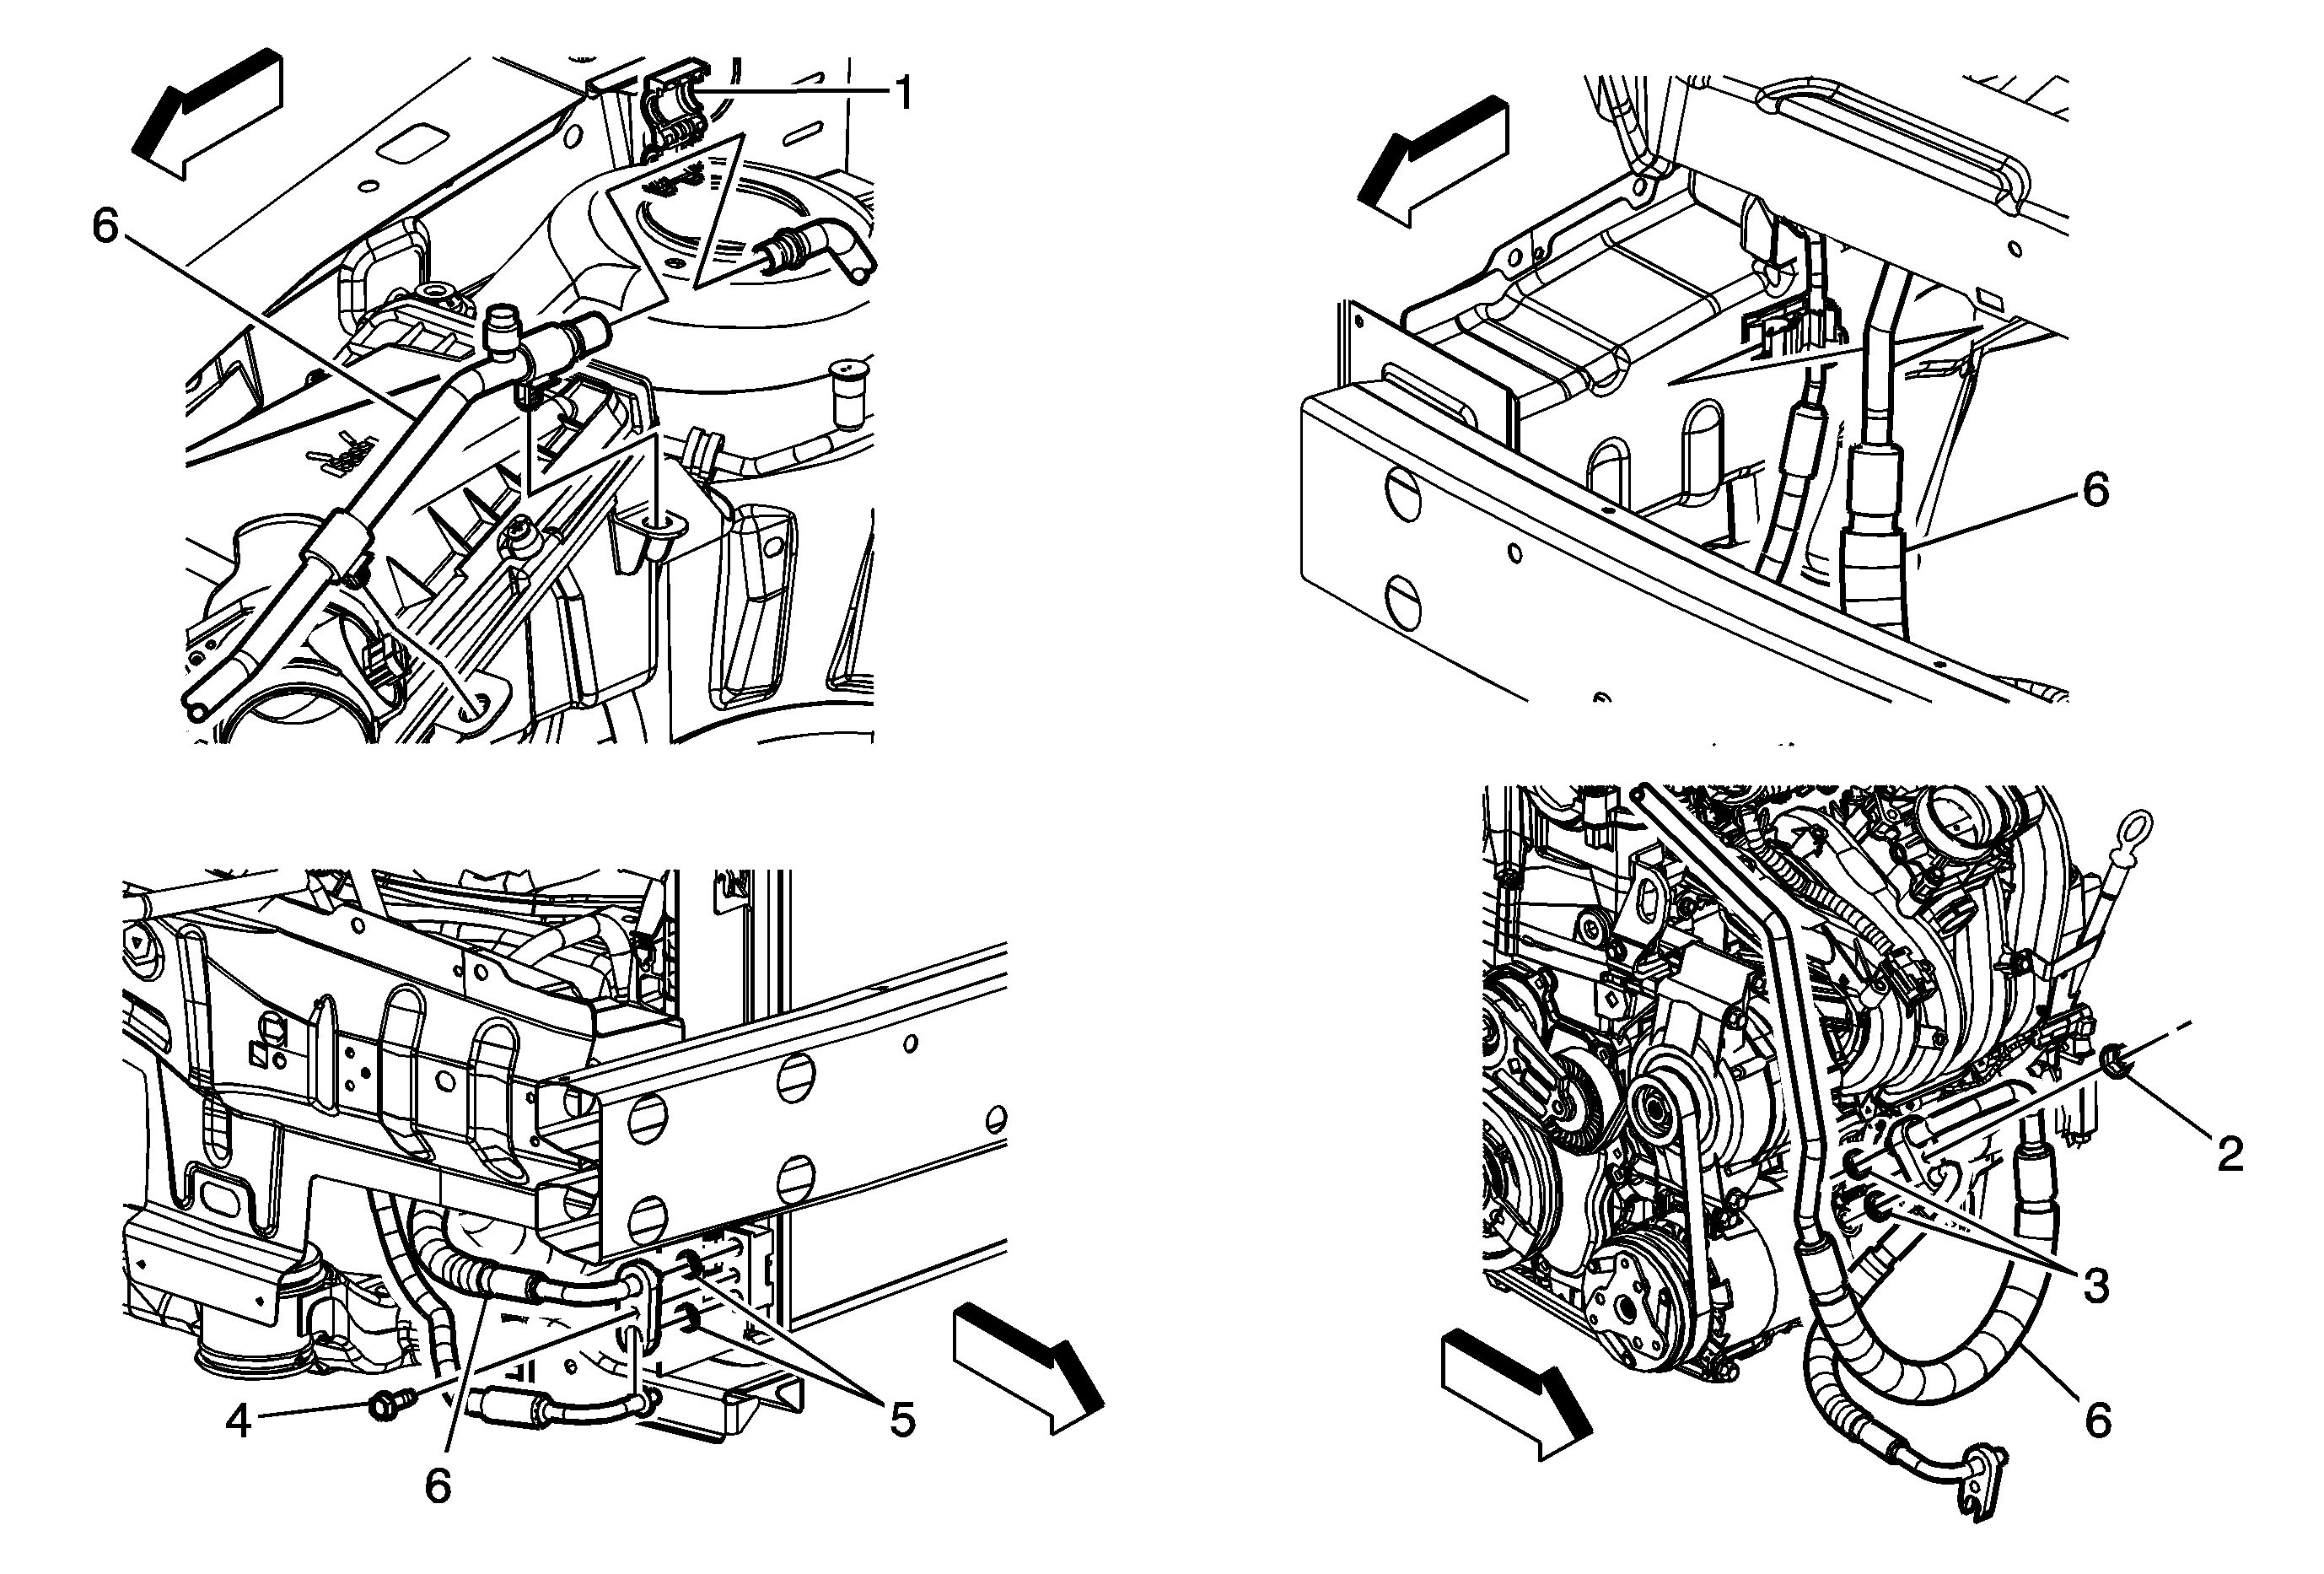
Callout
| Component Name
|
Preliminary Procedure
- Recover the refrigerant. Refer to
Refrigerant Recovery and Recharging.
- Remove the air cleaner intake duct fro the air cleaner assembly. Refer to
Air Cleaner Assembly Replacement.
- Raise and support the vehicle. Refer to
Lifting and Jacking the Vehicle.
- Remove the right front fender liner. Refer to
Front Wheelhouse Panel Splash Shield Replacement.
|
1
| A/C Compressor and Condenser Connector
Tip
- Insert 2 small screwdrivers into the 2 slots of the compressor hose and suction line connector and release locking tabs.
- Remove the A/C compressor hose from the evaporator hose assembly and discard O-rings. Refer to
O-Ring Replacement.
|
2
| A/C Compressor Hose Nut
Caution: Refer to Fastener Caution in the Preface section.
Tip
Remove the A/C compressor hose from the A/C compressor and cap hose.
Tighten
20 N·m (15 lb ft) |
3
| Sealing Washer
Tip
Remove and discard sealing washers. Refer to
Sealing Washer Replacement. |
4
| A/C Compressor Hose Bolt
Tighten
20 N·m (15 lb ft) |
5
| Sealing Washer
Tip
Remove and discard sealing washers. Refer to
Sealing Washer Replacement. |
6
| A/C Compressor Hose Assembly
Procedure
- Note routing of the A/C compressor hose to ensure proper routing.
- Using
J 39400 leak test A/C compressor hose connections.
Special ToolsJ 39400 Electronic Halogen Leak Detector
|
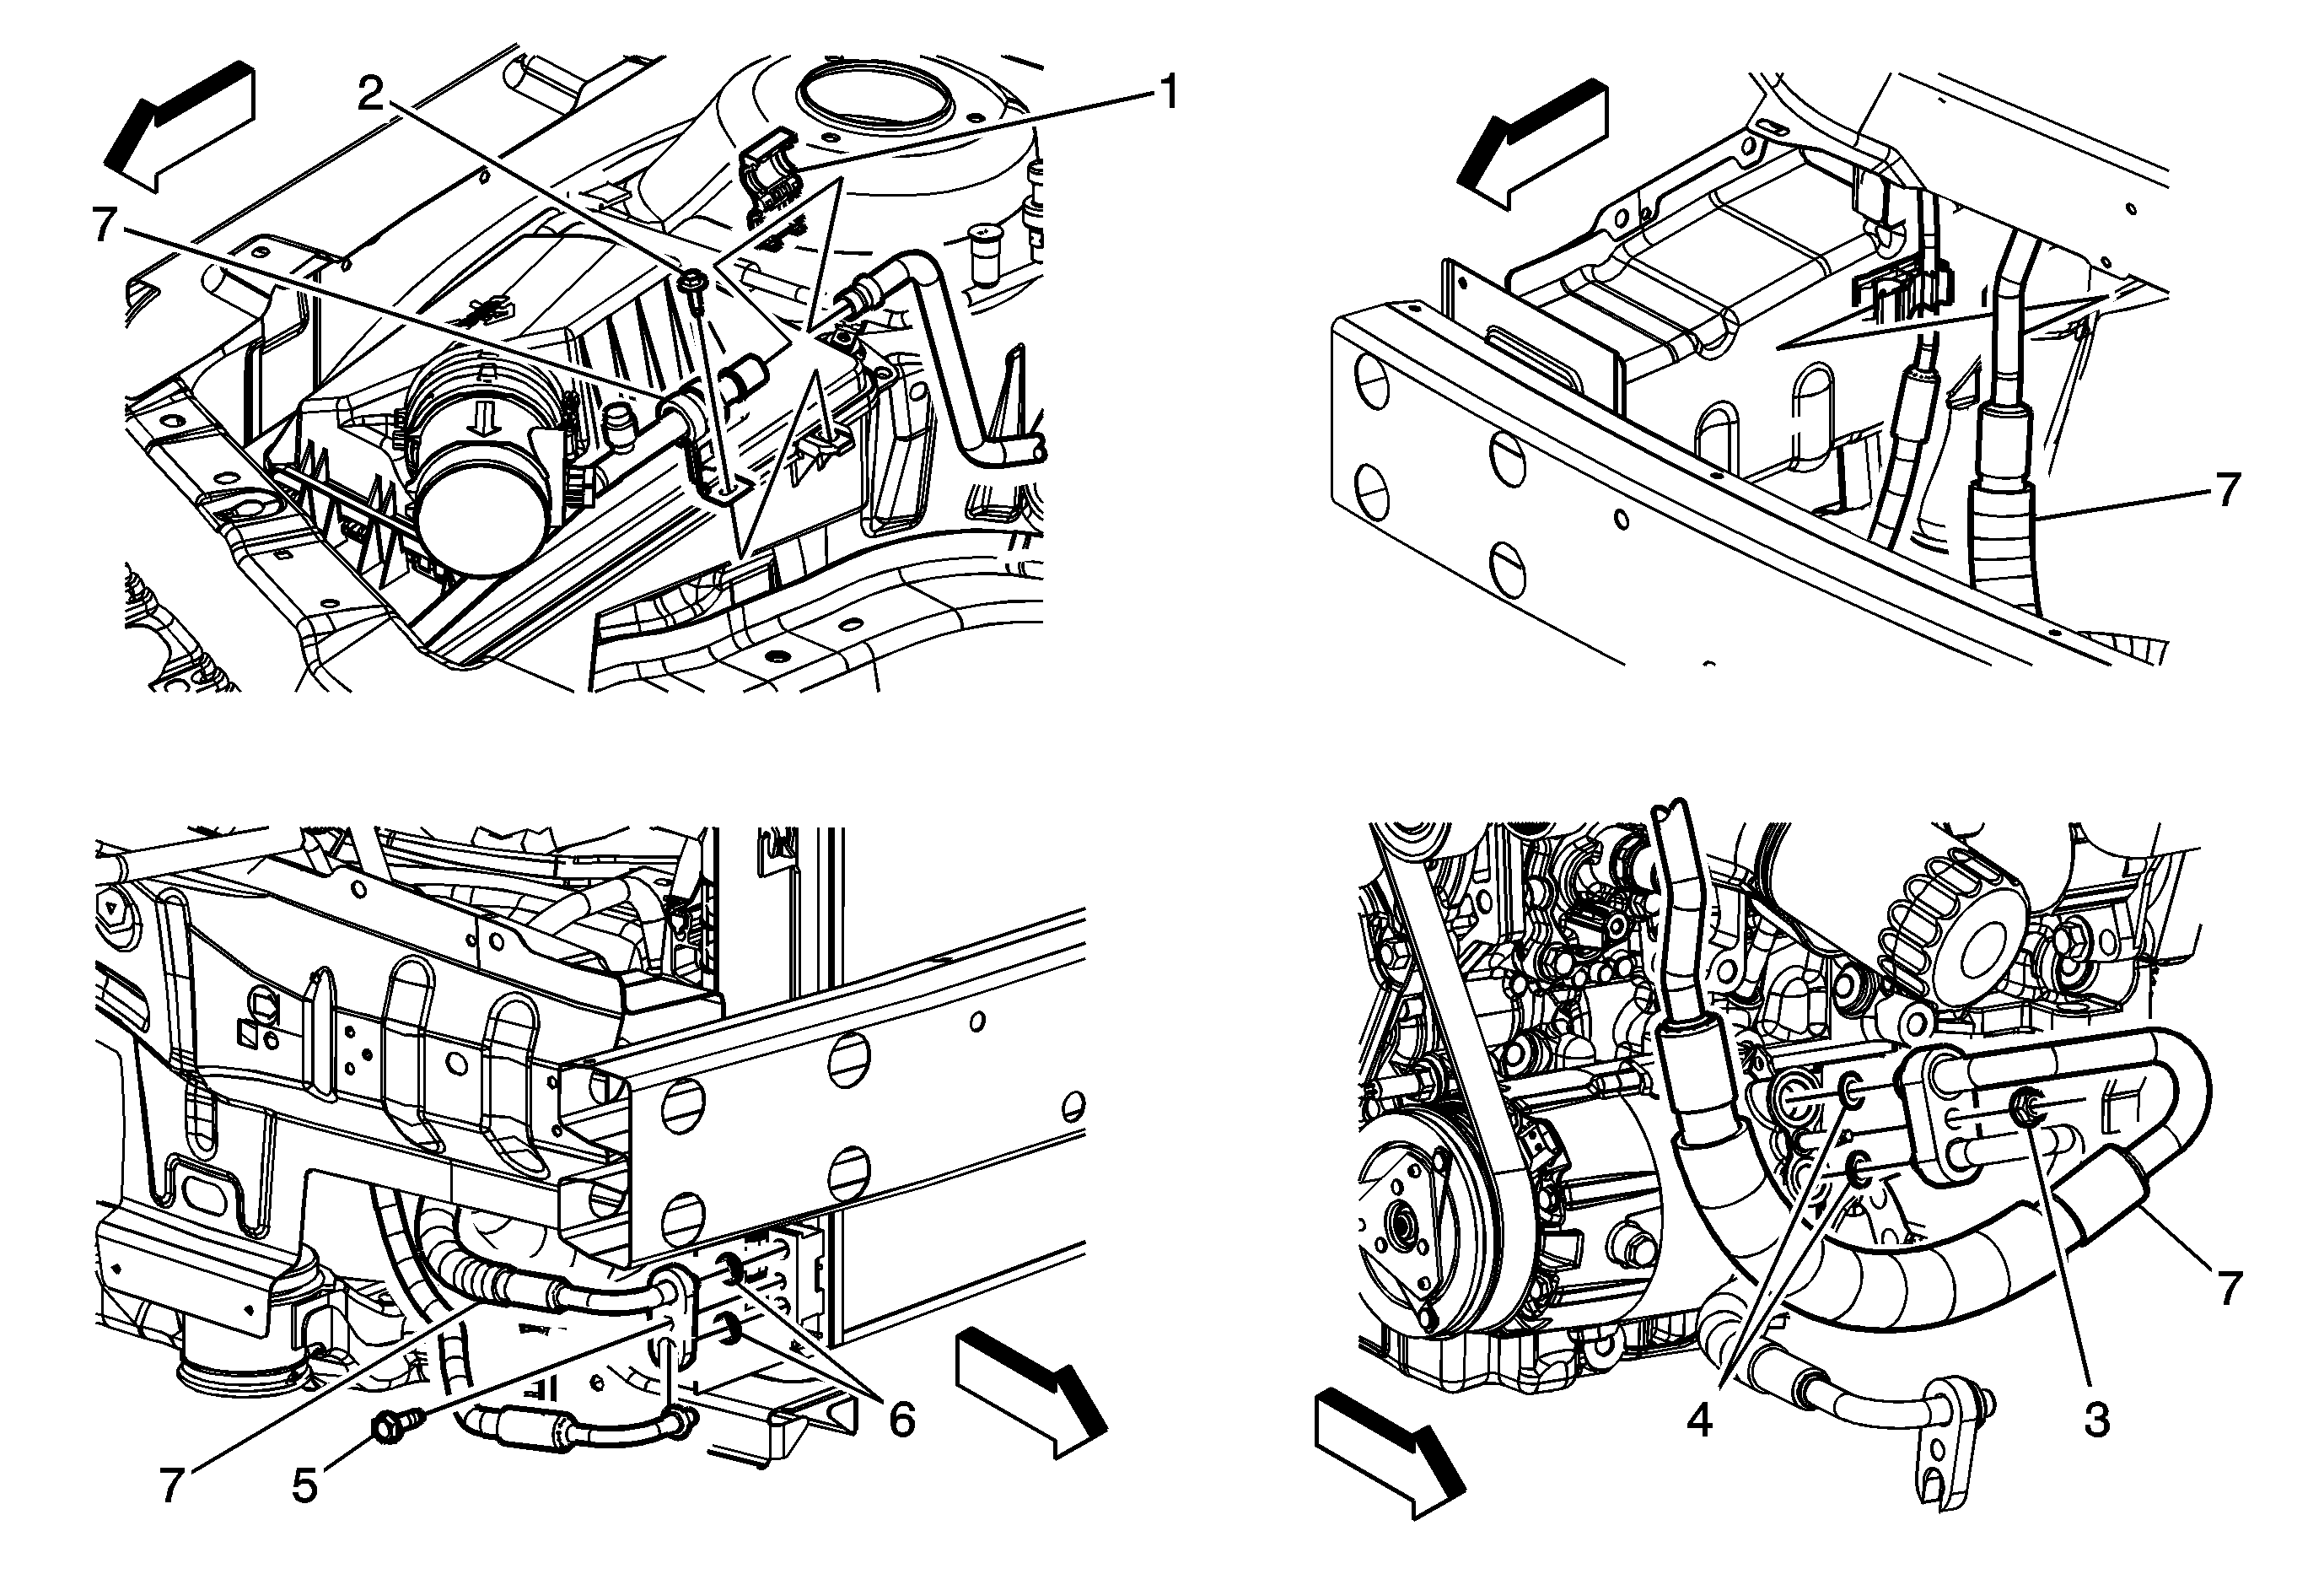
Callout
| Component Name
|
Preliminary Procedure
- Recover the refrigerant. Refer to
Refrigerant Recovery and Recharging.
- Remove the air cleaner intake duct fro the air cleaner assembly. Refer to
Air Cleaner Assembly Replacement.
- Raise and support the vehicle. Refer to
Lifting and Jacking the Vehicle.
- Remove the right front fender liner. Refer to
Front Wheelhouse Panel Splash Shield Replacement.
|
1
| A/C Compressor and Condenser Connector
Procedure
- Insert 2 small screwdrivers into the 2 slots of the compressor hose and suction line connector and release locking tabs.
- Remove the A/C compressor hose from the evaporator hose assembly and discard O-rings. Refer to
O-Ring Replacement.
|
2
| A/C Compressor Hose Nut
Caution: Refer to Fastener Caution in the Preface section.
Tip
Remove the A/C compressor hose from the A/C compressor and cap hose.
Tighten
20 N·m (15 lb ft) |
3
| Sealing Washer
Tip
Remove and discard sealing washers. Refer to
Sealing Washer Replacement. |
4
| A/C Compressor Hose Bolt
Tighten
20 N·m (15 lb ft) |
5
| Sealing Washer
Tip
Remove and discard sealing washers. Refer to
Sealing Washer Replacement. |
6
| A/C Compressor Hose Assembly
Procedure
- Note routing of the A/C compressor hose to ensure proper routing.
- Using
J 39400 leak test A/C compressor hose connections.
Special ToolsJ 39400 Electronic Halogen Leak Detector
|
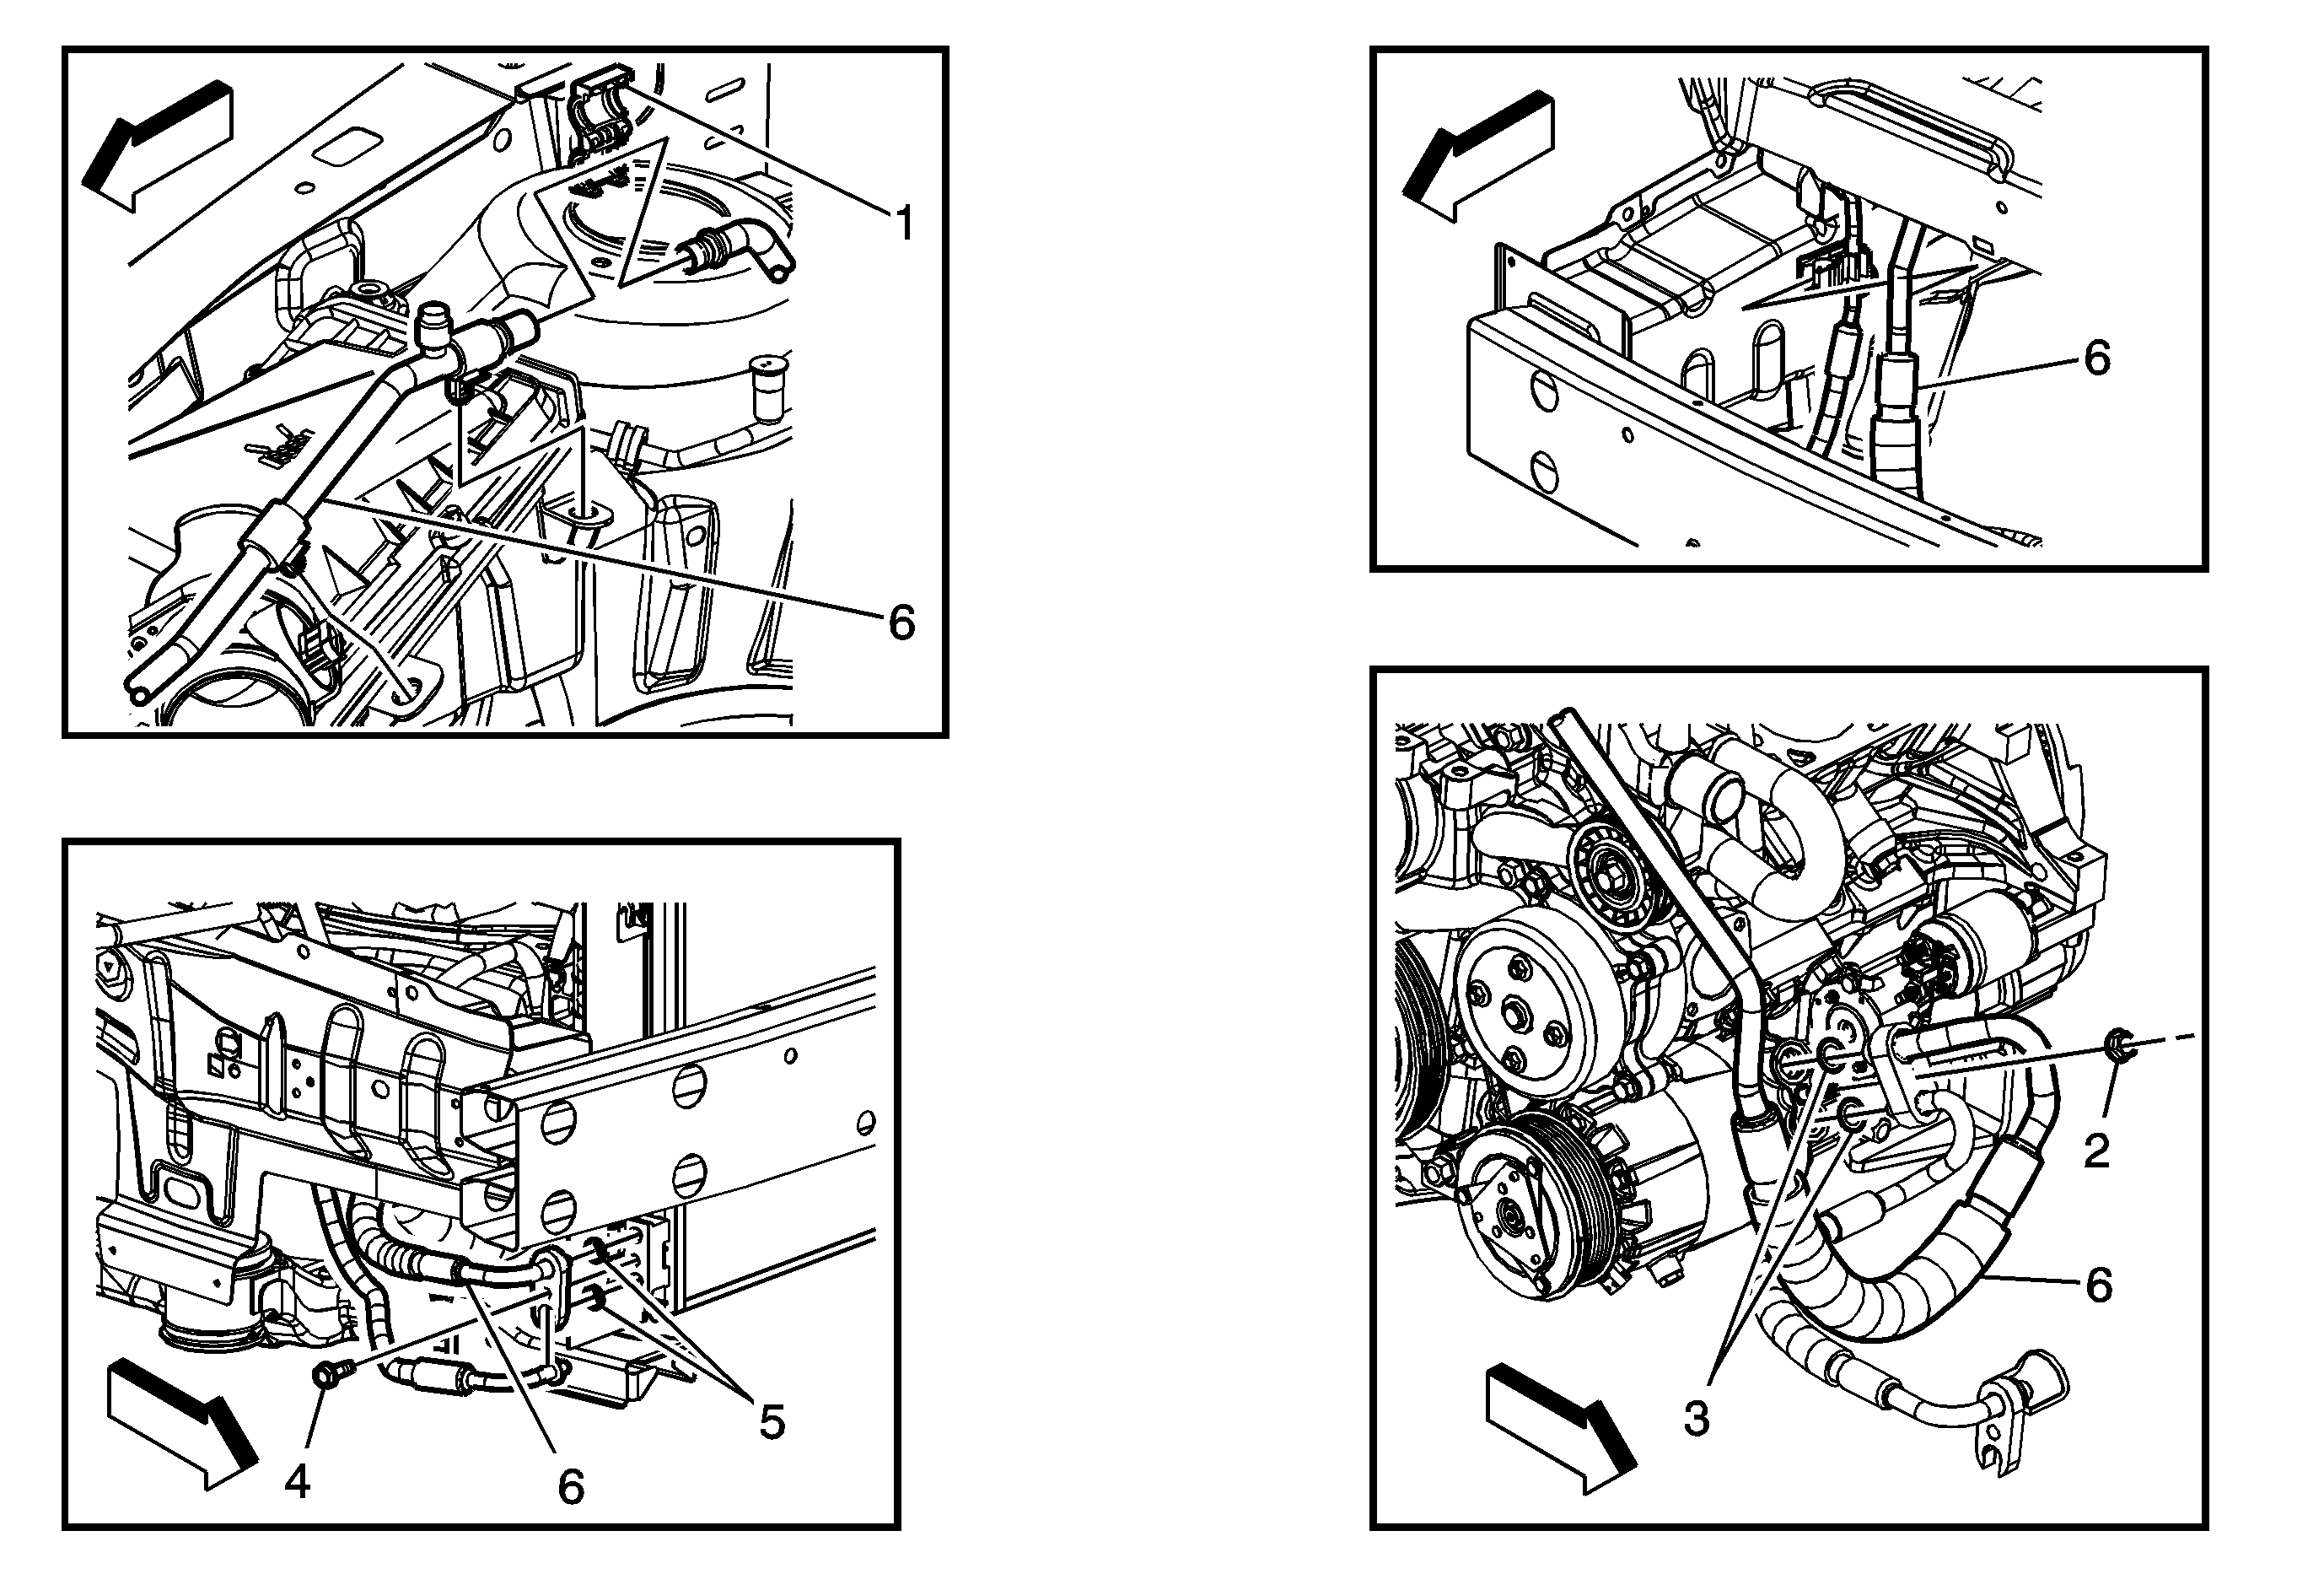
Callout
| Component Name
|
Preliminary Procedures
- Recover the refrigerant. Refer to
Refrigerant Recovery and Recharging.
- Remove the air cleaner intake duct from the air cleaner assembly. Refer to
Air Cleaner Inlet Duct Replacement.
- Raise and support the vehicle. Refer to
Lifting and Jacking the Vehicle.
- Remove the right front fender liner. Refer to
Front Wheelhouse Panel Splash Shield Replacement.
|
1
| A/C Compressor and Condenser Connector
Procedure
- Insert 2 small screwdrivers into the 2 slots of the compressor hose and suction line connector and release locking tabs.
- Remove the A/C compressor hose from the evaporator hose assembly and discard O-rings. Refer to
O-Ring Replacement.
|
2
| A/C Compressor Hose Clip Bracket Bolt
Caution: Refer to Fastener Caution in the Preface section.
Tighten
10 N·m (89 lb in) |
3
| A/C Compressor Hose Nut
Tip
Remove the A/C compressor hose from the A/C compressor and cap hose.
Tighten
20 N·m (15 lb ft) |
4
| Sealing Washer
Tip
Remove and discard sealing washers. Refer to
Sealing Washer Replacement. |
5
| A/C Compressor Hose Bolt
Tighten
20 N·m (15 lb ft) |
6
| Sealing Washer
Tip
Remove and discard sealing washers. Refer to
Sealing Washer Replacement. |
7
| A/C Compressor Hose Assembly
Procedure
- Note routing of the A/C compressor hose to ensure proper routing.
- Using
J 39400 leak test A/C compressor hose connections.
Special ToolsJ 39400 Electronic Halogen Leak Detector
|