Clunk/Knock/Rattle Noise from Front of Vehicle When Driving/Turning Over Bumps at Low Speeds (Diagnose Noise, Lubricate Inner/Outer Steering Shaft, Reposition I-Shaft, Add Foam to Radiator Surge Tank)

| Subject: | Clunk, Knock or Rattle Noise From Front of Vehicle While Driving or Turning Over Bumps at Low Speeds (Diagnose Noise - Lubricate Inner and Outer Steering Shaft, Reposition I-Shaft, Add Foam to Radiator Surge Tank Mounting Bracket and/or Replace Steering Gear, If Necessary) |
| Models: | 2004-2007 Chevrolet Malibu/Maxx |
| 2008 Chevrolet Malibu |
| 2005-2007 Pontiac G6 |
| 2007-2008 Saturn Aura |
This bulletin is being revised to add the 2008 Chevrolet Malibu and Saturn AURA and include a different procedure to correct Condition # 1. Please discard Corporate Bulletin Number 06-02-32-007B (Section 02 -- Steering).
Condition 1
Some customers may comment on a clunk noise heard and felt in the steering wheel while driving at slow speeds and turning. The clunk noise may appear to be directly in front of the driver. Hitting a bump while turning can produce the clunk noise. Sometimes the noise may be duplicated when the vehicle is sitting still and the steering wheel is turned 90 degrees in either direction before initially centering the steering wheel.
Cause 1
The clunk noise may be caused by the lack of lubrication between the inner and outer components of the intermediate shaft..
Correction 1
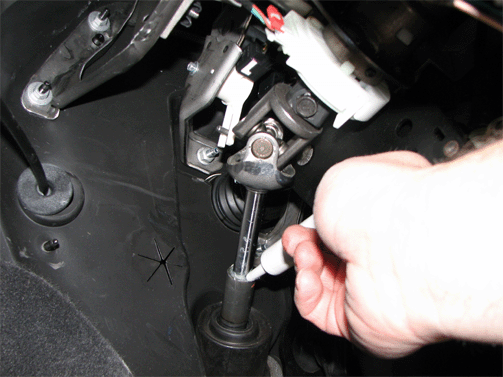
Lubricate the intermediate shaft with steering column shaft lubrication kit, P/N 26098237.
- From inside the vehicle, remove the instrument panel insulator panel - left side panel to gain access to the intermediate shaft.
- Remove the intermediate shaft to steering column attachment bolt.
- Remove the intermediate shaft from the steering column.
- Extend the intermediate shaft all the way. Using the intermediate shaft grease kit, P/N 26098237, inject the grease into the gap between the inner shaft and the outer shaft as you are collapsing the shaft. This will draw the grease into the shaft.
- Cycle the shaft up and down several times to distribute the grease.
- Install the intermediate shaft to the column.
- Wipe off any excessive grease on the intermediate shaft to avoid damage from drips on the carpet.
- Install the instrument panel insulator panel - left side.
- Verify that the noise is no longer present.

Important: Remove original thread locker material from the bolt and apply Loctite® 242 (or equivalent) to the threads of the bolt and reinstall intermediate shaft bolt.
Tighten
| • | For electronic power steering, tighten the bolt to 49 N·m (36 lb ft). |
| • | For hydraulic power steering, tighten the bolt to 62 N·m (46 lb ft). |
Condition 2
Important: This condition ONLY applies to 2004-2007 Chevrolet Malibu/Maxx and 2005-2007 Pontiac G6.
Some customers may comment on a knocking or rattling type noise from the front of the vehicle when driven at low speeds and over bumps. The noise only occurs when the steering wheel is in the straight ahead position and sounds like the noise is in the left suspension of the vehicle or directly in front of the driver.
Correction 2
- Ensure the noise is not caused by Condition # 1.
- Determine the source of the noise. Install the chassis ears at the following locations:
- If the noise is coming from the upper strut mount or sway bar link, replace as necessary and retest.
- For 2004-2006 Chevrolet and Pontiac model year vehicles, the noise may be coming from the radiator surge tank area. (The 2007 model year vehicles use a different style radiator surge tank - refer to Step 9.)
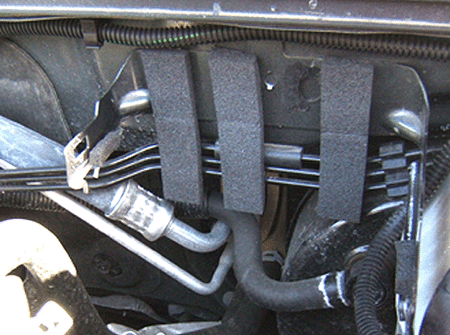
- If the noise is coming from the radiator surge tank, release the two retaining tabs holding the radiator surge tank and reposition the tank away from the attaching bracket and isolate with closed cell foam.
- Cut three pieces of closed cell foam, P/N P46515 (or equivalent), into 25 mm (1 in) by 102 mm (4 in) pieces.
- Cut two pieces of closed cell foam into 25 mm (1 in) by 6 mm (¼ in) pieces.
- Install the three pieces of foam to the attaching bracket starting at the top center inside the bracket and proceed down across the fuel lines, then at the inside of the bracket at the left and right positions of the center piece of foam. Finally, install the last two pieces of foam to the inside bracket at the left and right extended sides behind the retaining holes as shown above.
- Reposition the radiator surge tank back onto the bracket and seat the two retaining tabs on the tank.
- Drive the vehicle to verify that the noise is no longer present.
| • | sway bar link - one side at a time |
| • | upper strut mount - one side at a time |
| • | steering gear near the pinion area |
| • | base of the steering column housing |
| • | radiator surge tank |

Parts Information
Order Adhesive Back Shim Stock from Kent Automotive at 1-888-YES-KENT or online at www.kent-automotive.com.
Part Number | Description | Material Allowance |
|---|---|---|
P46515 | Adhesive Back Shim Stock (25 mm x 30 ft roll) [15 mm (9/16 in) thickness] | $1.60 per vehicle ($1.78 in Canada) |
Part Number | Description |
|---|---|
26098237 | Intermediate Shaft Grease Kit |
Warranty Information
For vehicles repaired under warranty, use:
Labor Operation | Description | Labor Time |
|---|---|---|
E9448* | Lubricate and Reposition I-Shaft to Correct Noise | 0.3 hr |
Add | Install Foam (2004-2006) | 0.1 hr |
* This is a unique labor operation for bulletin use only. It will not be published in the Labor Time Guide. For other repairs, submit the appropriate published labor operation. | ||
