DIESEL COAST DOWN SHUDDER INFORMATION

CONDITION: Coast down shudder may be experienced on late 1981 350 V8 diesel equipped Impala/Caprice models equipped with a 350C automatic transmission and 1982 diesel Caprice/Impala, Malibu and Monte Carlo models equipped with a 350C or 200-4R automatic transmission. The coast down shudder is most pronounced at speeds between fifty (50) and forty (40) mph, with the converter clutch engaged, when the operator goes to a closed throttle position.
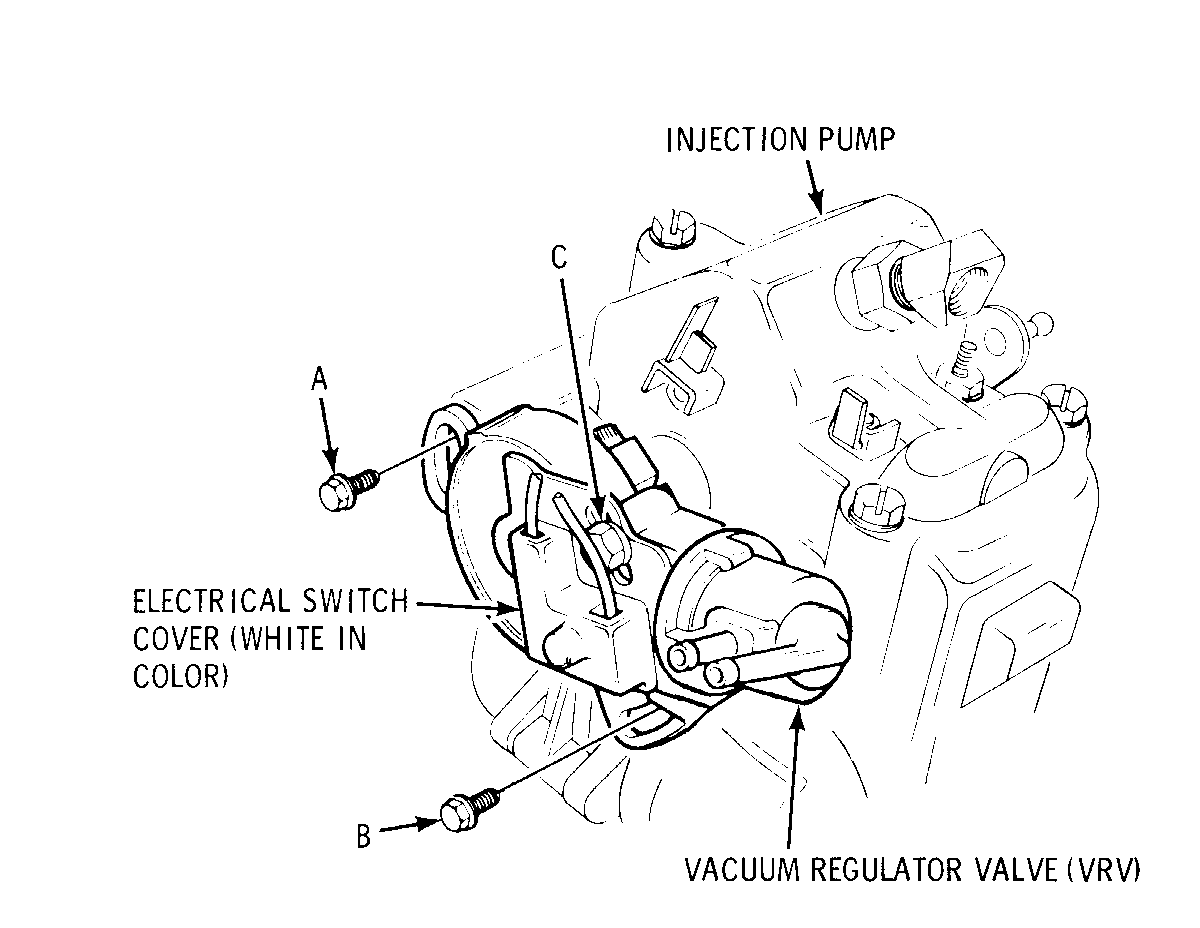
CORRECTION A new design vacuum regulator valve (VRV) P/N 22517904 is now available to correct coast down shudder. This vacuum regulator valve electrically disconnects the torque converter clutch (TCC) by de-energizing the solenoid at both closed throttle and full throttle positions. The new vacuum regulator valve is easily identified by the electrical switch cover which is white in color. (See Figure 1.)
PROCEDURE
(1) Remove air cleaner assembly.
(2) Disconnect electrical connections at injection pump and the VRV valve and the vacuum connector at the VRV. Move connections to side to gain access to pump.
(3) Remove rear A/C compressor brace and T.V. cable bracket. Disconnect T.V. cable.
(4) Remove three (3) remaining air crossover bolts and remove air crossover.
(5) Install the screened covers on the intake manifold openings. (Tool J26996-10.)
(6) Remove the VRV valve by removing the two (2) VRV attaching bolts (bolts "A" and "B", see Figure 1). For easy access to the lower bolt, (bolt "B") use a 1/4" drive flex socket (3/8") and/or a 3/8" combination wrench.
NOTICE: It is possible to have either an Eaton or Rochester type VRV on the engine. The replacement VRV is the Eaton type and replaces either type.
(7) Install the VRV as follows:
NOTICE: It is not necessary nor recommended to remove or rotate injection pump to install the valve.
(a) Fit the VRV valve onto pump.
(b) Install the top VRV attaching bolt into pump (bolt "A"). Snug bolt to hold VRV.
(c) Install bottom VRV attaching bolt (bolt "B") by moving VRV until threaded hole on pump lines up with slot. Work bolt through slot so end of bolt is at threaded hole on pump. Bolt head and washer will lay on the intake manifold. As washer will not move onto threaded portion of bolt, a 3/8" open end wrench will start bolt in hole. Turn bolt while pushing lightly against washer.
(8) Adjust VRV vacuum setting as outlined in the 1981 Service Manual, page 6A6-8 or the 1982 Service Manual, page 6C5-4, whichever is applicable.
(9) Remove screened covers from the intake manifold. Replace air crossover, torque bolts to specification 30 N.m (22 ft. lbs.), replace T.V. bracket and A/C brace. Attach injector pump electrical connections and T.V. cable.
(10) Adjust fast idle speed to specifications given on the emission label.
(11) Make VRV light load switch adjustment as follows:
(a) With key off, disconnect fast idle solenoid electrical connector, connect jumper wire between solenoid wire and 12 volt source to energize solenoid.
(b) Turn key to run position (DO NOT START). Fast idle solenoid should be activated. Open throttle to be sure pump is on "fast" idle.
(c) Loosen VRV cover adjustment screw with a 5/16" wrench (screw "C", see Figure 1).
(d) Disconnect VRV electrical connector.
(e) Install a self powered test light between the VRV connector terminals.
(f) If test light is not on, turn VRV cover until test light is on.
(g) Adjust VRV cover until test light goes off. (Contacts just open.)
(h) Tighten VRV cover adjustment screw (screw "C").
(i) Remove test light and reconnect VRV electrical connector.
(12) Replace air cleaner assembly.
WARRANTY INFORMATION
Operation Number Time TC
J-6272 .6 92
Add: To make light load switch adjustment .1
Use the time noted above. Labor time guide will be revised to reflect this time allowance change.

General Motors bulletins are intended for use by professional technicians, not a "do-it-yourselfer". They are written to inform those technicians of conditions that may occur on some vehicles, or to provide information that could assist in the proper service of a vehicle. Properly trained technicians have the equipment, tools, safety instructions and know-how to do a job properly and safely. If a condition is described, do not assume that the bulletin applies to your vehicle, or that your vehicle will have that condition. See a General Motors dealer servicing your brand of General Motors vehicle for information on whether your vehicle may benefit from the information.
