Circuit Description
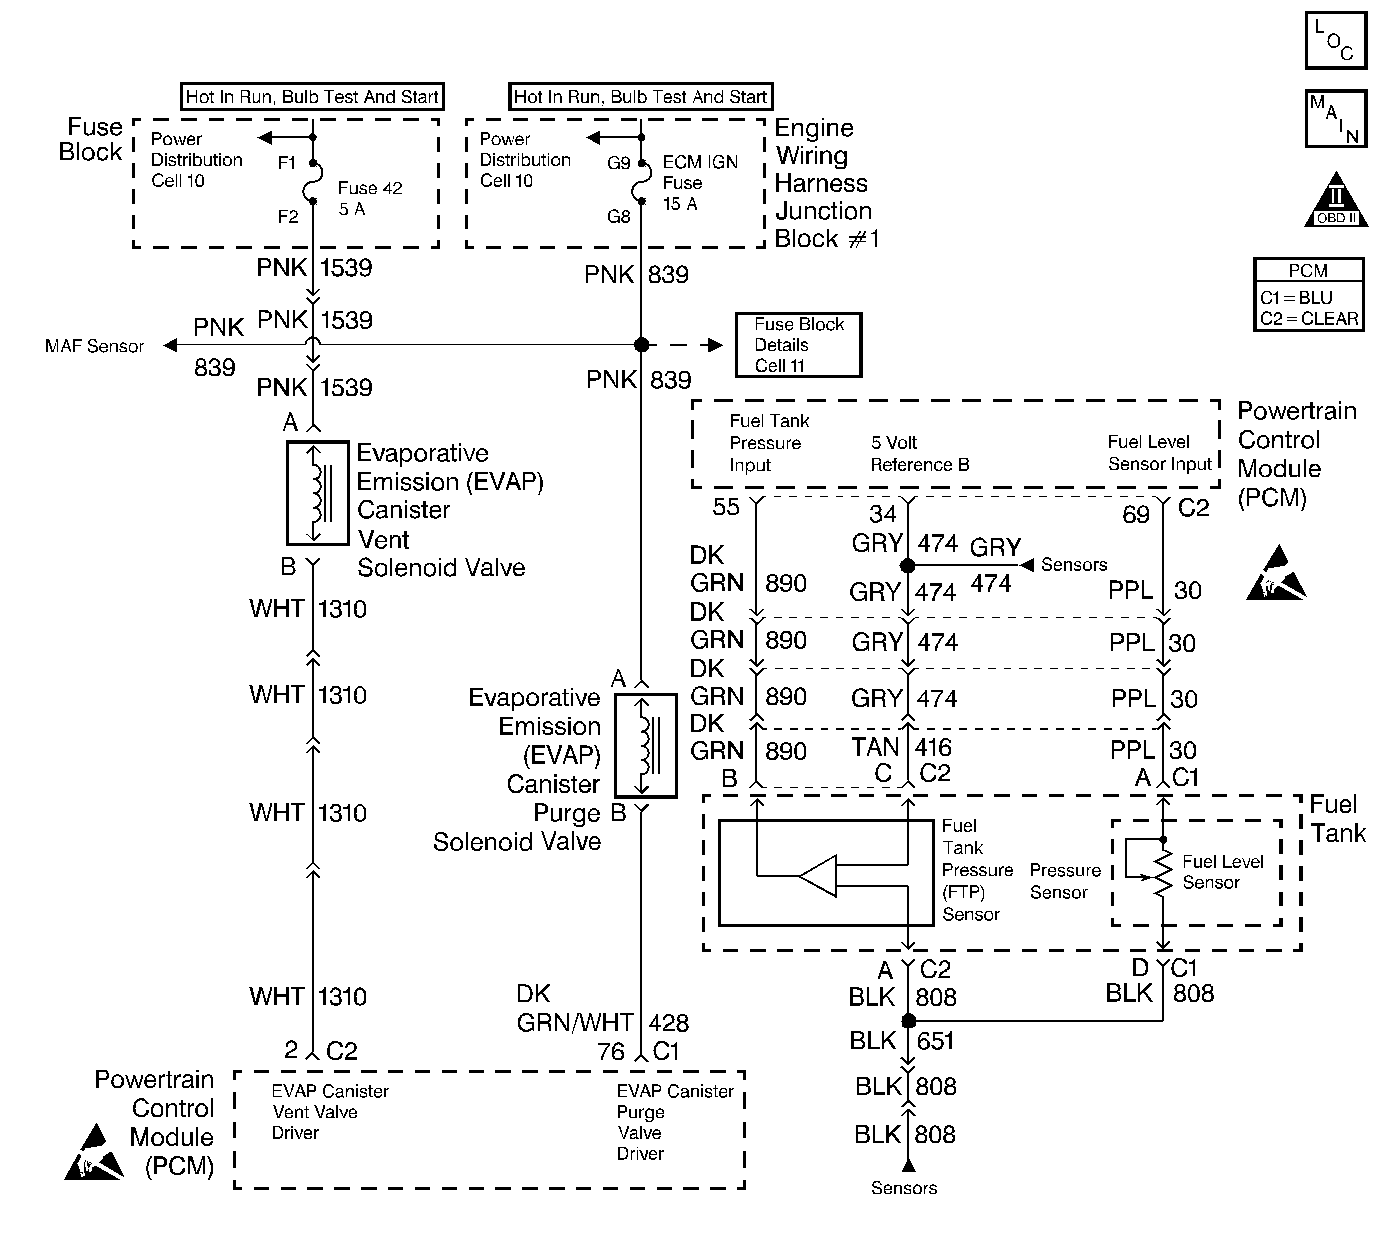
The evaporative system includes the following components:
| • | The fuel tank. |
| • | The EVAP canister vent valve. |
| • | The fuel tank pressure sensor. |
| • | The fuel pipes and hoses. |
| • | The fuel cap. |
| • | The EVAP vapor lines. |
| • | The EVAP purge lines. |
| • | The evaporative emission canister. |
| • | The EVAP purge valve. |
The evaporative leak detection diagnostic strategy is based on applying vacuum to the EVAP system and monitoring vacuum decay. The PCM monitors vacuum level via the Fuel Tank Pressure sensor input. At an appropriate time, the EVAP purge valve and the EVAP canister vent valve are turned ON, allowing engine vacuum to draw a small vacuum on the entire evaporative emission system. If a sufficient vacuum level cannot be achieved, a large leak or a malfunctioning EVAP purge valve is indicated. This can be caused by the following conditions:
| • | Disconnected or malfunctioning fuel tank pressure sensor. |
| • | Missing or malfunctioning fuel cap. |
| • | Disconnected, damaged, pinched, or blocked EVAP purge line. |
| • | Disconnected or damaged EVAP canister vent hose. |
| • | Disconnected, damaged, pinched, or blocked fuel tank vapor line. |
| • | Disconnected or malfunctioning EVAP purge valve. |
| • | Disconnected or malfunctioning EVAP canister vent valve. |
| • | Open ignition feed circuit to the EVAP canister vent or purge valve. |
| • | Damaged evaporative emissions canister. |
| • | Leaking fuel sender assembly O-ring. |
| • | Leaking fuel tank or fuel filler neck |
Any of the above conditions can set DTC P0440.
Conditions for Running the DTC
| • | No VSS, TP sensor, HO2S, Misfire, IAT sensor, MAP sensor, Fuel Trim, Fuel Injector(s), EGR Pintle Position, ECT, or MAF sensor DTC(s) set. |
| • | Engine coolant temperature is greater than 50°C (122°F). |
| • | Start up engine coolant temperature is between 4°C and 30°C (40°F and 86°F). |
| • | Start up intake air temperature is between 4°C and 30°C (40°F and 86°F). |
| • | Fuel tank fuel level is between 15 percent and 85 percent. |
| • | BARO is more than 75 kPa. |
| • | System voltage is between 5 and 16 volts. |
Conditions For Setting the DTC
The EVAP system is not able to achieve or maintain vacuum during the diagnostic test.
Action Taken When the DTC Sets
| • | The PCM will illuminate the MIL during the first trip in which the diagnostic test has been run and failed. |
| • | The PCM will store conditions which were present when the DTC set as Freeze Frame and Fail Records data. |
Important: Although these diagnostics are considered type A, they act like type B diagnostics under certain conditions. Whenever the EVAP diagnostics report that the system has passed, or if the battery has been disconnected, the diagnostic must fail during two consecutive cold start trips before setting a DTC. The initial failure is not reported to the diagnostic executive or displayed on a scan tool. A passing system always reports to the diagnostic executive immediately.
Conditions for Clearing the MIL/DTC
| • | The PCM will turn the MIL OFF when the diagnostic has been run and the malfunction condition is no longer present. |
| • | A history DTC P0440 will clear after 40 consecutive warm-up cycles have occurred without a malfunction. |
| • | DTC P0440 can be cleared by using the scan tool. |
Diagnostic Aids
Check for the following conditions:
| • | Cracked or punctured EVAP canister. |
| • | Damaged or disconnected source vacuum line, EVAP purge line, vent hose or fuel tank vapor line. |
| • | Poor connection at the PCM. |
| • | Inspect harness connectors for backed out terminals, improper mating, broken locks, improperly formed or damaged terminals, and poor terminal to wire connection. |
| • | Damaged harness. |
| Inspect the wiring harness to the EVAP canister vent valve, the EVAP purge valve, and the fuel tank pressure sensor for an intermittent open or short circuit. |
| • | Kinked, pinched or plugged vacuum source, EVAP purge, or fuel tank vapor line. Verify that the lines are not restricted. |
| • | Malfunctioning or damaged canister. |
| A malfunctioning canister may intermittently allow charcoal into the EVAP purge solenoid, vacuum switch, and associated lines causing a DTC to be set. Use the following procedure to check for a carbon release condition: |
| 1. | Turn OFF the ignition switch. |
| 2. | Remove the EVAP purge valve. Refer to Evaporative Emission Canister Purge Solenoid Valve Replacement . |
| 3. | Lightly tap the EVAP purge valve and (if applicable) the vacuum switch on a clean work area looking for carbon particles exiting either of the vacuum ports. |
| 4. | If no carbon release is evident, reinstall the components and continue with the DTC P0440 diagnostic table. If carbon is being released from either component, continue with this service procedure. |
| 5. | Remove the charcoal canister from the vehicle. |
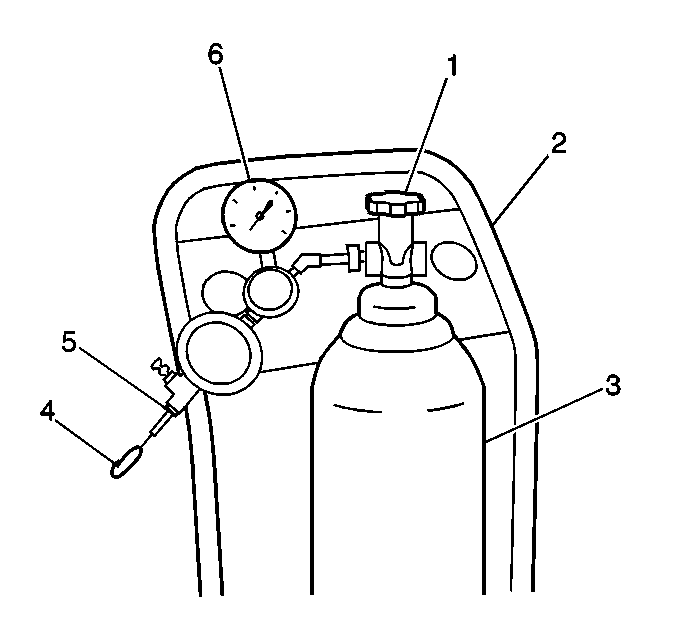
| 6. | Ensure that the main cylinder valve is turned off on the

|
| 7. | Disconnect the black hose that connects the nitrogen cylinder to the EVAP purge/pressure diagnostic station at the pressure regulator by unscrewing the knurled nut on the regulator. No tools are required to remove the black hose from the regulator. |
| 8. | Using a section of vacuum line, connect one end over the open threaded fitting of the EVAP purge/pressure diagnostic station pressure regulator. |
| 9. | Connect the remaining end to the EVAP purge valve end of the EVAP purge line at the vehicle and turn on the main nitrogen cylinder valve. Continue to blow any debris from the purge line for 15 seconds. |
| 10. | Return the EVAP Pressure/Purge Diagnostic Station to its original condition by re-installing the black hose that was disconnected in step 7. |
| 11. | Replace the following components: |
| • | The EVAP purge valve. Refer to Evaporative Emission Canister Purge Solenoid Valve Replacement . |
| • | The EVAP canister. Refer to Evaporative Emission Canister Replacement . |
| 12. | Proceed with the DTC P0440 diagnostic table. |
Reviewing the Fail Records vehicle mileage since the diagnostic test last failed may help determine how often the condition that caused the DTC to be set occurs. This may assist in diagnosing the condition.
Test Description
The numbers below refer to the step numbers on the diagnostic table.
-
If a vent valve or EVAP purge valve electrical malfunction is present, the purge system will not operate correctly. Repairing the electrical malfunction will very likely correct the condition that set DTC P0440.
-
Checks the fuel tank pressure sensor at ambient pressure.
-
Determines whether or not the EVAP system can be sealed sufficiently to be pressurized. If not, the large leak must be located and corrected before continuing with diagnosis.
-
Verifies that the fuel tank pressure sensor accurately reacts to EVAP system pressure changes.
-
Checks for a blocked EVAP purge valve. The PCM commands the EVAP purge valve OFF (open) and the vent valve ON (closed), with the System Performance EVAP output control function activated on the scan tool. Any pressure in the system should be released through the EVAP purge valve within a few seconds.
-
Ensures that sufficient source vacuum is present at the EVAP purge valve.
Step | Action | Value(s) | Yes | No | ||||||
|---|---|---|---|---|---|---|---|---|---|---|
1 | Did you perform the Powertrain On-Board Diagnostic (OBD) System Check? | -- | ||||||||
|
Important: Visually/physically inspect for the following conditions:
Is DTC P1676 EVAP Purge Valve Control Circuit or DTC P1665 EVAP Vent Solenoid Control Circuit also set? | -- | Go to the other DTC first | ||||||||
Is Fuel Tank Pressure at the specified value? | 0 in. H2O | Go to DTC P0453 Fuel Tank Pressure Sensor Circuit High Voltage | ||||||||
|
Important: Before continuing with diagnosis, zero the EVAP Pressure and Vacuum
(inches of H2O) gauges on the
Can specified value be achieved? | 5 in. H2O | |||||||||
Is Fuel Tank Pressure at the specified value? | 5 in. H2O | |||||||||
6 |
Can vacuum be maintained at the specified value? | 5 in. Hg | ||||||||
7 |
Was a problem found? | -- | Go to DTC P0452 Fuel Tank Pressure Sensor Circuit Low Voltage | |||||||
Does the EVAP pressure decrease to the second specified value within 15 seconds while System Performance is activated? | 5 in. H2O 0 in. H2O | |||||||||
Is the source vacuum level greater than the specified value? | -15 in. Hg | Go to Diagnostic Aids | ||||||||
10 |
Was a problem found? | -- | ||||||||
11 |
Was a problem found? | -- | ||||||||
12 |
Did you complete the repair? | -- | -- | |||||||
13 | Replace the EVAP purge valve. Refer to Evaporative Emission Canister Purge Solenoid Valve Replacement . Important: Check for carbon release into the EVAP system. Refer to Diagnostic Aids. Did you complete the repair? | -- | -- | |||||||
14 | Locate and repair cause of no source vacuum to the EVAP purge valve. Important: Check for carbon release into the EVAP system. Refer to Diagnostic Aids. Did you complete the repair? | -- | -- | |||||||
15 | Replace the EVAP canister vent valve. Refer to Evaporative Emission Vent Valve Replacement . Did you complete the repair? | -- | -- | |||||||
16 |
Does the EVAP pressure decrease to less than the second specified value within 2 minutes? | 15 in. H2O 10 in. H2O | System OK |
