Inspection and Testing
Inspect the following starter motor components:
- The drive pinion.
| • | The pinion should turn freely in the overrunning direction and
turn with some degree of resistance in the drive direction. |
| • | Inspect the pinion teeth for chips, cracks, or excessive wear.
Badly chipped pinion teeth can indicate chipped ring gear teeth. Replace
the flywheel as needed. |
| | Notice: Do not clean or immerse the starter motor parts in grease
dissolving solvents. The solvents will dissolve the grease packed in the drive
or the bearings, and may damage the armature or the field coil insulation.
|
| • | The starter drive requires no lubrication, but it should be wiped clean. |

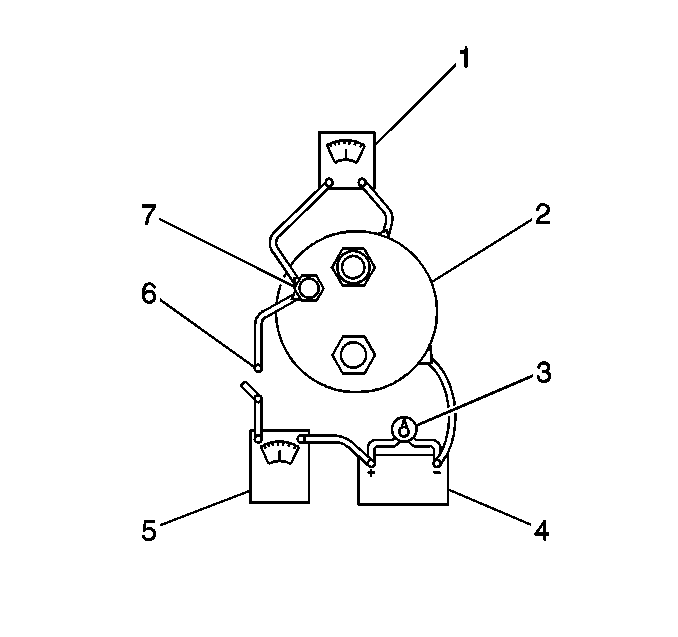
- The solenoid hold-in windings
by connecting an ammeter (5) and a switch (6) in series with a 12 V
battery (4) and the solenoid terminal on the solenoid switch (7).
| 2.1. | Connect a voltmeter (1) to the solenoid terminal (7) and the ground. |
| 2.2. | Disconnect the motor lead from the solenoid. Tape the lead in
order to prevent contact. |
| 2.3. | Connect the carbon pile (3) across the battery (4). |
| 2.4. | Adjust the voltage to 10 V and note the ammeter reading.
The starter motor reading should be 6-12 A. |
Notice: Do not allow the solenoid pull-in current to flow for more
than 15 seconds at a time. The windings can be damaged by overheating. Also,
the current draw readings will decrease as the windings heat up.
- The solenoid hold-in windings and the pull-in windings by making connections
as for the previous test.
| 3.1. | Ground the solenoid motor terminal. |
| 3.2. | Adjust the voltage to 10 V and note the ammeter reading.
The starter motor reading must be 30-45 A. |
| • | The current reading will change as the windings heat up. |
| • | The current draw readings that are over the specifications indicate
shorted turns or a ground in the solenoid windings. |
| • | The current draw readings that are under the specifications indicate
excessive resistance. |
| • | No reading indicates an open. |

