Inflatable Restraint Side Impact Sensor Replacement Impala
Removal Procedure
- Disable the SIR system. Refer to SIR Disabling and Enabling .
- Remove the center pillar lower trim. Refer to Center Pillar Lower Trim Panel Replacement in Interior Trim.
- Remove the connector position assurance (CPA) from the yellow 2-way harness connector on the inflatable restraint side impact sensor.
- Disconnect the wiring harness connector from the side impact sensor.
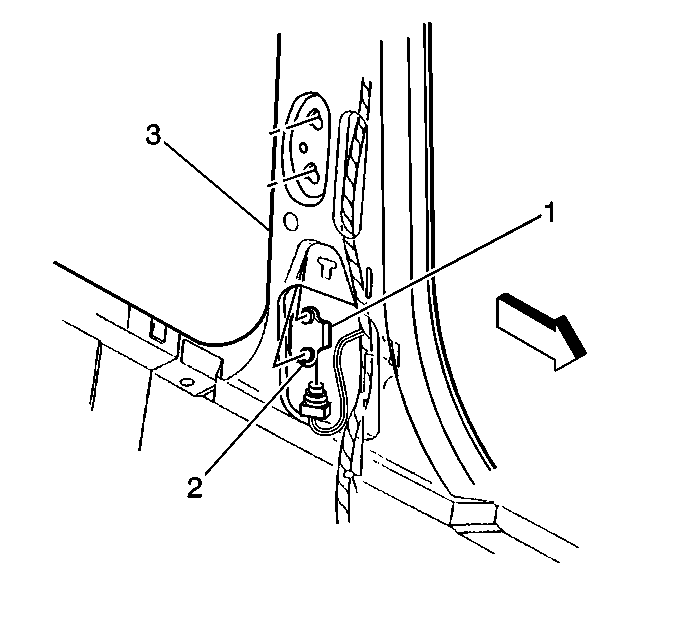
- Loosen the 2 fasteners (2) on the side impact sensor.
- Remove the side impact sensor (1) from the center pillar (3).
Caution: Refer to SIR Caution in the Preface section.

Caution: Do not strike or jolt the inflatable restraint side impact sensor (SIS). Before applying power to the SIS make sure that it is securely fastened. Failure to observe the correct installation procedures could cause SIR deployment, personal injury, or unnecessary SIR system repairs.
Installation Procedure
- Remove any dirt, grease, or other impurities from the mounting surface.
- Install the side impact sensor (1) to the center pillar (3).
- Tighten the 2 fasteners (2) on the side impact sensor (1).
- Connect the yellow 2-way harness connector on the side impact sensor.
- Install the CPA to the yellow 2-way connector on the side impact sensor and tighten using only hand tools.
- Install the center pillar lower trim. Refer to Center Pillar Lower Trim Panel Replacement in Interior Trim.
- Enable the SIR system. Refer to SIR Disabling and Enabling .

Notice: Use the correct fastener in the correct location. Replacement fasteners must be the correct part number for that application. Fasteners requiring replacement or fasteners requiring the use of thread locking compound or sealant are identified in the service procedure. Do not use paints, lubricants, or corrosion inhibitors on fasteners or fastener joint surfaces unless specified. These coatings affect fastener torque and joint clamping force and may damage the fastener. Use the correct tightening sequence and specifications when installing fasteners in order to avoid damage to parts and systems.
Tighten
Tighten the fasteners to 10 N·m (89 lb in).
Inflatable Restraint Side Impact Sensor Replacement Monte Carlo
Removal Procedure
- Disable the SIR system. Refer to SIR Disabling and Enabling .
- Remove the left door trim panel. Refer to Front Side Door Trim Panel Replacement in Doors.
- Remove the water deflector as required. Refer to Front Side Door Water Deflector Replacement in Doors.
- Remove the inner energy absorber pad. Refer to Front Door Energy Absorber Pad Replacement in Doors.
- Loosen the top clip from the outer energy absorber pad and pull the pad away from the outer door panel.
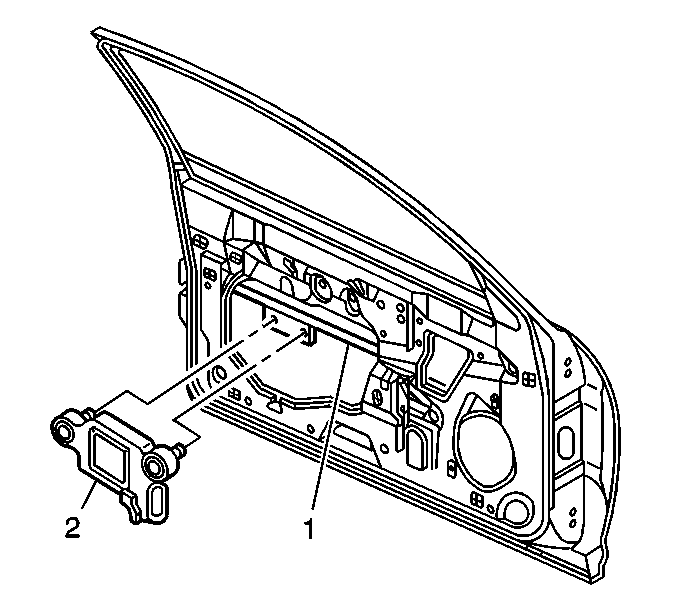
- Remove the inflatable sensor (2) fasteners.
- Slide the discriminating sensor out from behind the mounting bracket on the door impact beam (1).
- Disconnect the wiring harness connector from the inflatable restraint side impact sensor.
- Remove the side impact sensor from the door.
Caution: Refer to SIR Caution in the Preface section.
Caution: Do not strike or jolt the inflatable restraint side impact sensor (SIS). Before applying power to the SIS make sure that it is securely fastened. Failure to observe the correct installation procedures could cause SIR deployment, personal injury, or unnecessary SIR system repairs.

Installation Procedure
- Remove any dirt, grease, or other impurities from the mounting surface.
- Position the side impact sensor (2) to the mounting bracket.
- Connect the yellow 2-way harness connector to the side impact sensor.
- Install the side impact sensor (1) fasteners. Tighten the fasteners with hand tools only.
- Press the outer energy absorber pad toward the outer door panel and secure the pad with the clip.
- Install the Inner energy absorber pad. Refer to Front Door Energy Absorber Pad Replacement in Doors.
- Install the water deflector as required. Refer to Front Side Door Water Deflector Replacement in Doors.
- Install the left door trim panel. Refer to Front Side Door Trim Panel Replacement in Doors.
- Enable the SIR system. Refer to SIR Disabling and Enabling .

Notice: Use the correct fastener in the correct location. Replacement fasteners must be the correct part number for that application. Fasteners requiring replacement or fasteners requiring the use of thread locking compound or sealant are identified in the service procedure. Do not use paints, lubricants, or corrosion inhibitors on fasteners or fastener joint surfaces unless specified. These coatings affect fastener torque and joint clamping force and may damage the fastener. Use the correct tightening sequence and specifications when installing fasteners in order to avoid damage to parts and systems.
Tighten
Tighten the fasteners to 10 N·m (89 lb in).
