Underhood Fuse Block Replacement Fuse and Relay Block 1
Removal Procedure
Caution: Unless directed otherwise, the ignition and start switch must be in the OFF or LOCK position, and all electrical loads must be OFF before servicing
any electrical component. Disconnect the negative battery cable to prevent an electrical spark should a tool or equipment come in contact with an exposed electrical terminal. Failure to follow these precautions may result in personal injury and/or damage to
the vehicle or its components.
- Disconnect
the negative battery cable.
- Remove the air cleaner assembly. Refer to
Air Cleaner Assembly Replacement
in Engine Controls.
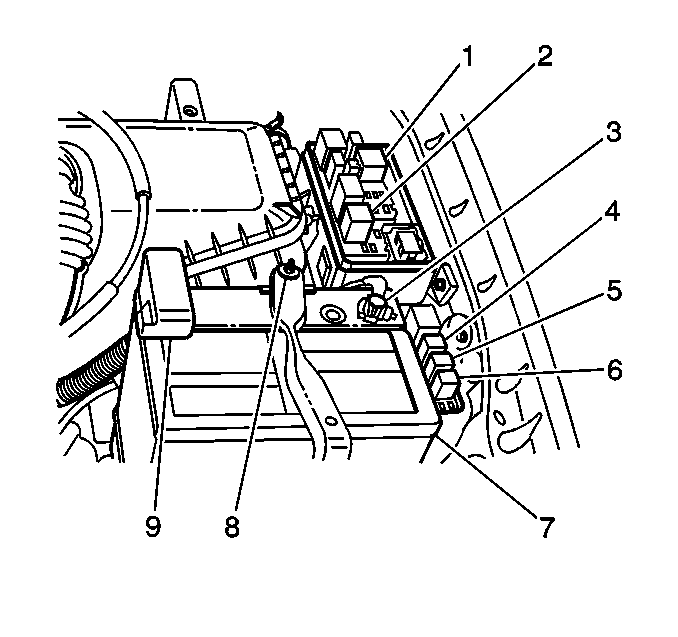
- Remove the 2 bolts that hold fuse and relay block 1 (1)
to the inner fender.
- Carefully pull fuse and relay block 1 away from the inner
fender and unsnap the lower cover.
- Disconnect each of the harness connectors.
- Remove fuse and relay block 1 from the vehicle.
Installation Procedure
- Install fuse and relay
block 1 (1) to the vehicle.
- Connect each connector to fuse and relay block 1.
- Install the lower cover.
- Install fuse and relay block 1 to the inner fender. Secure
with the 2 bolts.
- Install the air cleaner assembly. Refer to
Air Cleaner Assembly Replacement
in Engine Controls.
- Connect the negative battery cable.
Tighten
Tighten the negative battery cable to 15 N·m (11 lb ft).
Underhood Fuse Block Replacement Engine Accessory Harness
Removal Procedure
Caution: Unless directed otherwise, the ignition and start switch must be in the OFF or LOCK position, and all electrical loads must be OFF before servicing
any electrical component. Disconnect the negative battery cable to prevent an electrical spark should a tool or equipment come in contact with an exposed electrical terminal. Failure to follow these precautions may result in personal injury and/or damage to
the vehicle or its components.
- Remove the
battery. Refer to
Battery Replacement
.
- Remove the air cleaner assembly. Refer to
Air Cleaner Assembly Replacement
in Engine Controls.
- Disconnect the following underhood electrical connectors:
| • | The engine coolant temperature (ECT) sender |
| • | The crankshaft position sensor |
| • | The manifold absolute pressure (MAP) sensor |
| • | The camshaft position sensor |
| • | The idle air control (IAC) valve |
| • | The throttle position sensor (TPS) |
| • | The A/C compressor clutch (C101) if equipped |
| • | The battery positive wire from the battery positive terminal |
| • | The torque converter clutch solenoid (4 speed automatic only) |
| • | The park/neutral position (PNP) switch (automatic transaxle) |
| • | The reverse lamp switch (manual transaxle) |
| • | The Evaporative Canister Purge Solenoid Valve |
| • | The oil pressure switch |
| • | The intake air temperature (IAT) sensor |
| • | The vehicle speed sensor (VSS) |
| • | The underhood data link connector |
| • | The heated oxygen sensor 1 |
| • | The knock sensor (C100) |
| • | C8 from fuse and relay block 1 |
| • | C6 from fuse and relay block 1 |
| • | C2 from fuse and relay block 1 |
- Remove the front floor console. Refer to
Front Floor Console Replacement
in Instrument
Panel, Gauges and Console.
- Disconnect the following instrument panel electrical connectors:
| • | Powertrain Control Module (PCM) C1 |
| • | The noise suppressor filter |
- Remove the harness from the interior of the vehicle. Push the
harness through the bulkhead grommet into the engine compartment.
- Disconnect the harness retaining clips.
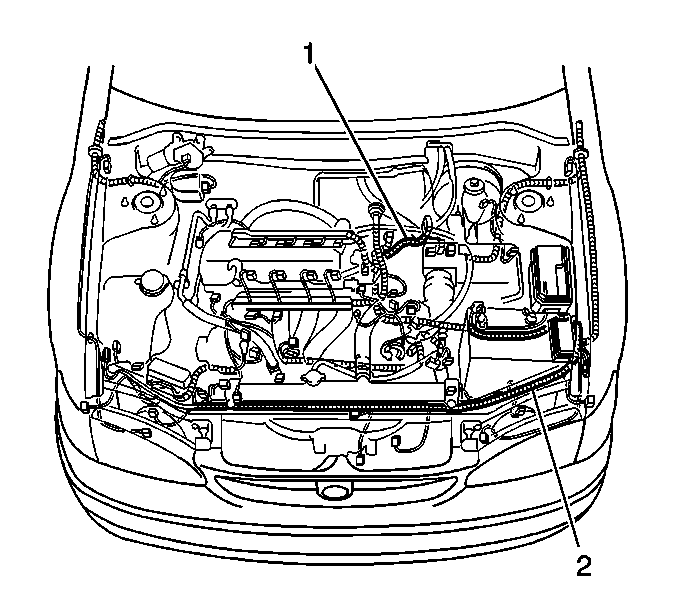
- Remove the harness (1) from the vehicle.
Installation Procedure
- Install the harness (1)
to the vehicle.
- Connect the harness retaining clips.
- Install the harness to the interior of the vehicle. Push the harness
through the bulkhead grommet into the interior of the vehicle.
- Connect the following instrument panel electrical connectors:
| • | Powertrain Control Module (PCM) C1 |
| • | The noise suppressor filter |
- Install the front floor console. Refer to
Front Floor Console Replacement
in Instrument
Panel, Gauges and Console.
- Connect the following underhood electrical connectors:
| • | The engine coolant temperature (ECT) sender |
| • | The crankshaft position sensor |
| • | The manifold absolute pressure (MAP) sensor |
| • | The camshaft position sensor |
| • | The idle air control (IAC) valve |
| • | The throttle position sensor (TPS) |
| • | The A/C compressor clutch (C101) if equipped |
| • | The battery positive wire from the battery positive terminal |
| • | The torque converter clutch solenoid (4 speed automatic only) |
| • | The park/neutral position (PNP) switch (automatic transaxle) |
| • | The reverse lamp switch (manual transaxle) |
| • | The Evaporative Canister Purge Solenoid Valve |
| • | The oil pressure switch |
| • | The intake air temperature (IAT) sensor |
| • | The vehicle speed sensor (VSS) |
| • | The underhood data link connector |
| • | The heated oxygen sensor 1 |
| • | The knock sensor (C100) |
| • | C8 from fuse and relay block 1 |
| • | C6 from fuse and relay block 1 |
| • | C2 from fuse and relay block 1 |
- Install the air cleaner assembly. Refer to
Air Cleaner Assembly Replacement
in Engine Controls.
- Install the battery. Refer to
Battery Replacement
.
Underhood Fuse Block Replacement Engine Main Harness
Removal Procedure
Caution: Unless directed otherwise, the ignition and start switch must be in the OFF or LOCK position, and all electrical loads must be OFF before servicing
any electrical component. Disconnect the negative battery cable to prevent an electrical spark should a tool or equipment come in contact with an exposed electrical terminal. Failure to follow these precautions may result in personal injury and/or damage to
the vehicle or its components.
- Remove the
battery. Refer to
Battery Replacement
.
- Remove the nut from the positive (+) battery cables.
- Separate the positive (+) battery cable from the fuse and relay
block 1 feed cable.
- Remove the air cleaner assembly. Refer to
Air Cleaner Assembly Replacement
in Engine Controls.
- Remove the 2 bolts that hold fuse and relay block 1 to
the inner fender.
- Carefully pull fuse and relay block 1 away from the inner
fender and unsnap the lower cover.
- Disconnect each of the harness connectors.
- Remove fuse and relay block 1 from the vehicle.
- Remove the bolt that holds fuse and relay block 2 to the
inner fender.
- Remove the bolts that hold fuse and relay block 3 to the
front support.
- Disable the SIR system. Refer to
Disabling the SIR System
in Restraints.
- Disconnect the following underhood electrical connectors:
| • | The SIR left front discriminating sensor |
| • | The brake pressure modulating valve (BPMV) |
| • | The brake fluid level switch |
| • | The left front wheel speed sensor |
| • | The left turn/park lamp |
| • | The right turn/park lamp |
| • | The A/C refrigerant pressure switch |
| • | The ambient air temperature sensor |
| • | The auxiliary fan motor |
| • | The windshield washer pump |
- Remove the knee bolster. Refer to
Knee Bolster Replacement
in Instrument Panel, Gauges and Console.
- Disconnect the following interior electrical connectors:
| • | C1 from junction block 2 |
| • | C2 from junction block 2 |
| • | C2 from junction block 1 |
- Remove the harness from the interior of the vehicle. Push the
harness through the bulkhead grommet into the engine compartment.
- Remove the bolts from the upper radiator support brackets.
- Disconnect the harness retaining clips.
- Lean the radiator assembly forward.
- Note the routing of the harness. Remove the harness (2) from the
vehicle.
Installation Procedure
- Lean the radiator assembly
forward.
- Install the harness (2) to the vehicle.
- Connect the harness retaining clips.
- Install the bolts to the upper radiator support brackets.
- Install the harness to the interior of the vehicle. Push the harness
through the bulkhead grommet into the interior compartment.
- Connect the following interior electrical connectors:
- Install the knee bolster. Refer to
Knee Bolster Replacement
in Instrument Panel, Gauges and Console.
- Install fuse and relay block 3 to the front support. Secure
with the 2 bolts.
- Install fuse and relay block 2 to the inner fender. Secure
with the 1 bolt.
- Install fuse and relay block 1 to the vehicle.
- Connect each of the harness connectors.
- Install the lower cover.
- Install fuse and relay block 1 to the inner fender. Secure
with the 2 bolts.
- Connect the following underhood electrical connectors:
| • | The SIR left front discriminating sensor |
| • | The brake pressure modulating valve (BPMV) |
| • | The brake fluid level switch |
| • | The left front wheel speed sensor |
| • | The left turn/park lamp |
| • | The right turn/park lamp |
| • | The A/C refrigerant pressure switch |
| • | The ambient air temperature sensor |
| • | The auxiliary fan motor |
| • | The windshield washer pump |
- Install the air cleaner assembly. Refer to
Air Cleaner Assembly Replacement
in Engine Controls.
- Install the positive (+) battery cable to the fuse and relay block 1
feed cable. Install the nut.
- Enable the SIR system. Refer to
Enabling the SIR System
in Restraints.
- Install the battery. Refer to
Battery Replacement
.
