For 1990-2009 cars only
Removal Procedure
- Disconnect the negative battery cable.
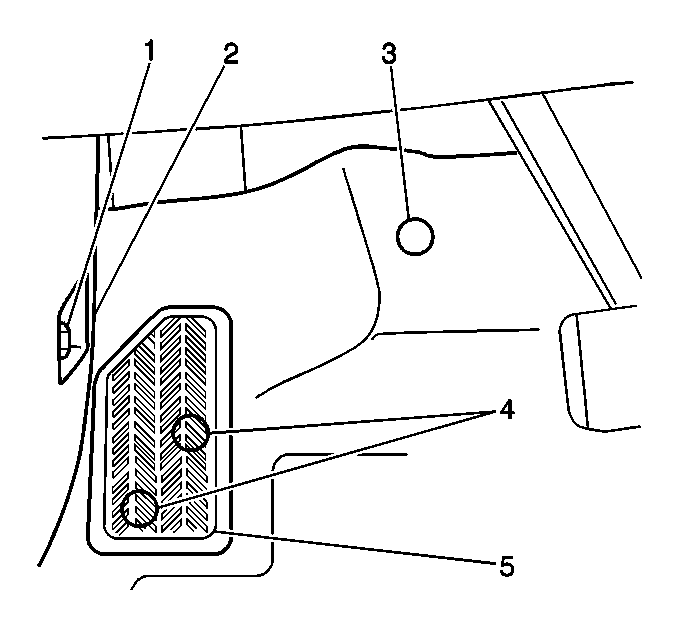
- Remove the LH kick panel nut (1) and the LH kick panel (2).
- Remove the 2 screws and disconnect the hood release lever from the knee bolster.
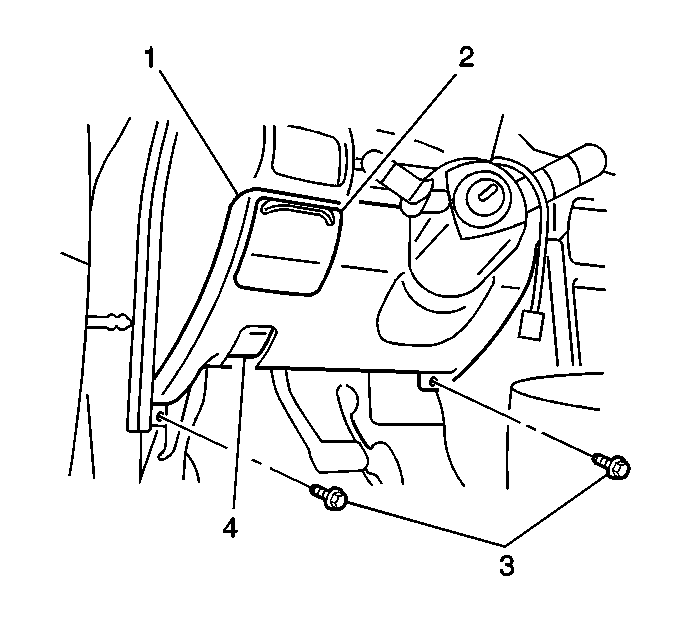
- Remove the 2 bolts (3) that secure the knee bolster trim panel (1). Position the trim panel as necessary to gain access to the knee bolster.
- Remove the 2 bolts and the knee bolster.
- Remove the LH ventilation duct.
- Remove the following components:
- Disconnect the brake light switch electrical connector.
- Remove the brake pedal bracket front bolt.
- Remove the brake pedal bracket mounting nuts.
- Remove the brake pedal and the bracket assembly.
- Remove the brake pedal shaft bolt and nut.
- Remove the brake pedal (3) from the bracket.
- Remove the brake pedal bushings.
- Remove the cover to the brake pedal.
Caution: Unless directed otherwise, the ignition and start switch must be in the OFF or LOCK position, and all electrical loads must be OFF before servicing any electrical component. Disconnect the negative battery cable to prevent an electrical spark should a tool or equipment come in contact with an exposed electrical terminal. Failure to follow these precautions may result in personal injury and/or damage to the vehicle or its components.
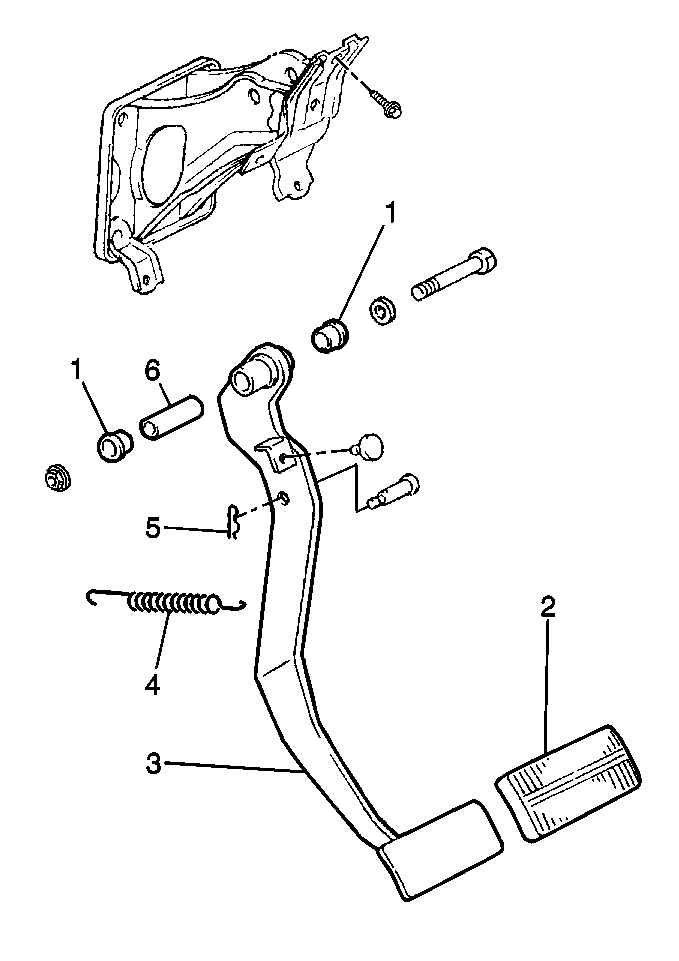
| • | The brake pedal return spring |
| • | The R-clip |
| • | The clevis pin |
| • | The wave washer |
Installation Procedure
- Install the cover to the brake pedal (3).
- Lubricate the brake pedal bushings using Lubriplate lubricant, GM P/N 12346293 (or equivalent). Use a lubricant that meets the requirements of NLGI 2 Category LB or GC-LB.
- Install the brake pedal bushings to the brake pedal.
- Install the brake pedal to the bracket. Secure with the brake pedal shaft bolt and nut.
- Install the brake pedal and bracket assembly to the vehicle. Secure with the brake pedal bracket mounting nuts.
- Install the brake pedal bracket front bolt.
- Connect the brake light switch electrical connector.
- Install the following components:
- Install the LH ventilation duct.
- Install the knee bolster. Secure with 2 bolts.
- Install the knee bolster trim panel (1). Secure with 2 bolts (3).
- Connect the hood release lever. Secure with 2 screws.
- Install the LH kick panel (2). Secure with 1 nut (1).
- Inspect the Brake Pedal Travel. Refer to Brake Pedal Travel
- Connect the negative battery cable.
Tighten
Tighten the bolt and the nut to 20 N·m (14.75 lb in).
Tighten
Tighten the nuts to 10 N·m (89 lb in).
Tighten
Tighten the bolt to 20 N·m (14.75 lb ft).
| • | The wave washer |
| • | The clevis pin |
| • | The R-clip |
| • | The brake pedal return spring |
Tighten
Tighten the bolts to 10 N·m (89 lb in).
Tighten
Tighten the bolts to 10 N·m (89 lb in).
Tighten
Tighten the nut to 5.4 N·m (48 lb in).
