Step
| Action
| Yes
| No
|
DEFINITION:
The V5 compressor is a variable displacement compressor which matches air conditioning
demand by changing the stroke rather than cycling the clutch. A control valve is
located in the rear head of the compressor. The control valve senses the compressor
low side pressure and causes the compressor mechanism to change stroke.
During extended periods of shutdown, liquid refrigerant collects in the compressor
crankcase. This is normal. The cooling action may be delayed for up to 2 minutes
until the refrigerant is pumped from the compressor crankcase.
Because the V5 compressor always runs and the system does not cycle, these
diagnostic procedures differ from those used for fixed displacement systems. Use
these procedures in order to avoid needlessly replacing A/C components.
Certain conditions which are normal to proper air conditioning system operation
may lead an owner to wrongly suspect a problem.
The air discharged from the air conditioning system may not feel as cold as
expected under conditions of high humidity. The reason is that the vaporized moisture
in humid air heats more effectively than dry air does, making the humid air harder
to cool.
In terms of overall comfort, however, the dryer dehumidified air coming from
the air conditioning system during hot, humid weather evaporates more moisture
on a person's skin, providing more of a cooling effect than might be felt from
cooler but more humid air.
This fact should be explained to an owner if no mechanical cause is found for
a persistent complaint of insufficient cooling.
|
1
| Did you perform the System Performance Test?
| Go to
Step 2
| Go to System Performance Test
|
2
|
- Inspect the A/C fuse for an open.
- Inspect the compressor clutch connector for an open or a poor connection.
Is the repair complete?
| Go to System Performance Test
| Go to
Step 3
|
3
|
- Inspect the temperature cable operation.
- Move the temperature control rapidly from the coldest to the hottest
position.
- Listen for the door hitting at each end.
- Repair as necessary. Refer to Temperature Control Cable
Adjustment
.
Is the repair complete?
| Go to System Performance Test
| Go to
Step 4
|
4
| Inspect the blower motor for proper operation. Refer to HVAC System Check.
Is the repair complete?
| Go to System Performance Test
| Go to
Step 5
|
5
| Inspect the cooling fan system for proper operation. Refer to HVAC System
Check.
Is the repair complete?
| Go to System Performance Test
| Go to
Step 6
|
6
|
- Inspect the condenser for restricted air flow.
- Clean and/or repair the condenser as necessary. Refer to Condenser Replacement
.
Is the repair complete?
| Go to System Performance Test
| Go to
Step 7
|
7
| Inspect for a slipping, damaged or missing compressor drive belt. Refer to
Drive Belt Replacement
in Engine Mechanical.
Is the repair complete?
| Go to System Performance Test
| Go to
Step 8
|
8
|
- The ambient air temperature must be at least 16°C (60°F).
- The engine should be at operating temperature.
- Ensure that the R-134a manifold gauge set is properly calibrated.
- Connect the High and Low side pressure gauges to the service ports on
the vehicle.
- Both pressures should be almost equal to each other.
Are both pressures 345 kPa (50 psi) or higher?
| Go to
Step 10
| Go to
Step 9
|
9
|
- Leak test the system. Refer to Leak Testing
.
- Add 0.45 kg (1.0 lb) of refrigerant if necessary.
- Evacuate and recharge the system. Refer to Refrigerant
Recovery and Recharging
.
Is the repair complete?
| Go to System Performance Test
| --
|
10
|
- Run the engine at idle.
- Set the air mode to the FRESH position.
- Set the blower speed to HIGH.
- Set the temperature control to the coldest position.
- Depress the A/C switch to the ON position.
Does the compressor clutch engage?
| Go to
Step 11
| Go to
HVAC Compressor Clutch Does Not Engage
|
11
| Inspect the system for the following conditions:
| • | The A/C lines vibrating against other components. Reposition, repair
or insulate the A/C lines as necessary. |
| • | A loud knocking or moaning noise from the compressor, refer to Noise Diagnosis - A/C System
. Cycle the compressor ON
and OFF in order to verify the source of the noise. |
Is there noise from the compressor?
| Go to
Step 12
| Go to
Step 13
|
12
| Repair or replace the compressor. Refer to the following:
| • | Compressor Clutch Plate and Hub Assembly Removal (V5
- Direct Mount) |
| • | Compressor Clutch Plate/Hub Assembly Install (V5 -
Direct Mount) |
Is the repair complete?
| Go to System Performance Test
| --
|
13
|
Important: This test is designed for typical garage
conditions: 21-32°C (70-90°F) and no sun load. Normal discharge
air temperature is typically at least 7°C (20°F) cooler than ambient temperature.
This test is designed to create enough cooling load to cause the V5 to operate at
full stroke. This procedure must be followed exactly for accurate test results.
- The ambient air temperature must be at least 16°C (60°F).
- Close all vehicle doors and windows.
- Set the air mode to the FRESH position.
- Set the blower speed to High.
- Set the temperature control to the coldest position.
- Depress the A/C switch to the ON position.
- Run the engine at idle for 5 minutes.
- Feel the liquid line on both sides of the orifice tube.
Is there a noticeable temperature difference?
| Go to
Step 15
| Go to
Step 14
|
14
|
- Recover the refrigerant. Refer to Refrigerant Recovery
and Recharging
.
- Inspect for a missing or damaged expansion (orifice) tube or O-ring.
Refer to Expansion (Orifice) Tube Replacement
.
Is the repair complete?
| Go to System Performance Test
| --
|
15
|
Important: Humidity and temperature variables can create
borderline diagnostic conditions and increase the pressure range of a normally operating
system. If possible, test a known good system in order to determine if the pressures
are normal for the climatic conditions encountered.
- Operate the A/C system for 5 minutes or more.
- Record the High and Low side pressures while the cooling fans are running.
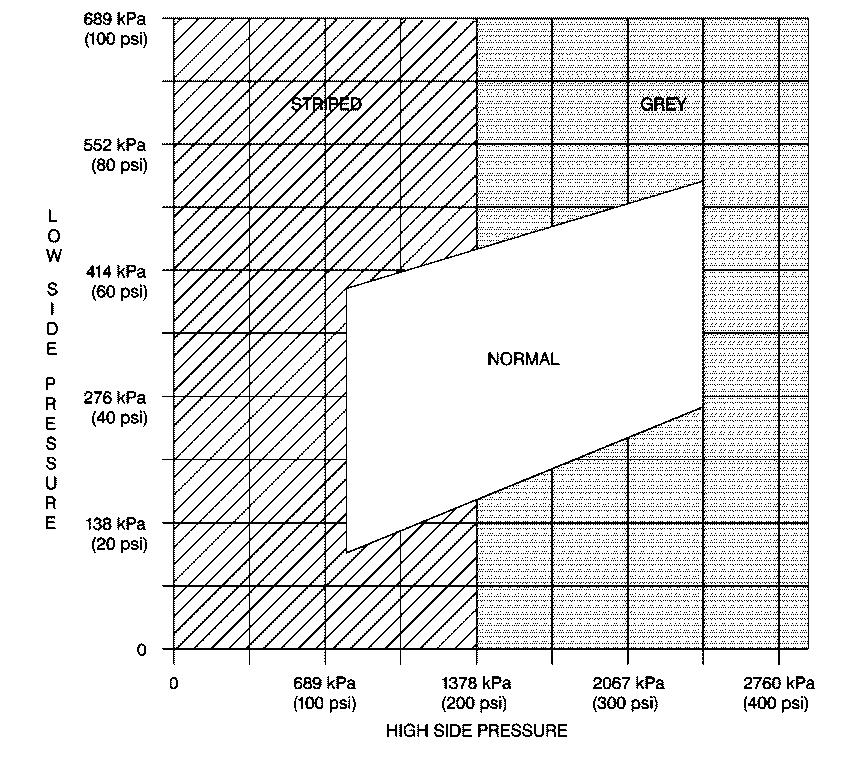
- Locate the intersection of the High and Low side pressures on the diagnostic
table.
Do the pressures intersect in the grey side of the table?
| Go to
Step 16
| Go to
Step 19
|
16
|
- The A/C system is still operating.
- Close the vehicle doors and windows.
- Open the hood.
- The engine cooling fans must be running.
- Feel the liquid line between the condenser and the expansion (orifice)
tube. The line should feel warm to the touch.
Does the line feel cold?
| Go to
Step 18
| Go to
Step 17
|
17
| The refrigerant system is overcharged or there is air in the system. Evacuate
and recharge. Refer to Refrigerant Recovery and Recharging
and Leak Testing
.
Is the repair complete?
| Go to System Performance Test
| --
|
18
|
- Repair the restriction in the High side of the refrigerant system. Refer
to Leak Testing
and Refrigerant
Recovery and Recharging
.
- Visually inspect the line/pipe for a frost spot in order to locate the
restriction.
Is the repair complete?
| Go to System Performance Test
| --
|
19
| Do the pressures intersect in the striped side of the table?
| Go to
Step 20
| Go to
Step 28
|
20
| Are the compressor High and Low side pressures within 207 kPa (30 psi)
of each other?
| Go to
Step 21
| Go to
Step 23
|
21
|
- The ambient air temperature must be at least 16°C (60°F).
- Close all vehicle doors and windows.
- Set the air mode to the FRESH position.
- Set the blower speed to HIGH.
- Set the temperature control to the coldest position.
- Depress the A/C switch to the ON position.
- Run the engine at 3000 RPM.
- Cycle the A/C switch ON and OFF every 20 seconds for 3 minutes.
Are the compressor High and Low side pressures within 207 kPa (30 psi)
of each other?
| Go to
Step 22
| Go to
Step 13
|
22
|
- Inspect the compressor for seizure.
- Stop the engine.
- Disengage the compressor clutch.
- Rotate the compressor clutch driver, not the pulley, by hand.
Does the compressor clutch driver turn freely by hand?
| Go to Compressor Replacement
| Go to
Step 26
|
23
| Is the Low side pressure 172-241 kPa (25-35 psi)?
| Go to
Step 24
| Go to
Step 26
|
24
| The refrigerant is undercharged. Add 0.40 kg (14 oz)
of refrigerant.
Does the cooling performance improve?
| Go to
Step 9
| Go to
Step 25
|
25
|
- Discharge the system.
- Inspect for a plugged expansion (orifice) tube or a restriction in the
High side of the system.
- Clear the lines.
- If only light debris is present in the tube, clean the tube using compressed
air.
- Clean or replace the expansion (orifice) tube as necessary. Refer to Expansion (Orifice) Tube Replacement
.
Is the repair complete?
| Go to System Performance Test
| --
|
26
|
Important: This control valve test is designed to create
a low cooling load which causes the V5 to operate at less than full stroke. This
procedure must be followed exactly for accurate test results.
- Run the engine for 5 minutes at 2000 RPM.
- Set the blower speed to LOW.
- Set the temperature control to the coldest position.
- Set the fresh/recirc door to the RECIRC position.
- Depress the A/C switch to the ON position.
- Close the vehicle's windows and doors.
- Open the hood.
Is the Low side pressure 172-241 kPa (25-35 psi)?
| Go to
Step 13
| Go to
Step 27
|
27
| Replace the control valve. Refer to the following:
| • | Compressor Control Valve Assembly Removal (V5 -
Direct Mount) |
| • | Compressor Control Valve Assembly Install (V5 -
Direct Mount) |
Is the repair complete?
| Go to System Performance Test
| --
|
28
| The pressures intersect in the white (normal) side of the table. The refrigeration
system components are functioning properly. Inspect for restrictions or leakage
within the heater case. Refer to
Air Delivery Improper
.
Is the repair complete?
| Go to System Performance Test
| --
|
A/C System Reference Table
Symptom
| Possible Causes
|
High Side Pressure Above Specifications
|
| • | The refrigerant is overcharged. This may cause compressor noise. Discharge
and recharge the refrigeration system. Refer to Refrigerant Recovery
and Recharging
. |
| • | The expansion (orifice) tube is restricted. The Low side pressure may
be lower than normal. Remove and inspect the expansion (orifice) tube. Clean or
replace the expansion (orifice) tube. Refer to Expansion (Orifice)
Tube Replacement
. |
| • | There is a High side restriction. Feel along the liquid line before the
expansion (orifice) tube. A cold line indicates a high side restriction. Feel
the hoses/pipes for an abrupt temperature change indicating a restriction. Inspect
the High side hoses/pipes for a frost spot indicating a restriction. Repair as
necessary. |
| • | There is a cooling fan malfunction. Refer to HVAC
System Check
. |
| • | There is insufficient airflow across the condenser. |
| - | There is extremely high ambient humidity. |
| - | The condenser fins are dirty or bent. Clean or repair the condenser as
necessary. Refer to Condenser Replacement
. |
| • | The compressor is malfunctioning. Repair or replace the compressor as
necessary. Refer to Compressor Replacement
. |
|
High Side Pressure Below Specifications
|
| • | There is insufficient refrigerant or leakage. The suction line before
the accumulator may be warm if the charge is low. Leak test the system and recharge.
Refer to Leak Testing
and Refrigerant Recovery and Recharging
. |
| • | There is an expansion (orifice) tube malfunction. The expansion (orifice)
tube or the O-ring may be missing or damaged. Feel the liquid line after the expansion
(orifice) tube. If the line is warm, remove and inspect the expansion (orifice)
tube. Refer to Expansion (Orifice) Tube Replacement
. |
| • | There is insufficient compression from the compressor. If the suction
and discharge pressure are equal, and the pressures do not change when the A/C
is turned on and off, the compressor may be internally damaged. Inspect for a
free wheeling clutch driver. Repair or replace the compressor as necessary.
Refer to Compressor Replacement
. |
|
Low Side Pressure Above Specifications
|
| • | The refrigerant is overcharged. This may cause compressor noise. Discharge
and recharge the refrigeration system. Refer to Refrigerant Recovery
and Recharging
. |
| • | There is an expansion (orifice) tube malfunction. The expansion (orifice)
tube or the O-ring may be missing or damaged. Feel the liquid line after the expansion
(orifice) tube. If the line is warm, remove and inspect the expansion (orifice)
tube. Refer to Expansion (Orifice) Tube Replacement
. |
| • | There is a compressor malfunction. If the suction and discharge pressure
are equal, and the pressures do not change when the A/C is turned on and off,
the compressor may be internally damaged. Inspect for a free wheeling clutch driver.
Repair or replace the compressor as necessary. Refer to Compressor
Replacement
. |
|
Low Side Pressure Below Specifications
|
| • | There is insufficient refrigerant or leakage. Leak test the system and
recharge. Refer to Leak Testing
and Refrigerant Recovery and Recharging
. |
| • | The expansion (orifice) tube is restricted. Remove and inspect the expansion
(orifice) tube. Clean or replace the expansion (orifice) tube. Refer to Expansion (Orifice) Tube Replacement
. |
| • | There is a hose/pipe restriction. Inspect the low side hoses/pipes for
a frost spot indicating restriction. Feel along the hoses/pipes for an abrupt
temperature change. Repair as necessary. |
| • | There is a kink in the low side hoses/pipes. |
| • | The suction screen is clogged. |
|
Center Air Outlet Temperature Above Specifications
|
| • | The refrigerant system is improperly charged. Discharge and recharge
the refrigeration system. Refer to Refrigerant Recovery and Recharging
. |
| • | The evaporator fins are dirty or bent. Clean or repair the evaporator.
Refer to Evaporator Core Replacement
. |
| • | The temperature control door is malfunctioning. Refer to Temperature Control Cable Adjustment
. |
| • | The compressor is malfunctioning. Repair or replace the compressor as
necessary. Refer to Compressor Replacement
. |
|
Center Air Outlet Temperature Below Specifications
| There is a blower malfunction causing insufficient air volume. Refer to HVAC System Check
.
|