Accelerator Control Cable Replacement w/o Cruise
Removal Procedure
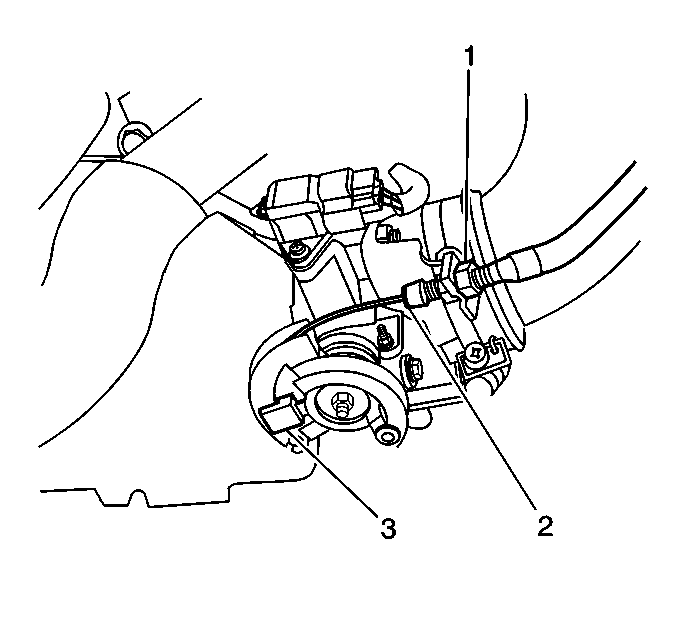
- Loosen the cable adjusting locknuts (1).
- Remove the accelerator cable from the bracket.
- Disconnect the accelerator cable from the throttle lever (3). Opening the throttle lever by hand will aide in the accelerator cable removal.
- Disconnect the accelerator cable from the accelerator pedal.
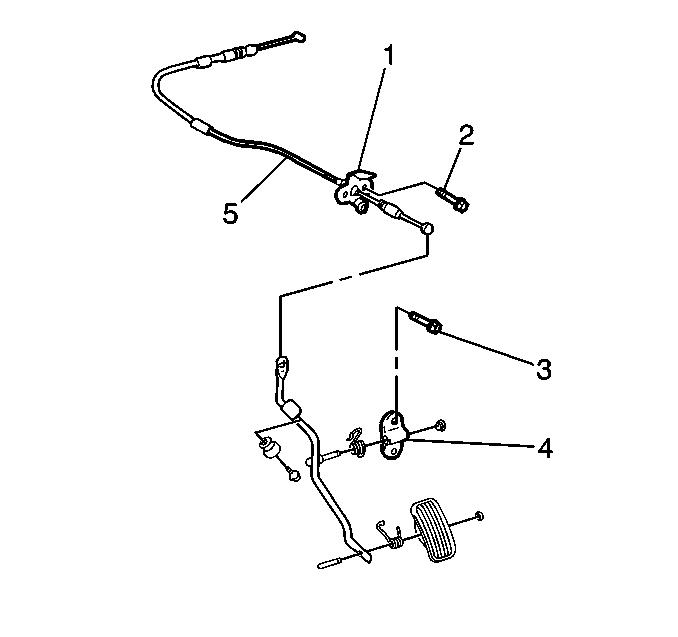
- Disconnect the 2 bolts (2) and accelerator cable (5) and the bracket (1) at the bulkhead
- Disconnect the accelerator control cable (5) from the vehicle.


Installation Procedure
- Install the accelerator cable (5) and the bracket (1) to the bulkhead.
- Secure with the 2 bolts (2).
- Connect the accelerator cable to the accelerator pedal.
- Connect the accelerator cable (2) to the throttle lever (3). Opening the throttle lever by hand will aide in the accelerator cable installation.
- Connect the accelerator cable to the accelerator cable bracket.
- Secure with the 2 nuts (1).

Notice: Use the correct fastener in the correct location. Replacement fasteners must be the correct part number for that application. Fasteners requiring replacement or fasteners requiring the use of thread locking compound or sealant are identified in the service procedure. Do not use paints, lubricants, or corrosion inhibitors on fasteners or fastener joint surfaces unless specified. These coatings affect fastener torque and joint clamping force and may damage the fastener. Use the correct tightening sequence and specifications when installing fasteners in order to avoid damage to parts and systems.
Tighten
Tighten the bolts to 15 N·m (11 lb ft).

Tighten
Tighten the locknuts to 8 N·m (71 lb in).
Accelerator Control Cable Replacement Cruise Actuator to Throttle
Removal Procedure
- Loosen the cable adjusting locknuts (1).
- Remove the accelerator throttle cable from the bracket.
- Disconnect the accelerator cable from the throttle lever (3).
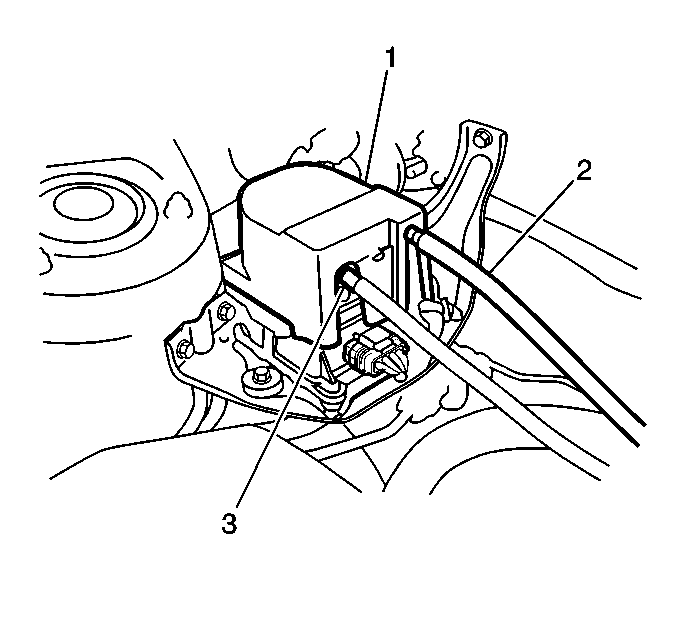
- Remove the cruise control actuator cover (1) by applying a slight outward pressure to both sides at the base of the cover.
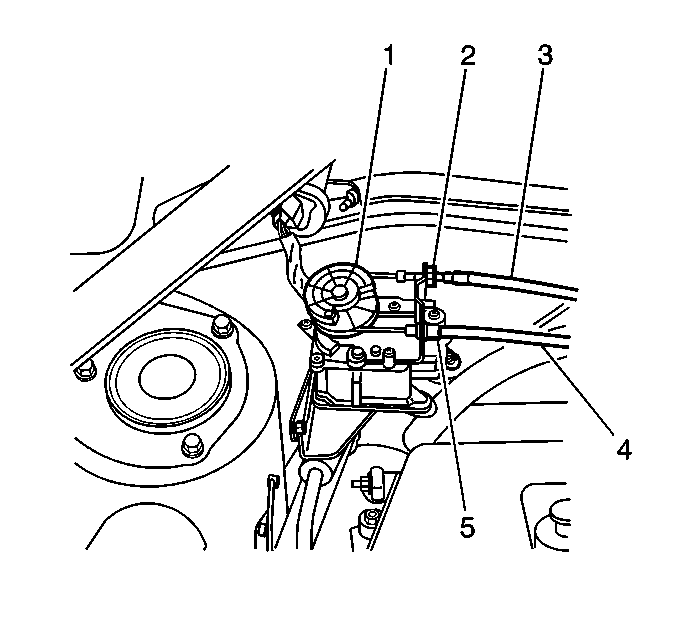
- Remove the cable attaching screw (5).
- Remove the accelerator throttle cable (4) from the bracket.
- Disconnect the accelerator throttle cable (4) from the actuator lever (1).
- Remove the accelerator throttle cable from the cable guide clip.

Opening the throttle lever by hand will aide in the accelerator cable removal.


Installation Procedure
- Connect the accelerator throttle cable (4) to the actuator lever (1).
- Install the accelerator throttle cable (4) into the bracket.
- Secure with one screw.
- Install the cruise control actuator cover (1) by applying slight downward pressure to the cover.
- Connect the accelerator throttle cable (2) to the throttle lever (3). Opening the throttle lever by hand will aide in the accelerator throttle cable installation.
- Connect the accelerator throttle cable to the accelerator cable bracket.
- Connect the accelerator throttle cable to the cable guide clip.
- Adjust the cable adjusting locknuts to allow slight freedom of movement between the accelerator cable and the throttle lever.
- Secure with the 2 nuts (1).

Notice: Use the correct fastener in the correct location. Replacement fasteners must be the correct part number for that application. Fasteners requiring replacement or fasteners requiring the use of thread locking compound or sealant are identified in the service procedure. Do not use paints, lubricants, or corrosion inhibitors on fasteners or fastener joint surfaces unless specified. These coatings affect fastener torque and joint clamping force and may damage the fastener. Use the correct tightening sequence and specifications when installing fasteners in order to avoid damage to parts and systems.
Tighten
Tighten the cable screw (5) to 2 N·m (18 lb in).


Tighten
Tighten the adjusting locknuts to 8 N·m (71 lb in).
Accelerator Control Cable Replacement Cruise Actuator to Pedal
Removal Procedure
- Remove the cruise control actuator cover (1) by applying a slight outward pressure to both sides at the base of the cover.
- Loosen the cable adjusting lock nuts (2).
- Remove the accelerator pedal cable from the bracket.
- Disconnect the accelerator pedal cable from the actuator lever (1). Rotating the actuator lever by hand will aide in the accelerator pedal cable removal.
- Remove the accelerator pedal cable from the cable guide clip.
- Disconnect the accelerator cable from the accelerator pedal.
- Disconnect the 2 bolts (2) and the accelerator cable (5) and the bracket (1) at the bulkhead.
- Remove the accelerator cable (5) from the vehicle.


Installation Procedure
- Install the accelerator pedal cable (5) and the bracket (1) to bulkhead.
- Secure with the 2 bolts (2).
- Connect the accelerator pedal cable to the accelerator pedal.
- Connect the accelerator pedal cable (3) to the actuator lever (1). Rotating the actuator lever (1) by hand will aide in accelerator pedal cable installation.
- Connect the accelerator pedal cable to the cable guide clip.
- Install the accelerator pedal cable (3) into the bracket.
- Adjust the cable adjusting locknuts to allow slight freedom of movement between the accelerator pedal cable and the actuator lever.
- Secure the cable adjustment with the 2 cable adjusting locknuts (2).

Notice: Use the correct fastener in the correct location. Replacement fasteners must be the correct part number for that application. Fasteners requiring replacement or fasteners requiring the use of thread locking compound or sealant are identified in the service procedure. Do not use paints, lubricants, or corrosion inhibitors on fasteners or fastener joint surfaces unless specified. These coatings affect fastener torque and joint clamping force and may damage the fastener. Use the correct tightening sequence and specifications when installing fasteners in order to avoid damage to parts and systems.
Tighten
Tighten the bolts to 15 N·m (11 lb ft).

Tighten
Tighten the locknuts to 8 N·m (71 lb in).
