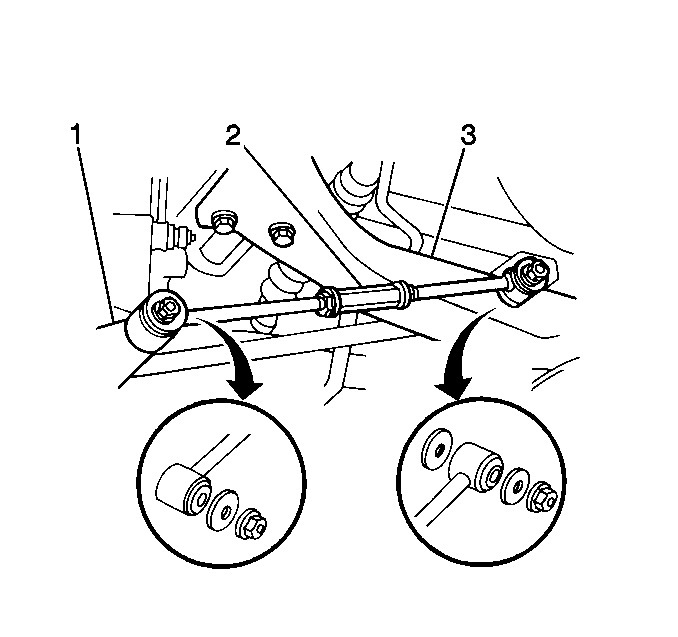
Removal Procedure
Important: The gas tank and the rear suspension trailing arms interfere with the
access to the rear suspension front lower control arm bolts. In order to remove
the rear suspension front lower arm, separate the trailing arm from the knuckle,
and lower the rear suspension crossmember. Refer to
Crossmember Replacement
. In order to remove the rear suspension
rear lower control arm, continue with this procedure.
- Raise and support the vehicle. Refer to
Lifting and Jacking the Vehicle
in General Information.

- Remove the following components
in order to remove the rear suspension rear lower control arm (2):
| • | The rear suspension rear lower control arm |
- Use paint in order to place match marks on the following components:
| • | The inner rear control arm end |
| • | The rear control arm adjuster |
| • | The outer rear control arm end |
- Loosen the 2 lock nuts.
- Separate the following components:
| • | The inner rear control arm end |
| • | The rear control arm adjuster |
| • | The outer rear control arm end |
Installation Procedure
Important: In order to install the rear suspension front lower control arm, refer
to
Crossmember Replacement
. In order
to install the rear suspension rear lower control arm, continue with this
procedure.
- If you are replacing the rear suspension rear lower control arm, use
paint in order to place match marks on the new rear lower control arm in the
same locations as on the old rear lower control arm.
- Connect the following components, aligning the match marks:
| • | The inner rear control arm end |
| • | The rear control arm adjuster |
| • | The outer rear control arm end |

Important: The weight of the vehicle must be on the tires and wheels before tightening
the nuts or the bolts.
- Install the rear suspension rear lower control arm (2) to the
rear suspension crossmember using 3 washers.
Secure the rear suspension rear lower control arm with 2 nuts.
- Lower the vehicle.
- Move the vehicle to a drive-on lift or an alignment rack.
- Stabilize the suspension by bouncing the vehicle up and down several
times in order to allow the suspension to settle.
Notice: Use the correct fastener in the correct location. Replacement fasteners
must be the correct part number for that application. Fasteners requiring
replacement or fasteners requiring the use of thread locking compound or sealant
are identified in the service procedure. Do not use paints, lubricants, or
corrosion inhibitors on fasteners or fastener joint surfaces unless specified.
These coatings affect fastener torque and joint clamping force and may damage
the fastener. Use the correct tightening sequence and specifications when
installing fasteners in order to avoid damage to parts and systems.
- Tighten the rear
suspension control arm nuts and bolts.
Tighten
Tighten the nuts and the bolts to 125 N·m (89 lb ft).
- Measure the rear wheel alignment. Adjust as necessary. Refer to
Wheel Alignment Measurement
in Wheel Alignment.
- Remove the vehicle from the alignment rack.


