Engine Cranks But Does Not Run 2.2L SFI
Refer to
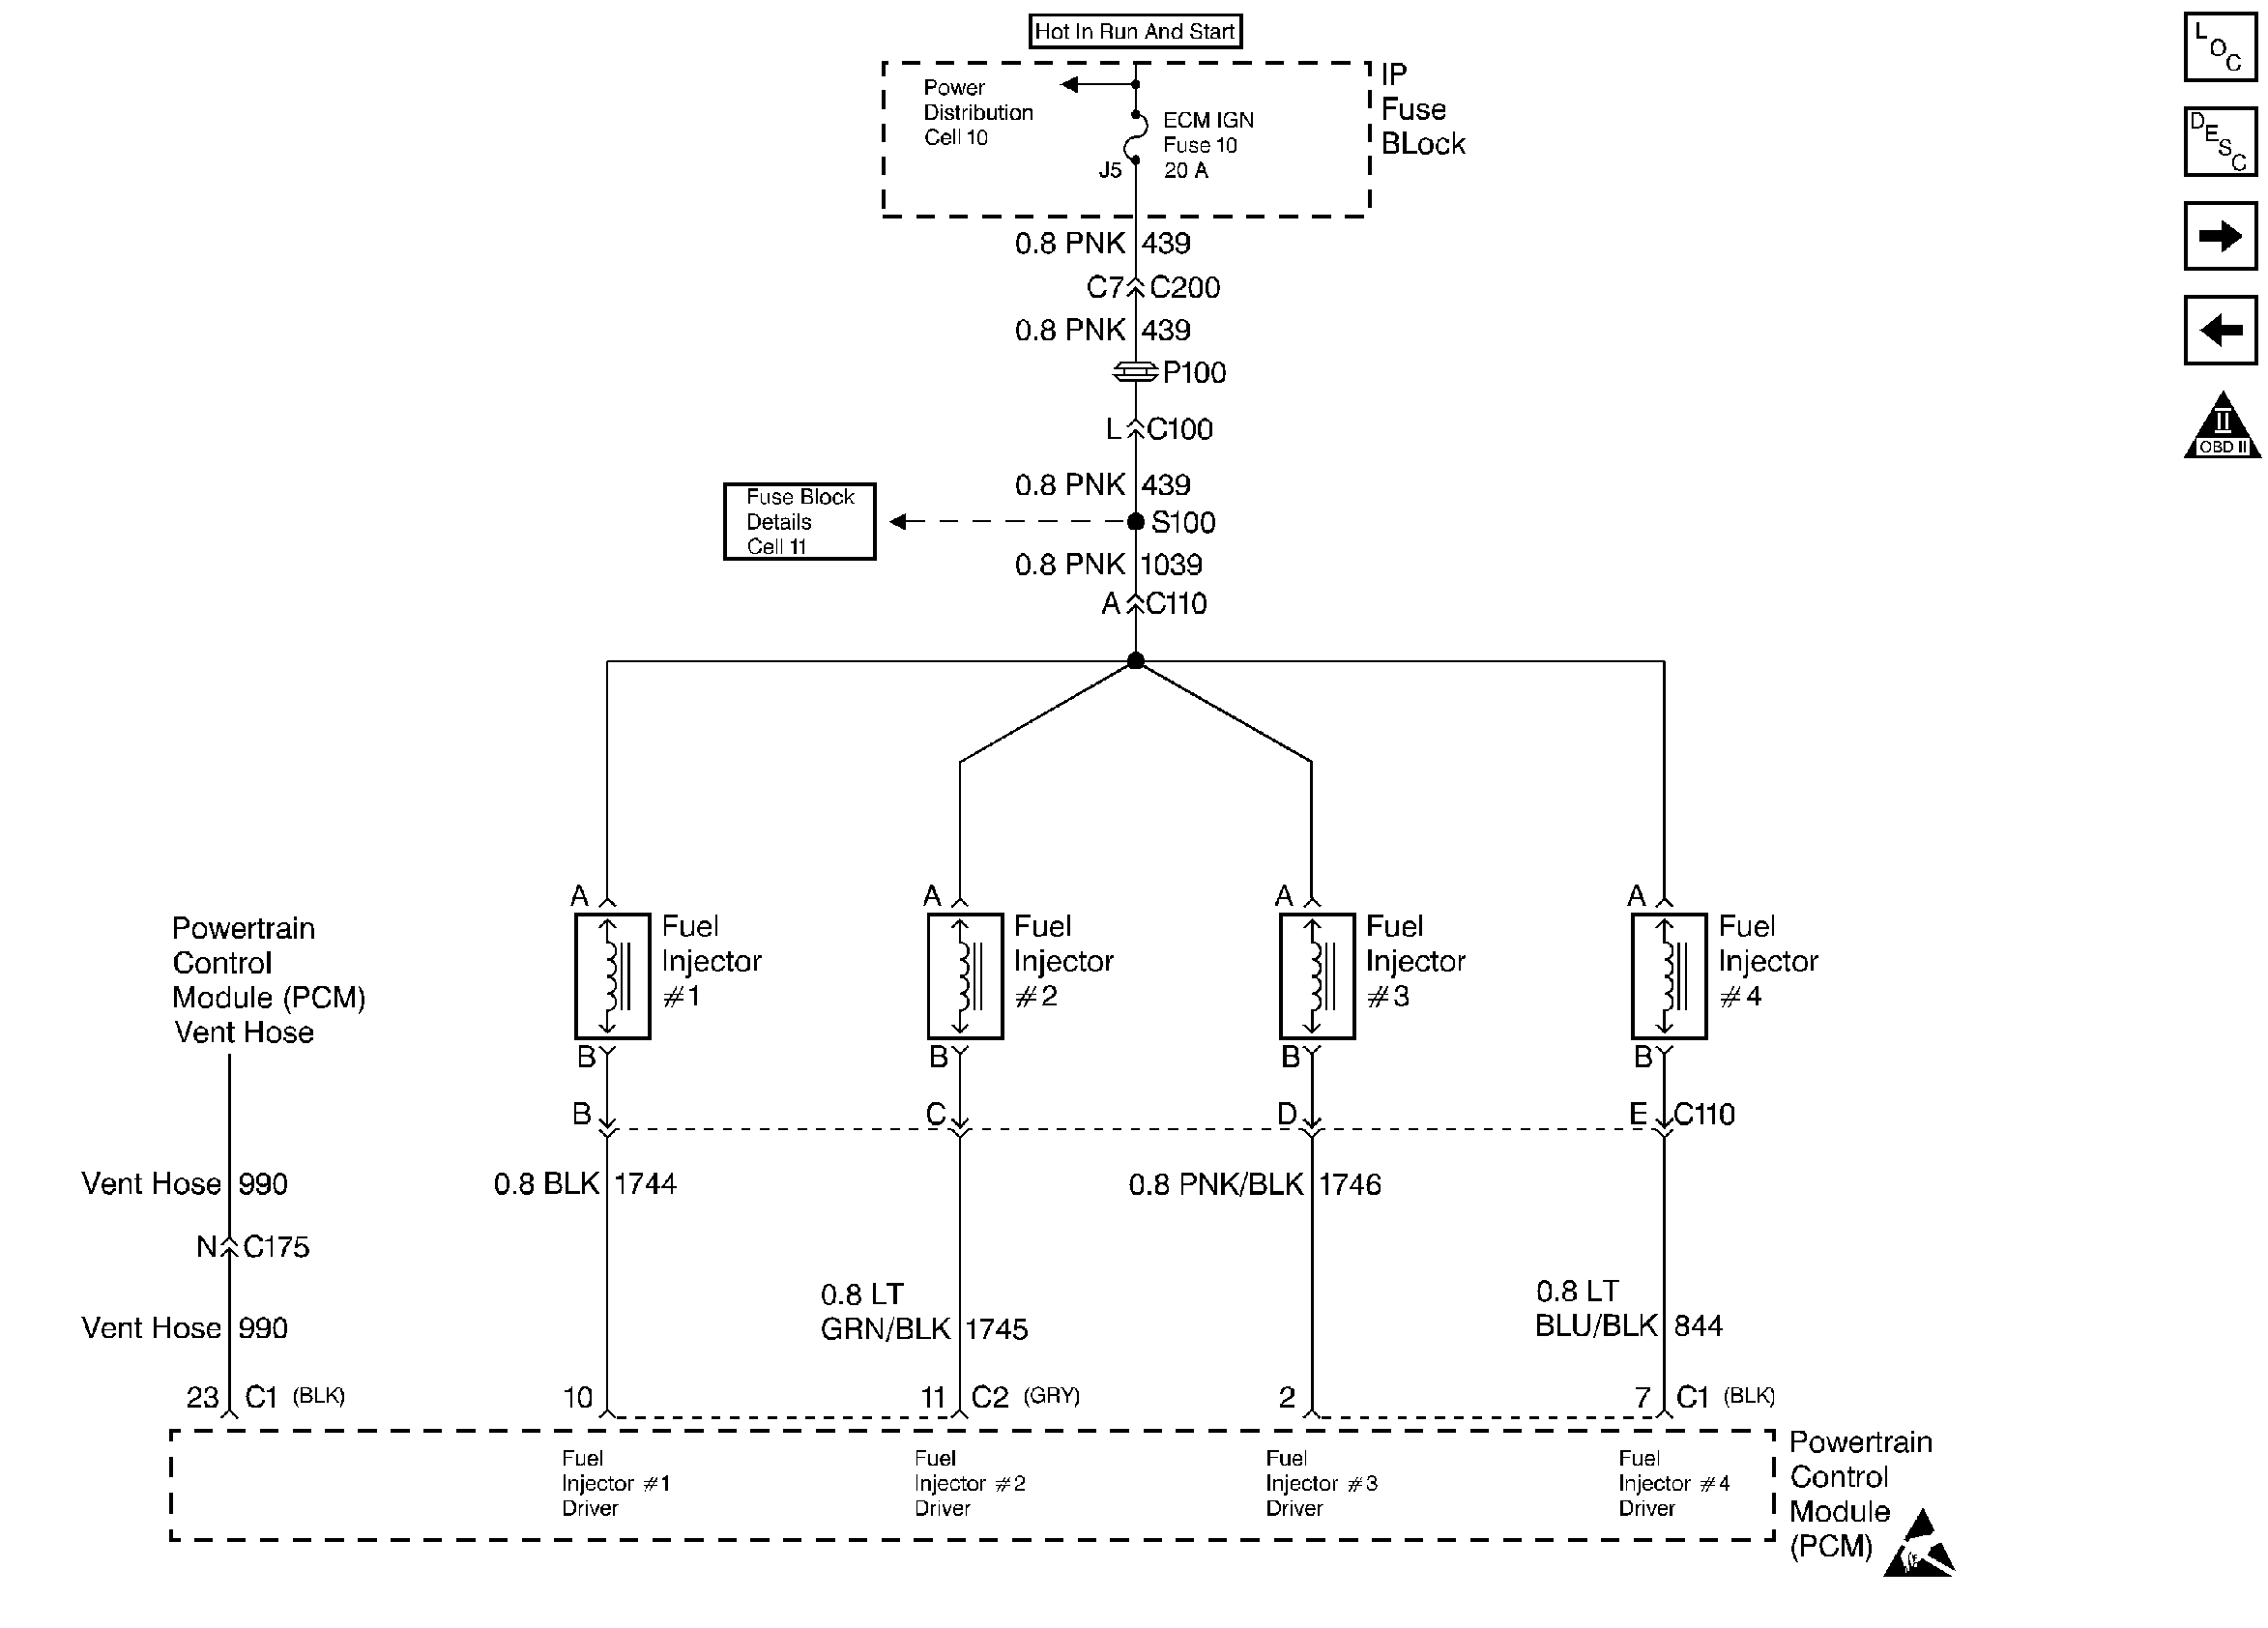
Fuel Injectors

.
Refer to
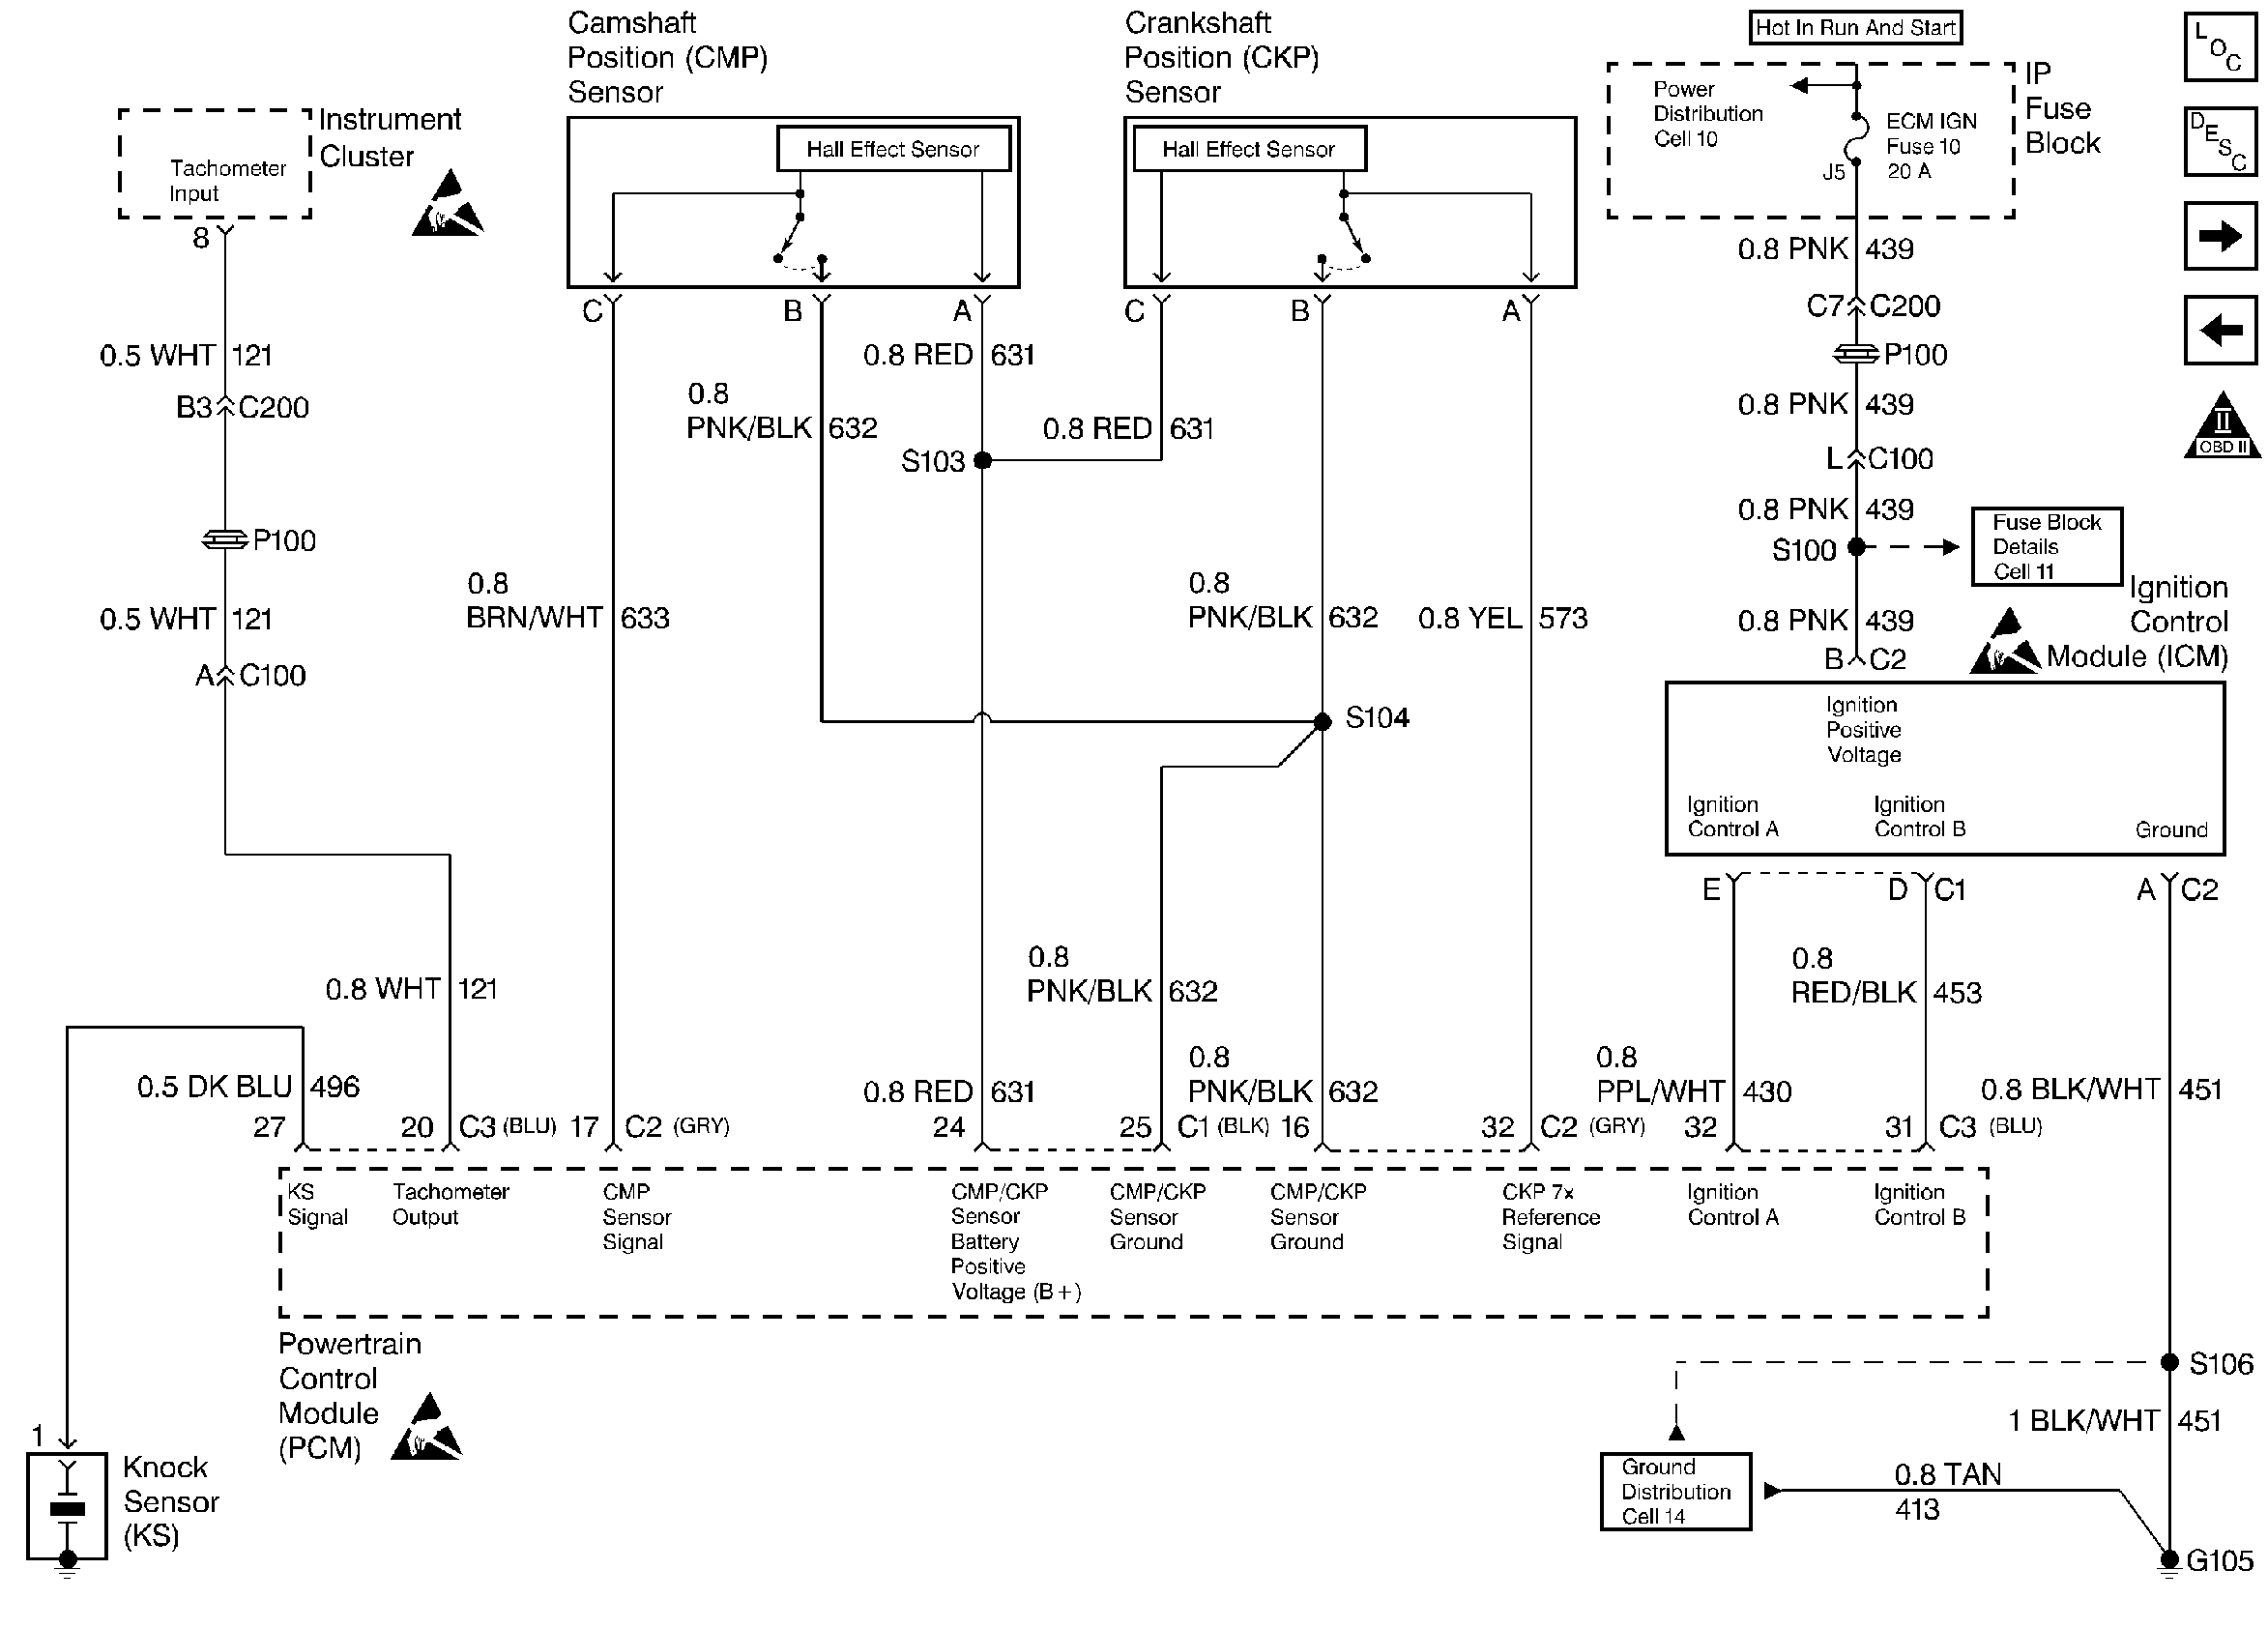
Ignition System

.
Circuit Description
This engine is equipped with a distributorless ignition system called the Electronic Ignition (EI) system. The primary circuit of the EI system consists of 2 separate ignition coils, an electronic Ignition Control Module (ICM) and a Crankshaft Position (CKP) sensor as well as the related connecting wires and the Ignition Control (IC) portion of the PCM. Each secondary circuit consists of the secondary winding of the coil, 2 connecting metal strips molded into the coil housing, the spark plug boot/connector assemblies and the spark plugs.
Important: The Camshaft Position (CMP) Sensor is only used for a misfire detection and is not part of the ignition system.
Diagnostic Aids
Check for the following conditions:
| • | The Throttle Position (TP) sensor binding or sticking in wide open throttle position |
| • | The Throttle Position (TP) sensor for a shorted or open circuit |
| • | Water or foreign material in the fuel |
| • | Low compression (timing chain failure) |
| • | A slow responding EGR Valve |
Test Description
The numbers below refer to the step numbers in the diagnostic table
-
The Powertrain OBD System Check prompts the technician to complete some basic checks and store the Freeze Frame Data and the Failure records on the scan tool if applicable. This creates an electronic copy of the data taken when the fault occurs. This information on the scan tool can be referred to later.
-
This verifies that the fuel injectors are receiving the proper voltage.
-
The PCM should turn ON the fuel pump for 2 to 3 seconds after the ignition is turned ON. Turn OFF the ignition for at least 10 seconds in order to assure that the PCM powers down. The PCM will then switch the fuel pump back ON. Whenever the fuel pump does not operate, use the Engine Cranks But Will Not Run (Fuel Pump Circuit) in order to diagnose the cause.
-
The battery voltage should be available at the terminal C of the CKP sensor harness, and the terminal B should be a good ground.
-
By grounding the test light to the terminal B and the B+, ensures the integrity of the ground circuit.
-
The CKP ACT. CNT should go to 256 counts, before starting back at 0. At this point, it is important that the reference CKP ACT. CNT is incrementing.
-
This verifies a frequency output from the PCM.
-
If the ignition control A and the ignition control B are shorted together, there will not be a frequency signal. This step determines if the ignition control A and the ignition control B are shorted together.
-
Thoroughly examine the CKP sensor connector. It should be free of corrosion and contaminants, and the pins should make proper contact.
-
This will verify if the open circuit is in the ICM or the circuit.
Step | Action | Value(s) | Yes | No |
|---|---|---|---|---|
Was the Powertrain On-Board Diagnostic (OBD) System Check performed? | -- | |||
2 | Inspect the PCM ground connection at the engine block. Is the ground connection clean and tight? | -- | ||
3 | Inspect the fuel pump/injector fuse and the ignition fuse. Are the fuses OK? | -- | ||
4 |
Does the TP sensor voltage read less than the specified value? | 1.0 V | ||
5 | Does the Engine Coolant Temperature Sensor and the Intake Air Temperature Sensor read close to each other? | -- | Go to DTC P0118 Engine Coolant Temperature (ECT) Sensor Circuit High Voltage | |
6 | Check the Manifold Absolute Pressure (MAP) sensor while cranking the engine. Does the MAP sensor voltage change while cranking the engine? | -- | ||
Did the test light flash ON and OFF on all the cylinders? | -- | |||
Is the fuel pressure within the specified value? | 284-325 kPa (41-47 psi) | System OK Refer to the Diagnostic Aids | ||
9 | Scan the CKP Act Cnt on the scan tool while cranking the engine. Does the CKP Act Cnt increment on the scan tool? | -- | ||
10 |
Is a spark observed on all of the cables? | -- | ||
Does the test lamp illuminate? | -- | |||
Does the test lamp illuminate? | -- | |||
Does the CKP Act Cnt increment? | -- | |||
Do both terminals D and E show a frequency between the specified value? | 1-10 Hz | |||
Is the voltage within the specified value? | B+ | |||
16 |
Did the test lamp illuminate on one or both terminals? | -- | ||
17 |
Did the test lamp illuminate on both terminals D and E? | -- | ||
18 |
Is the resistance within the specified value? | ∞ | ||
19 | If the injector test light failed to flash on all four cylinders, check for an open ignition feed circuit. Was a problem found? | -- | ||
20 |
Was a problem found? | -- | ||
21 | Check for an open or grounded circuit in the cylinder that did not flash the injector test light. Was a problem found? | -- | ||
22 | Repair the PCM ground connection. Refer to Wiring Repairs in Engine Electrical. Is the action complete? | -- | -- | |
Is the action complete? | -- | -- | ||
24 |
| -- | -- | |
25 | Check for a short or an open in the CKP sensor feed circuit. Was a problem found? | -- | ||
Replace the ignition coil for the effected cylinders that did not spark with a known good ignition coil. Did the engine start? | -- | |||
27 | Replace the Ignition Coil Module (ICM). Refer to the Ignition Control Module Replacement . Is the action complete? | -- | -- | |
28 |
Is the action complete? | -- | -- | |
29 | Replace the ignition coil circuit A or B. Refer to Wiring Repairs in Engine Electrical. Is the action complete? | -- | ||
30 |
Was a circuit repair necessary? | -- | ||
31 |
Is the action completed? | -- | -- | |
32 | Check for an open or a short in the CMP positive voltage circuit. Was a problem found? | -- | ||
33 |
Does the engine start and continue to run? | -- | ||
34 |
Are any DTCs displayed | -- | Go to The Applicable DTC Table | System OK |
Engine Cranks But Does Not Run Fuel Pump Circuit
Refer to
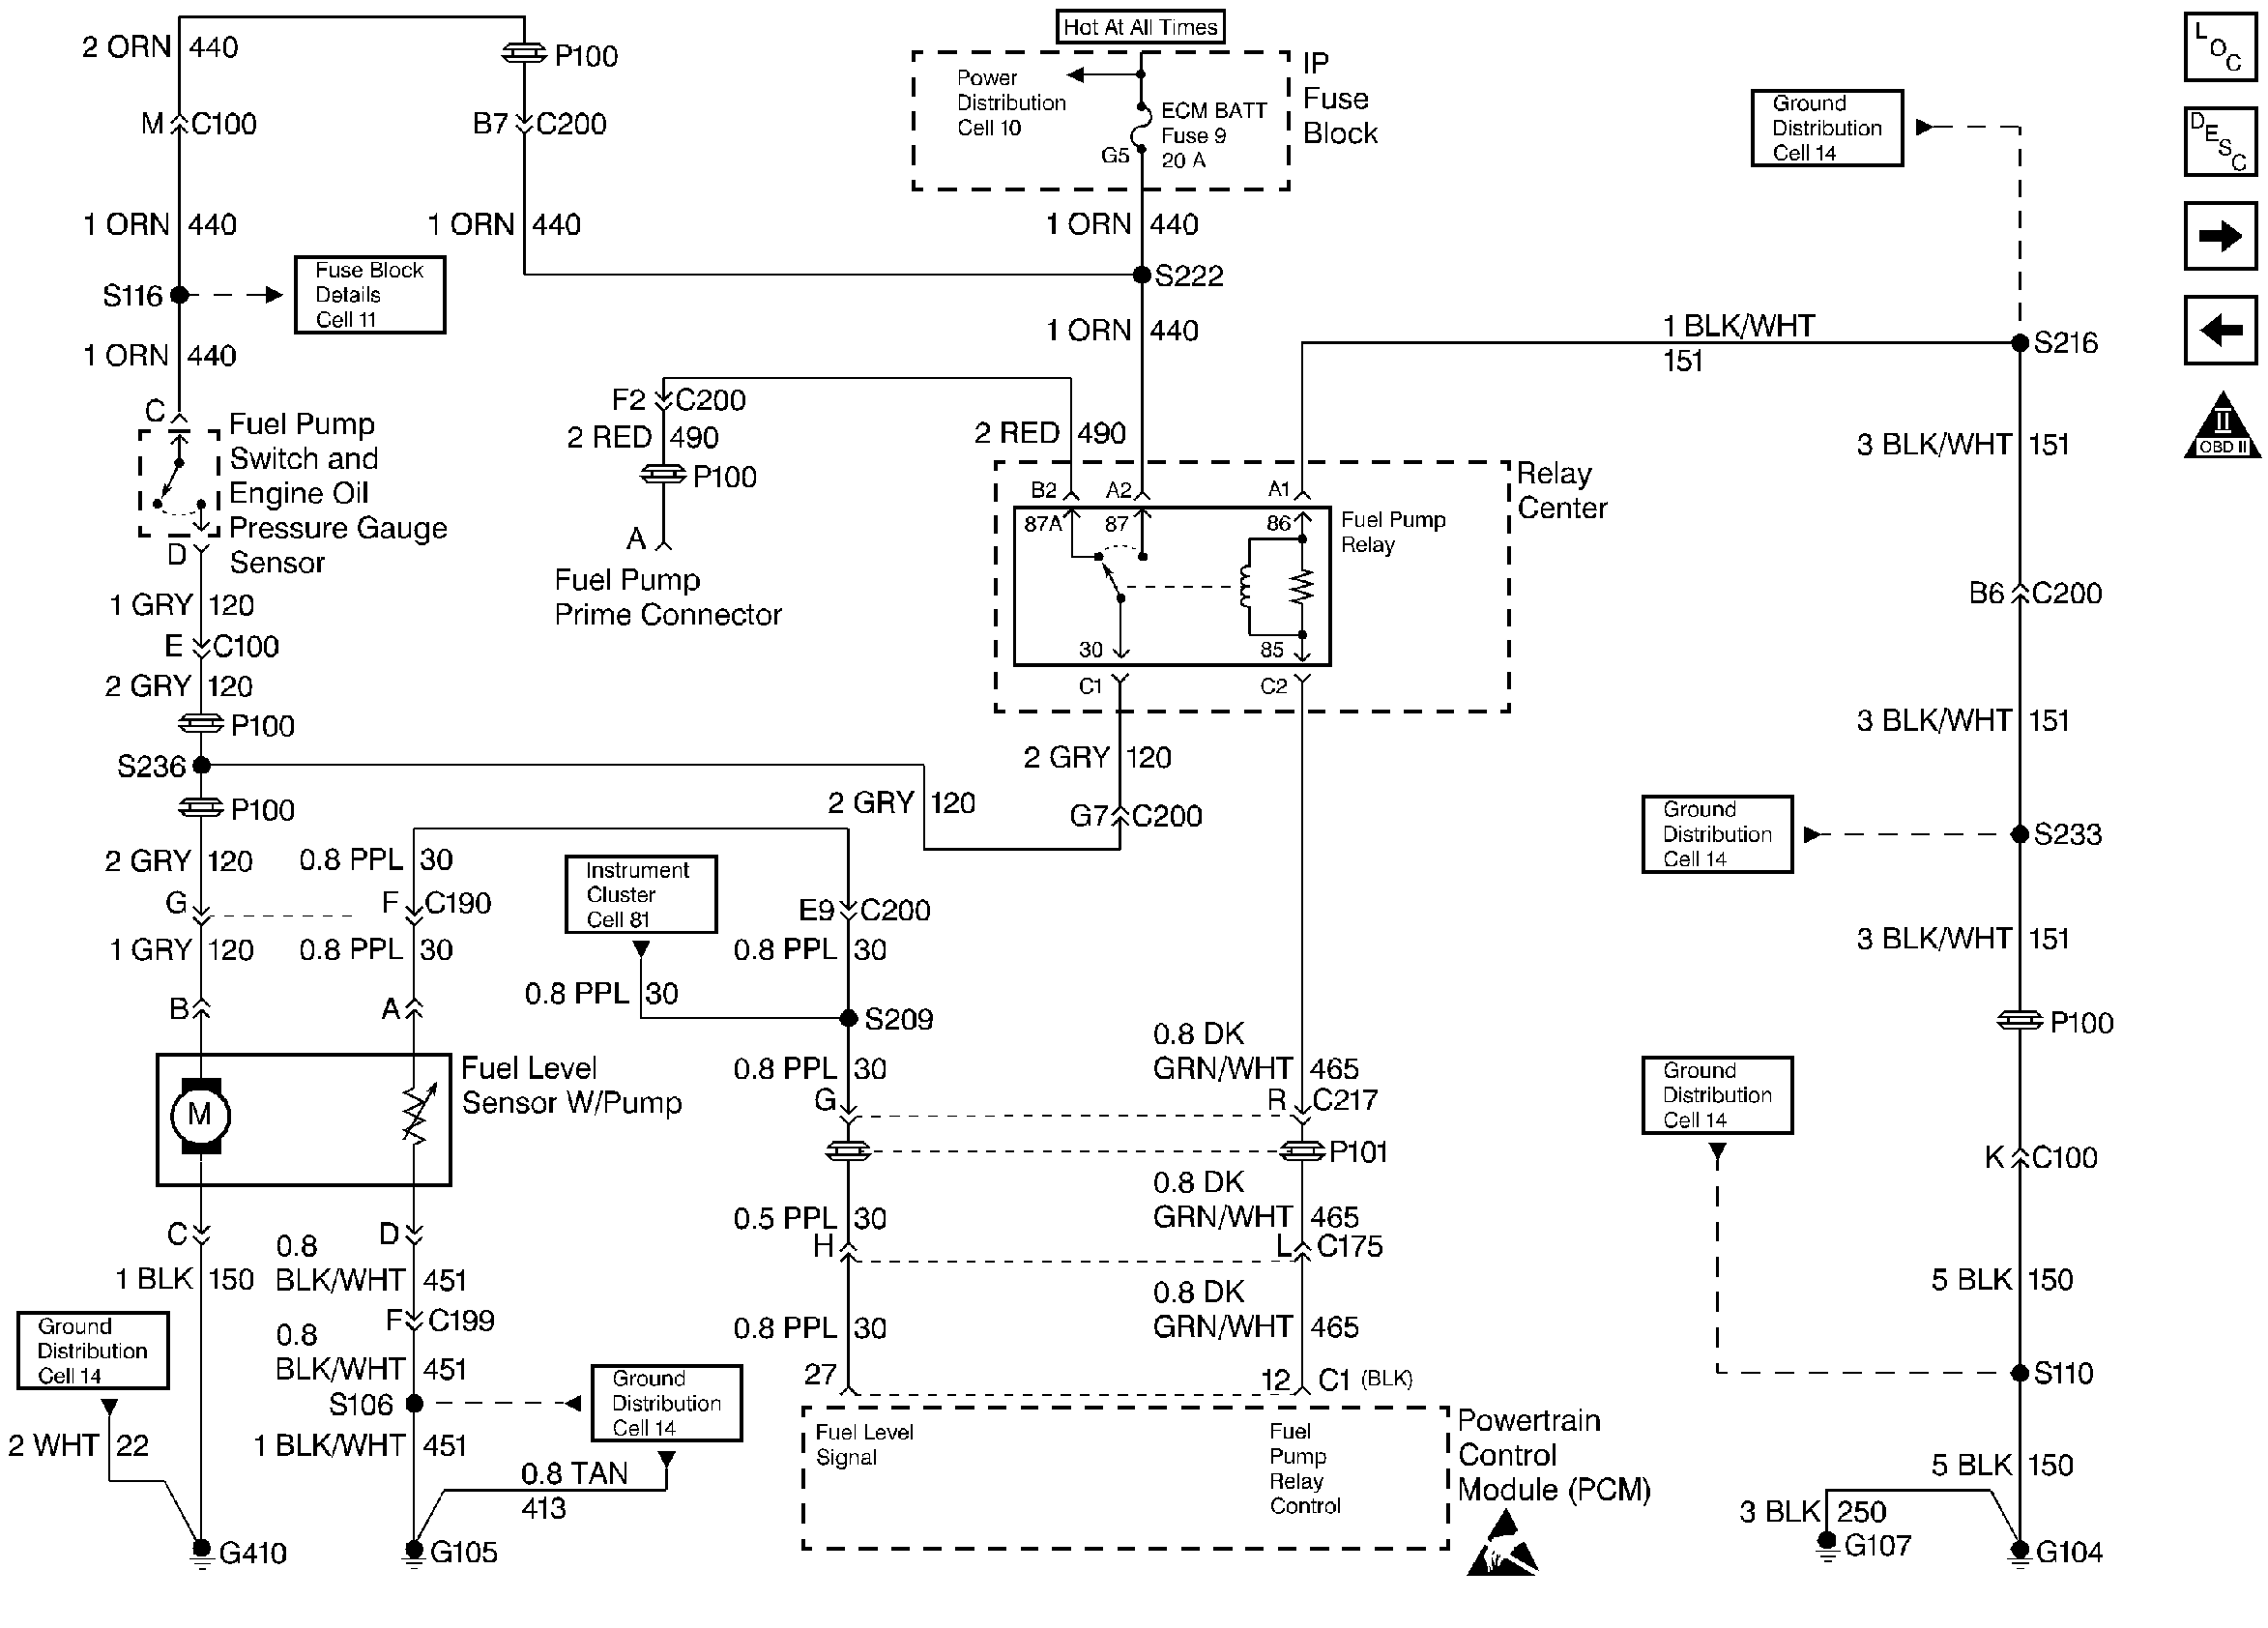
Fuel Pump Relay and Fuel Level Sensor

.
Circuit Description
When the ignition switch is turned on, the Powertrain Control Module (PCM) turns on the in-tank fuel pump. The in-tank fuel pump remains on as long as the PCM receives the ignition reference pulses from the Ignition Control Module (ICM). If there are no references pulses, the PCM will shut off the fuel pump about 2 to 3 seconds after the key on, or about 10 seconds after the reference pulses stop. Whenever sufficient oil pressure is present to close the oil pressure switch, the fuel pump will remain on during the cranking without the reference pulses.
The pump delivers fuel to the fuel rail and injectors, then to the pressure regulator, where the system pressure is controlled between 283-324 kPa (41-47 psi) with no manifold vacuum or between 214-303 kPa (31-44 psi) at idle. The excess fuel is then returned to the fuel tank.
Improper fuel system pressure may result in one or more of the following symptoms:
| • | Cranks but will not run |
| • | DTC P0171 |
| • | DTC P0172 |
| • | DTC P1171 |
| • | DTC P0300 |
| • | Cuts out, may feel like an ignition problem |
| • | Poor fuel economy |
| • | Loss of power |
| • | Hesitation |
Diagnostic Aids
A failed pump relay results in an extended engine crank time because of the time required to build enough oil pressure in order to close the oil pressure switch and turn on the fuel pump. There may be instances when the relay has failed but the engine will not crank fast enough in order to build enough oil pressure in order to close the switch. This or a faulty oil pressure switch can result in an Engine Cranks But Will Not Run condition.
Test Description
The numbers below refer to the step numbers in the diagnostic table.
-
The Powertrain OBD System Check prompts the technician to complete some basic checks and store the Freeze Frame Data and the Failure records on the scan tool if applicable. This creates an electronic copy of the data taken when the fault occurs. This information on the scan tool can be referred to later.
-
Whenever the fuse is open, a short to ground in the fuel pump feed terminal, ignition feed circuit or the fuel pump is the cause. Find and repair the short before replacing the fuse.
-
This step determines if the fuel pump circuit is being controlled by the PCM. The PCM should energize the fuel pump relay and turn the fuel pump ON. If the engine is not cranking or running, the PCM should de-energize the relay or the fuel pump within 2 to 3 seconds after the ignition is turned ON.
-
Jumpering the fuel pump feed terminal to the ignition feed circuit, verifies that the fuel pump relay ignition feed circuit, the fuel pump feed circuit, the fuel pump, and the fuel pump ground are OK.
-
Reprogram the replacement PCM. Refer to the latest Techline information for programming procedures.
-
This step checks the fuel pump ground circuit on the body side of the harness only.
-
This step checks for an open relay ground circuit.
-
This step will determine if a short to ground on the fuel pump feed terminal caused the fuse to open. In order to prevent mis-diagnosis, disconnect the fuel pump harness before the test.
-
The only possible place the fuel pump relay ignition feed terminal can be open is between the oil pressure switch and the fuel pump relay.
Step | Action | Value(s) | Yes | No |
|---|---|---|---|---|
Was the Powertrain On-Board Diagnostic (OBD) System Check performed? | -- | |||
Inspect the fuel pump relay fuse. Is the fuse OK? | -- | |||
Does the in-tank fuel pump run for 2 seconds after ignition when commanded? | -- | |||
Does the fuel pump run? | -- | |||
5 |
Does the test lamp illuminate? | -- | ||
6 | With a test lamp connected to a ground, probe the ignition feed terminal to the relay. Is the test lamp on? | -- | ||
7 | With the test lamp connected to B+, probe the ground terminal to the relay. Is the test lamp on? | -- | ||
8 |
Is the action complete? | -- | ||
9 |
Does the test lamp illuminate? | -- | ||
10 | Repair the open ignition feed circuit for the fuel pump relay. Refer to Wiring Repairs in Engine Electrical. Is the action complete? | -- | -- | |
11 | Replace the fuel pump relay. Refer to Fuel Pump Relay Replacement . Is the action complete? | -- | -- | |
12 | Repair the open ground circuit to the fuel pump relay. Refer to Wiring Repairs in Engine Electrical. Is the action complete? | -- | -- | |
13 |
Was a repair necessary? | -- | ||
14 | With a test lamp connected to B+, probe the fuel pump ground circuit (body side). Does the test lamp illuminate? | -- | ||
15 | Repair the open fuel pump feed circuit. Refer to Wiring Repairs in Engine Electrical. Is the action complete? | -- | -- | |
Replace the PCM. Refer to Powertrain Control Module Replacement/Programming . Is the action complete? | -- | -- | ||
Was a repair necessary? | -- | |||
Repair the open fuel pump circuit. Refer to Wiring Repairs in Engine Electrical. Is the action complete? | -- | -- | ||
19 | Replace the fuel pump. Refer to Fuel Sender Assembly Replacement (Fuel Pump) . Is the action complete? | -- | -- | |
Does the test lamp illuminate? | -- | |||
21 | Repair the short to ground in the fuel pump feed circuit. Refer to Wiring Repairs in Engine Electrical. Is the action complete? | -- | -- | |
22 | With the test lamp still connected to B+, probe the fuel pump relay ignition feed circuit terminal. Does the test lamp illuminate? | -- | ||
23 | Repair the short to ground in the fuel pump relay ignition feed circuit. Refer to Wiring Repairs in Engine Electrical. Is the action complete? | -- | -- | |
24 |
Was a repair necessary? | -- | ||
25 | An additional check of the fuel pump and the engine oil pressure switch and the circuitry can be made at this point. Check the fuel pump and the engine oil pressure switch and circuitry? | -- | ||
26 |
Does the engine continue to run? | -- | ||
27 |
Is the test lamp ON? | -- | ||
28 |
Is the test lamp on? | -- | ||
29 | Replace the fuel pump and the engine oil pressure indicator switch. Refer to Fuel Pump and Engine Oil Pressure Switch Replacement . Is the action complete? | -- | -- | |
30 | Repair the open fuel pump feed circuit from the fuel pump and the engine oil pressure switch. Refer to Wiring Repairs in Engine Electrical. Is the action complete? | -- | -- | |
Repair the open in the ignition feed circuit to the fuel pump and the engine oil pressure switch. Refer to Wiring Repairs in Engine Electrical. Is the action complete? | -- | -- | ||
32 |
Does the engine start and continue to run? | -- | ||
33 |
Are any DTCs displayed that have not bee diagnosed? | -- | Go to The Applicable DTC Table | System OK |
