HIGH TRANS. CASE SHIFT EFFORT (EASY SHIFT PACKAGE AVAILABLE)

Subject: HIGH TRANSFER CASE SHIFT EFFORT
Model and Year: 1988-91 T1 TRUCKS
Some 1988-91 T-Trucks may experience high transfer case shift effort or total blockouts when "shifting on the fly" from 2H to 4H under cold weather conditions.
This condition may be corrected by the installation of the synthetic 75W90 gear lube described in Dealer Service Bulletin No. 91-128-7A. This fluid maintains a more constant viscosity under cold weather conditions allowing quicker front axle synchronization and easier transfer case engagement.
If the installation of the synthetic fluid does not result in a satisfactory shift effort, an "Easy Shift" package may be installed in the transfer case. This package features a roller pin (53) rather than a solid pin on the mode shift fork (54) and revised ramp angles on the sector (55) to reduce engagement forces. This package was installed in the 1991 model year and will provide reduced transfer case shift effort under cold weather conditions.
VEHICLES INVOLVED:
Group A:
Some 1988-91 T-Trucks equipped with transfer cases identified by the following part numbers:
15568078 15627441 15568079 15627442 15568597 15653450
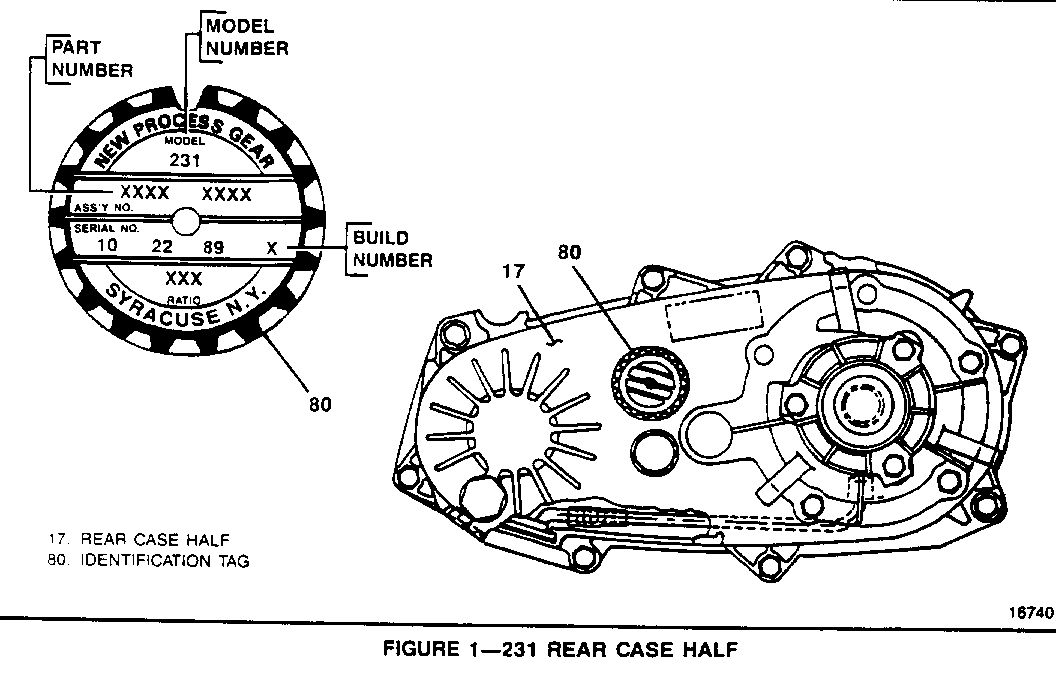
This part number can be found on the identification tag (80) located on the rear case half (Figure 1).
Group B:
Some 1991 T-Trucks equipped with transfer cases identified by the following part numbers and built before 10/22/90:
15653414 15659232
This part number and build number can be found on the identification tag (80) located on the rear case half (Figure 1).
SERVICE PROCEDURE:
Group A:
These transfer cases require the replacement of the parts indicated in the Group A column of the PARTS INFORMATION section.
Group B:
These transfer cases require the replacement of the parts indicated in the Group B column of the PARTS INFORMATION section.
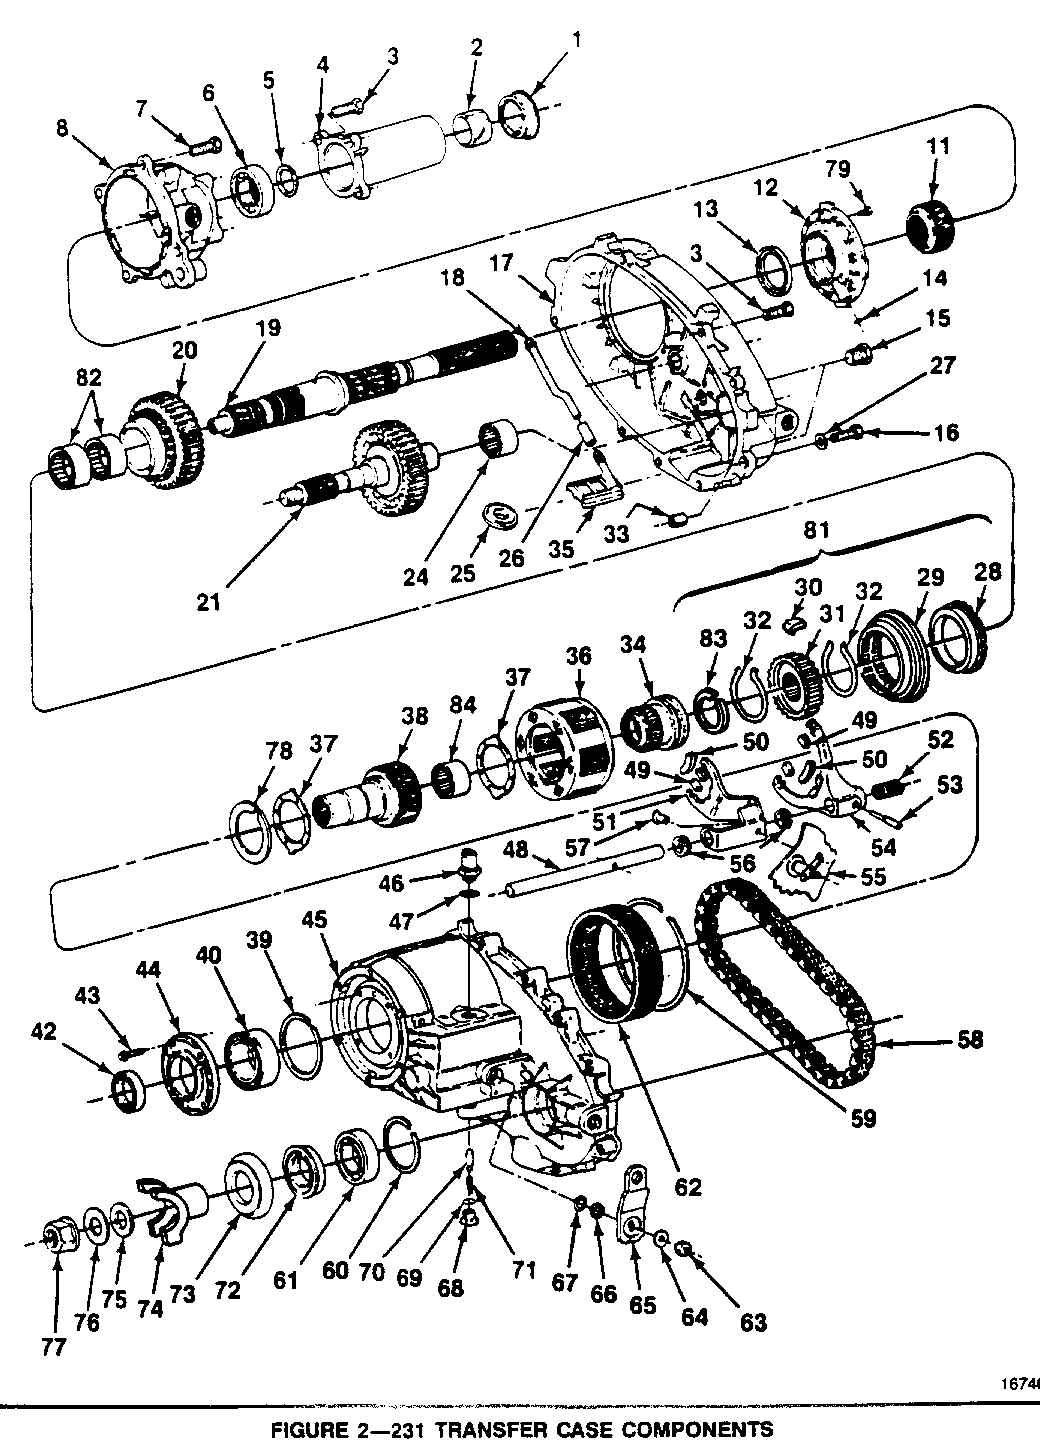
REMOVE (Figures 2 & 3)
Tools required:
J8092 Drive handle J33790 Bearing installer and remover
1. Transfer case from vehicle.
- Refer to Section 7D of the appropriate S/T Service Manual for complete transfer case removal procedure.
2. Front output flange nut (77), washer (76), rubber sealing washer (75) and front output flange (74) from the front output shaft. 3. Vacuum switch (46) and 0-ring seal (47). 4. Poppet screw (68), 0-ring seal (69), poppet spring (71) and poppet plunger (70).
Mainshaft Extension and Oil Pump Housing
5. Rear extension housing bolts (3) and rear extension (4). 6. Bearing retainer (snap ring) (5) from the mainshaft (19). 7. Pump retainer housing bolts (7). 8. Pump retainer housing (8) from the rear case half (17). 9. Speedometer tone wheel (11) from the mainshaft (19). 10. Case bolts (3) from the case halves.
- Note the two longer bolts (16) and washers go into doweled case holes (33).
- Separate case halves, insert screwdrivers into the slot cast in the case ends and pry apart. Do not attempt to wedge the case halves apart at any point on the mating surfaces.
- Be careful not to damage the oil pump (12) (located in the rear case half) while removing the rear case half (17).
Internal Components
11. Fork shift spring (52). 12. Mainshaft (19)/drive sprocket 14071703 (20), chain (58) and front output shaft (21) as a unit. Mode shift fork (54) and shift rail (48) will be removed with the mainshaft.
INSPECT: The teeth of the synchronizer stop ring (28) and drive sprocket (20) for damage. If they are damaged or in cases of customer complaint of clash when shifting from 2Hi to 4Hi, follow steps 13, 14 & 15, otherwise skip to step 16.
13. Retainer (snap ring) (83) from the mainshaft (19). 14. Synchronizer assembly (81). 15. Drive sprocket (20) from the mainshaft (19). 16. Range shift fork (51), range shift hub (34) and sector with shaft (55) from the planetary carrier (36). - It is necessary to rotate the sector with shaft (55) to obtain clearance when removing the range fork (51).
17. Plastic washer (retainer) (66) and o-ring seal (67) from the front case half.
IMPORTANT: Group B vehicles should complete step 17 and skip to INSTALL step 8.
18. Input bearing retainer bolts (43) and input bearing retainer (44) from the front case half (45). 19. Retainer snap ring from the input gear (38). 20. Planetary carrier (36) and the input gear (38) from the annulus gear (62) using a soft hammer. 21. Input bearing retainer (39) and input bearing (40). 22. Front output bearing retainer ring (snap ring) (60). 23. Front output bearing (61) from the front case half (45) using J33790, and J8092. 24. Seal (42) from the input bearing retainer (44) if it shows signs of damage.
INSTALL (Figures 2 & 3)
Tools required:
J8092 Drive handle J33790 Bearing installer and remover J33833 Bearing installer and remover
1. Front output bearing (61) to the new front case half P/N 15635347 (45) using J 8092 and J 33833. 2. New front output shaft seal P/N 15579788 (72) to the new front case half (45). 3. Front output bearing retainer ring (snap ring) (60) to the new case half. 4. New input seal P/N 14095609 (42) into retainer (44) if it was removed in step 24 above. 5. Input bearing (40) and input bearing retainer (39) to the new case half using J 36372. 6. Planetary carrier (36) and the input gear (38) to the annulus gear (62) using a soft hammer. 7. Retainer snap ring to the input gear (38). Input bearing retainer (44) and input bearing retainer bolts (43) to the front case half (45).
- Clean mating surfaces and apply RTV or equivalent on bearing retainer mating surfaces.
NOTE: Do not block oil feed hole from case to bearing retainer.
- Apply Loctite 242 (R) or equivalent on bearing retainer bolts.
- Tighten bolts to 19 N.m (14 lbs. ft.).
8. New o-ring seal P/N 14095598 (67) and new plastic washer (retainer) P/N 14037958 (66) into the front case half. 9. New sector with shaft P/N 15637215 (55) into the front case half. 10. Range shift fork (51), range shift hub (34) into the planetary carrier (36).
- It is necessary to rotate the sector with shaft (55) to obtain clearance when installing the range fork (51).
INSPECT: The teeth of the synchronizer stop ring (28) and drive sprocket (20) for damage. If the parts are to be replaced due to damage or in cases of customer complaint of clash when shifting from 2Hi to 4Hi, follow steps 11, 12, & 13, otherwise skip to step 14.
11. New drive sprocket P/N 15579803 (20) to the main shaft (1 9). 12. New synchronizer stop ring P/N 14071703 (28) to the drive sprocket (20). 13. Synchronizer assembly (81) to the main shaft. 14. Mainshaft (19)/drive sprocket (20), chain (58) and front output shaft (21) as a unit. Mode shift fork (54) and shift rail (48) will be installed with the mainshaft. 15. Fork shift spring (52).
Mainshaft Extension and Oil Pump
16. Rear case (17) over mainshaft (19) and onto the front case half (45).
- Clean case mating surfaces and apply RTV sealer or equivalent to the mating surfaces.
- Transfer dowels from old case half to new case half if necessary.
IMPORTANT: Be careful not to damage the oil pump (12) while installing the rear case half (Figure 7).
17. Case bolts (3) into case halves. - Apply Loctite 242 (R) or equivalent on pump housing bolt threads. - The two longer bolts and washers into the doweled case holes (33). - Tighten bolts to 31 N.m (23 lbs. ft.).
18. Speedometer tone wheel (11) to the main shaft (19). 19. Pump retainer housing (8) and pump housing bolts (7) to the rear case half (17). - Clean mating surfaces and apply RTV sealer or equivalent to the mating surfaces. - Apply Loctite (R) or equivalent on pump housing threads. - Pump housing bolts are shouldered (7). - Tighten bolts to 41 N.m (30 lbs. ft.)
20. Output bearing retainer (snap ring) (5), to the main shaft (19).
21. Rear extension housing (4) and extension housing bolts (3) to the pump retainer housing (8). - Clean mating surfaces and apply RTV sealer or equivalent to the mating surfaces. - Apply Loctite 242 (R) or equivalent on the extension housing bolts. - Tighten bolts to 31 N.m (23 lbs. ft.).
External Components
22. Poppet plunger (70), poppet spring (71), new 0-ring seal P/N 14071849 (69), and poppet screw (68) to the front case half (45). - Tighten poppet screw to 31 N.m (23 lbs. ft.). - New poppet plunger P/N 15633556 (70) group A vehicles only. - New poppet spring P/N 15633557 (71) group A vehicles only - New poppet screw P/N 15633558 (68) group A vehicles only.
23. Vacuum switch (46) and new o-ring P/N 14071849 (47) to the front case housing. - Tighten switch to 24 N.m ( 17 lbs. ft.).
24. Front output flange (74), rubber sealing washer (75), washer (76) and flange nut (77). - Tighten nut (26) to 149 N.m (110 lbs. ft).
25. New vent pipe P/N 15581915 in new front case half (group A vehicles only). - Lightly coat end of vent pipe with Loctite 609 (R) or equivalent.
26. Transfer case into vehicle. - Refer to section 7D of the appropriate S/T Service Manual for complete transfer case replacement procedure.
SERVICE PARTS INFORMATION:
The "Easy Shift" package consists of the following parts. Parts must be ordered individually.
Required Parts Part Quantity Figure 1 Group A Group B Number Description Required Reference Trucks Trucks -------- --------------- -------- --------- ------- -------- 15635347 Front case half 1 45 X 15637215 Sector W/shaft 1 55 X X 15637217 Mode shift fork 1 54 X X 15633556 Poppet plunger 1 70 X 15633557 Poppet spring 1 71 X 15633558 Plug 1 68 X 14071849 0-ring 2 69 & 47 X X 15581915 Vent Pipe 1 N/S X 14095609 Input seal 1 42 X 14037958 Retainer 1 66 X X 14095598 Range sector seal 1 67 X X 15579788 Output front seal 1 72 X 15642511 Adapter gasket 1 N/S X X
15579803 Drive Sprocket 1 20 * * 14071703 Synchronizer 1 28 * * Blocking Ring
These parts required only if damaged or in cases of customer complaint of clash when shifting from 2Hi to 4Hi.
Parts are currently available from GMSPO.
WARRANTY INFORMATION:
For vehicles repaired under warranty use:
Labor Labor Operation Truck Time -------- ------- ------ T7251 Group A 3.2 hr.
T7261 Group B 2.8 hr.
NOTE: Labor Operation is coded to base vehicle coverage in the warranty system.
FIGURE 3-231 TRANSFER CASE COMPONENTS
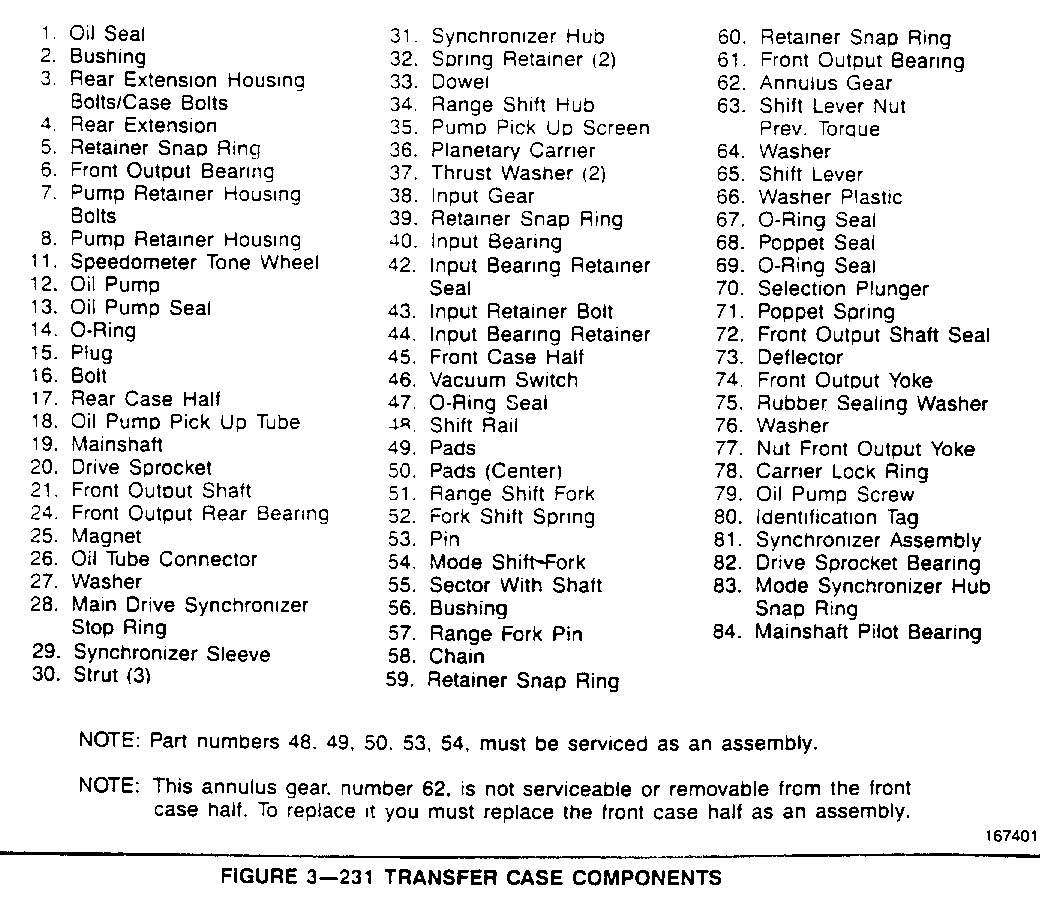
1. Oil Seal 46. Vacuum Switch 2. Bushing 47. O-Ring Seal 3. Rear Extension Housing 48. Shift Rail Bolts/Case Bolts 49. Pads 4. Rear Extension 50. Pads (Center) 5. Retainer Snap Ring 51. Range Shift Fork 6. Front Output Bearing 52. Fork Shift Spring 7. Pump Retainer Housing 53. Pin Bolts 54. Mode Shift Fork 8. Pump Retainer Housing 55. Sector With Shaft 11. Speedometer Tone Wheel 56. Bushing 12. Oil Pump 57. Range Fork Pin 13. Oil Pump Seal 58. Chain 14. O-Ring 59. Retainer Snap Ring 15. Plug 60. Retainer Snap Ring 16. Bolt 61. Front Output Bearing 17. Rear Case Half 62. Annulus Gear 18. Oil Pump Pick Up Tube 63. Shift Lever Nut 19. Mainshaft Prev. Torque 20. Drive Sprocket 64. Washer 21. Front Output Shaft 65. Shift Lever 24. Front Output Rear Bearing 66. Washer Plastic 25. Magnet 67. O-Ring Seal 26. Oil Tube Connector 68. Poppet Seal 27. Washer 69. O-Ring Seal 28. Main Drive Synchronizer 70. Selection Plunger Stop Ring 71. Poppet Spring 29. Synchronizer Sleeve 72. Front Output Shaft Seat 30. Strut (3) 73. Deflector 31. Synchronizer Hub 74. Front Output Yoke 32. Spring Retainer (2) 75. Rubber Sealing Washer 33. Dowel 76. Washer 34. Range Shift Hub 77. Nut Front Output Yoke 35. Pump Pick Up Screen 78. Carrier Lock Ring 36. Planetary Carrier 79. Oil Pump Screw 37. Thrust Washer (2) 80. Identification Tag 38. Input Gear 81. Synchronizer Assembly 39. Retainer Snap Ring 82. Drive Sprocket Bearing 40. Input Bearing 83. Mode Synchronizer Hub 42. Input Bearing Retainer Snap Ring Seal 84. Mainshaft Pilot Bearing 43. Input Retainer Bolt 44. Input Bearing Retainer 45. Front Case Half
NOTE: Part numbers 48, 49, 50, 53, 54, must be serviced as an assembly.
NOTE: This annulus gear, number 62, is not serviceable or removable from the front case half. To replace it you must replace the front case half as an assembly.
General Motors bulletins are intended for use by professional technicians, not a "do-it-yourselfer". They are written to inform those technicians of conditions that may occur on some vehicles, or to provide information that could assist in the proper service of a vehicle. Properly trained technicians have the equipment, tools, safety instructions and know-how to do a job properly and safely. If a condition is described, do not assume that the bulletin applies to your vehicle, or that your vehicle will have that condition. See a General Motors dealer servicing your brand of General Motors vehicle for information on whether your vehicle may benefit from the information.
