For 1990-2009 cars only
Tools Required
J 39400-A Halogen Leak Detector
Removal Procedure
- Recover the refrigerant. Refer to Refrigerant Recovery and Recharging .
- Drain the cooling system. Refer to Cooling System Draining and Filling in Engine Cooling.
- Remove the cooling fan and shroud. Refer to Engine Cooling Fan Replacement in Engine Cooling.
- Remove the A/C drive belt. Refer to Air Conditioning Compressor Belt Replacement in Engine Mechanical - 6.0L.
- Release the tension on the air conditioning drive belt.
- Reposition the air conditioning drive belt from the compressor pulley.
- Remove the compressor hose assembly. Refer to Compressor Hose Assembly Replacement .
- Remove the lower coolant hose. Refer to Radiator Inlet Hose Replacement in Engine Cooling.
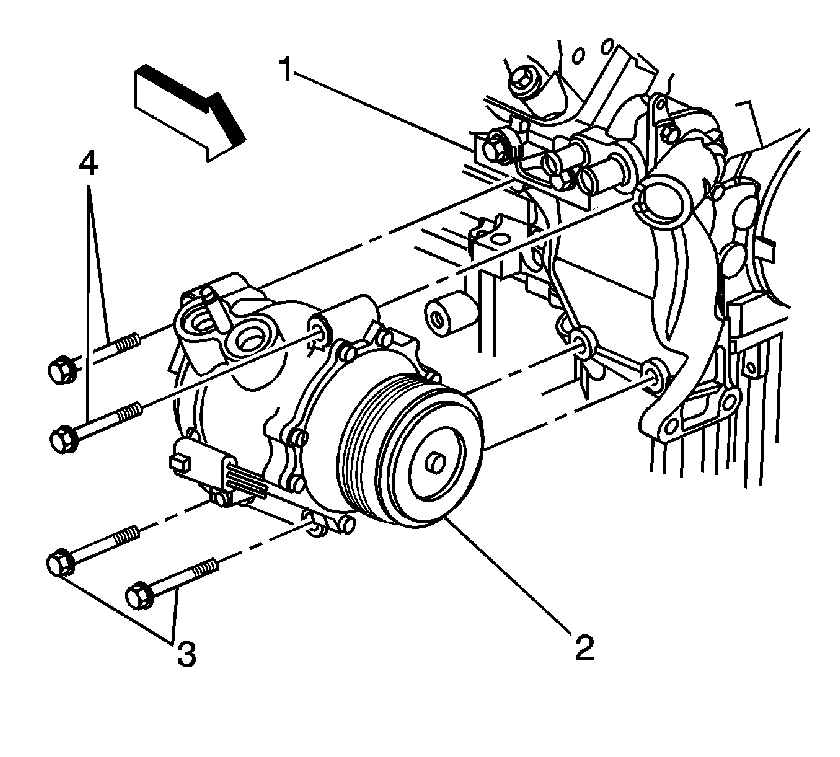
- Remove the upper A/C compressor mounting bracket bolts (4).
- Raise the vehicle. Refer to Lifting and Jacking the Vehicle in General Information.
- Remove the lower A/C compressor mounting bracket bolts (3).
- Remove the upper A/C compressor mounting bolts.
- Remove the lower A/C compressor mounting bracket bolts. The accessory drive belt tensioner will be removed with one of the bolts.
- Remove the last A/C compressor mounting bolt with the compressor removed from the engine.
- Remove the electrical connection from the compressor.
- Lower the vehicle. Refer to Lifting and Jacking the Vehicle in General Information.
- Remove the A/C compressor from the bracket.
- Remove the compressor.
- If replacing the A/C compressor. Refer to Compressor Oil Balancing .
Installation Procedure
- Add the proper amount of PAG oil to the compressor crankcase. Refer to Compressor Oil Balancing .
- Install the A/C compressor.
- Install the A/C compressor to the bracket.
- Align the bracket with the long bolts before tightening the compressor (2) to the bracket (1).
- Install the upper rear compressor mounting bolt.
- Install the accessory drive belt tensioner to the compressor mounting bracket.
- Install the bolts to the accessory drive belt tensioner.
- Raise the vehicle. Refer to Lifting and Jacking the Vehicle in General Information.
- Install the A/C compressor mounting bolts (3).
- Connect the electrical connector to the A/C compressor.
- Lower the vehicle. Refer to Lifting and Jacking the Vehicle in General Information.
- Install the upper A/C compressor mounting bracket bolts (4).
- Install the compressor hose assembly. Refer to Compressor Hose Assembly Replacement .
- Install the lower coolant hose. Refer to Radiator Inlet Hose Replacement in Engine Cooling.
- Install the A/C drive belt. Refer to Air Conditioning Compressor Belt Replacement in Engine Mechanical - 6.0L.
- Install the fan and shroud. Refer to Engine Cooling Fan Replacement in Engine Cooling.
- Fill the cooling system. Refer to Cooling System Draining and Filling in Engine Cooling.
- Evacuate and recharge the A/C system. Refer to Refrigerant Recovery and Recharging .
- Leak test the fittings of the component using the J 39400-A .
Notice: Refer to Fastener Notice in the Preface section.
Tighten
Tighten the bolt to 50 N·m (37 lb ft).
Tighten
Tighten the bolt to 50 N·m (37 lb ft).
Tighten
Tighten the bolts to 50 N·m (37 lb ft).
Tighten
Tighten the bolts to 50 N·m (37 lb ft).
