Evaporative Emission Canister Vent Solenoid Valve Replacement 15 Regular Cab
Removal Procedure
Important: Clean the evaporative emission (EVAP) connections and surrounding areas prior to disconnecting the fittings in order to avoid possible system contamination.
- Raise and suitably support the vehicle. Refer to Lifting and Jacking the Vehicle.
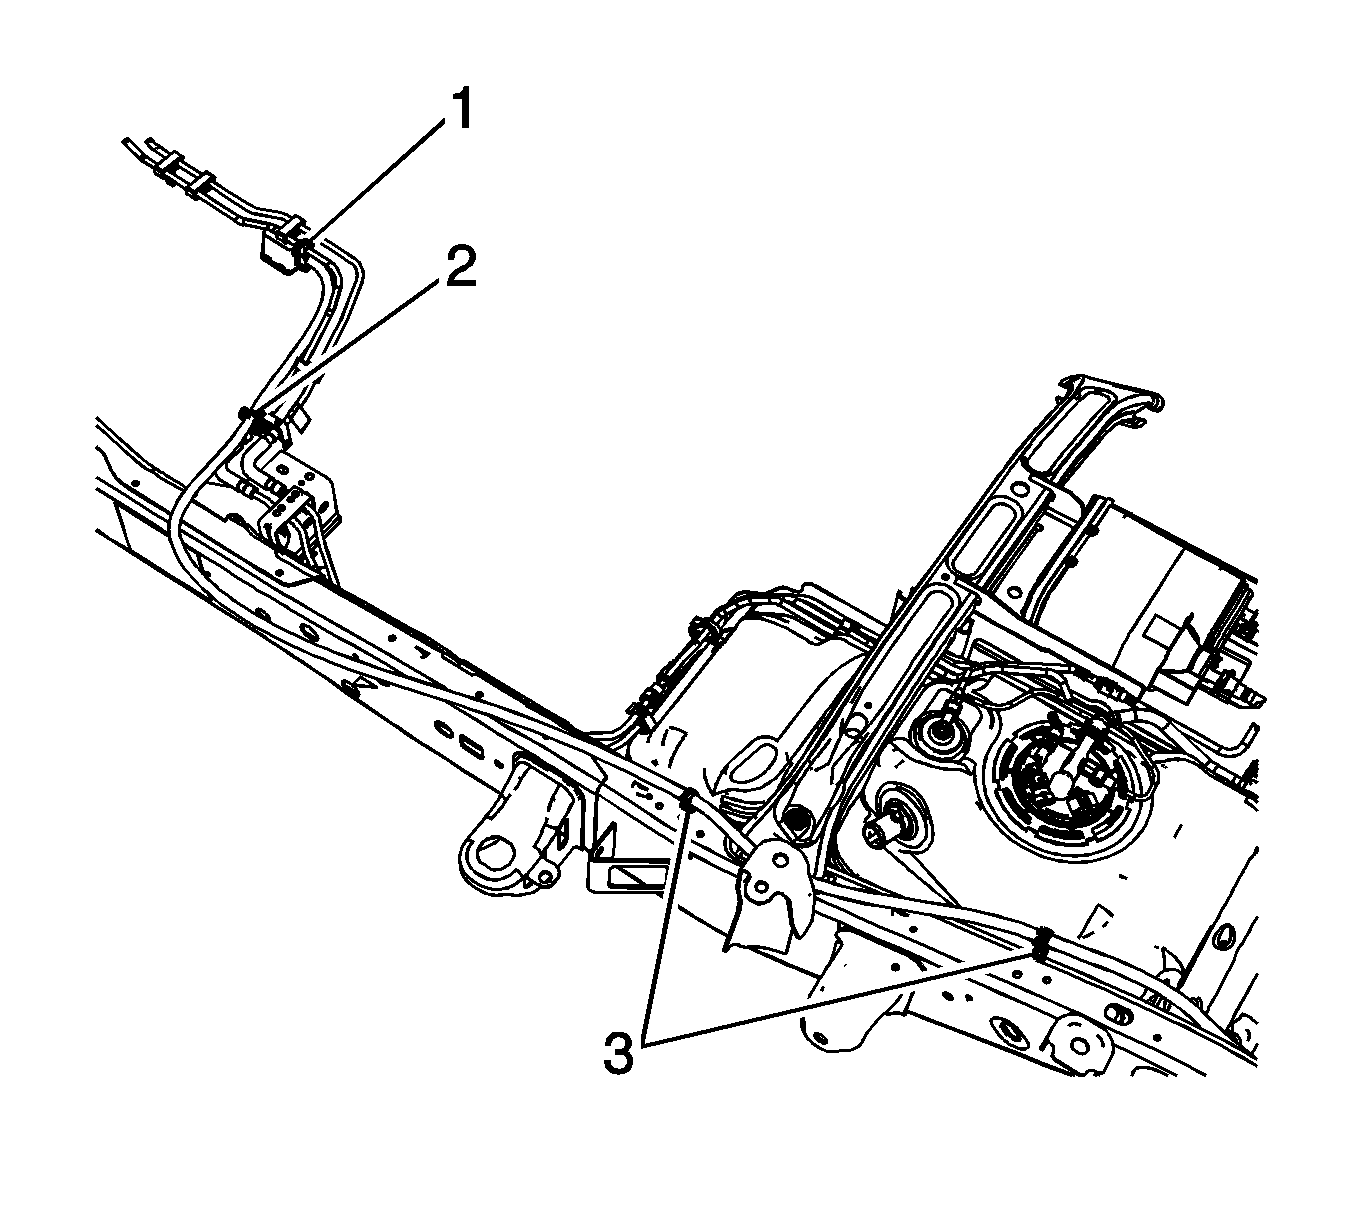
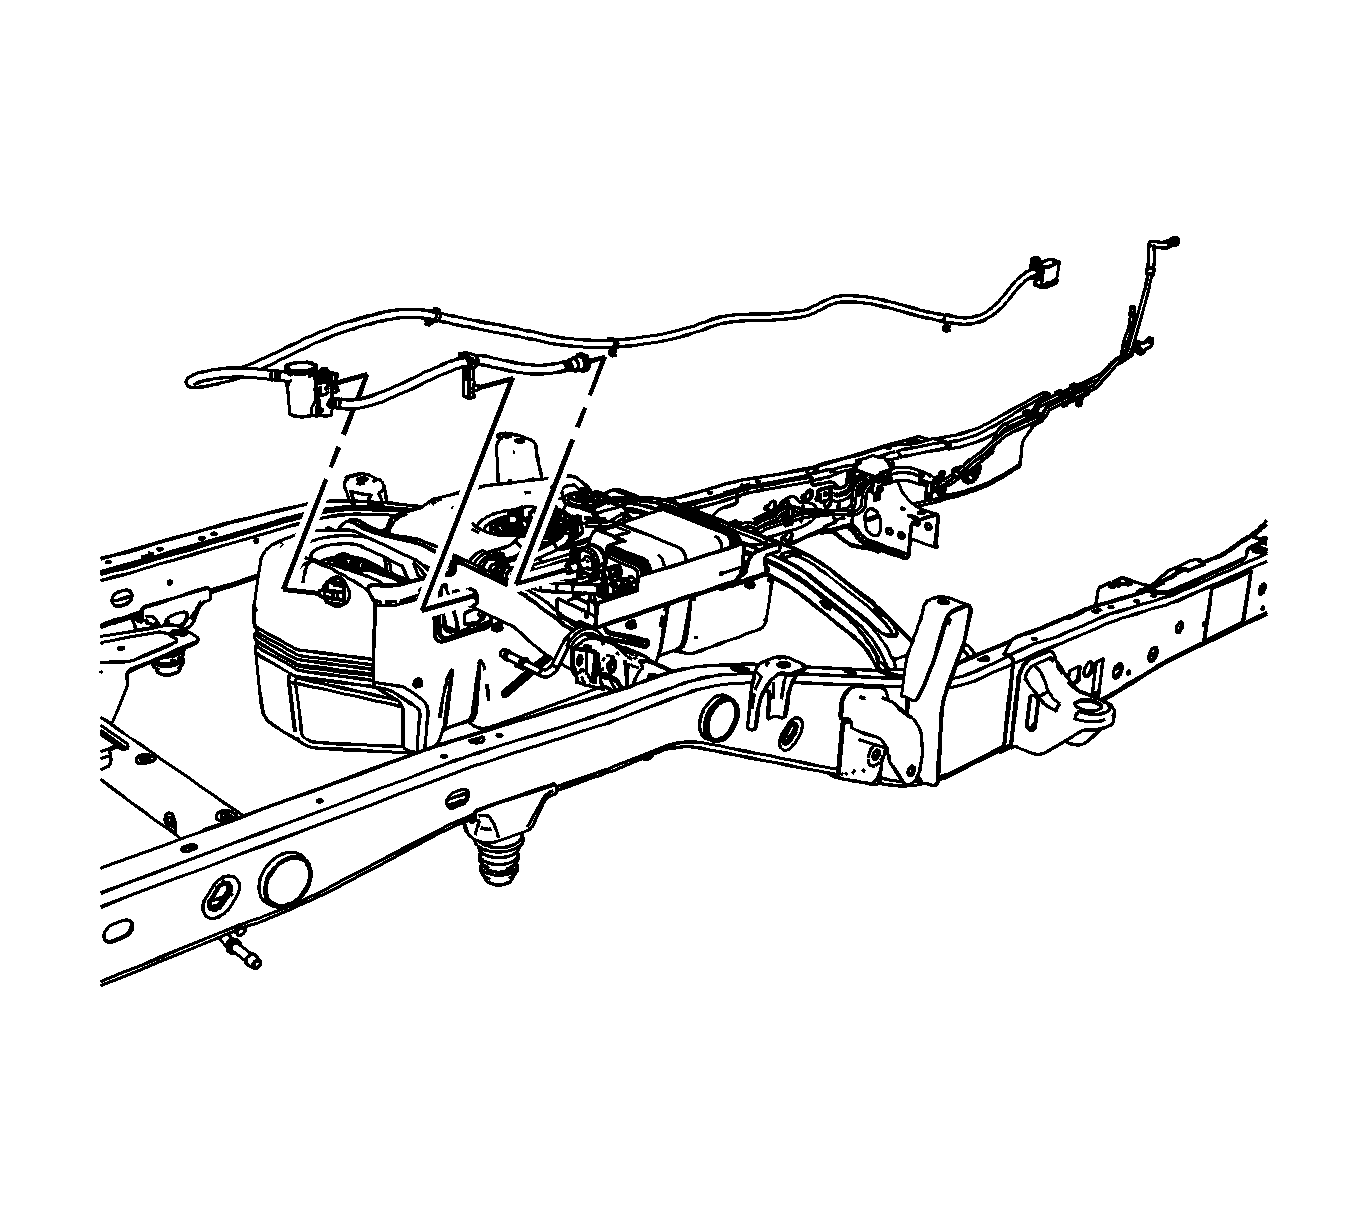
- Remove EVAP canister vent solenoid clip (1) from the chassis EVAP line.
- Remove the EVAP canister vent solenoid pipe from the clip (2) on the chassis EVAP line.
- Remove the EVAP canister vent solenoid pipe from the clips (3) on the brake pipes.
- Disconnect the chassis wiring harness electrical connector from the EVAP canister vent solenoid.
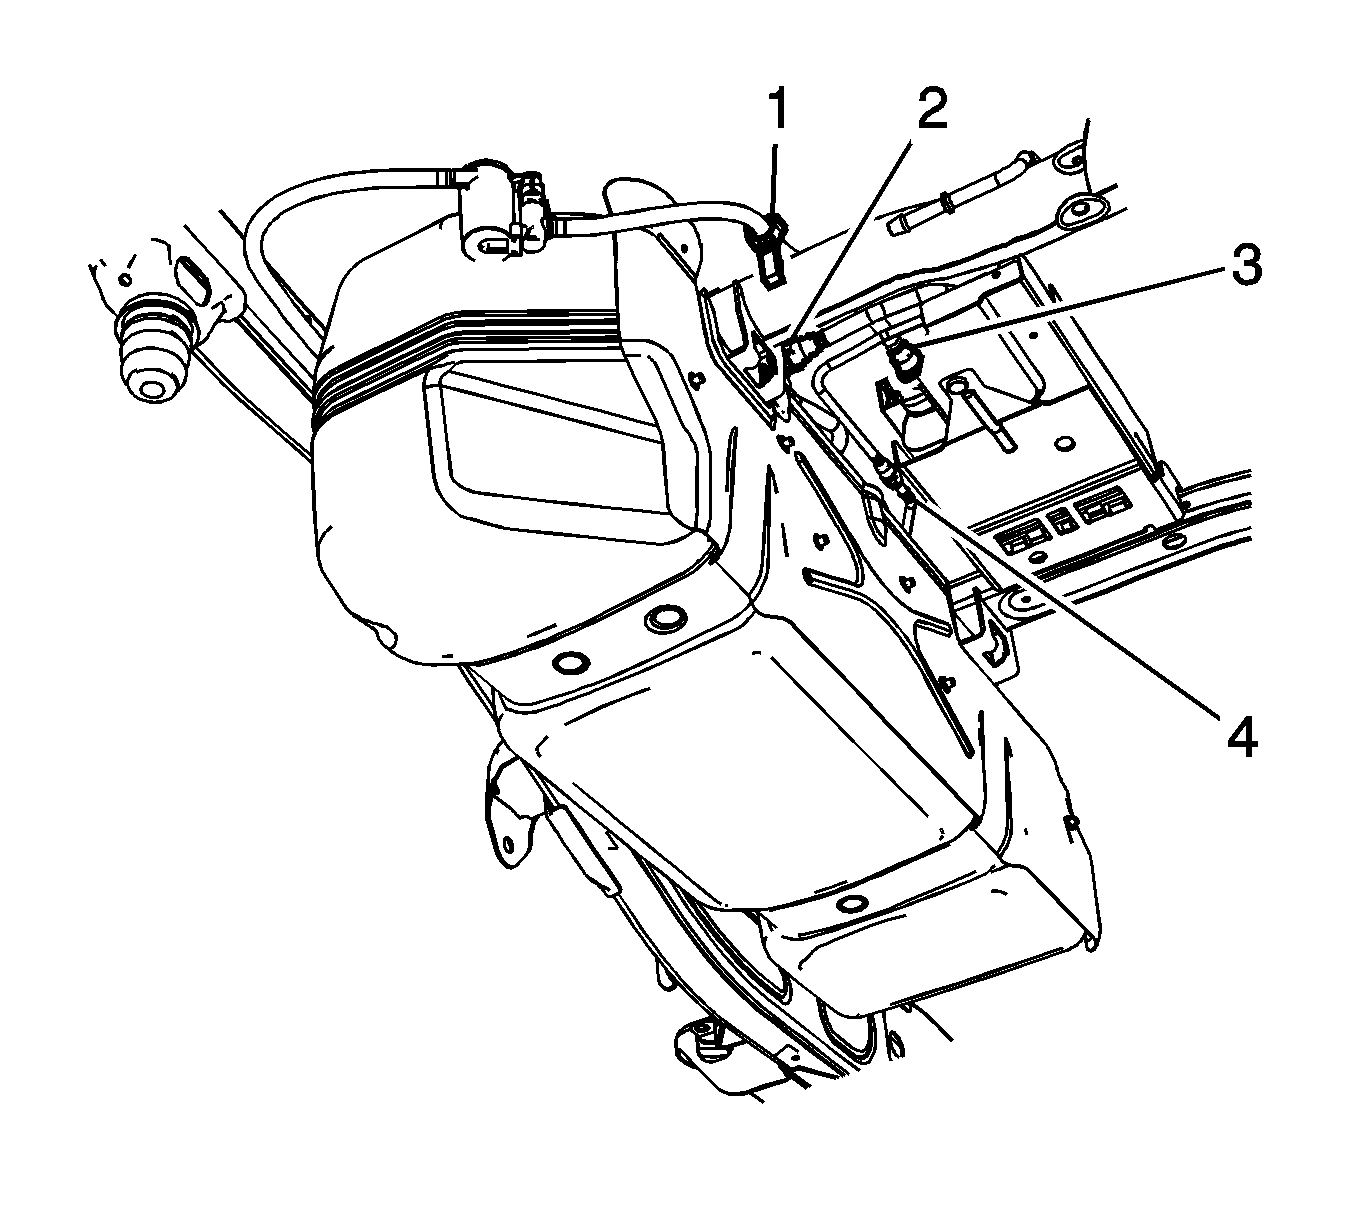
- Disconnect the EVAP vent solenoid pipe quick connect fitting (3) from the EVAP canister. Refer to Plastic Collar Quick Connect Fitting Service.
- Remove the EVAP vent solenoid pipe clip (1) from the frame crossmember.
- Insert a small flat bladed tool between the EVAP canister vent solenoid and the fuel tank bracket, disengaging the retainer (1).
- Slide the EVAP canister vent solenoid off the bracket towards the passenger side of the vehicle.
- Remove the EVAP canister vent solenoid from the vehicle.
Installation Procedure
- Position and install the EVAP canister vent solenoid to the vehicle.
- Slide the EVAP canister vent solenoid onto the bracket towards the driver side of the vehicle.
- Ensure that the EVAP canister vent solenoid engages the fuel tank bracket retainer (1).
- Connect the EVAP vent solenoid pipe quick connect fitting (3) to the EVAP canister. Refer to Plastic Collar Quick Connect Fitting Service.
- Install the EVAP vent solenoid pipe clip (1) to the frame crossmember.
- Connect the chassis wiring harness electrical connector to the EVAP canister vent solenoid.
- Install EVAP canister vent solenoid clip (1) to the chassis EVAP line.
- Install the EVAP canister vent solenoid pipe to the clip (2) on the chassis EVAP line.
- Install the EVAP canister vent solenoid pipe to the clips (3) on the brake pipes.
- Lower the vehicle.


Evaporative Emission Canister Vent Solenoid Valve Replacement 15 Ext/Crew Cab
Removal Procedure
Important: Clean the evaporative emission (EVAP) connections and surrounding areas prior to disconnecting the fittings in order to avoid possible system contamination.
- Raise and suitably support the vehicle. Refer to Lifting and Jacking the Vehicle.
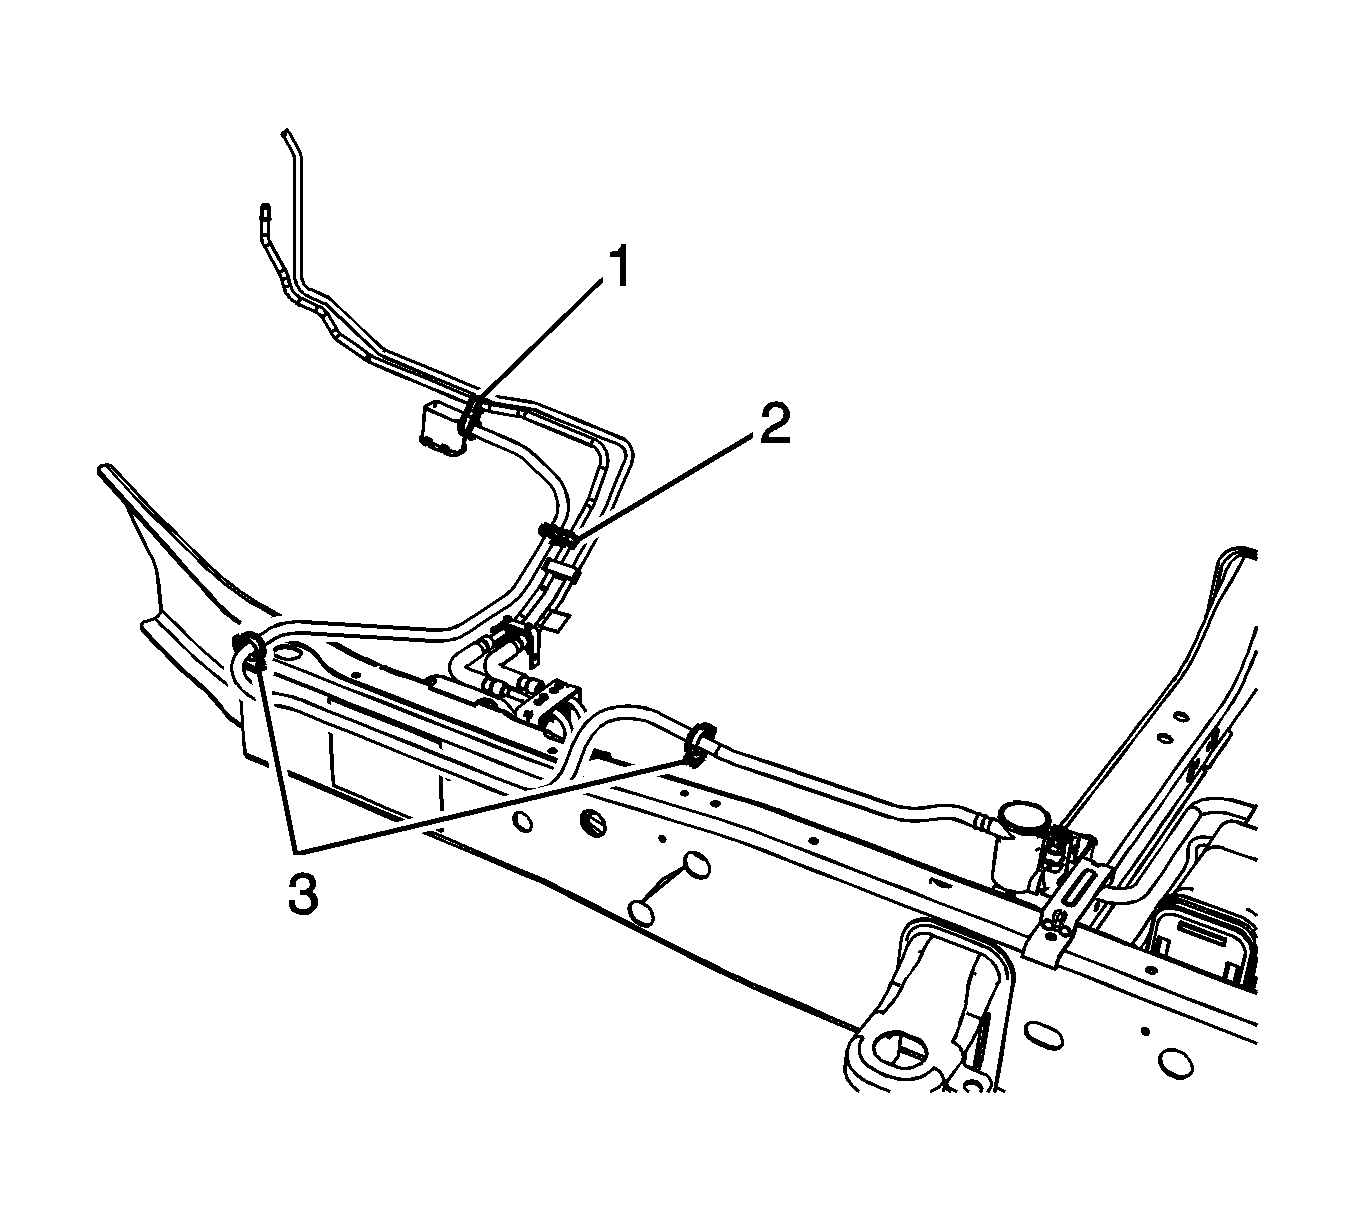
- Remove EVAP canister vent solenoid clip (1) from the chassis EVAP line.
- Remove the EVAP canister vent solenoid pipe from the clip (2) on the chassis EVAP line.
- Remove the EVAP canister vent solenoid pipe from the clips (3) on the brake pipes.
- Disconnect the chassis wiring harness electrical connector from the EVAP canister vent solenoid.
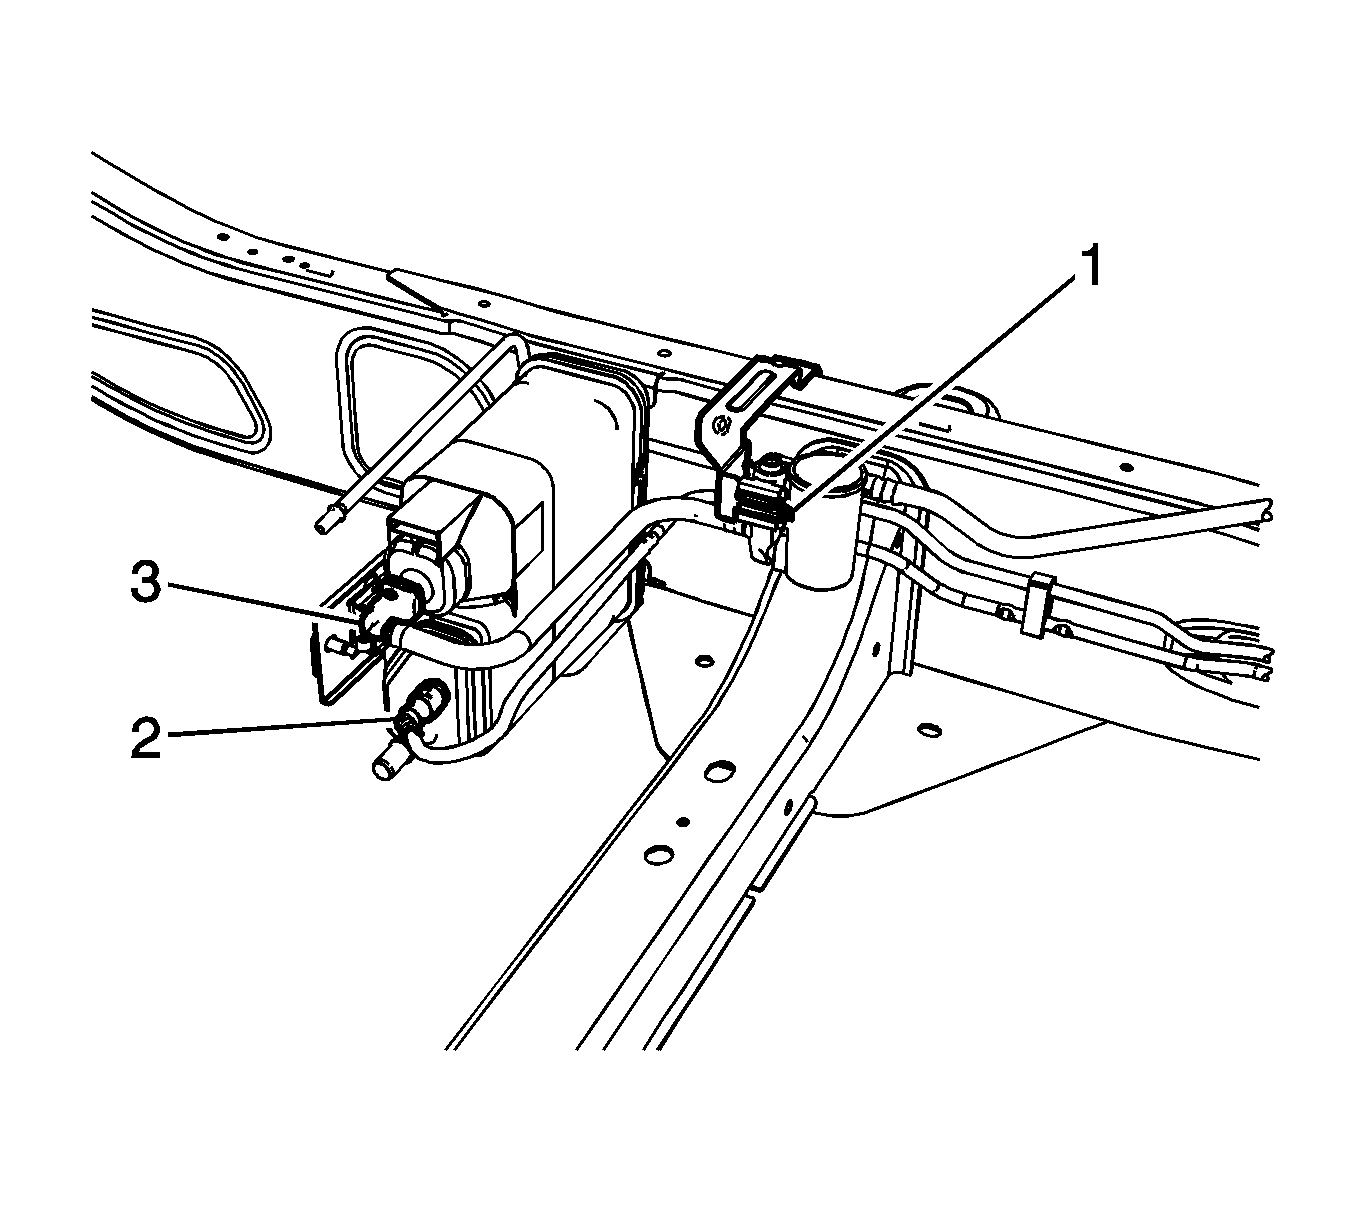
- Disconnect the EVAP vent solenoid pipe quick connect fitting (3) from the EVAP canister. Refer to Plastic Collar Quick Connect Fitting Service.
- Disengaging the retainer (1) securing the EVAP canister vent solenoid.
- Slide the EVAP canister vent solenoid off the bracket towards the front of the vehicle.
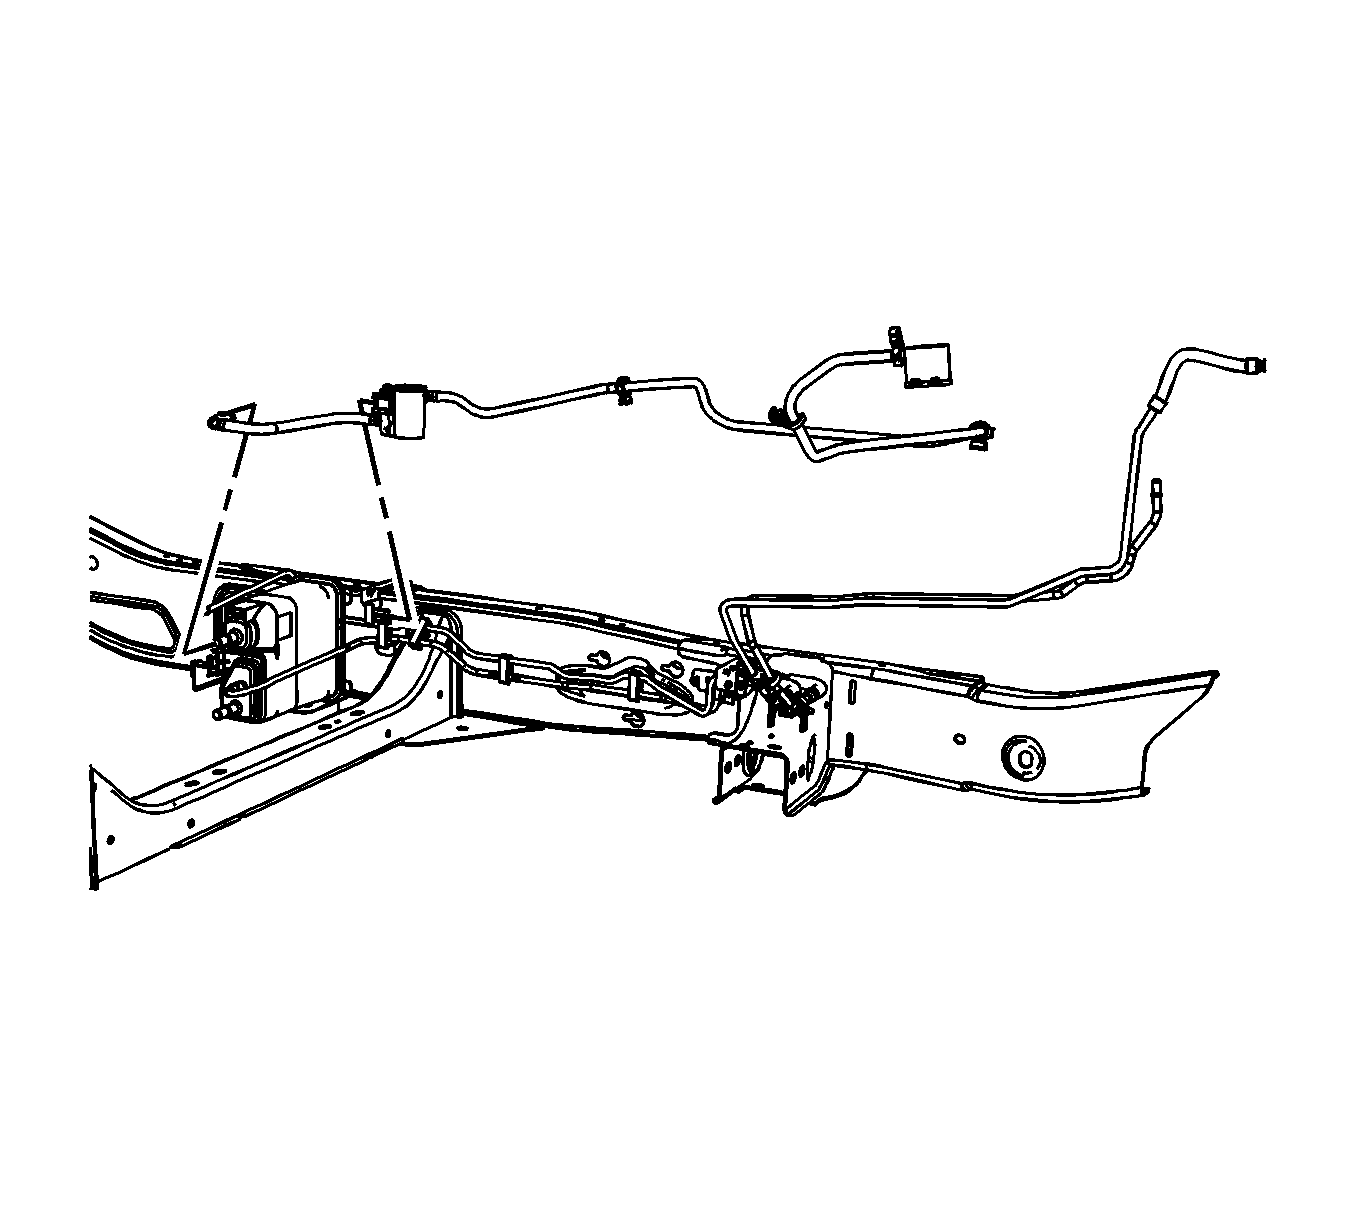
- Remove the EVAP canister vent solenoid from the vehicle.
Installation Procedure
- Position and install the EVAP canister vent solenoid to the vehicle.
- Slide the EVAP canister vent solenoid onto the bracket towards the rear of the vehicle.
- Ensure that the retainer (1) is engaged, securing the EVAP canister vent solenoid.
- Connect the EVAP vent solenoid pipe quick connect fitting (3) to the EVAP canister. Refer to Plastic Collar Quick Connect Fitting Service.
- Connect the chassis wiring harness electrical connector to the EVAP canister vent solenoid.
- Install EVAP canister vent solenoid clip (1) to the chassis EVAP line.
- Install the EVAP canister vent solenoid pipe to the clip (2) on the chassis EVAP line.
- Install the EVAP canister vent solenoid pipe to the clips (3) on the brake pipes.
- Lower the vehicle.


Evaporative Emission Canister Vent Solenoid Valve Replacement 25 Ext/Crew Cab w/6 Ft Bed
Removal Procedure
Important: Clean the evaporative emission (EVAP) connections and surrounding areas prior to disconnecting the fittings in order to avoid possible system contamination.
- Raise and suitably support the vehicle. Refer to Lifting and Jacking the Vehicle.
- Remove EVAP canister vent solenoid clip (1) from the chassis EVAP line.
- Remove the EVAP canister vent solenoid pipe from the clip (2) on the chassis EVAP line.
- Remove the EVAP canister vent solenoid pipe from the clips (3) on the brake pipes.
- Disconnect the chassis wiring harness electrical connector from the EVAP canister vent solenoid.
- Disconnect the EVAP vent solenoid pipe quick connect fitting (3) from the EVAP canister. Refer to Plastic Collar Quick Connect Fitting Service.
- Remove the EVAP vent solenoid pipe clip (1) from the frame crossmember.
- Insert a small flat bladed tool between the EVAP canister vent solenoid and the fuel tank bracket, disengaging the retainer (1).
- Slide the EVAP canister vent solenoid off the bracket towards the passenger side of the vehicle.
- Remove the EVAP canister vent solenoid from the vehicle.


Installation Procedure
- Position and install the EVAP canister vent solenoid to the vehicle.
- Slide the EVAP canister vent solenoid onto the bracket towards the driver side of the vehicle.
- Ensure that the EVAP canister vent solenoid engages the fuel tank bracket retainer (1).
- Connect the EVAP vent solenoid pipe quick connect fitting (3) to the EVAP canister. Refer to Plastic Collar Quick Connect Fitting Service.
- Install the EVAP vent solenoid pipe clip (1) to the frame crossmember.
- Connect the chassis wiring harness electrical connector to the EVAP canister vent solenoid.
- Install EVAP canister vent solenoid clip (1) to the chassis EVAP line.
- Install the EVAP canister vent solenoid pipe to the clip (2) on the chassis EVAP line.
- Install the EVAP canister vent solenoid pipe to the clips (3) on the brake pipes.
- Lower the vehicle.


Evaporative Emission Canister Vent Solenoid Valve Replacement 15/25 Reg/Ext/Crew Cab w/8 Ft Bed
Removal Procedure
Important: Clean the evaporative emission (EVAP) connections and surrounding areas prior to disconnecting the fittings in order to avoid possible system contamination.
- Raise and suitably support the vehicle. Refer to Lifting and Jacking the Vehicle.
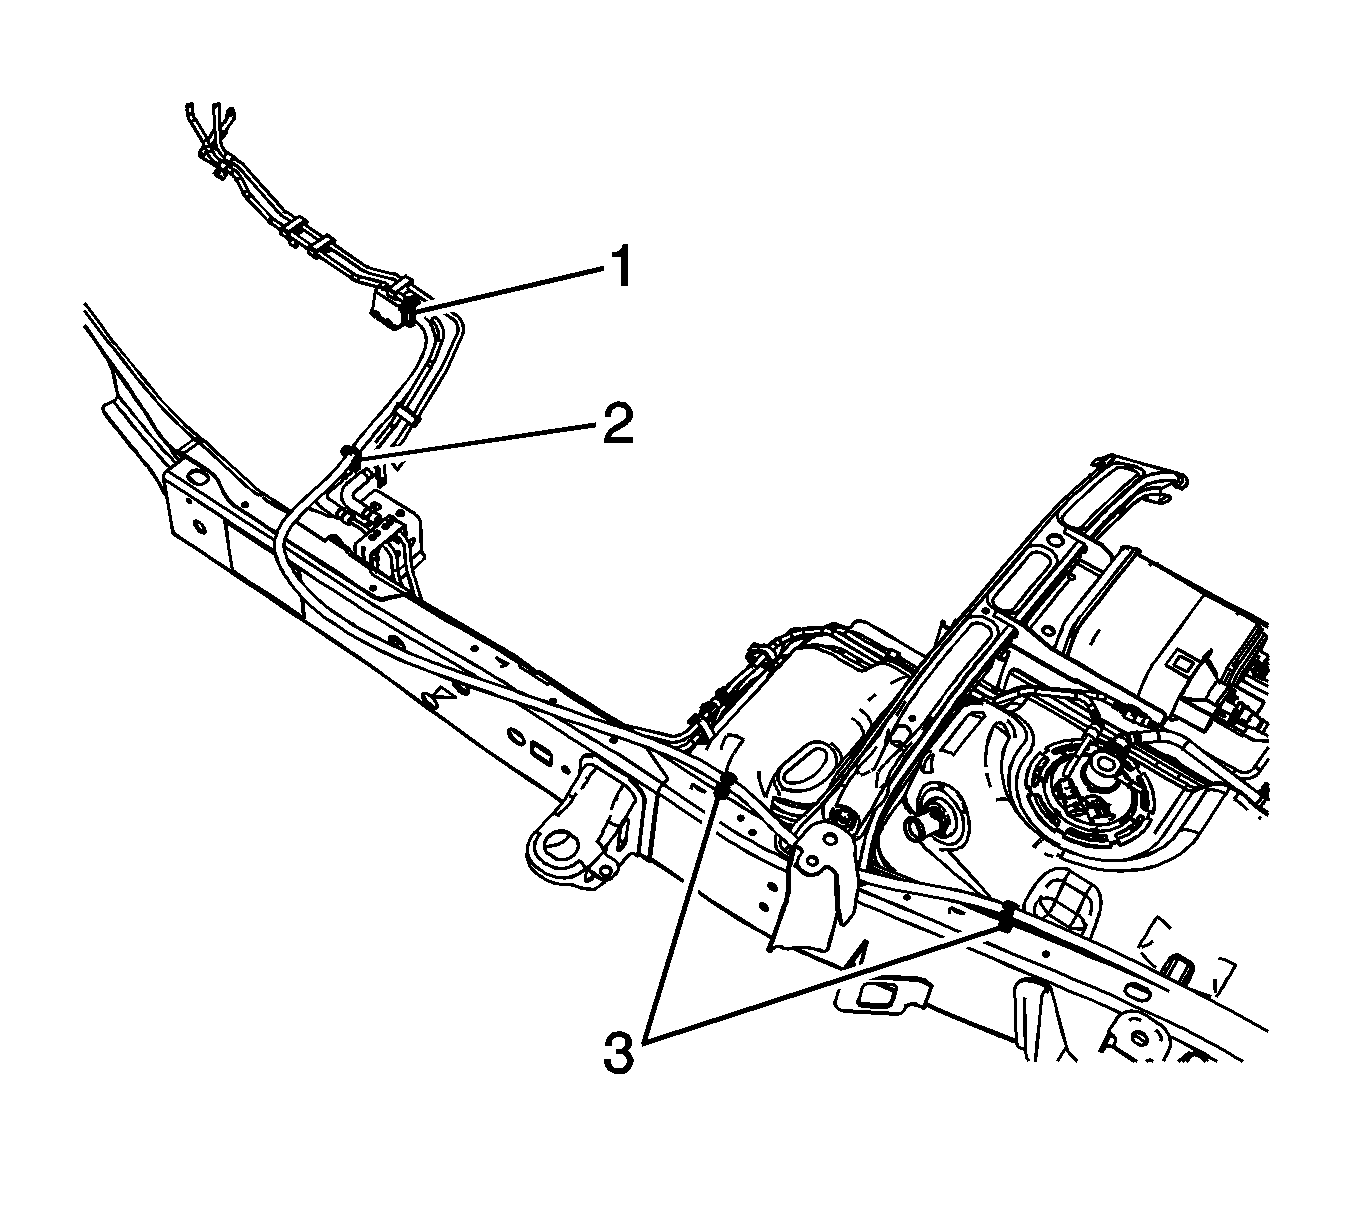
- Remove EVAP canister vent solenoid clip (1) from the chassis EVAP line.
- Remove the EVAP canister vent solenoid pipe from the clip (2) on the chassis EVAP line.
- Remove the EVAP canister vent solenoid pipe from the clips (3) on the brake pipes.
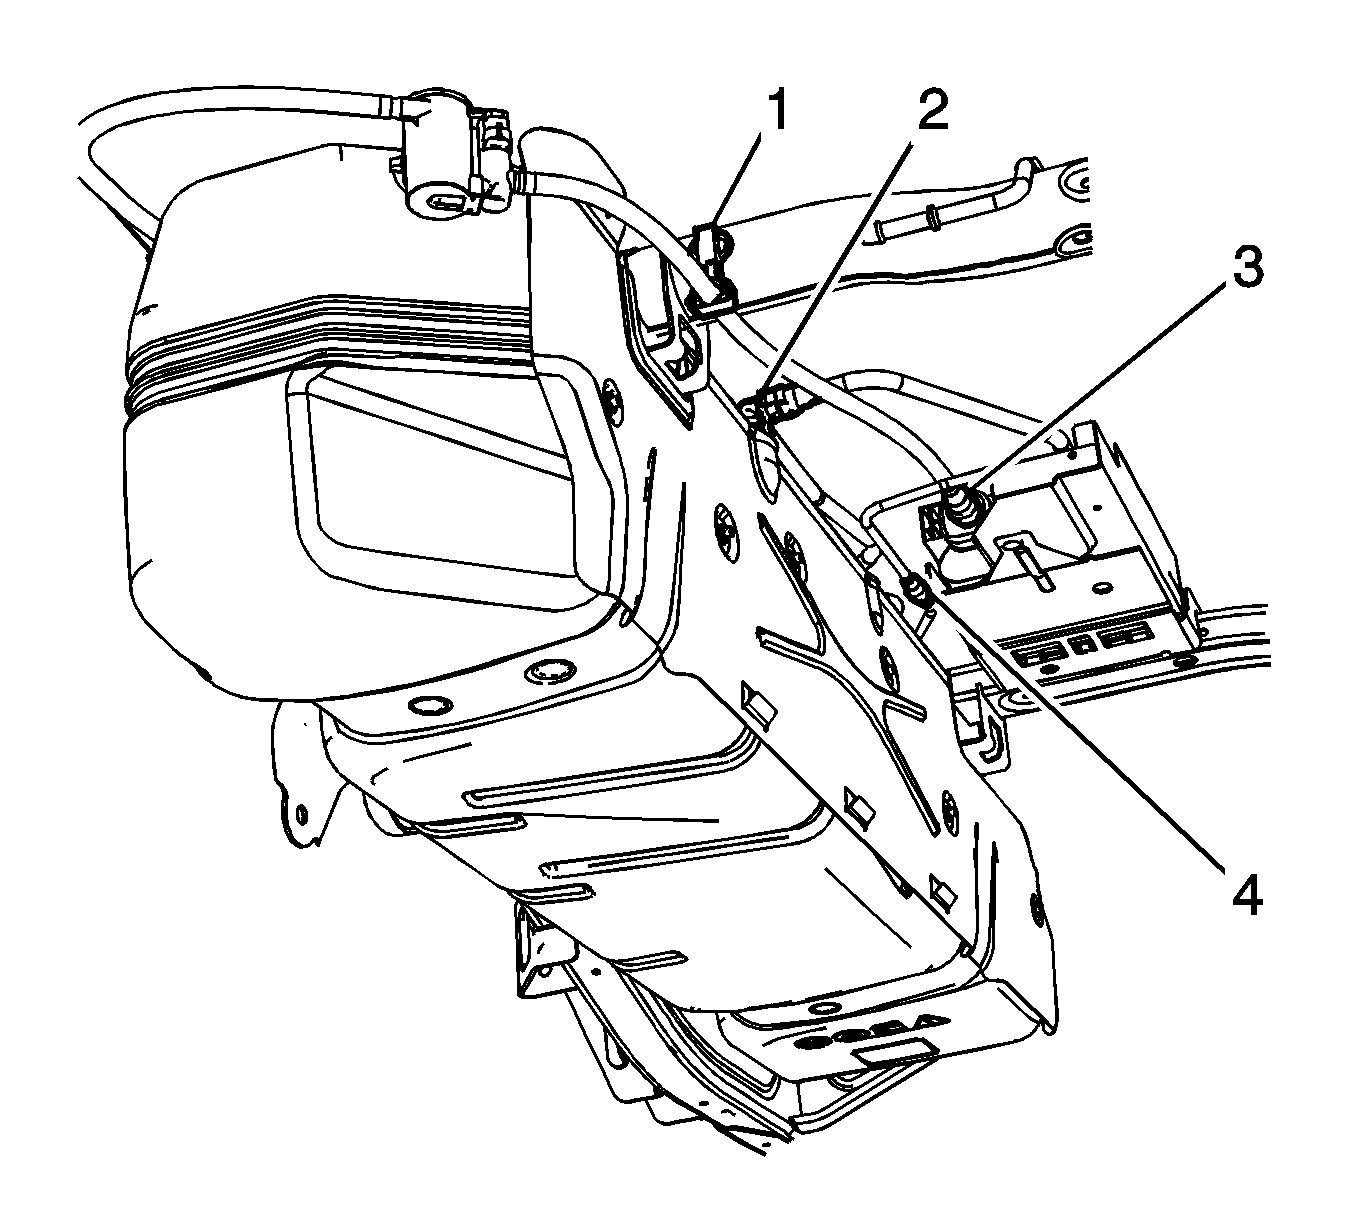
- Disconnect the chassis wiring harness electrical connector from the EVAP canister vent solenoid.
- Disconnect the EVAP vent solenoid pipe quick connect fitting (3) from the EVAP canister. Refer to Plastic Collar Quick Connect Fitting Service.
- Remove the EVAP canister vent solenoid pipe clip (1) from the frame crossmember.
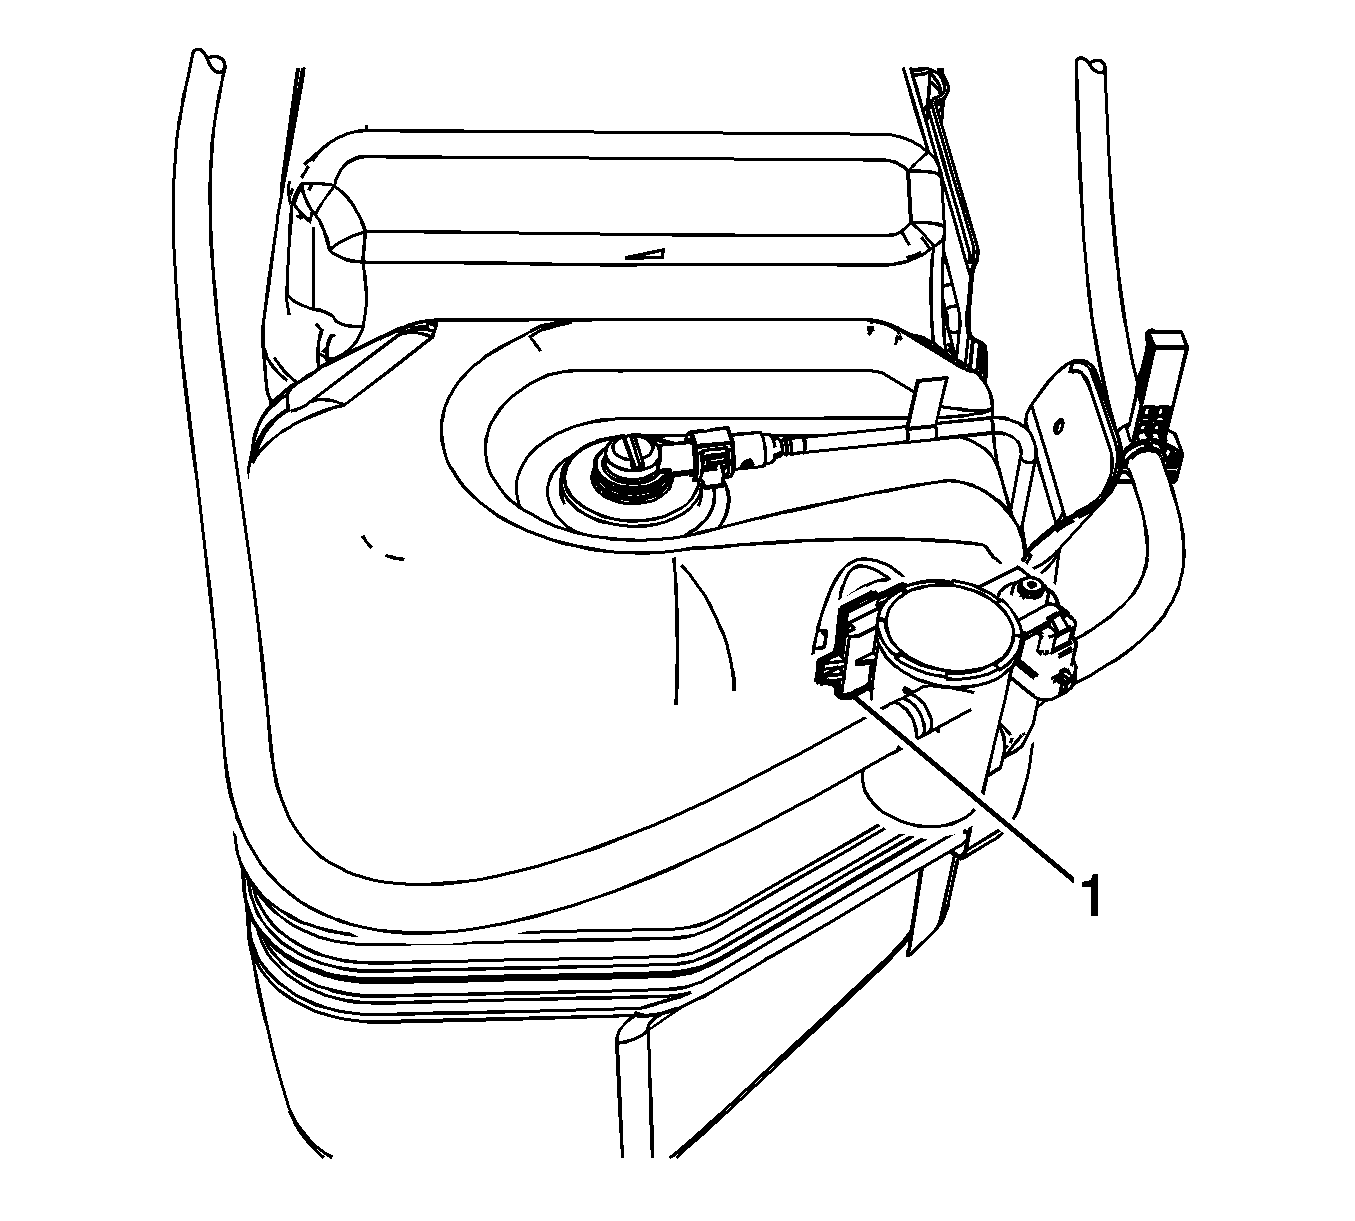
- Disengage the retainer (1) securing the EVAP canister vent solenoid.
- Slide the EVAP canister vent solenoid off the bracket towards the passenger side of the vehicle.
- Remove the EVAP canister vent solenoid from the vehicle.
Installation Procedure
- Position and install the EVAP canister vent solenoid to the vehicle.
- Slide the EVAP canister vent solenoid onto the bracket towards the driver side of the vehicle.
- Ensure that the retainer (1) is engaged, securing the EVAP canister vent solenoid.
- Connect the EVAP vent solenoid pipe quick connect fitting (3) to the EVAP canister. Refer to Plastic Collar Quick Connect Fitting Service.
- Install the EVAP canister vent solenoid pipe clip (1) to the frame crossmember.
- Connect the chassis wiring harness electrical connector to the EVAP canister vent solenoid.
- Install EVAP canister vent solenoid clip (1) to the chassis EVAP line.
- Install the EVAP canister vent solenoid pipe to the clip (2) on the chassis EVAP line.
- Install the EVAP canister vent solenoid pipe to the clips (3) on the brake pipes.
- Lower the vehicle.


Evaporative Emission Canister Vent Solenoid Valve Replacement 35 Reg/Ext/Crew Cab w/8Ft Bed
Removal Procedure
Important: Clean the evaporative emission (EVAP) connections and surrounding areas prior to disconnecting the fittings in order to avoid possible system contamination.
- Raise and suitably support the vehicle. Refer to Lifting and Jacking the Vehicle.
- Remove EVAP canister vent solenoid clip (1) from the chassis EVAP line.
- Remove the EVAP canister vent solenoid pipe from the clip (2) on the chassis EVAP line.
- Remove the EVAP canister vent solenoid pipe from the clips (3) on the brake pipes.
- Disconnect the chassis wiring harness electrical connector from the EVAP canister vent solenoid.
- Disconnect the EVAP vent solenoid pipe quick connect fitting (3) from the EVAP canister. Refer to Plastic Collar Quick Connect Fitting Service.
- Remove the EVAP canister vent solenoid pipe clip (1) from the frame crossmember.
- Disengage the retainer (1) securing the EVAP canister vent solenoid.
- Slide the EVAP canister vent solenoid off the bracket towards the passenger side of the vehicle.
- Remove the EVAP canister vent solenoid from the vehicle.


Installation Procedure
- Position and install the EVAP canister vent solenoid to the vehicle.
- Slide the EVAP canister vent solenoid onto the bracket towards the driver side of the vehicle.
- Ensure that the retainer (1) is engaged, securing the EVAP canister vent solenoid.
- Connect the EVAP vent solenoid pipe quick connect fitting (3) to the EVAP canister. Refer to Plastic Collar Quick Connect Fitting Service.
- Install the EVAP canister vent solenoid pipe clip (1) to the frame crossmember.
- Connect the chassis wiring harness electrical connector to the EVAP canister vent solenoid.
- Install EVAP canister vent solenoid clip (1) to the chassis EVAP line.
- Install the EVAP canister vent solenoid pipe to the clip (2) on the chassis EVAP line.
- Install the EVAP canister vent solenoid pipe to the clips (3) on the brake pipes.
- Lower the vehicle.


Evaporative Emission Canister Vent Solenoid Valve Replacement Rear of Tank
Removal Procedure
Note: Clean the evaporative emission (EVAP) connections and surrounding areas prior to disconnecting the fittings in order to avoid possible system contamination.
- Lift and support the vehicle. Refer to Lifting and Jacking the Vehicle.
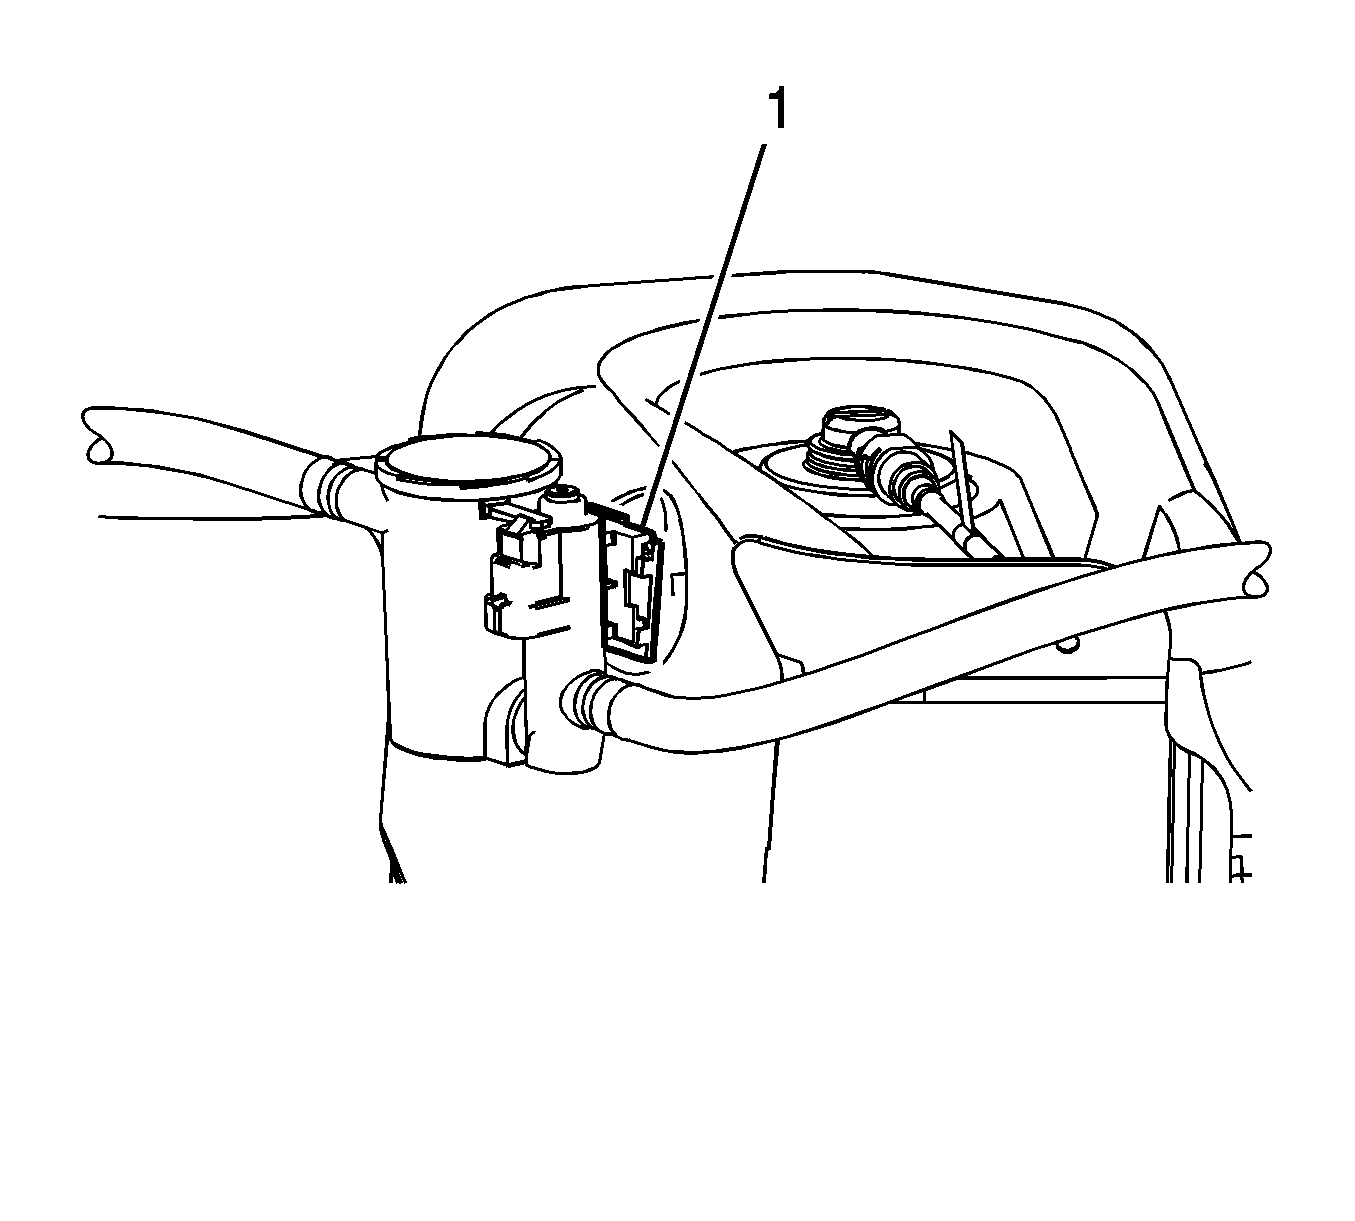
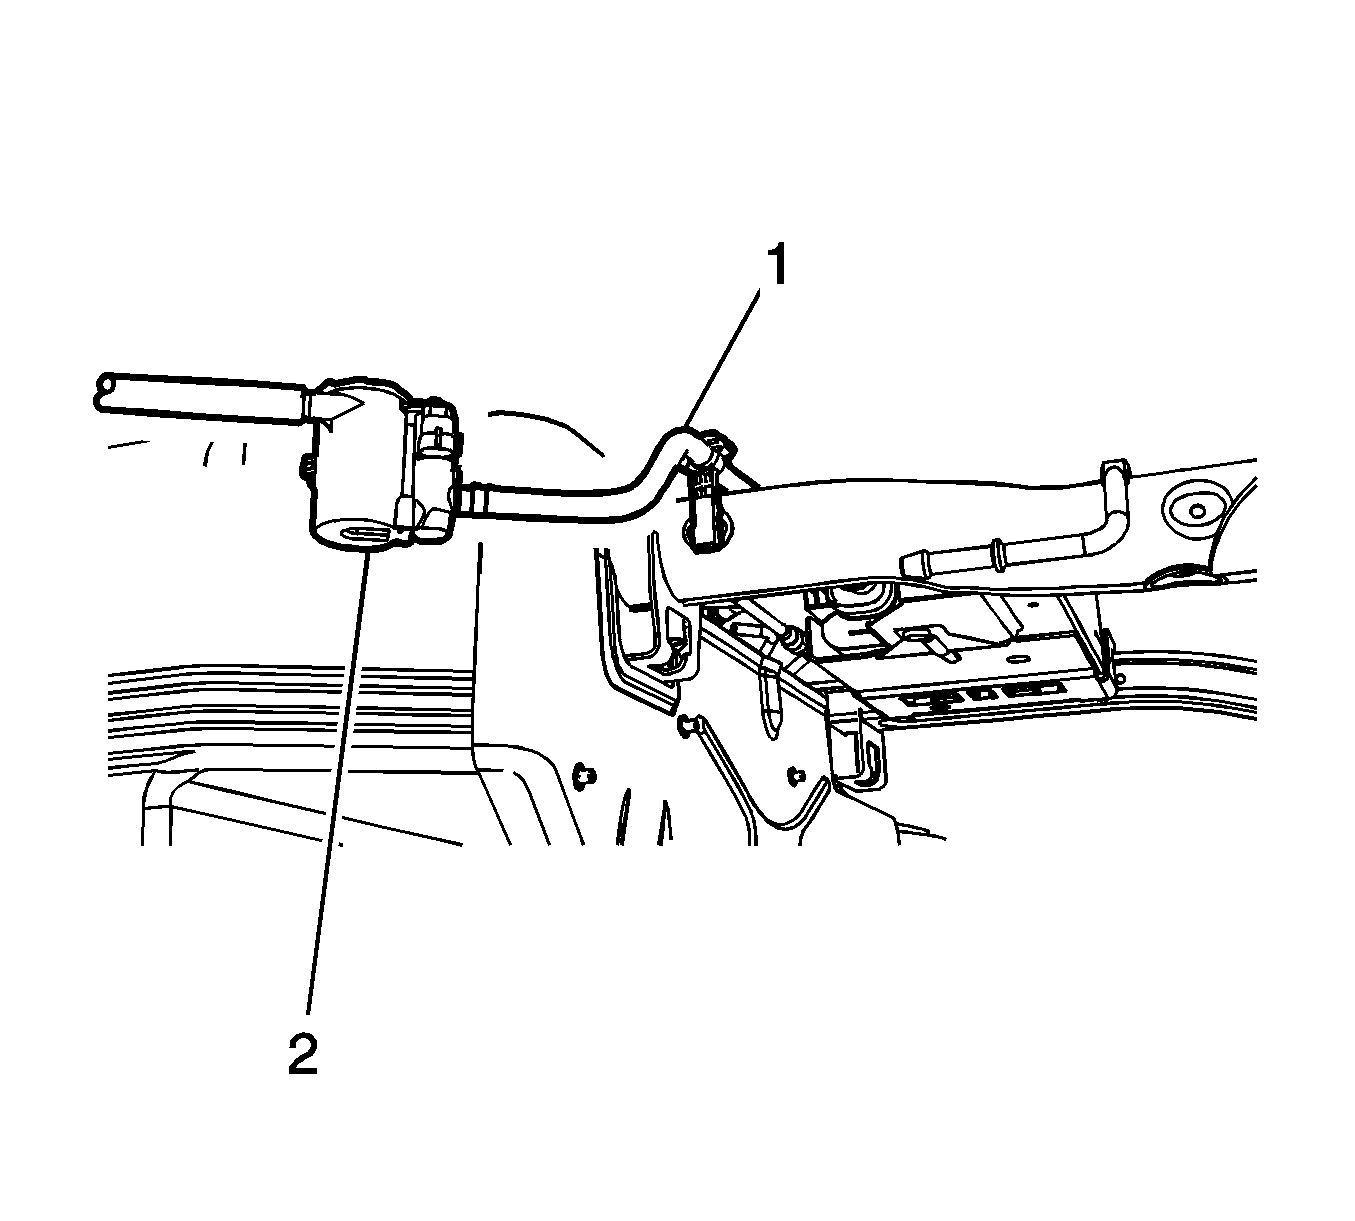
- Cut the canister vent solenoid hose (1) approximately 76 mm (3 in) from the evaporative emission canister vent solenoid (2).
- Disconnect the vent solenoid hose retainers (1).
- Remove the vent solenoid hose and filter (2).
- Replace the vent hose with bulk 5/8 in heater hose.
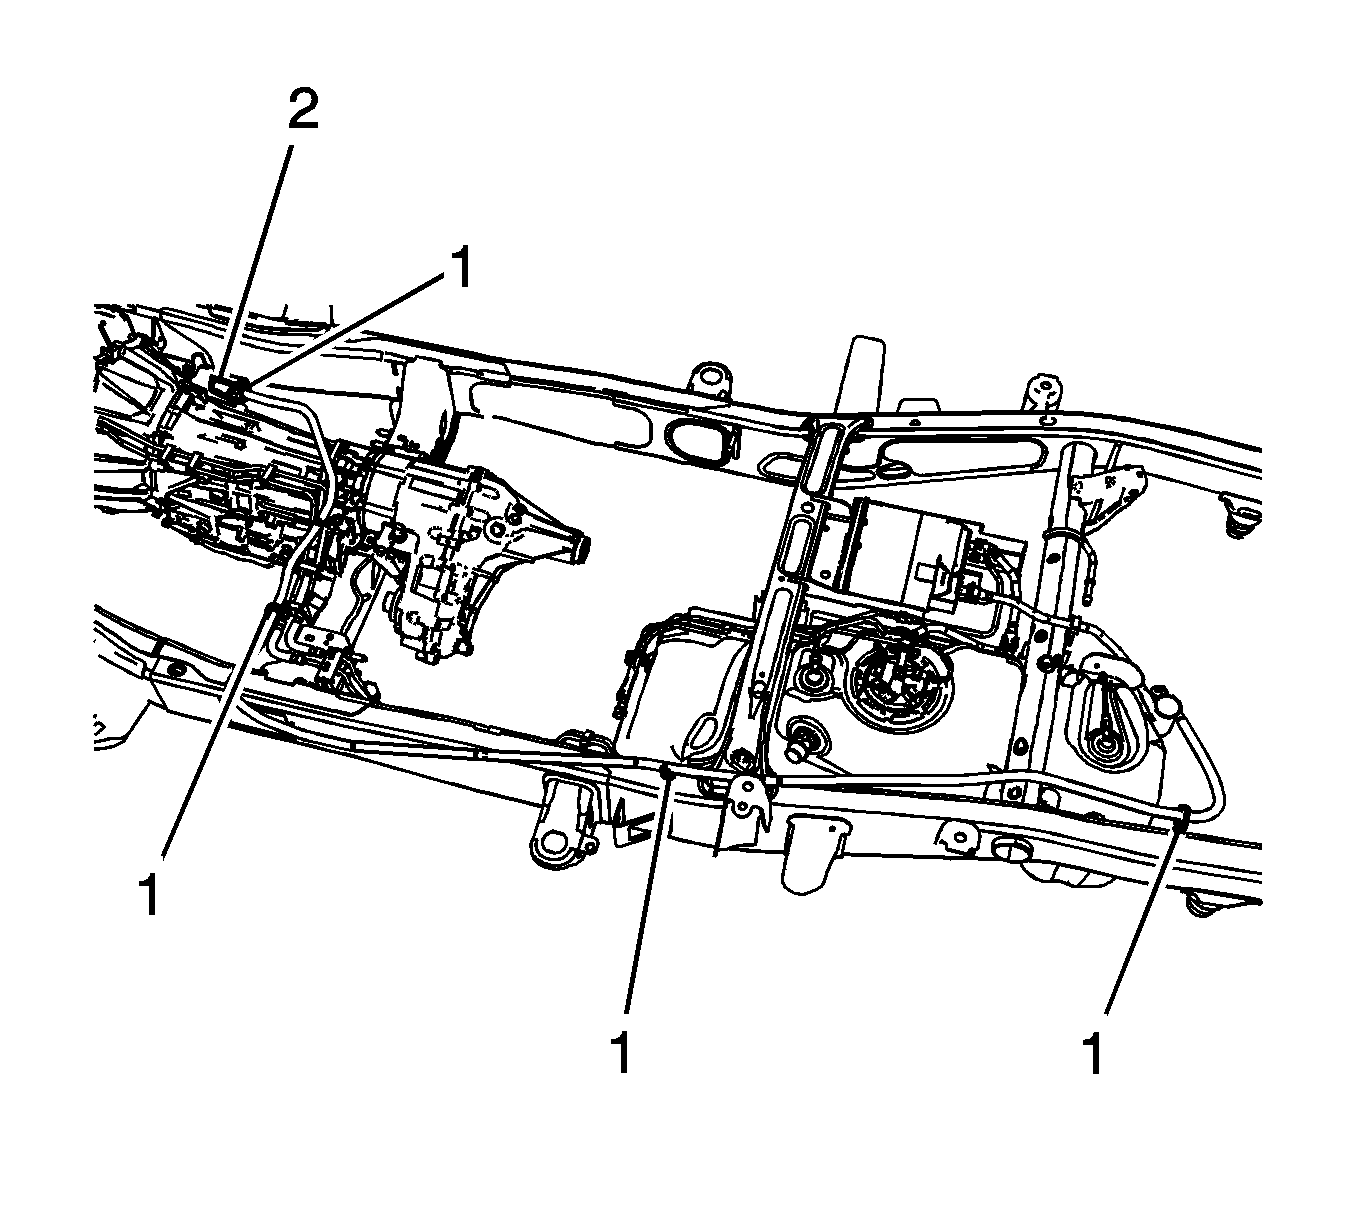
Note: Filter location on some models must be moved from driver side to passenger side.
Installation Procedure
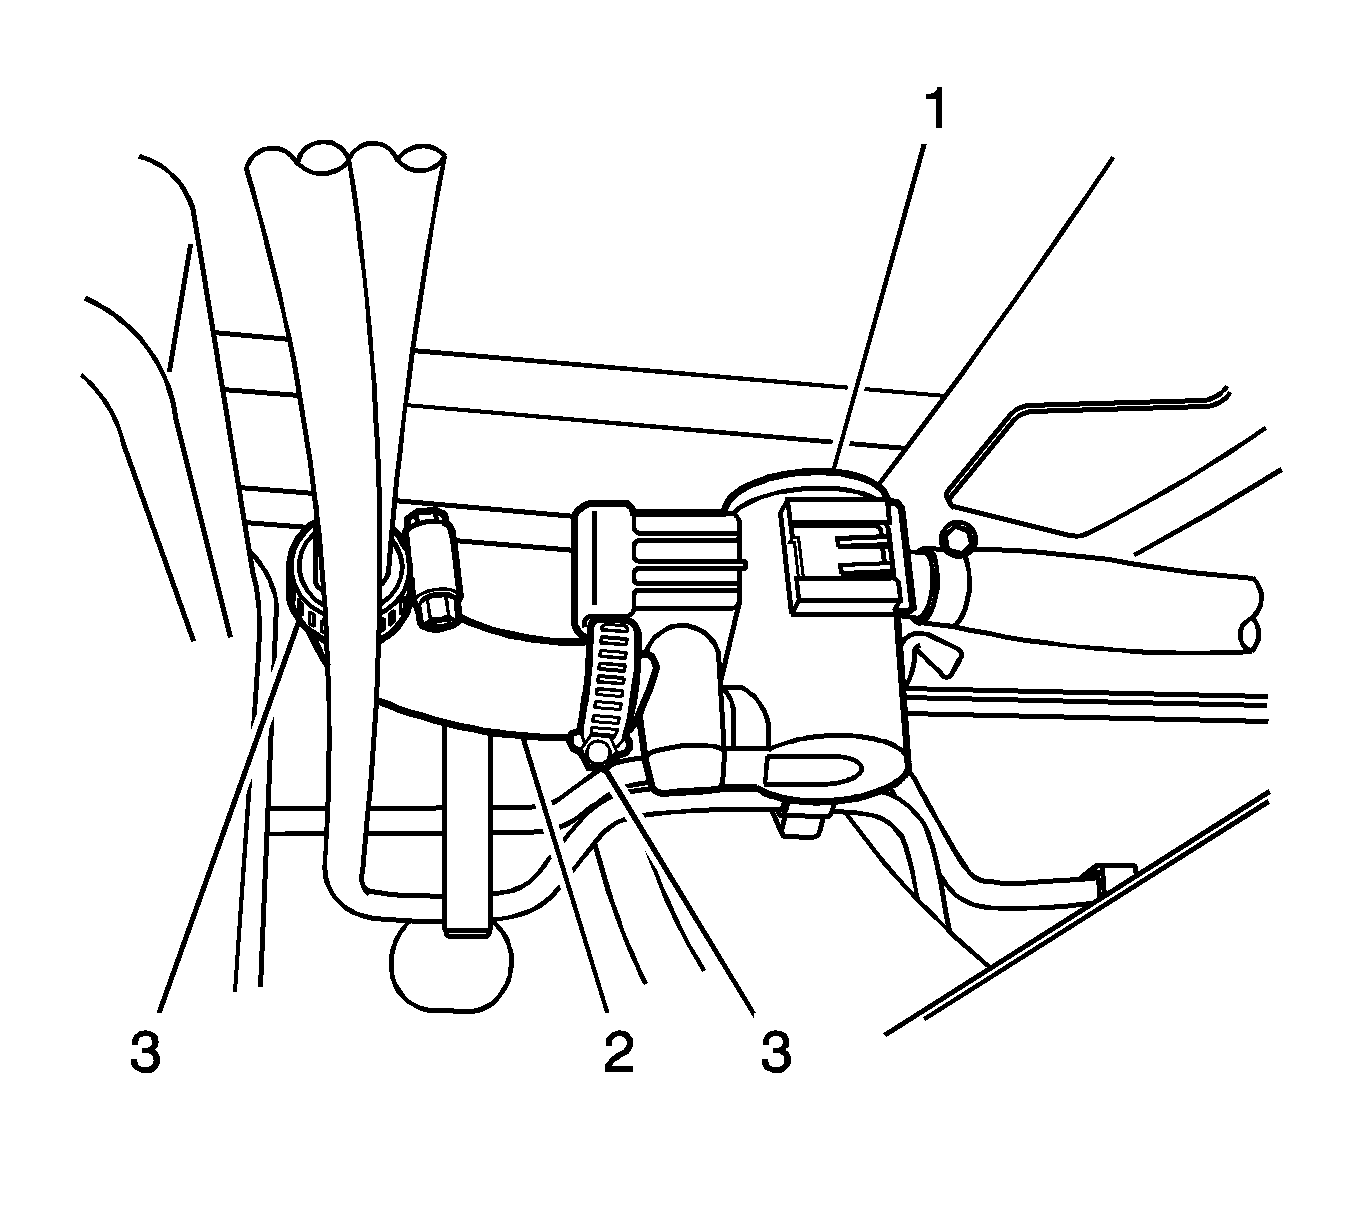
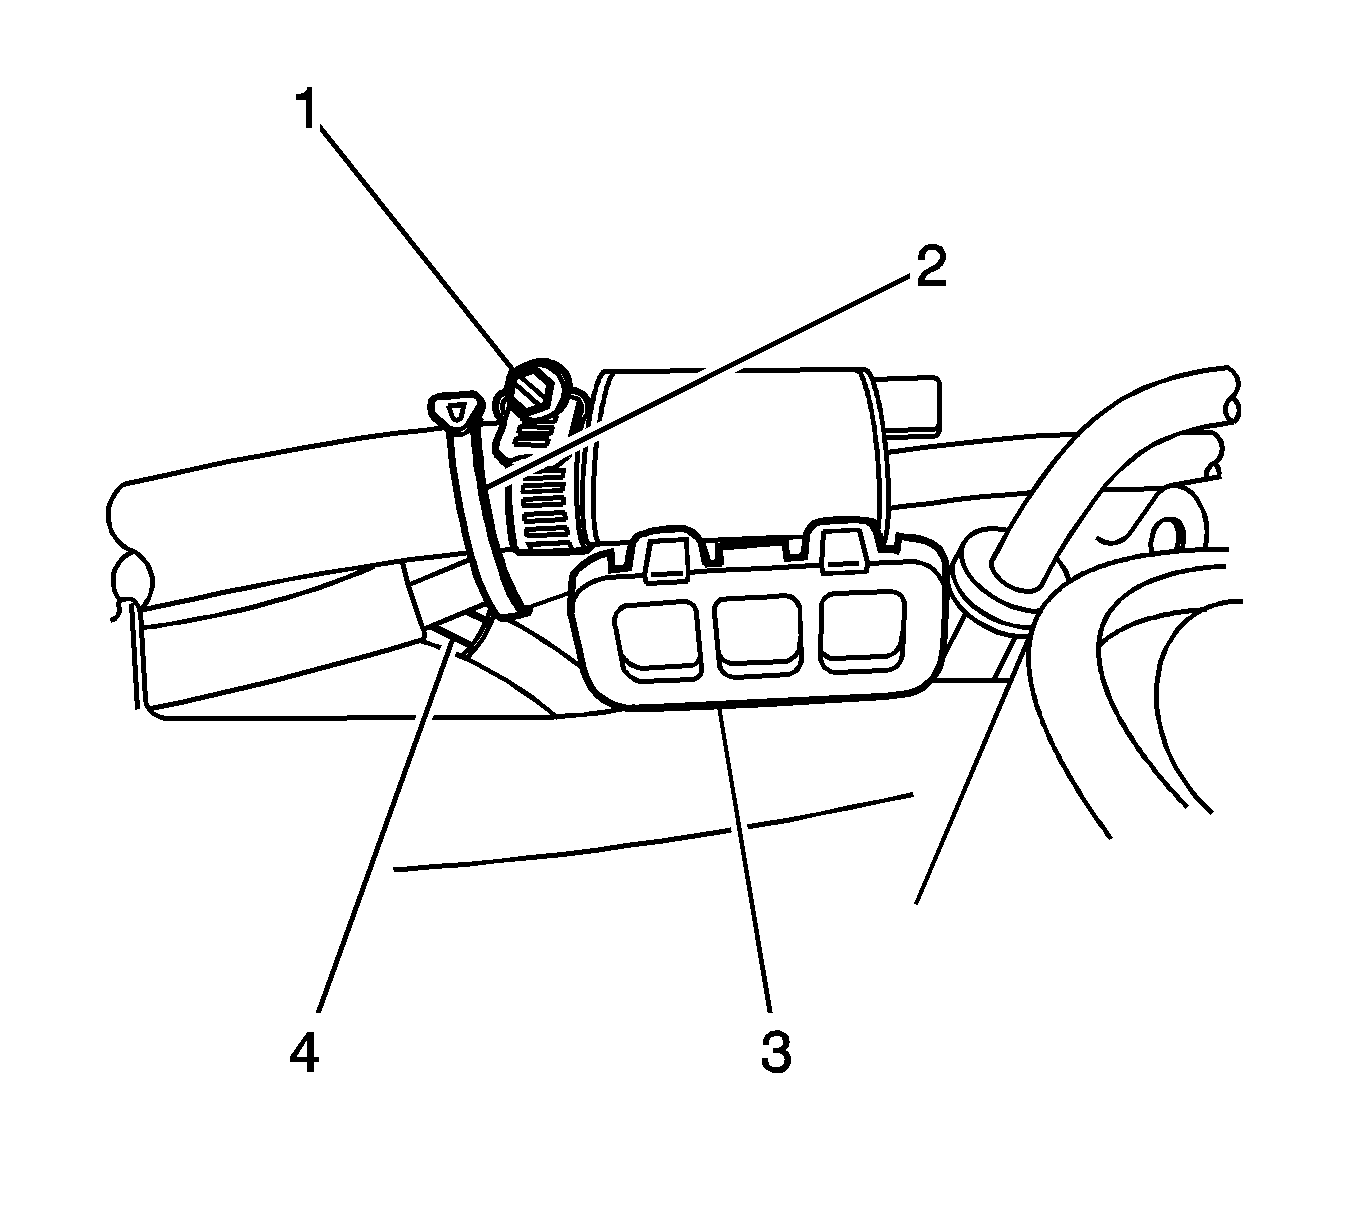
- Use a hose clamp (1) at the end of the vent hose.
- Ensure the filter (3) points down.
- Secure the vent hose with a tie strap (2) to the vent hose tee connector (4).
- Secure the remaining portion of the vent hose along the frame with tie straps as needed.
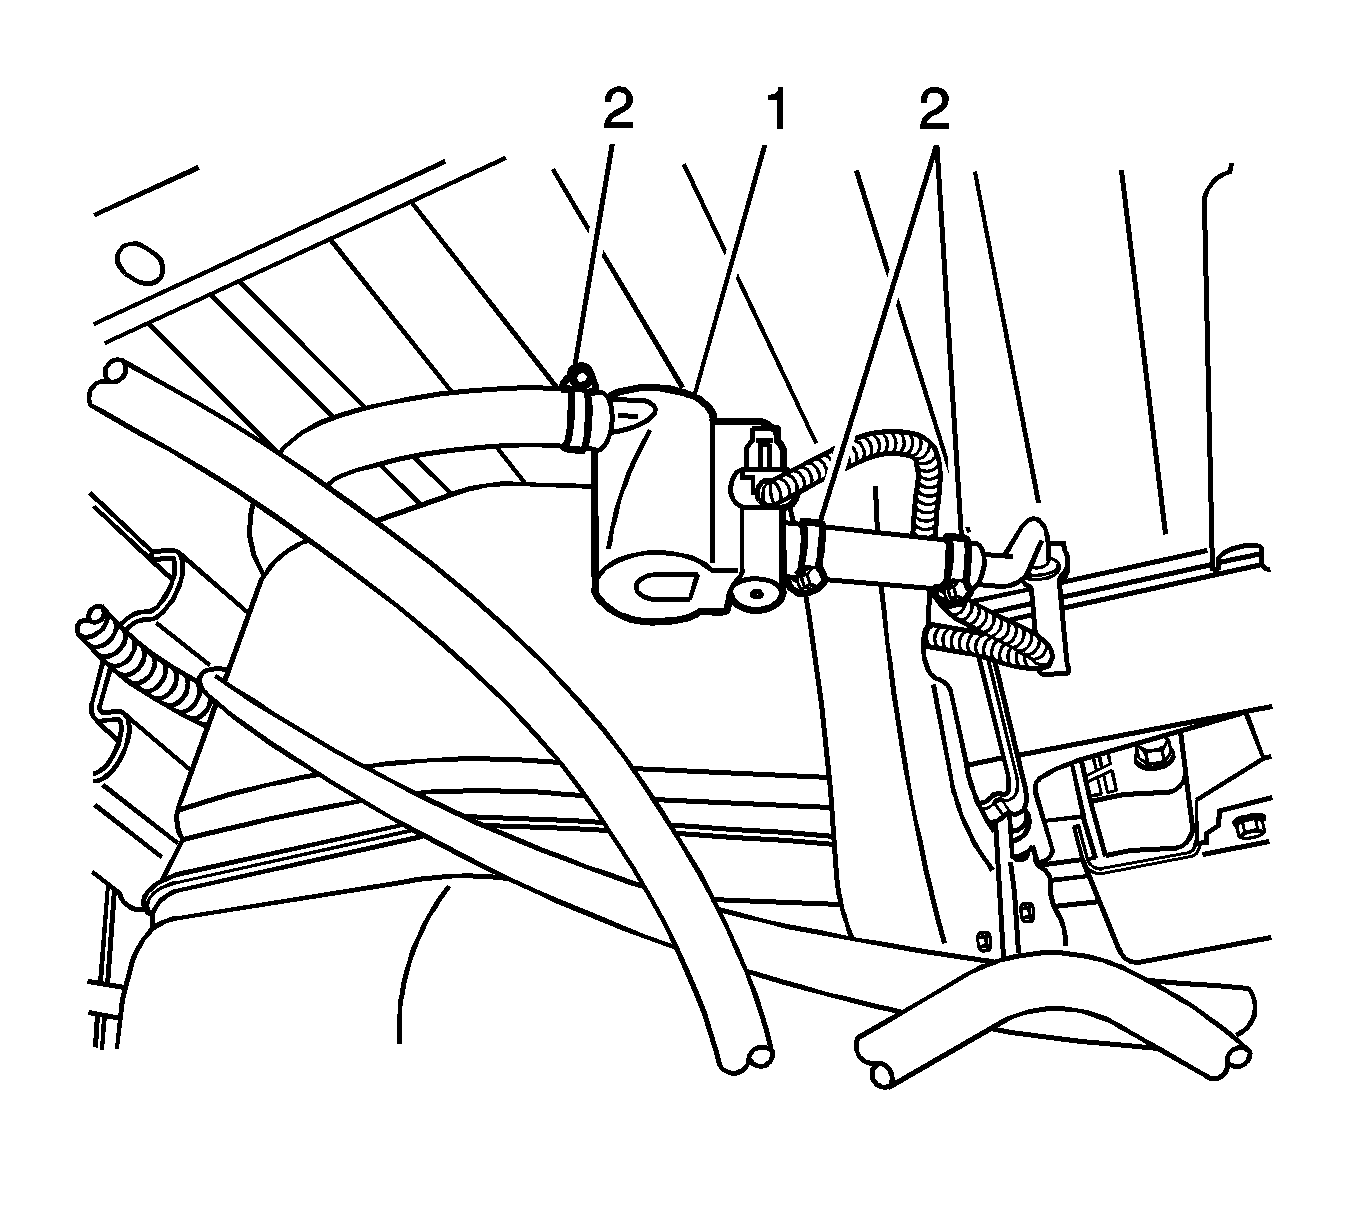
- Position and install the evaporative canister vent solenoid (1) to the vehicle.
- Secure both ends with hose clamps (2).
Evaporative Emission Canister Vent Solenoid Valve Replacement Front of Tank
Removal Procedure
Note: Clean the evaporative emission (EVAP) connections and surrounding areas prior to disconnecting the fittings in order to avoid possible system contamination.
- Lift and support the vehicle. Refer to Lifting and Jacking the Vehicle.
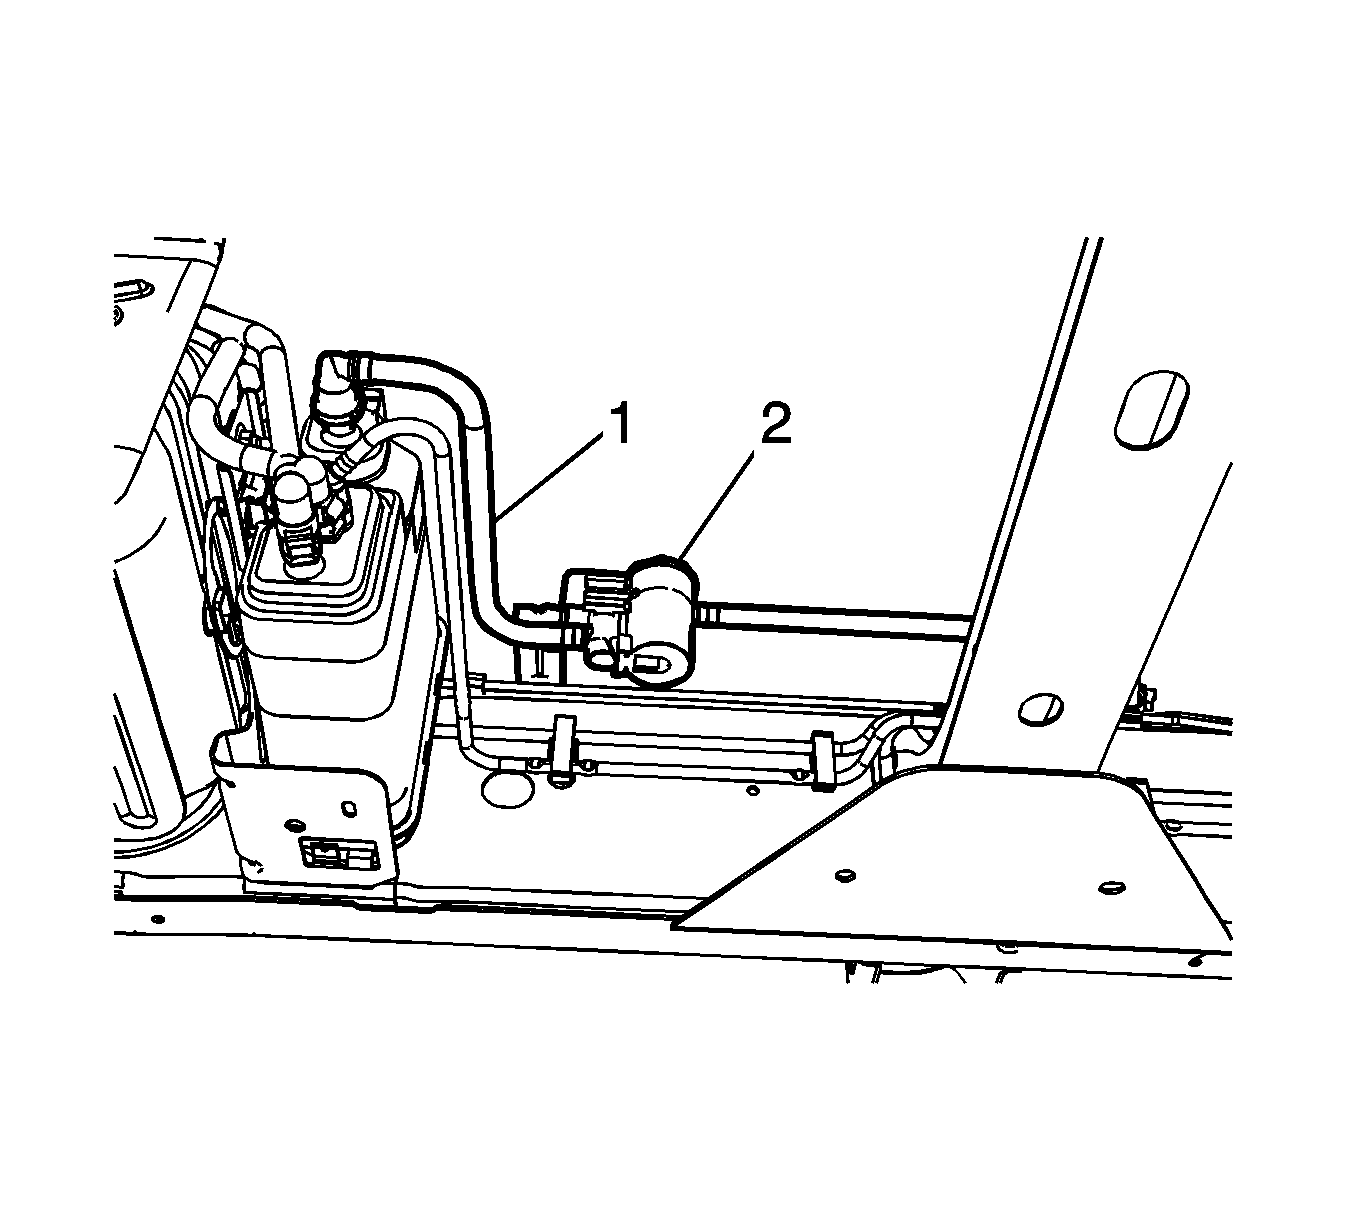
- Cut the canister vent solenoid hose (1) approximately 76 mm (3 in) from the evaporative emission canister vent solenoid (2).
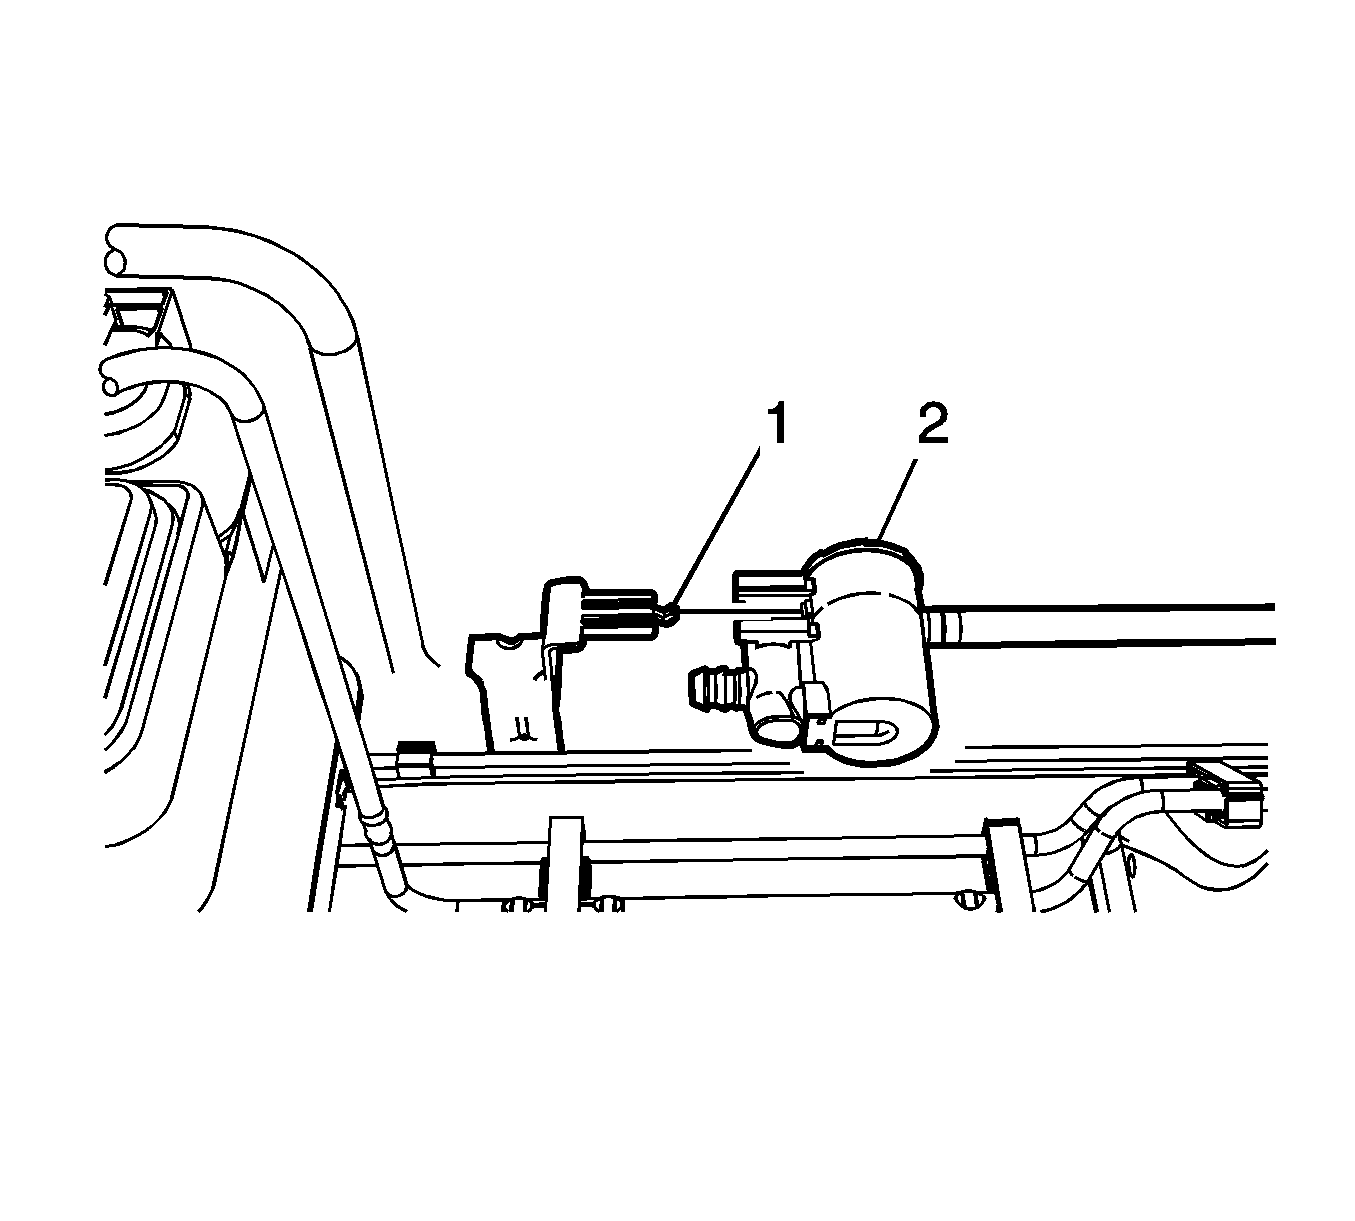
- Pull back on the retaining tab (1) and release the vent solenoid valve (2).
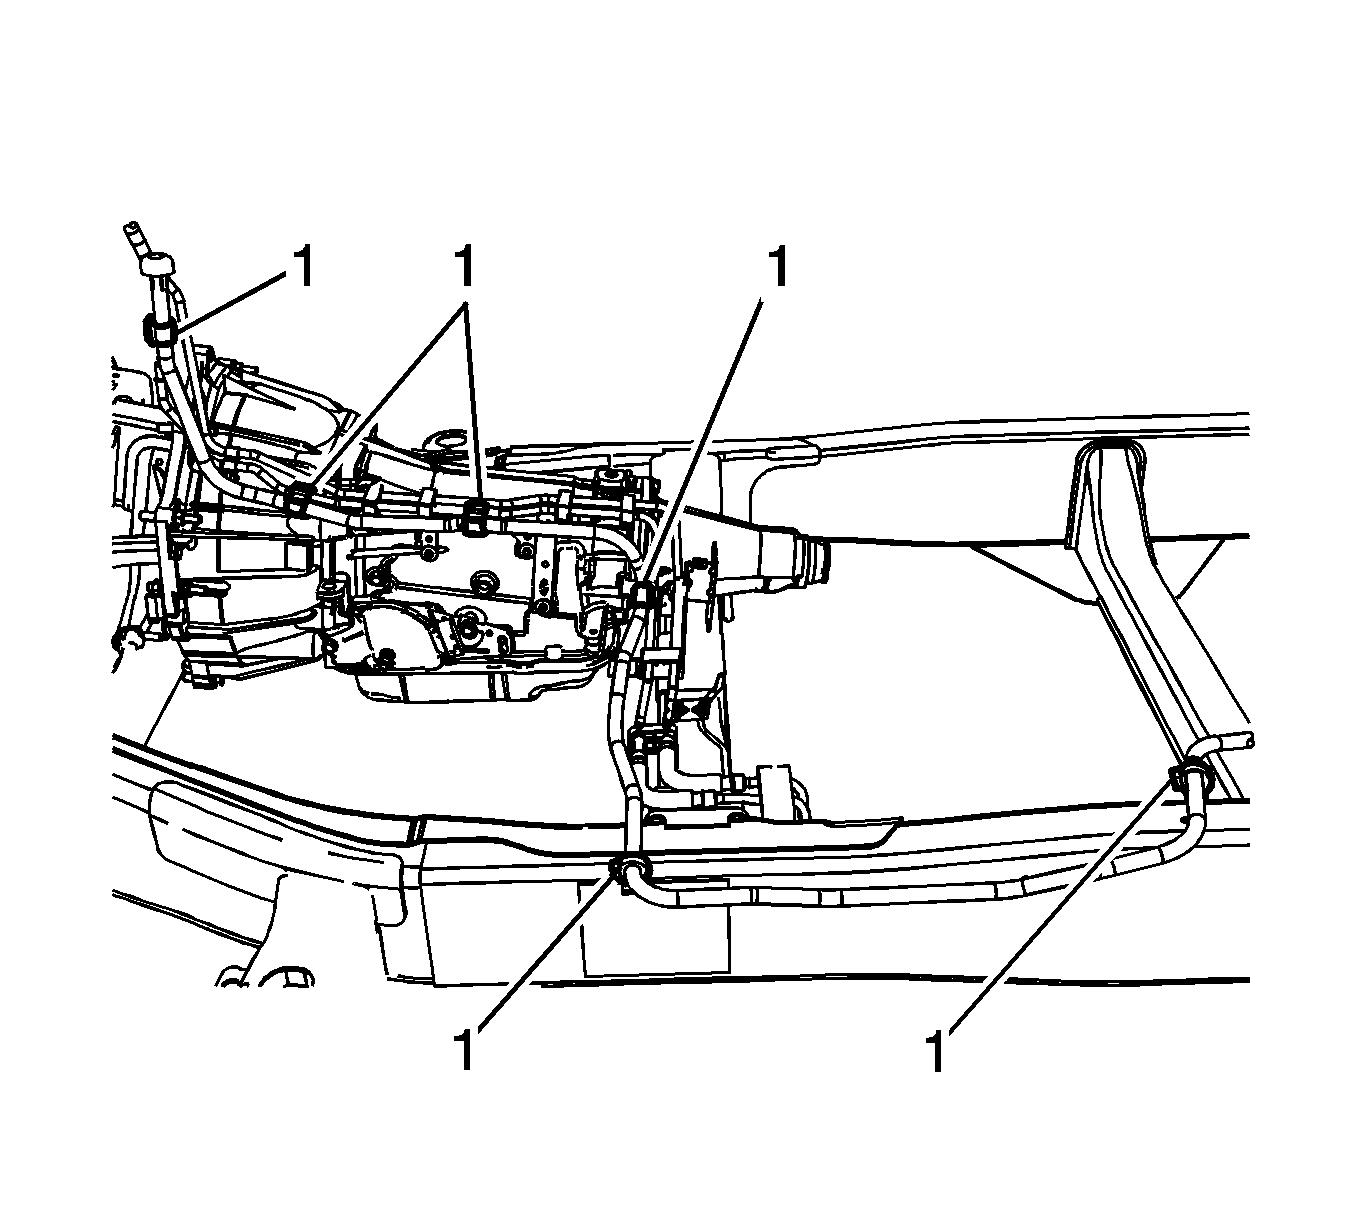
- Disconnect the vent solenoid hose from the plastic retainers (1).
- Remove the vent solenoid hose.
- Replace the vent hose with bulk 5/8 in heater hose.
Note: Filter location on some models must be moved from driver side to passenger side.
Installation Procedure
- Use a hose clamp (1) at the end of the vent hose.
- Ensure the filter (3) points down.
- Secure the vent hose with a tie strap (2) to the vent hose tee connector (4).
- Use 5/8 in heater hose and secure it along the frame with tie straps as needed.
- Position and install the evaporative canister vent solenoid (1) to the vehicle.
- Use 5/8 in heater hose (2) to secure both ends with hose clamps (3).

