Special Tools
J 33049 Camshaft Bearing Service Kit
For equivalent regional tools, refer to
Special Tools.
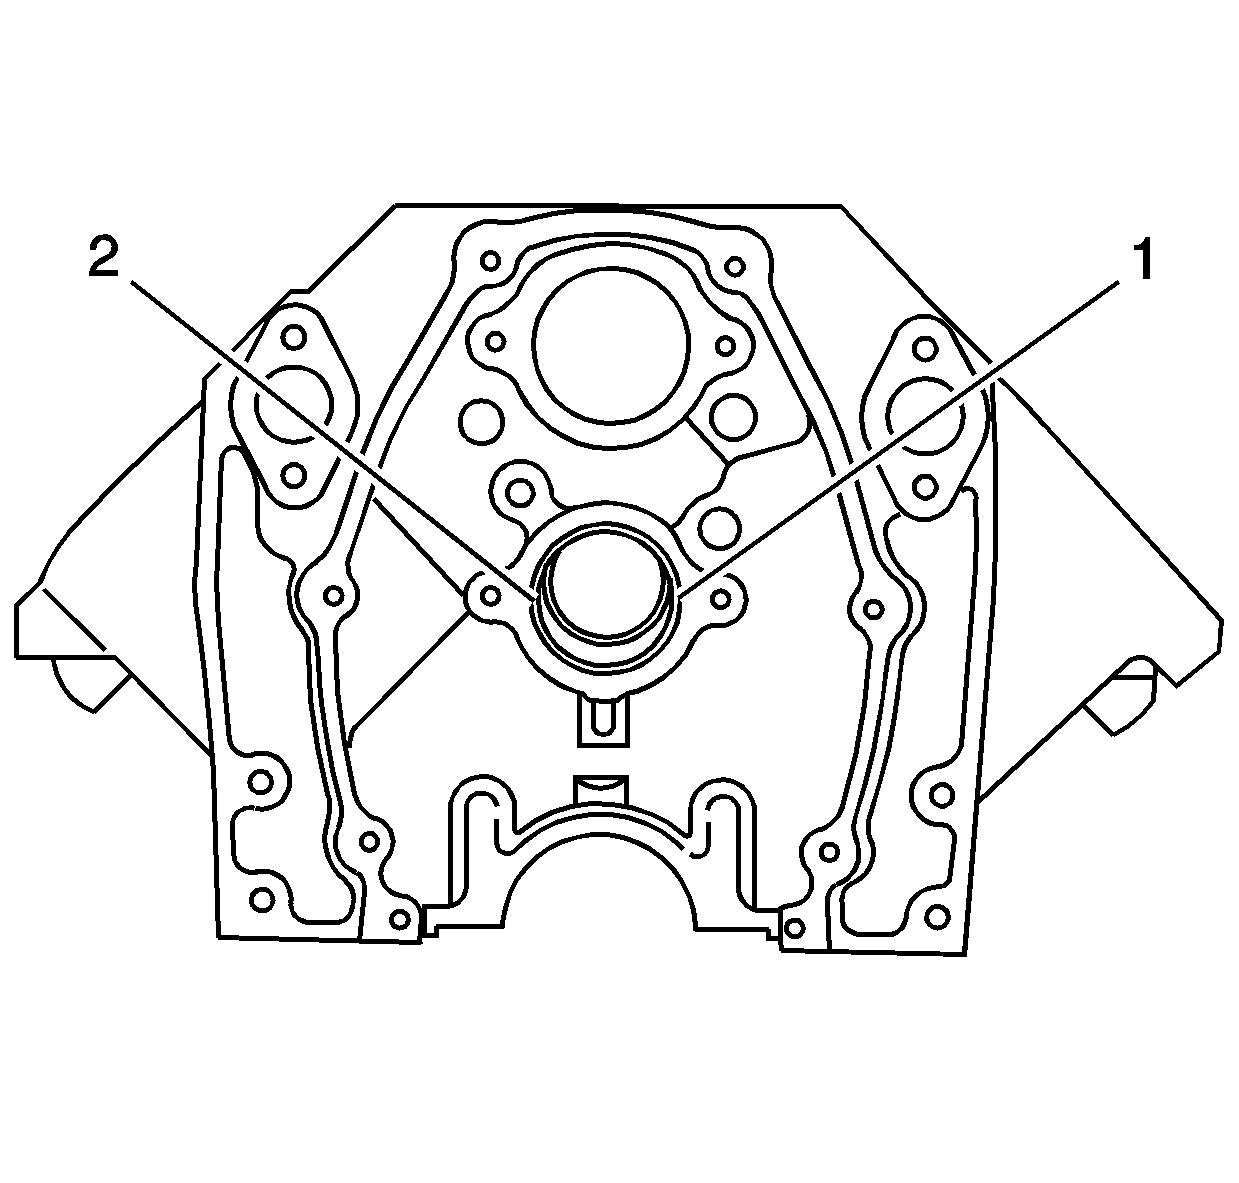
Note: When installing the camshaft bearings, always look in order to ensure that the camshaft bearing lubrication hole is located above the 3 o'clock position (1) or the 9 o'clock position (2). The proper
positioning of the camshaft bearing lubrication hole is in order to ensure the best lubrication of the engine camshaft journals.
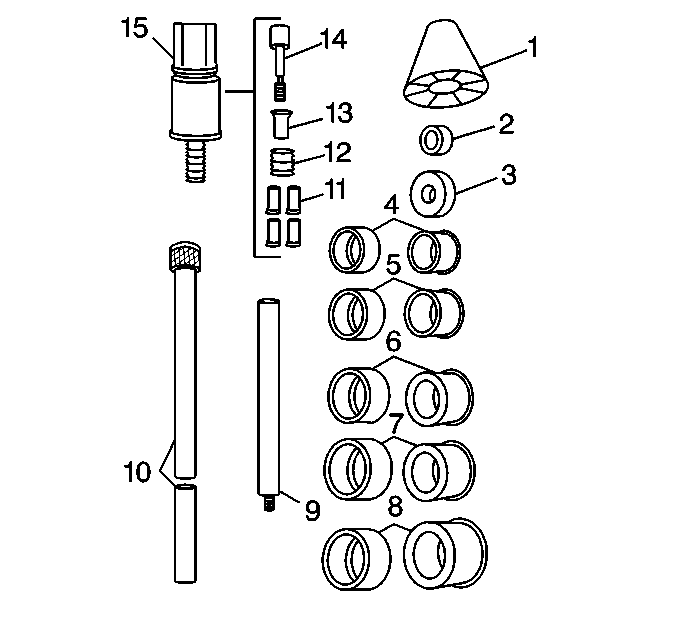
- Assemble the
J 33049 kit
handle (10), the expanding driver (4-8), the washer (2 or 3), and the expander assembly (15).
Warning: Refer to Safety Glasses Warning in the Preface section.
Note: The camshaft bearings vary in size. When ordering the new camshaft bearings, be sure to order the correct camshaft bearings for the application to be serviced.
Always install the camshaft outer bearings #1 and #4
first. The camshaft outer bearings serve as a guide for the
J 33049 kit
and help center the camshaft inner bearings during the installation process.
- Install the NEW camshaft outer bearings #4 and #1.
| 2.1. | Install the NEW camshaft outer bearing #4 onto the
J 33049 kit
expander assembly. |
| 2.2. | Tighten the
J 33049 kit
expander assembly nut until snug. |
| 2.3. | Align the lubrication hole of the camshaft outer bearing #4 above the 3 o'clock position or the 9 o'clock position of the camshaft outer bearing bore #4 at the rear of the engine block. |
| 2.4. | Drive the camshaft outer bearing #4 into the camshaft outer bearing bore #4 at the rear of the engine block. |
| 2.5. | Loosen the
J 33049 kit
expander assembly nut. |
| 2.6. | Remove the camshaft outer bearing #4 from the
J 33049 kit
expander assembly. |
| 2.7. | Install the NEW camshaft outer bearing #1 onto the
J 33049 kit
expander assembly. |
| 2.8. | Tighten the
J 33049 kit
expander assembly nut until snug. |
| 2.9. | Align the lubrication hole of the camshaft outer bearing #1 above the 3 o'clock position or the 9 o'clock position of the camshaft outer bearing bore #1 at the front of the engine block. |
| 2.10. | Drive the camshaft outer bearing #1 into the camshaft outer bearing bore #1 at the front of the engine block. |
| 2.11. | Loosen the
J 33049 kit
expander assembly nut. |
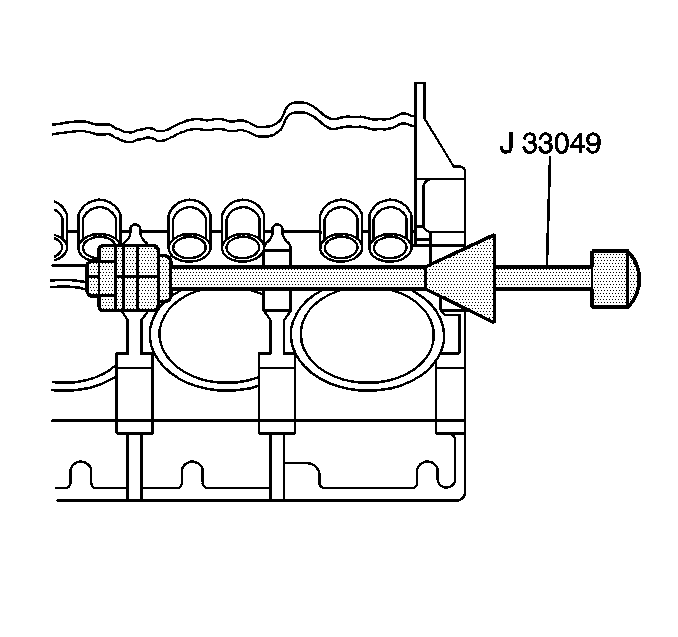
| 2.12. | Carefully slide the
J 33049 kit
into the engine block until the
J 33049 kit
expander assembly is positioned between
the camshaft inner bearing bores. |
- Install the NEW camshaft inner bearings #3 and #2.
| 3.1. | Install the NEW camshaft inner bearing #3 onto the
J 33049 kit
expander assembly. |
| 3.2. | Tighten the
J 33049 kit
expander assembly nut until snug. |
| 3.3. | Align the lubrication hole of the camshaft inner bearing #3 above the 3 o'clock position or the 9 o'clock position of the camshaft inner bearing bore #3 of the engine block. |
| 3.4. | Push the
J 33049 kit
guide cone into the camshaft front bearing bore #1 in order to align the
J 33049 kit
. |
| 3.5. | Drive the camshaft inner bearing #3 into the camshaft inner bearing bore #3. |
| 3.6. | Loosen the
J 33049 kit
expander assembly nut. |
| 3.7. | Carefully slide the
J 33049 kit
until the
J 33049 kit
expander assembly is positioned between the camshaft inner
bearing bore #2 and the camshaft outer bearing bore #1. |
| 3.8. | Install the NEW camshaft inner bearing #2 onto the
J 33049 kit
expander assembly. |
| 3.9. | Tighten the
J 33049 kit
expander assembly nut until snug. |
| 3.10. | Align the lubrication hole of the camshaft inner bearing #2 above the 3 o'clock position or the 9 o'clock position of the camshaft inner bearing bore #2 of the engine block. |
| 3.11. | Push the
J 33049 kit
guide cone into the camshaft front bearing bore #1 in order to align the
J 33049 kit
. |
| 3.12. | Drive the camshaft inner bearing #2 into the camshaft inner bearing bore #2. |
| 3.13. | Loosen the
J 33049 kit
expander assembly nut. |
- Carefully remove the
J 33049 kit
from the engine block.
