Parking Brake Shoe Replacement 15 Series
Removal Procedure
- Raise and support the vehicle. Refer to Lifting and Jacking the Vehicle in General Information.
- Remove the tire and the wheel. Refer to Tire and Wheel Removal and Installation in Tires and Wheels.
- Relieve the tension on the park brake cables by loosening the nut at the equalizer.
- Remove the park brake cable from the park brake actuator lever.
- Remove the rotor. Refer to Rear Brake Rotor Replacement in Disc Brakes.
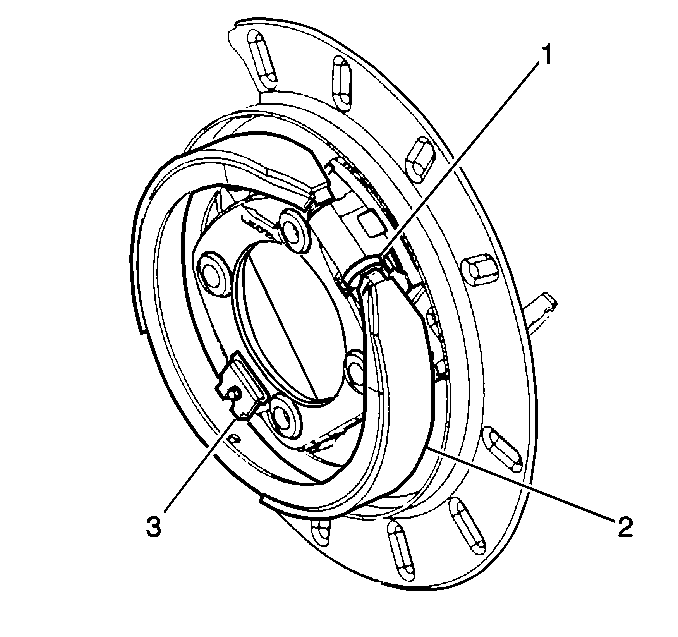
- Turn the adjustment screw (1) to the fully home position in the notched adjustment nut.
- Remove the park brake shoe assembly from the backing plate by removing the tips from the slots and sliding the shoe (2) towards the retaining spring (3) until the shoe disengages from the spring.
- Remove the park brake shoe assembly from the vehicle by placing one of the open ends of the shoe over the axle flange and rotating the shoe until it has cleared the flange.

Installation Procedure
- Clean the debris and the dust from the park brake components using a clean shop cloth.
- Align the slots in both the adjusting screw and tappet (1) to be parallel with the backing plate face.
- Install the park brake shoe assembly (2) to the vehicle by placing one of the open ends of the shoe over the axle flange and rotating the shoe until it is behind the flange.
- Position the park brake shoe on the inboard side of the actuator.
- Slide the park brake shoe into position and seat into the retaining spring (3).
- Inspect the shoe assembly position. The shoe must be central on the backing plate with both tips located in the slots.
- Adjust the park brake shoe. Refer to Park Brake Adjustment .
- Install the rotor. Refer to Rear Brake Rotor Replacement in Disc Brakes.
- Install the park brake cable to the park brake actuator lever.
- Tighten the nut to the intermediate cable at the equalizer.
- Install the tire and wheel. Refer to Tire and Wheel Removal and Installation in Tires and Wheels.
- Remove the safety stands.
- Lower the vehicle.
- Adjust park brake cable. Refer to Park Brake Adjustment .

Notice: Use the correct fastener in the correct location. Replacement fasteners must be the correct part number for that application. Fasteners requiring replacement or fasteners requiring the use of thread locking compound or sealant are identified in the service procedure. Do not use paints, lubricants, or corrosion inhibitors on fasteners or fastener joint surfaces unless specified. These coatings affect fastener torque and joint clamping force and may damage the fastener. Use the correct tightening sequence and specifications when installing fasteners in order to avoid damage to parts and systems.
Tighten
Tighten the nut to 3.5 N·m (31 lb in).
Parking Brake Shoe Replacement 25/35 Series
Removal Procedure
Caution: Refer to Brake Dust Caution in the Preface section.
- Raise and support the vehicle. Refer to Lifting and Jacking the Vehicle in General Information.
- Remove the tire and the wheel. Refer to Tire and Wheel Removal and Installation in Tires and Wheels.
- Relieve the tension on the park brake cables by loosening the nut at the equalizer.
- Remove the park brake cable from the park brake actuator lever.
- Remove the rotor. Refer to Rear Brake Rotor Replacement in Disc Brakes.
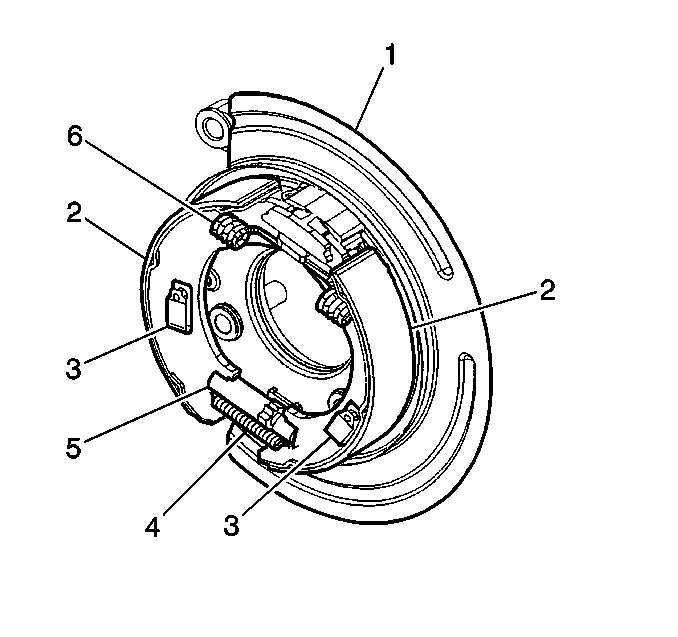
- Remove the park brake shoe return spring (6).
- Remove the park brake shoe anchor springs and pins (3).
- Separate the tips of the shoes from the park brake actuator and remove the park brake shoes and adjuster assembly from the vehicle.

Installation Procedure
- Clean the debris and the dust from the park brake components using a clean shop cloth.
- Install the adjuster assembly to the park brake shoes.
- Separate the tips of the shoes and install the park brake shoes to the park brake actuator.
- Install the park brake shoe anchor springs and pins (3).
- Install the park brake shoe return spring (6).
- Adjust the park brake shoe. Refer to Park Brake Adjustment .
- Install the rotor. Refer to Rear Brake Rotor Replacement in Disc Brakes.
- Install the park brake cable to the park brake actuator lever.
- Tighten the nut to the intermediate cable at the equalizer.
- Install the tire and wheel. Refer to Tire and Wheel Removal and Installation in Tires and Wheels.
- Remove the safety stands.
- Lower the vehicle.
- Adjust park brake cable. Refer to Park Brake Adjustment .

Notice: Use the correct fastener in the correct location. Replacement fasteners must be the correct part number for that application. Fasteners requiring replacement or fasteners requiring the use of thread locking compound or sealant are identified in the service procedure. Do not use paints, lubricants, or corrosion inhibitors on fasteners or fastener joint surfaces unless specified. These coatings affect fastener torque and joint clamping force and may damage the fastener. Use the correct tightening sequence and specifications when installing fasteners in order to avoid damage to parts and systems.
Tighten
Tighten the nut to 3.5 N·m (31 lb in).
