Auxiliary Heater Core Replacement Tahoe/Yukon
Removal Procedure
- Recover the refrigerant from the A/C system. Refer to Refrigerant Recovery and Recharging .
- Drain the engine coolant. Refer to Cooling System Draining and Filling in Engine Cooling.
- Raise the vehicle. Refer to Lifting and Jacking the Vehicle in General Information.
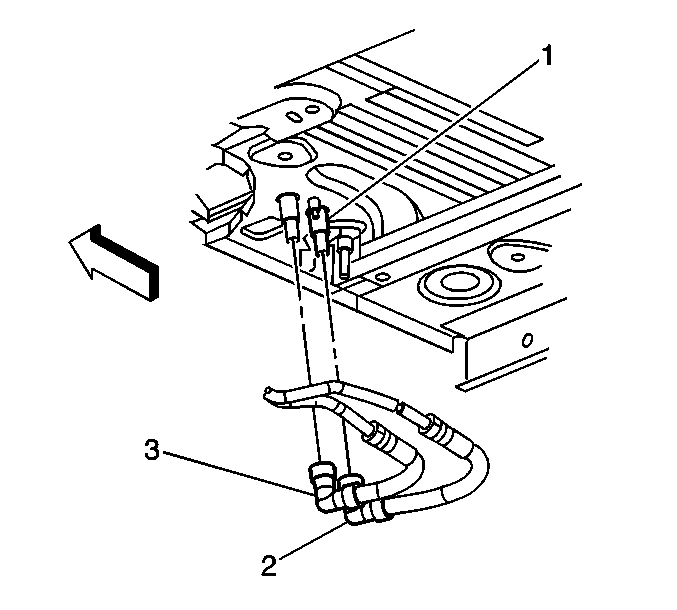
- Disconnect the heater lines (2, 3) from the auxiliary HVAC module at the underside of the vehicle.
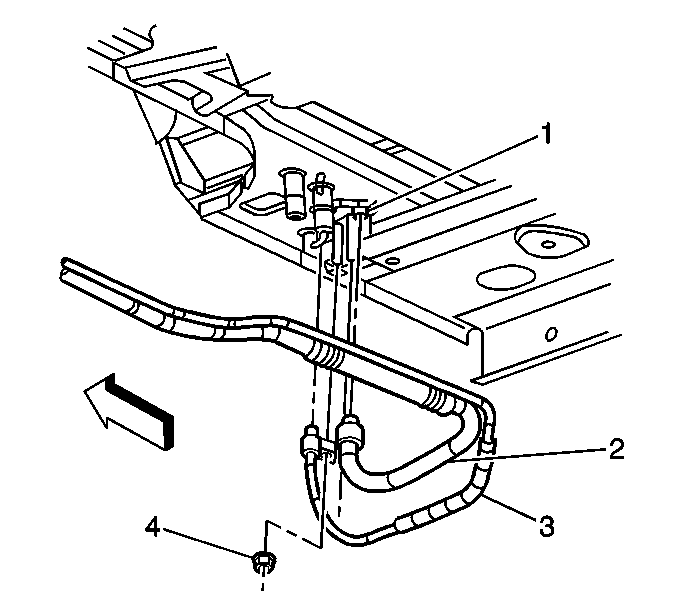
- Disconnect the air conditioning lines (2, 3) from the auxiliary HVAC module at the underside of the vehicle.
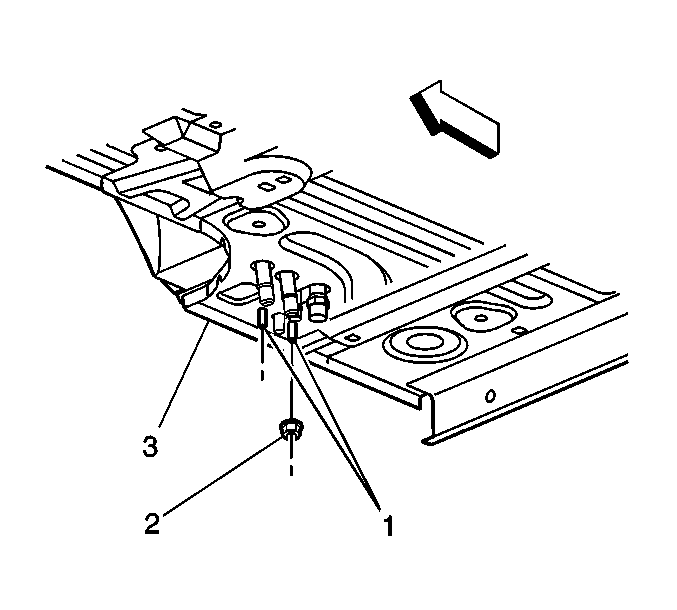
- Remove the nuts (2) from the studs (1) that secure the auxiliary HVAC module to the underside of the vehicle.
- Remove the safety stands.
- Lower the vehicle.
- Remove the right rear quarter trim panel. Refer to Rear Quarter Trim Panel Replacement in Interior Trim.
- Remove the Real Time Damping (RTD) Module. Refer to Electronic Suspension Control Module Replacement in Real Time Damping-RTD.
- Disconnect the electrical connectors.
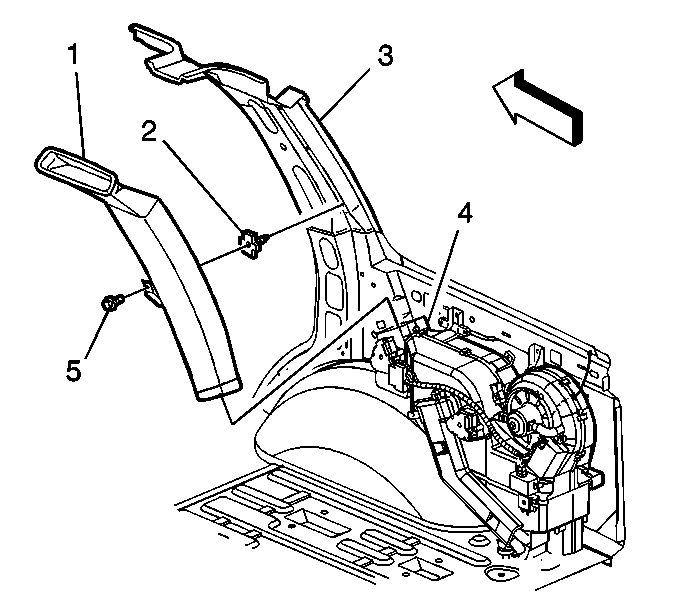
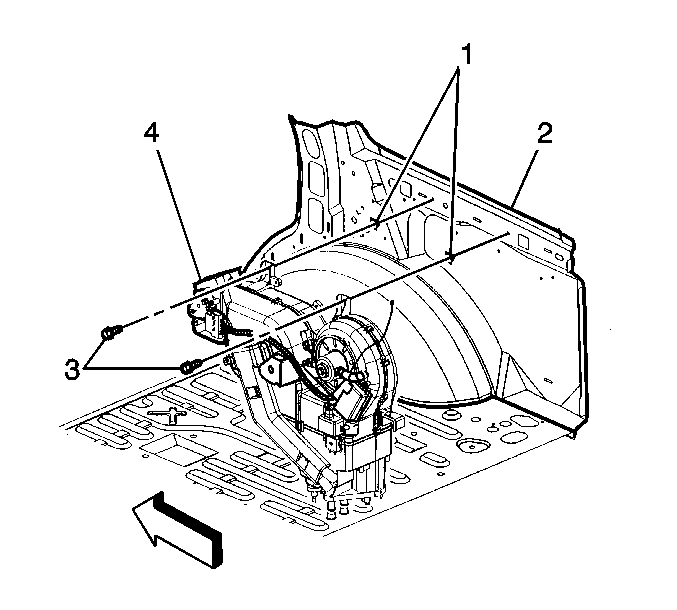
- Remove the fastener (5) for the upper auxiliary air duct (1). Carefully slide the duct up, into the headliner, until the bottom edge of the duct is above the air distributor duct.
- Remove the fasteners (3) retaining the rear auxiliary HVAC module to the vehicle.
- Remove the rear auxiliary HVAC module (4) from the vehicle and place it on a work surface.
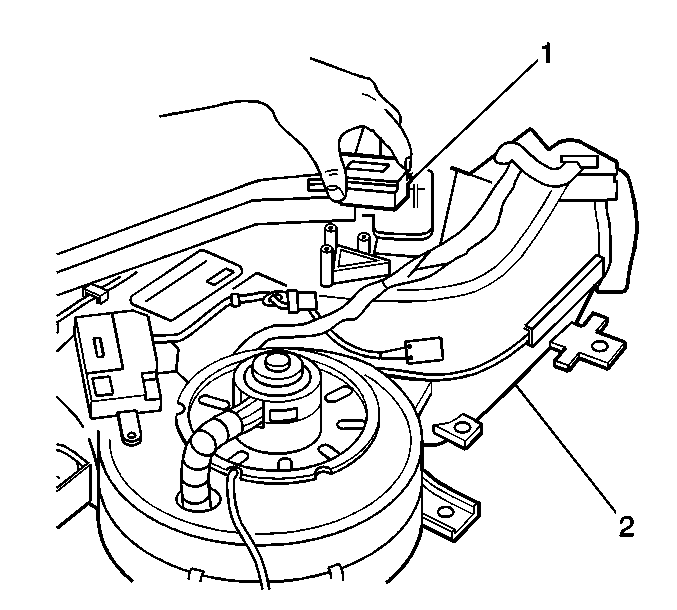
- Remove the air temperature actuator (1) from the module.
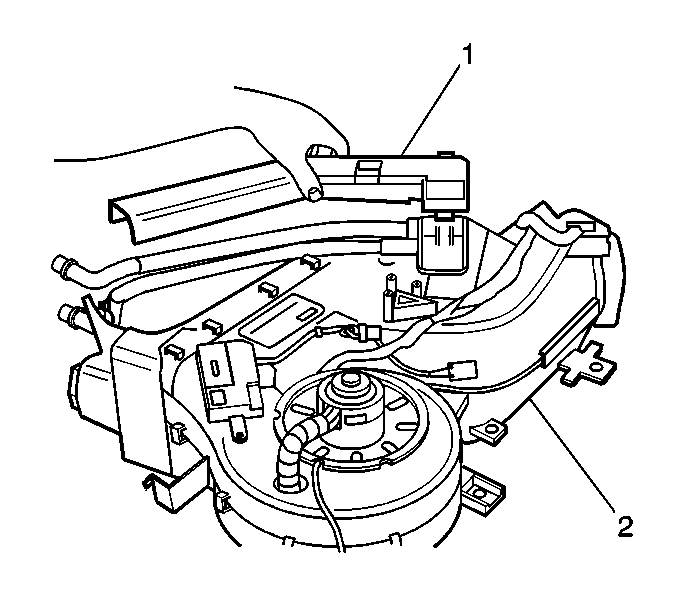
- Remove the heater core cover (1) from the module.
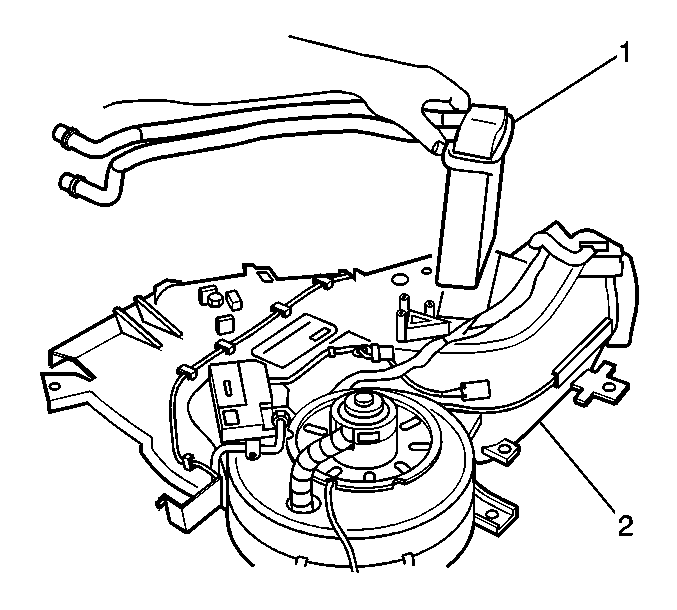
- Remove the heater core (1) from the module.
Installation Procedure
- Install the heater core (1) to the module.
- Install the heater core cover (1) to the module.
- Install the air temperature actuator (1) to the module.
- Install the auxiliary HVAC module assembly (4) to the vehicle.
- Install the two bolts (3) inside the vehicle in order to retain the case to the vehicle.
- Install the upper auxiliary air duct (1) to the air distributor duct. Install the fastener (5).
- Connect the electrical connectors.
- Install the RTD Module. Refer to Electronic Suspension Control Module Replacement in Real Time Damping-RTD.
- Install the right rear quarter trim panel. Refer to Rear Quarter Trim Panel Replacement in Interior Trim.
- Raise the vehicle. Refer to Lifting and Jacking the Vehicle in General Information.
- Install the nuts (2) that secure the auxiliary HVAC module to the vehicle.
- Install the air conditioning lines (2, 3) and the nut (4) to the auxiliary HVAC module.
- Install the heater lines (2, 3) to the auxiliary HVAC module at the underside of vehicle.
- Remove the safety stands.
- Lower the vehicle.
- Fill the engine coolant. Refer to Cooling System Draining and Filling in Engine Cooling.
- Recharge the refrigerant to the system. Refer to Refrigerant Recovery and Recharging .


Notice: Use the correct fastener in the correct location. Replacement fasteners must be the correct part number for that application. Fasteners requiring replacement or fasteners requiring the use of thread locking compound or sealant are identified in the service procedure. Do not use paints, lubricants, or corrosion inhibitors on fasteners or fastener joint surfaces unless specified. These coatings affect fastener torque and joint clamping force and may damage the fastener. Use the correct tightening sequence and specifications when installing fasteners in order to avoid damage to parts and systems.
Tighten
Tighten the nuts to 9 N·m (80 lb in).

Tighten
Tighten the nut to 16 N·m (12 lb ft).

Auxiliary Heater Core Replacement Suburban/Yukon XL
Removal Procedure
- Recover the refrigerant from the A/C system. Refer to Refrigerant Recovery and Recharging .
- Drain the engine coolant. Refer to Cooling System Draining and Filling in Engine Cooling.
- Raise the vehicle. Refer to Lifting and Jacking the Vehicle in General Information.
- Disconnect the heater lines (2, 3) from the auxiliary HVAC module at the underside of the vehicle.
- Disconnect the air conditioning lines (2, 3) from the auxiliary HVAC module at the underside of the vehicle.
- Remove the nuts (2) from the studs (1) that secure the auxiliary HVAC module to the underside of the vehicle.
- Remove the safety stands.
- Lower the vehicle.
- Remove the right rear quarter trim panel. Refer to Rear Quarter Trim Panel Replacement in Interior Trim.
- Remove the Real Time Damping (RTD) Module. Refer to Electronic Suspension Control Module Replacement in Real Time Damping-RTD.
- Disconnect the electrical connectors.
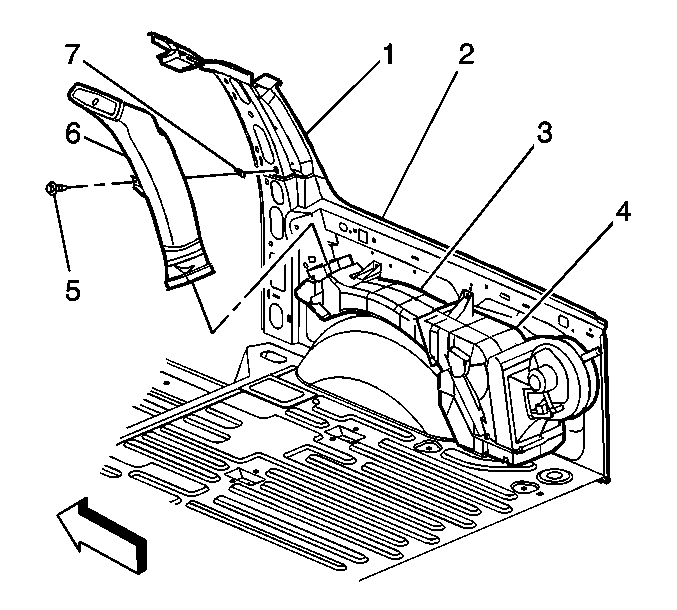
- Remove the fastener (5) for the upper auxiliary air duct (6). Carefully slide the duct up, into the headliner, until the bottom edge of the duct is above the air distributor duct.
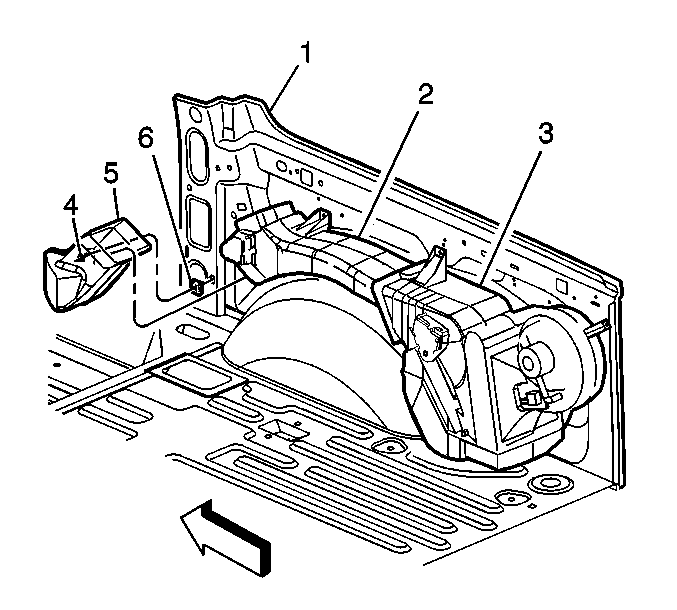
- Remove the fastener (4) for the lower auxiliary air outlet (5).
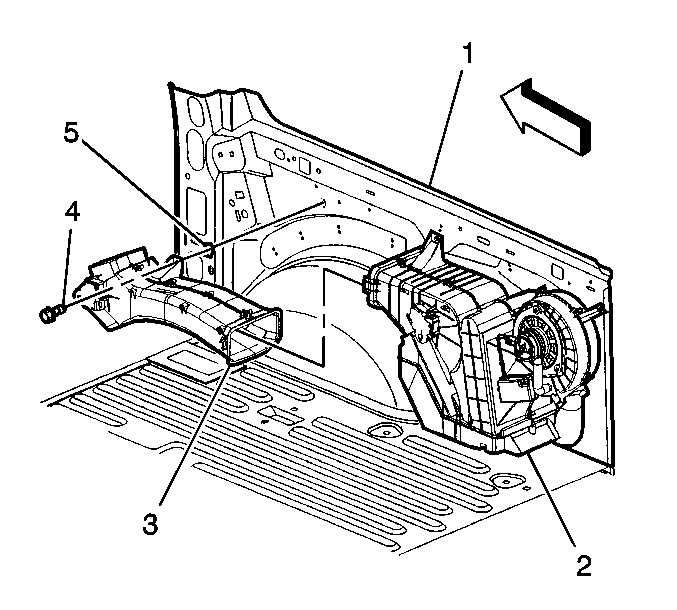
- Remove the fastener (4) for the air distributor duct (3). Remove the air distributor duct (3).
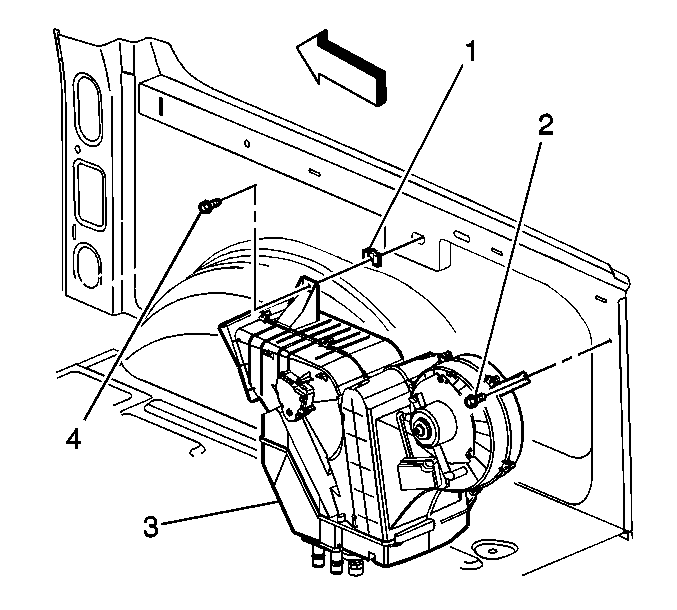
- Remove the fasteners (2, 4) retaining the rear auxiliary HVAC module to the vehicle.
- Remove the rear auxiliary HVAC module (3) from the vehicle and place it on a work surface.
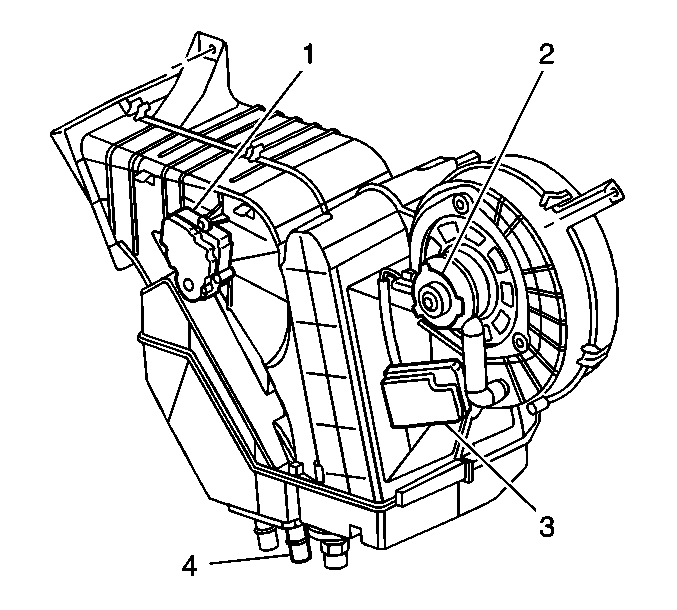
- Remove the air temperature actuator (1) from the module.
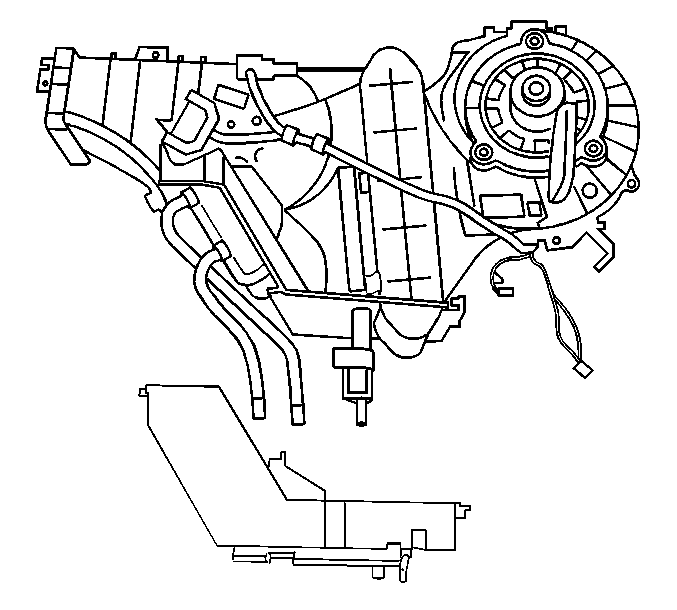
- Remove the stud on the underside of the rear HVAC module between the heater core inlet and outlet pipes.
- Carefully separate the heater core pipe gasket from the module case and remove the heater core pipe retainer.
- Remove the rear HVAC module lower cover.
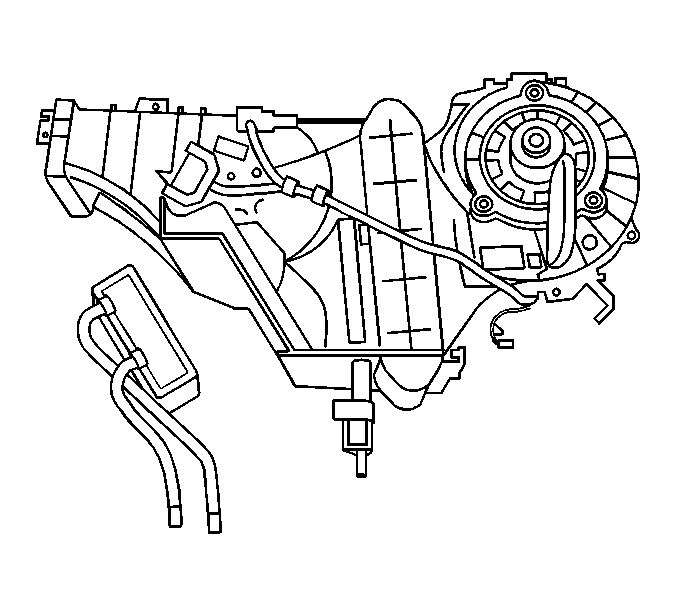
- Remove the heater core clamp.
- Remove the heater core from the module.


Installation Procedure
- Install the heater core to the module.
- Install the heater core clamp.
- Install the rear HVAC module lower cover.
- Install the heater core pipe retainer and gasket.
- Install the stud between the heater core inlet and outlet on the underside of the rear HVAC module.
- Install the air temperature actuator (1) to the module.
- Install the auxiliary HVAC module assembly (3) to the vehicle.
- Install the two bolts (2, 4) inside the vehicle in order to retain the case to the vehicle.
- Install the air distributor duct (3) and fastener (4).
- Install the lower auxiliary air outlet (5) and fastener (4).
- Install the upper auxiliary air duct (6) to the air distributor duct (3). Install the fastener (5).
- Connect the electrical connectors.
- Install the RTD Module. Refer to Electronic Suspension Control Module Replacement in Real Time Damping-RTD.
- Install the right rear quarter trim panel. Refer to Rear Quarter Trim Panel Replacement in Interior Trim.
- Raise the vehicle. Refer to Lifting and Jacking the Vehicle in General Information.
- Install the nuts (2) that secure the auxiliary HVAC module to the vehicle.
- Install the air conditioning lines (2, 3) and the nut (4) to the auxiliary HVAC module.
- Install the heater lines (2, 3) to the auxiliary HVAC module at the underside of vehicle.
- Remove the safety stands.
- Lower the vehicle.
- Fill the engine coolant. Refer to Cooling System Draining and Filling in Engine Cooling.
- Recharge the refrigerant to the system. Refer to Refrigerant Recovery and Recharging .


Notice: Use the correct fastener in the correct location. Replacement fasteners must be the correct part number for that application. Fasteners requiring replacement or fasteners requiring the use of thread locking compound or sealant are identified in the service procedure. Do not use paints, lubricants, or corrosion inhibitors on fasteners or fastener joint surfaces unless specified. These coatings affect fastener torque and joint clamping force and may damage the fastener. Use the correct tightening sequence and specifications when installing fasteners in order to avoid damage to parts and systems.
Tighten
Tighten the nuts to 9 N·m (80 lb in).

Tighten
Tighten the nut to 16 N·m (12 lb ft).

