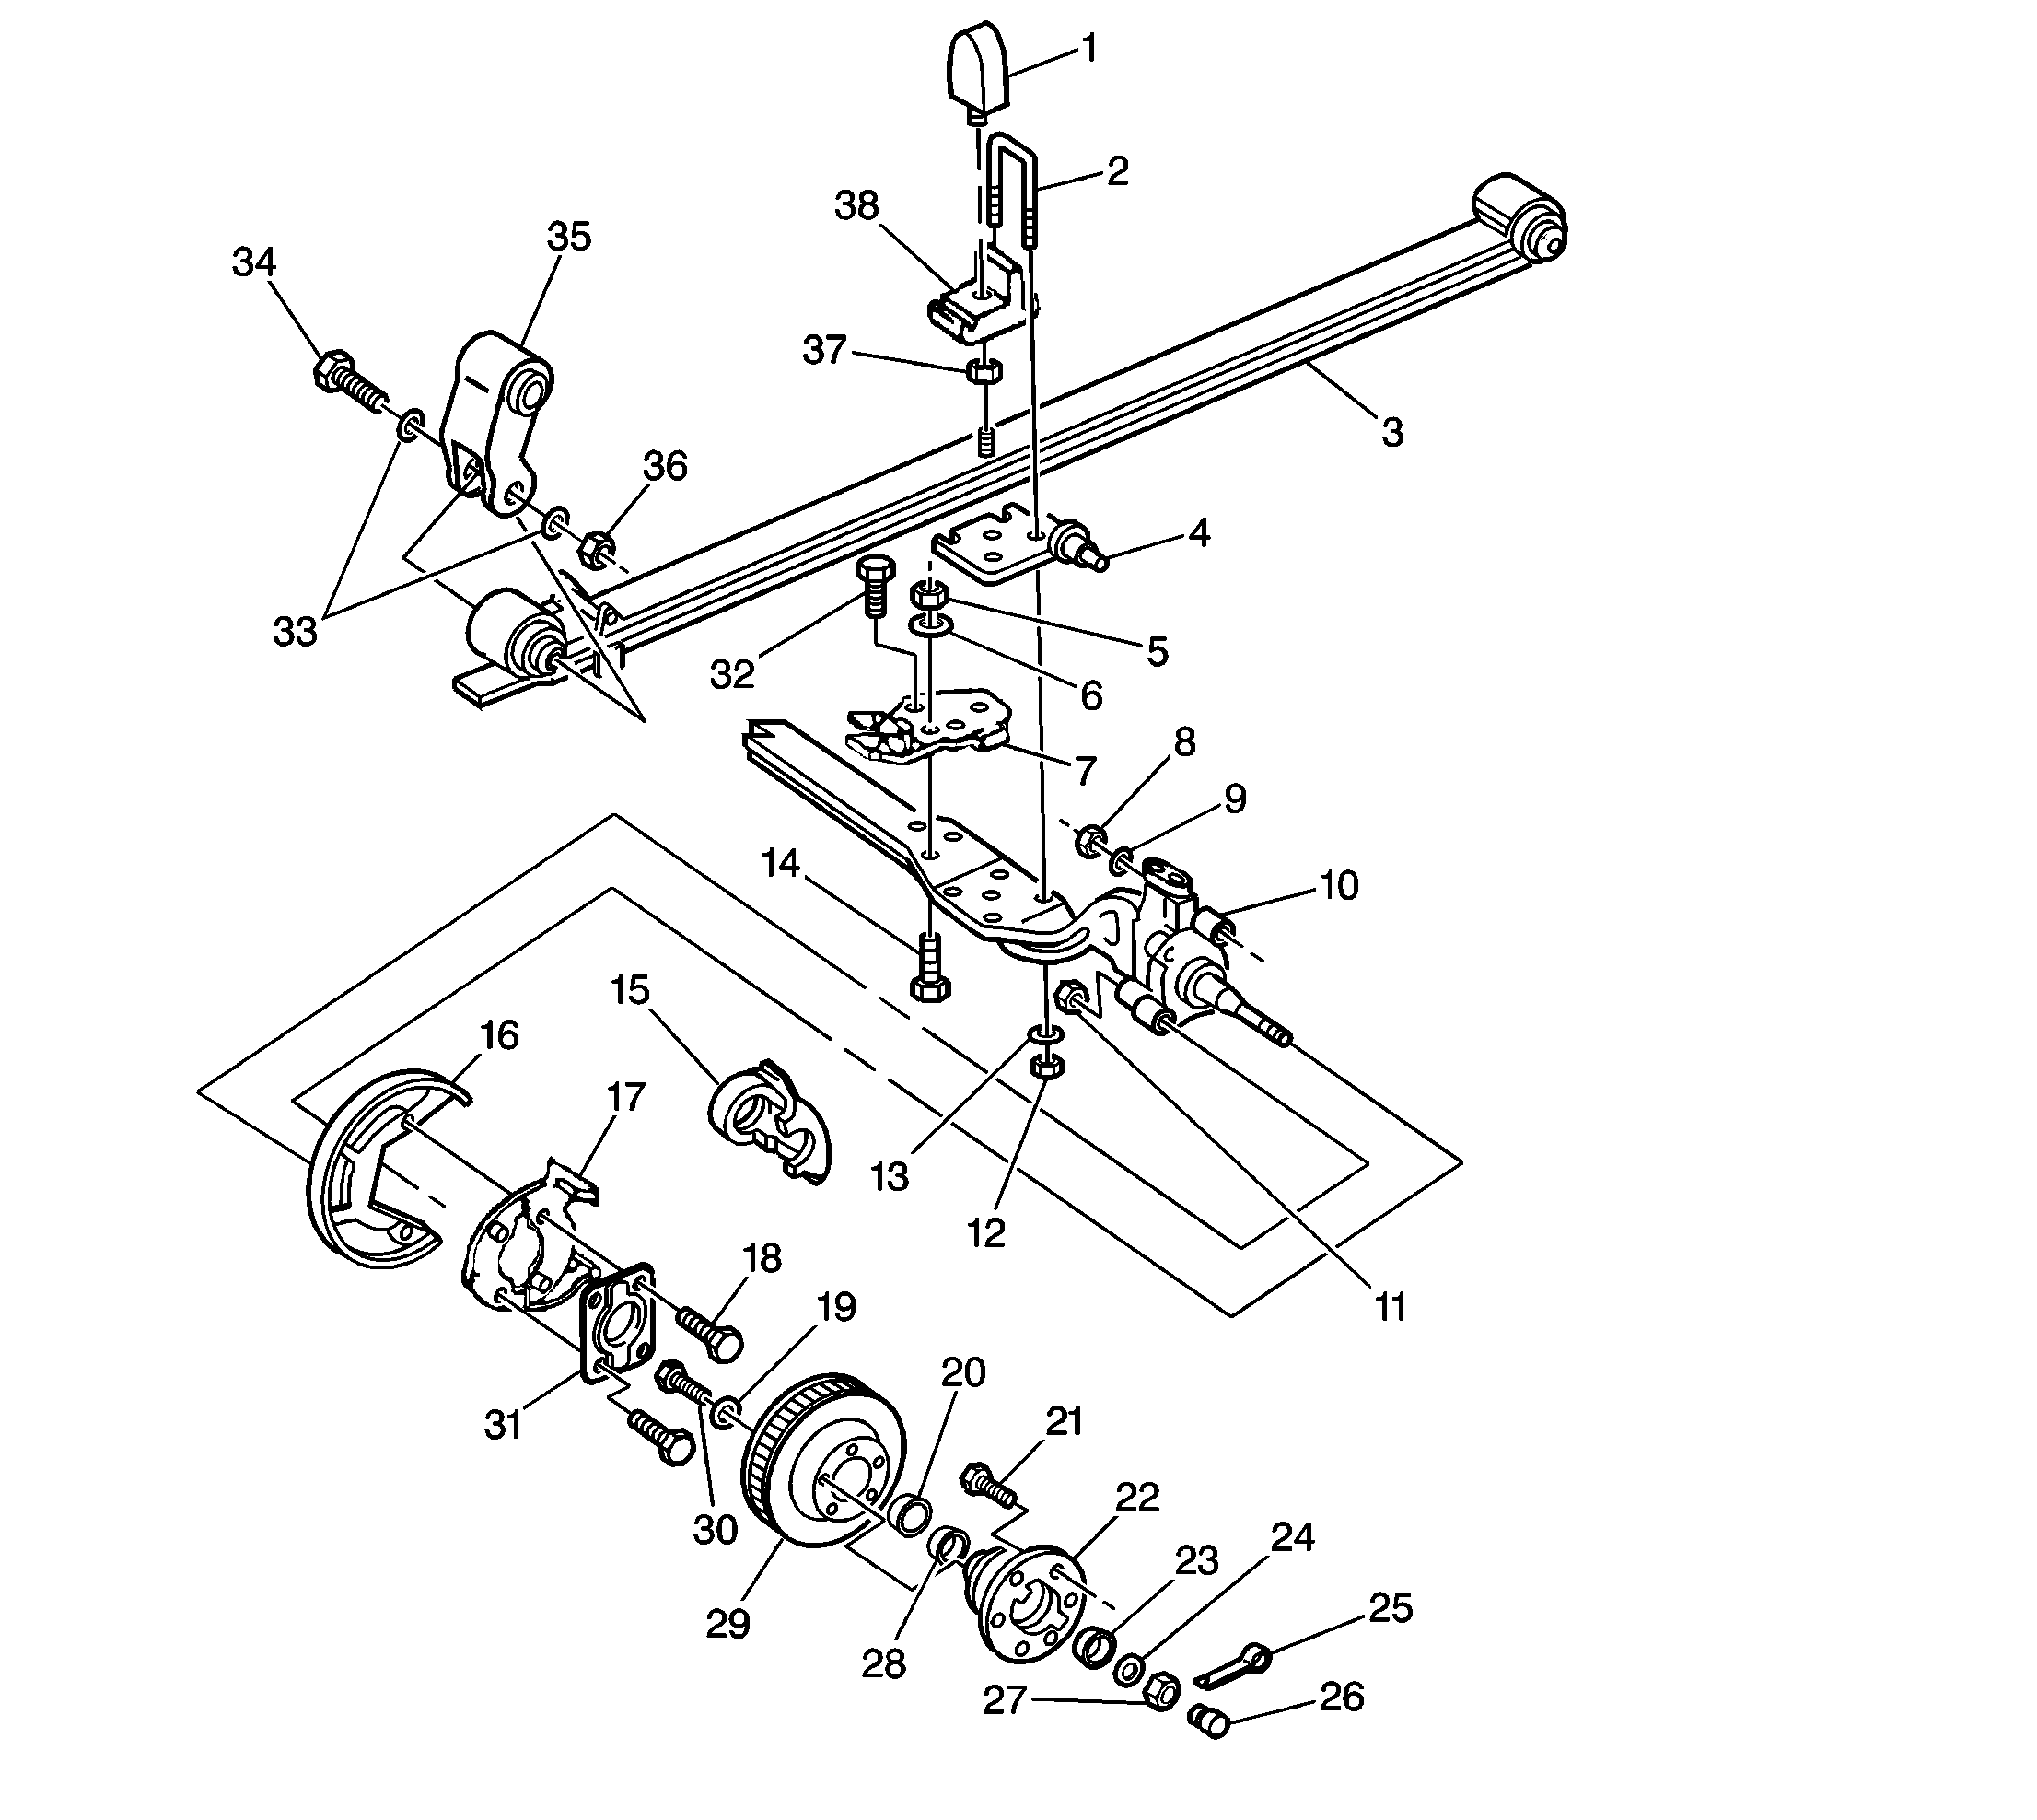
Front Wheel Hub, Bearing, and Seal Replacement S4WD
Removal Procedure
Tools Required
| • | J 36607 Ball Joint Separator |
| • | J 36605 Steering Knuckle Seal Installer |
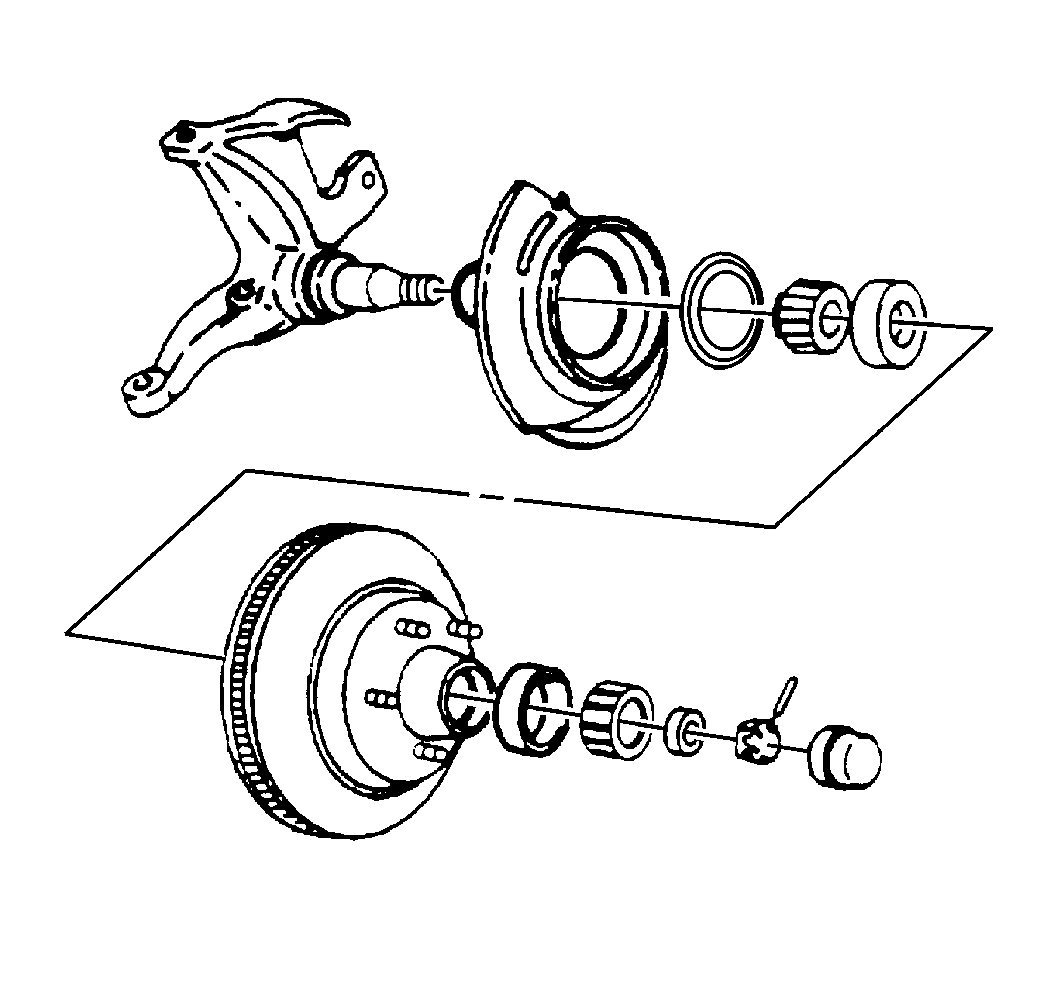
- Raise the vehicle. Support the vehicle with suitable safety stands.
- Remove the tire and wheel assembly. Refer to Wheel Removal in Tires and Wheels.
- Remove the brake caliper. Refer to Brake Caliper Replacement in Disc Brakes.
- Remove the brake rotor. Refer to Brake Rotor Replacement in Disc Brakes.
- Remove the drive axle nut.
- Remove the washer.
- Remove the tie rod nut.
- Disconnect the tie rod end from the knuckle. Refer to Tie Rod Replacement in Steering Linkage.
- Using a puller, remove the hub and bearing assembly.
- Remove the halfshaft. Refer to Wheel Drive Shaft Replacement in Wheel Drive Shafts.
- Remove the splash shield bolts.
- Remove the splash shield.
- Support the lower control arm with a jack stand.
- Remove the upper ball joint nut.
- Using the J 36607 , remove the upper ball joint from the knuckle. Refer to Upper Control Arm Ball Joint Replacement .
- Remove the lower ball joint nut.
- Using the J 36607 , remove the lower ball joint from the knuckle. Refer to Lower Control Arm Ball Joint Replacement .
- Remove the knuckle.
- Remove the seal from the knuckle.
Notice: Support the caliper with a piece of wire to prevent damage to the brake line.
Important: Wrap shop towels around the inner and the outer C/V joint boots in order to avoid damage to the boots during removal and installation.

Important: Lay the hub and bearing assembly on the hub bolt (outboard) side. This will prevent damage or contamination of the bearing seal.
Installation Procedure
- Using the J 36605 , install the seal into the knuckle.
- Connect the knuckle to the upper and the lower ball joint.
- Install the ball joint stud nuts.
- Tighten the lower stud nut to 128 N·m (94 lb ft).
- Tighten the upper stud nut to 100 N·m (74 lb ft).
- Tighten the nuts in order to align the cotter pin. Do not tighten more than 1/6 turn.
- Install new cotter pins. Bend the pin ends against the nut.
- Install the splash shield. Properly align the splash shield.
- Install the splash shield bolts.
- Prelube the steering knuckle seal.
- Install the halfshaft. Refer to Wheel Drive Shaft Replacement in Wheel Drive Shafts.
- Install the hub and bearing assembly. Align the threaded holes.
- Install the bolts.
- Connect the tie rod end to the knuckle. Refer to Tie Rod Replacement in Steering Linkage.
- Install the tie rod nut.
- Install the washer.
- Install the drive axle nut.
- Install the brake rotor. Refer to Brake Rotor Replacement in Disc Brakes.
- Install the brake caliper. Refer to Brake Caliper Replacement in Disc Brakes.
- Install the tire and wheel assembly. Refer to Wheel Installation in Tires and Wheels.
- Remove the jack stand.
- Lower the vehicle.
- Check the vehicle trim height. Adjust if necessary. Refer to Trim Height Inspection in Suspension General Diagnosis.
Notice: Use the correct fastener in the correct location. Replacement fasteners must be the correct part number for that application. Fasteners requiring replacement or fasteners requiring the use of thread locking compound or sealant are identified in the service procedure. Do not use paints, lubricants, or corrosion inhibitors on fasteners or fastener joint surfaces unless specified. These coatings affect fastener torque and joint clamping force and may damage the fastener. Use the correct tightening sequence and specifications when installing fasteners in order to avoid damage to parts and systems.
Tighten
Tighten
Tighten the bolts to 26 N·m (19 lb ft).
Tighten
Tighten the bolts to 180 N·m (133 lb ft).
Tighten
Tighten the nut to 48 N·m (35 lb ft).
Tighten
Tighten the nut to 225 N·m (165 lb ft).
Front Wheel Hub, Bearing, and Seal Replacement RWD-C3500HD
Removal Procedure
For front spring and components, refer to
Front Spring and Components (C3500HD)
Tools Required
J 9746-02 Wheel Stud Remover
- Raise the vehicle. Support the vehicle with suitable safety stands.
- Remove the tire and wheel assembly. Refer to Wheel Removal in Tires and Wheels.
- Remove the brake caliper. Refer to Brake Caliper Replacement in Disc Brakes.
- Remove the retainer/cap.
- Remove the cotter pin, the nut, and the washer.
- Remove the wheel hub/rotor.
- Remove the inner wheel bearing. Pry out the seal.
- Remove the races. Using a brass drift, drive out each race.
- Clean any grease from the hub/rotor and the steering knuckle spindle. Clean any grease from inside the hub.
- Using clean solvent and a small brush with no loose bristles, clean any grease from the wheel bearings and the races.
- Inspect the wheel bearings and the races for damage or wear.
- Inspect the hub/rotor for damage or wear.
Notice: Support the caliper with a piece of wire to prevent damage to the brake line.
| • | Pull the hub/rotor free from the spindle. Make sure the outer wheel bearing comes free. |
| • | Do not damage the steering knuckle spindle threads. |
Notice: Do not spin the wheel bearings with compressed air to dry them-the wheel bearings may be damaged.
| • | Refer to Wheel Bearings Diagnosis in Suspension General Diagnosis. |
| • | If a bearing or the race is damaged, replace both of these. |
| • | Check for out of round or scored conditions. |
| • | Check for pitting or cracks. |
| • | If necessary, repair or replace the hub/rotor. |
Installation Procedure
For Front Spring and Components refer to
Front Spring and Components (C3500HD)
- Install the races into the hub/rotor.
- Apply a thin film of grease to the steering knuckle spindle at the outer wheel bearing seat and at the inner wheel bearing seat, the shoulder, and the seal seat.
- Apply a small amount of grease inboard of each wheel bearing retainer/cap.
- Fill each wheel bearing (cone and roller assembly) full of grease.
- Install the inner wheel bearing into the hub/rotor. Put an additional quantity of grease outboard of this bearing.
- Install the new seal.
- Install the hub/rotor. Do not damage the steering knuckle spindle threads.
- Install the outer wheel bearing. Slide the bearing over the spindle until the wheel bearing fully seats against the hub/rotor outer race.
- Install the washer, the nut, and the cotter pin. Do not place the cotter pin through the hole in the spindle until the wheel bearings are adjusted.
- Install the cotter pin.
- Install the retainer/cap in place.
- Install the brake caliper. Refer to Brake Caliper Replacement in Disc Brakes.
- Install the tire and wheel assembly. Refer to Wheel Installation in Tires and Wheels.
- Lower the vehicle.
Notice: Start the races squarely inside the hub/rotor to avoid distortion and possible cracking.
| 1.1. | Place the hub/rotor on the J 9746-02 . Rest this assembly on the press bars. |
| 1.2. | Using a 7.6 cm (3 in) diameter bar, or equivalent, press the outer bearing race into position. |
| 1.3. | Remove the J 9746-02 and use a 7.6 cm (3 in) diameter bar, or equivalent, in order to press the inner bearing race into position. If the bar is larger than 7.6 cm (3 in), the bar may damage the bearing seal seat. |
Important:
• Use an approved, high-temperature front wheel bearing grease in
order to lubricate the bearings. Refer to
Fluid and Lubricant Recommendations
in Maintenance and Lubrication. • Do not mix different greases because mixing may change the grease
properties, resulting in poor performance.
Notice: Failure to completely pack the wheel bearing (cones, rollers, and cage) with grease will result in premature wheel bearing damage and/or wear.
| • | Use a cone-type grease machine that forces grease into the bearing. |
| • | If a cone-type grease machine is not available, pack the wheel bearing by hand. When packing the wheel bearing by hand, work the grease into the bearings between the rollers, the cones, and the cage. |
| 6.1. | Using a seal installer or a block, install the seal in order to ensure that the seal is flush with the hub/rotor flange. |
| 6.2. | Lubricate the seal lip with a thin layer of grease. |
Notice: Use the correct fastener in the correct location. Replacement fasteners must be the correct part number for that application. Fasteners requiring replacement or fasteners requiring the use of thread locking compound or sealant are identified in the service procedure. Do not use paints, lubricants, or corrosion inhibitors on fasteners or fastener joint surfaces unless specified. These coatings affect fastener torque and joint clamping force and may damage the fastener. Use the correct tightening sequence and specifications when installing fasteners in order to avoid damage to parts and systems.
Tighten
Tighten the nut to 16 N·m (12 lb ft), while
turning the hub/rotor assembly by hand.
| 9.1. | Apply an additional amount of grease outboard of the wheel bearing. |
| 9.2. | Adjust the wheel bearings. Refer to Wheel Bearing Adjustment . |
Front Wheel Hub, Bearing, and Seal Replacement RWD-All Except C3500HD
Removal Procedure
- Remove the brake caliper. Refer to Brake Caliper Replacement in Disc Brakes.
- Remove the cap from the hub/rotor.
- Remove the cotter pin, the nut, and the washer.
- Remove the hub/rotor from the spindle.
- Remove the outer bearing.
- Remove the seal. Pry the seal out and discard the seal.
- Remove the inner bearing.
- Clean all of the parts in a solvent, then air dry. Do not spin the bearings with compressed air.
- Inspect the hub/rotor. Refer to Brake Rotor Thickness Variation Check or Brake Rotor Lateral Runout Check or Brake Rotor Tolerance in Disc Brakes.
- Inspect the bearings and the races for wear or damage. Replace the parts as necessary. Refer to Wheel Bearings Diagnosis in Suspension General Diagnosis.
Notice: Support the caliper with a piece of wire to prevent damage to the brake line.
Important: Do not damage the outer bearing and the spindle threads.
Notice: Do not spin the wheel bearings with compressed air to dry them-the wheel bearings may be damaged.
Installation Procedure
Important:
• Make sure all of the parts are clean and free of grease. • Apply an approved high-temperature front wheel bearing grease
to the spindle at the inner and outer bearing seat, the shoulder, and the
seal seat. • Also, finger apply a small amount of grease inboard of each bearing
cup in the hub/rotor. • Pressure pack the bearings with a greasing machine, or hand pack
the bearings. Make sure the grease is worked thoroughly into the rollers,
the cone, and the cage.
- Install the inner bearing to the hub/rotor.
- Apply an additional quantity of grease outboard of the inner bearing.
- Install the seal.
- Install the hub/rotor to the spindle.
- Install the outer bearing to the hub/rotor.
- Install the washer.
- Install the nut.
- Tighten the nut to 16 N·m (12 lb ft), while turning the wheel assembly forward by hand.
- Apply grease to the outboard side of the outer bearing.
- Install the brake caliper. Refer to Brake Caliper Replacement in Disc Brakes.
| 3.1. | Lubricate the seal lip. |
| 3.2. | Use a seal installation tool or a flat block in order to press the seal down flush with the hub. |
| 3.3. | Seat the outer bearing and the cup. |
Important: Do not scuff the spindle threads.
Notice: Use the correct fastener in the correct location. Replacement fasteners must be the correct part number for that application. Fasteners requiring replacement or fasteners requiring the use of thread locking compound or sealant are identified in the service procedure. Do not use paints, lubricants, or corrosion inhibitors on fasteners or fastener joint surfaces unless specified. These coatings affect fastener torque and joint clamping force and may damage the fastener. Use the correct tightening sequence and specifications when installing fasteners in order to avoid damage to parts and systems.
Important: Adjust the wheel bearings. Refer to Wheel Bearing Adjustment .
Tighten
