GM Service Manual Online
For 1990-2009 cars only

Headlamp Replacement Non HID

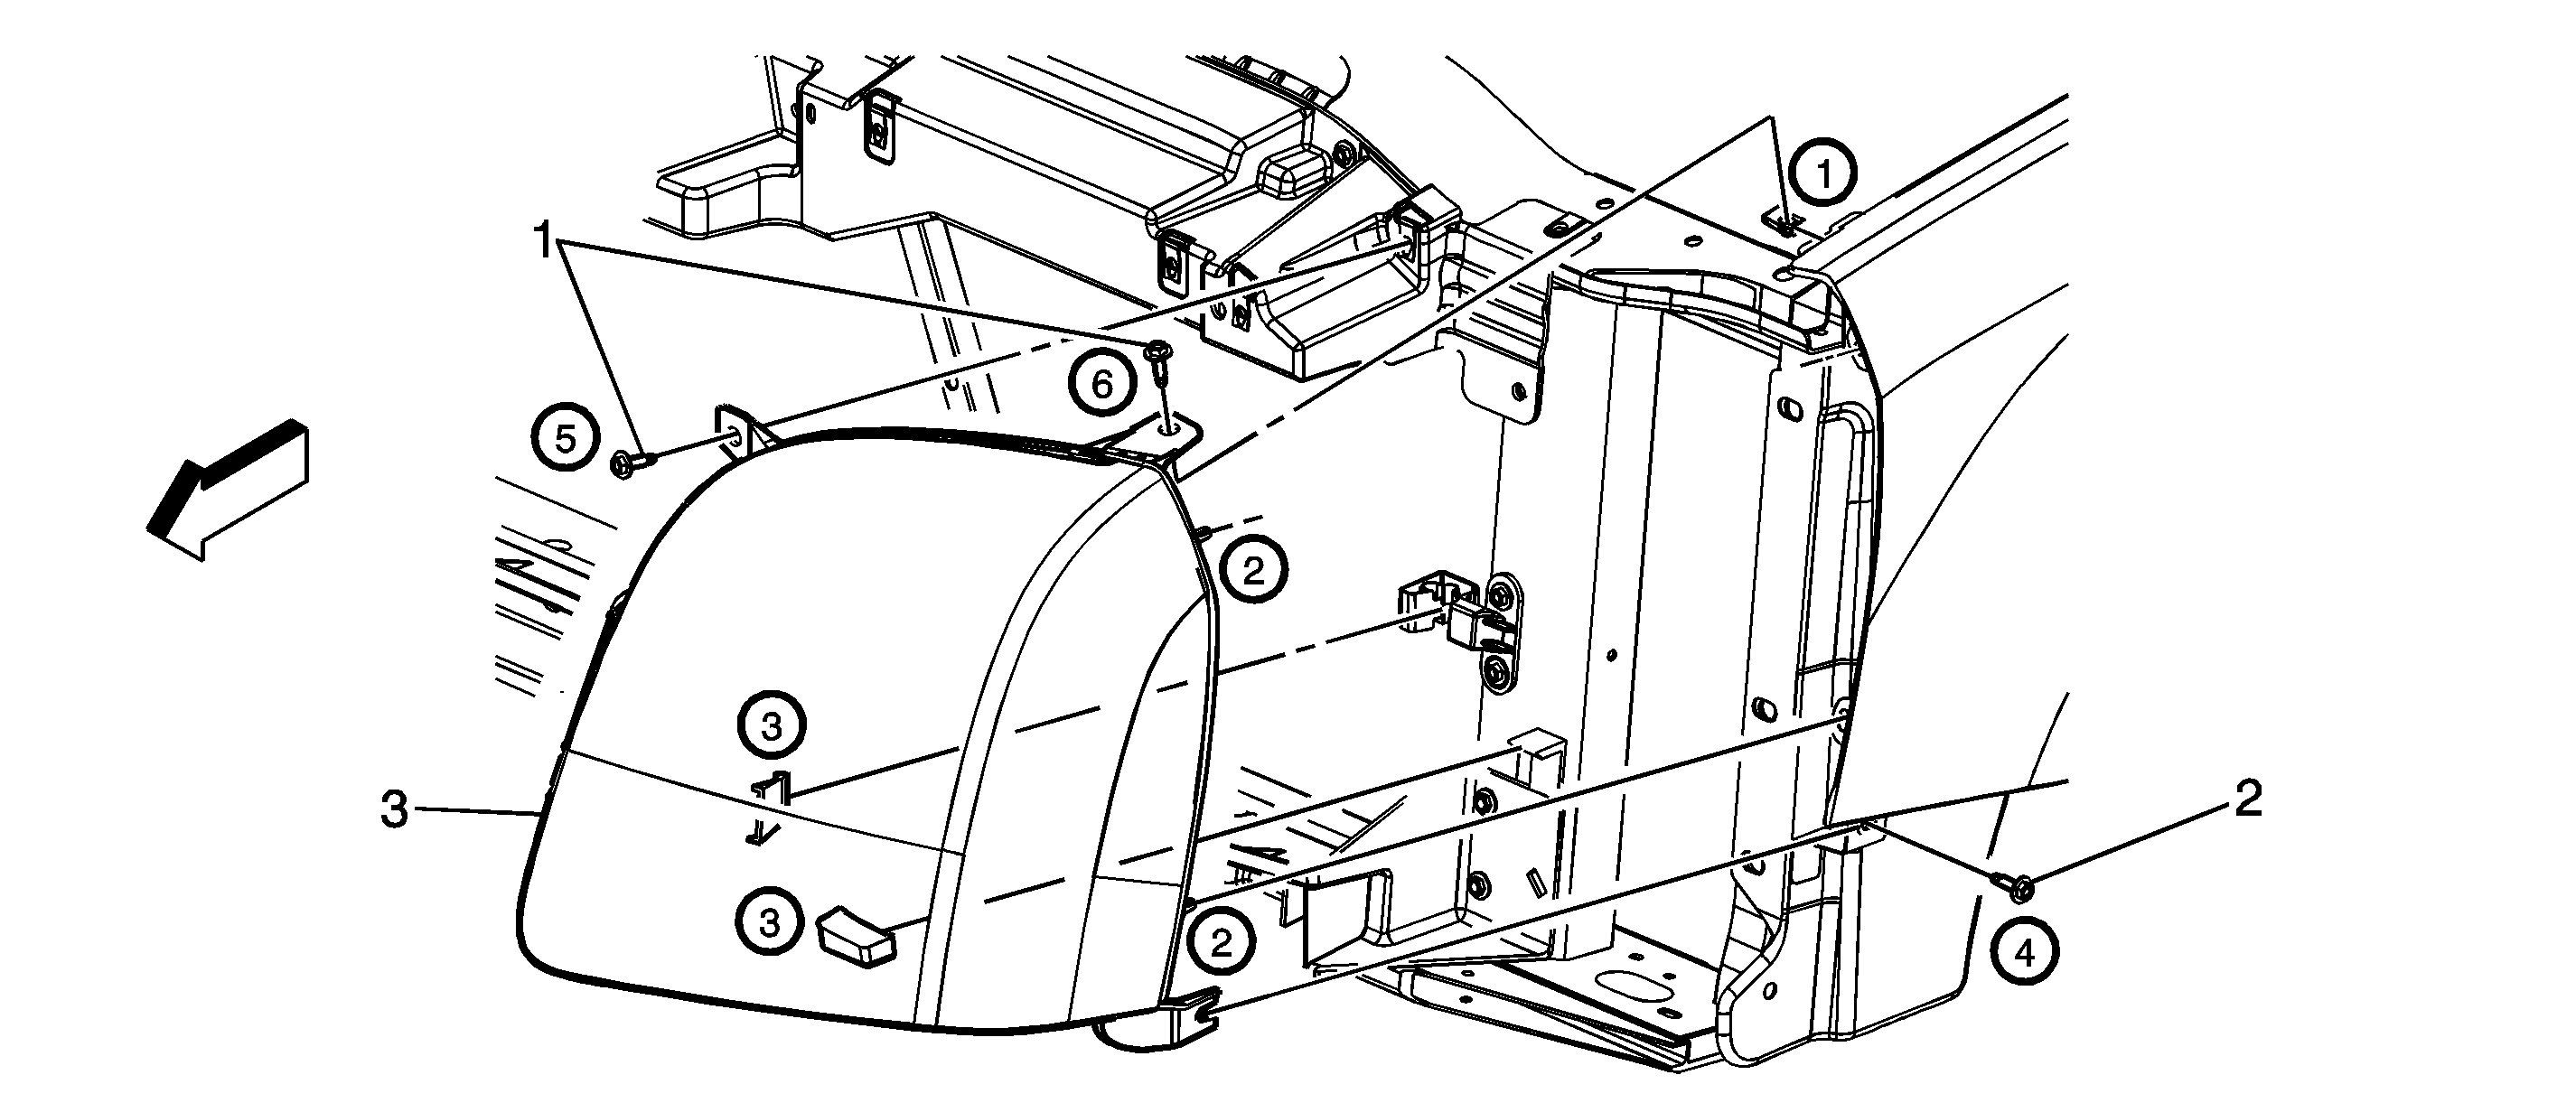
Object Number: 1669951  Size: SF

Callout

Component Name

Preliminary Procedures

  1. Remove the 2 forward screws (1).
  2. Remove the 2 wheelhouse to washer container pushpins (LH only).
  3. Open the hood.
  4. Remove the underhood beauty panel (Cadillac only).
  5. Remove the 6 upper fascia/grille bolts all the way to latch.
  6. Remove the lower rear fascia bolt from the support bracket.
  7. Loosen the 2 fascia to fender bolts from the bottom of fascia.
  8. Pull the outboard end of the front fascia straight outboard until it disengages from the fender attachment bracket.
  9. Pull the fascia forward and downward to allow enough clearance to remove the headlamp assembly.
  10. Remove the cross-car lower outboard headlamp attachment bolt.
  11. Remove the 2 remaining upper headlamp attachment bolts.
  12. Loosen the cross-car lower outboard headlamps attachment bolts.
  13. Grasp the headlamp at the upper inboard and lower outboard corners and pull the lamp straight forward until it disengages from the snap feature.
  14. Pull the outboard side of the headlamp forward until the locating pins disengage from the fender.
  15. Rock and cam the headlamp out of the vehicle.
  16. Disconnect the electrical harness connector.

1

Headlamp Screw (Qty: 2)

Notice: Refer to Fastener Notice in the Preface section.

Tighten
6 N·m (53 lb in)

2

Headlamp Screw

Tighten
6 N·m (53 lb in)

3

Headlamp Assembly Alignment Tabs (Qty: 2)

Tip
Pull to release the tabs on the back of the headlamp assembly.

4

Headlamp Assembly

Tip
Disconnect the electrical connectors.

Headlamp Replacement Yukon


Object Number: 1669958  Size: SF

Callout

Component Name

Preliminary Procedures

  1. Remove the 2 forward wheelhouse liner screws.
  2. Remove the 2 washer container push pins.
  3. Open the hood.
  4. Remove the 6 upper fascia bolts right to the hood latch mechanism.
  5. Remove the lower rear fascia bolt from the support bracket.
  6. Loosen the 2 fascia to fender bolts from under the fascia.
  7. Pull the outboard end of the front fascia straight outboard until it disengages from the fender attachment bracket.
  8. Pull the fascia forward and downward to allow enough clearance to remove the headlamp assembly.
  9. Loosen the lower outboard attachment bolts.
  10. Remove the 2 upper headlamp bolts.
  11. Grasp the headlamp at the upper inboard and lower outboard side and pull the headlamp forward to disengage the locating tab.
  12. Pull the outboard side of the headlamp forward until the 2 locating pins disengage from the radiator support.
  13. Disconnect the forward lamp harness connector.

1

Headlamp Bolt (Qty: 2)

Notice: Refer to Fastener Notice in the Preface section.

Tip
Secure the headlamp using the sequence as listed.

Tighten
6 N·m (53 lb in)

2

Headlamp Bolt

Tip
Loosen the lower outer fender bolt but do not remove.

Tighten
6 N·m (53 lb in)

3

Headlamp Assembly

Tip
Upon assembly, align the 2 outer locating pins and one inner alignment tab to the radiator support prior to applying pressure to the lamp in order to seat the lamp.

Headlamp Replacement Tahoe, Avalanche


Object Number: 1669903  Size: SF

Callout

Component Name

Preliminary Procedures

  1. Remove the 2 forward wheelhouse liner screws in order to access the hidden lower headlamp bolt. Refer to Front Wheelhouse Liner Replacement - Left Side or Front Wheelhouse Liner Replacement - Right Side .
  2. Open the hood.
  3. Remove the upper fascia bolts.
  4. Remove the lower rear fascia bolt from the support bracket.
  5. Loosen the 2 fascia to fender bolts from behind the wheelhouse liner.
  6. Pull the outboard end of the front fascia straight outboard until it disengages from the fender attachment bracket.
  7. Pull the fascia forward and downward to allow enough clearance to remove the headlamp assembly.
  8. Remove the 2 upper headlamp bolts.
  9. Grasp the headlamp at the upper inboard and lower outboard side and pull the headlamp forward to disengage the locating pins from the fender panel.
  10. Pull the outboard side of the headlamp forward until the locating pin is disengaged from the radiator support.
  11. Disconnect the electrical harness connector.

1

Headlamp Bolt

Notice: Refer to Fastener Notice in the Preface section.

Tighten
6 N·m (53 lb in)

2

Headlamp Bolts

Tighten
6 N·m (53 lb in)

3

Forward Lamp Harness Electrical Connector

4

Headlamp Assembly

Tip
Upon re-assembly, align the locating tab along with the outer locating pins prior to applying inward pressure to the headlamp assembly.

Headlamp Replacement Cadillac Escalade
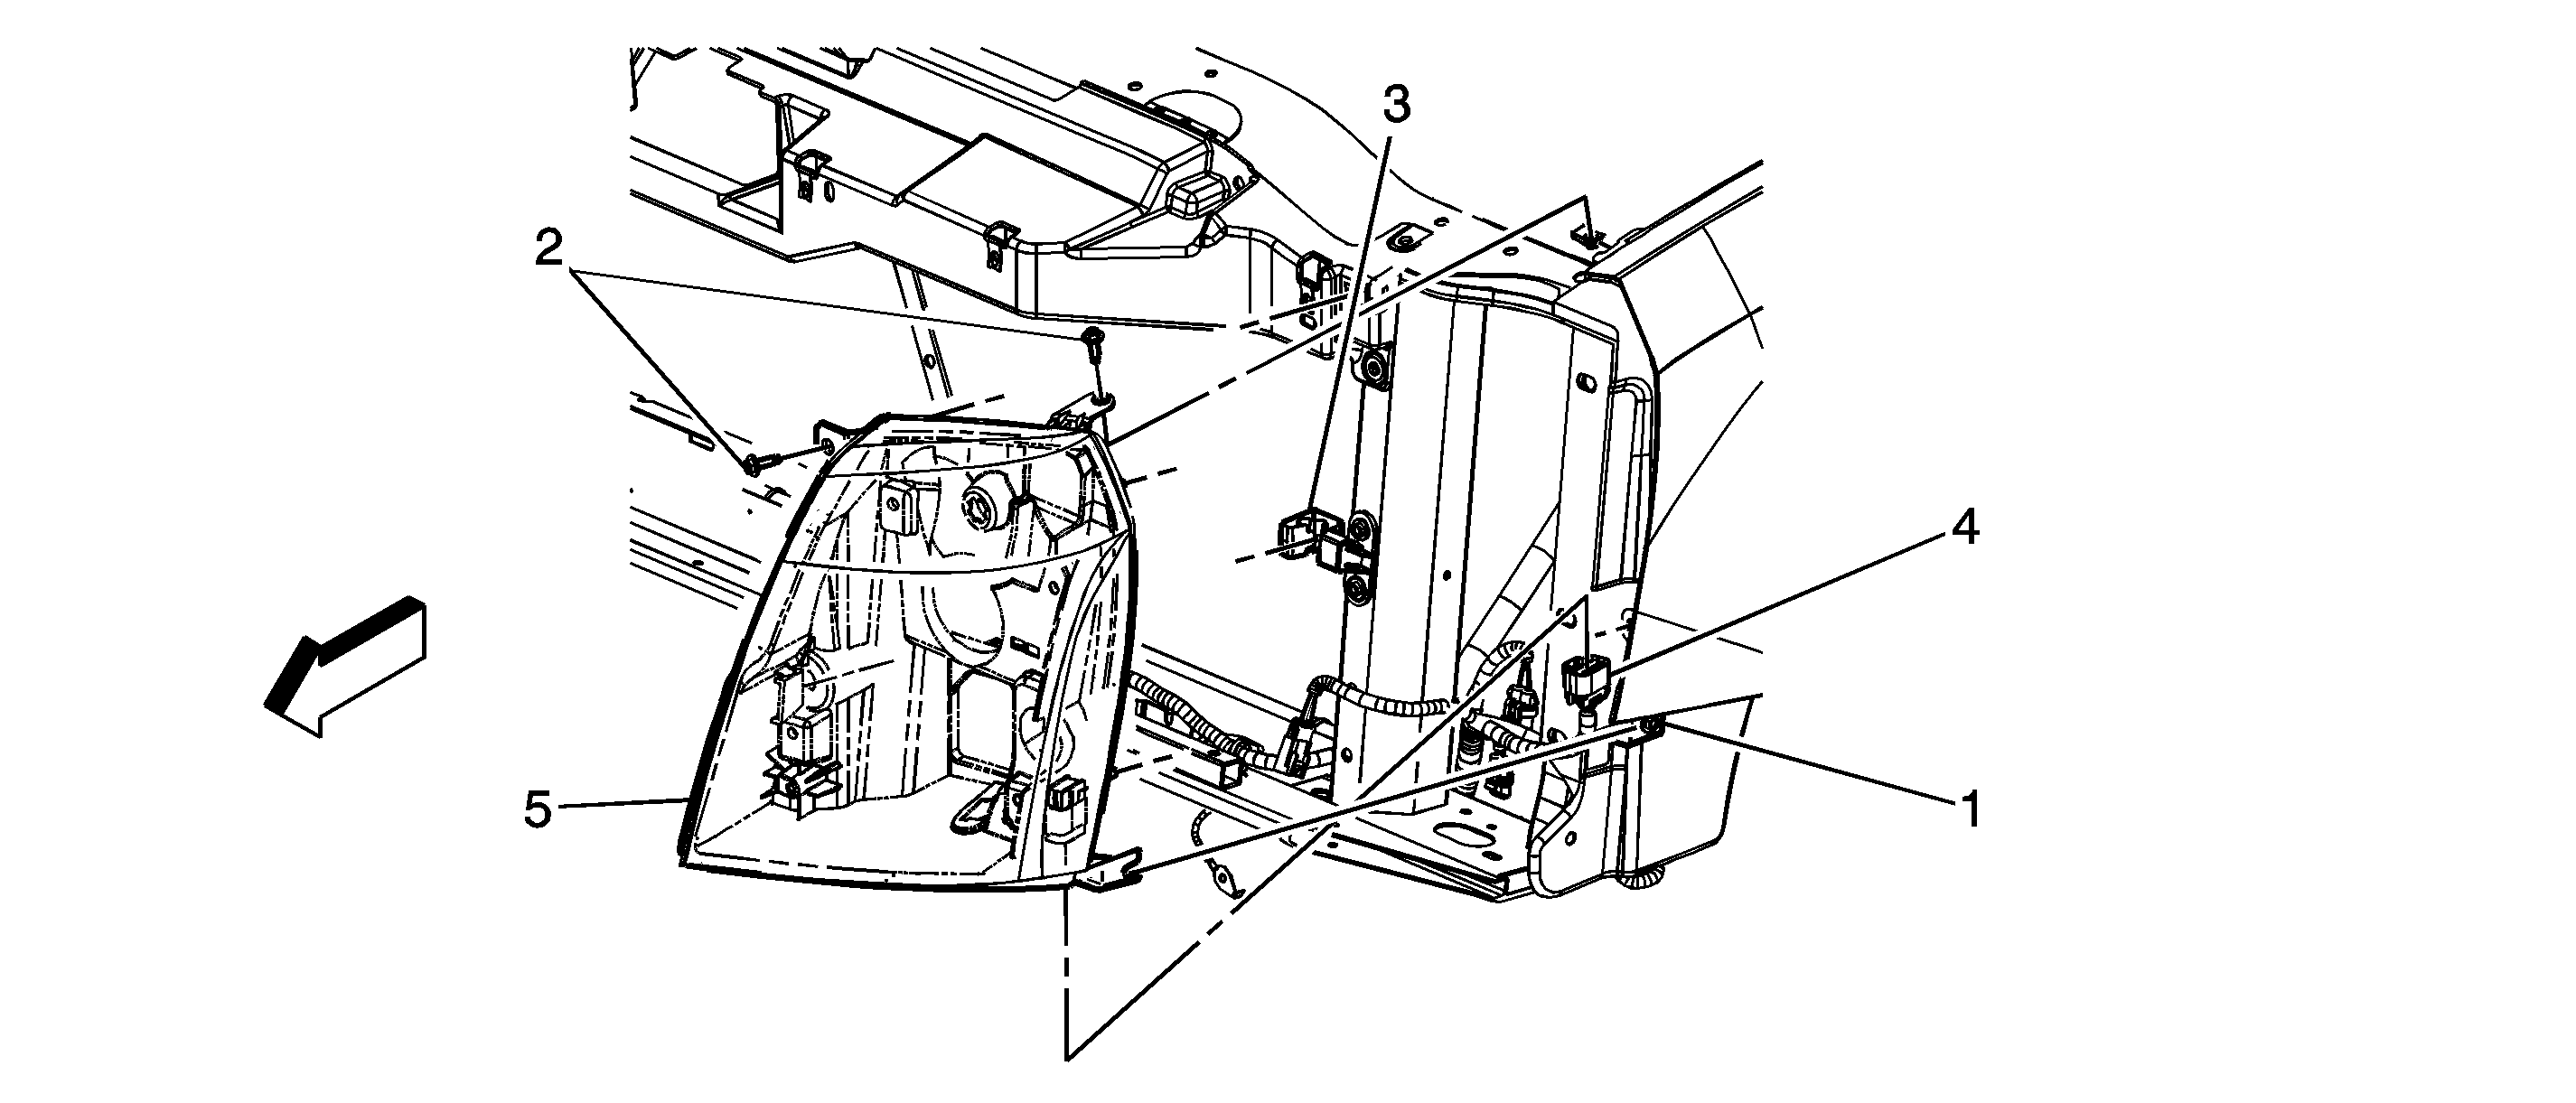

Object Number: 1669956  Size: SF

Callout

Component Name

Preliminary Procedures

  1. Remove the 2 forward wheelhouse liner screws.
  2. Remove the 3 washer container push pins.
  3. Open the hood.
  4. Through the wheelhouse opening, loosen the lower headlamp bolt (1).
  5. Remove the 2 upper headlamp bolts.
  6. Grasp the headlamp at the upper inboard and lower outboard side and pull the headlamp forward to disengage from the snap feature,
  7. Pull the outboard side of the headlamp forward until the locating pins disengage from the radiator support.
  8. Disconnect the electrical harness connector.

1

Headlamp Lower Screw

Notice: Refer to Fastener Notice in the Preface section.

Tighten
6 N·m (53 lb in)

2

Headlamp Screw (Qty: 2)

Tighten
6 N·m (53 lb in)

3

Headlamp Bracket

Tip
Pull to release the headlamp tab from the bracket.

4

Forward Lamp Harness Electrical Connector

5

Headlamp Assembly

Headlamp Replacement Chevrolet Tahoe Two-mode Hybrid
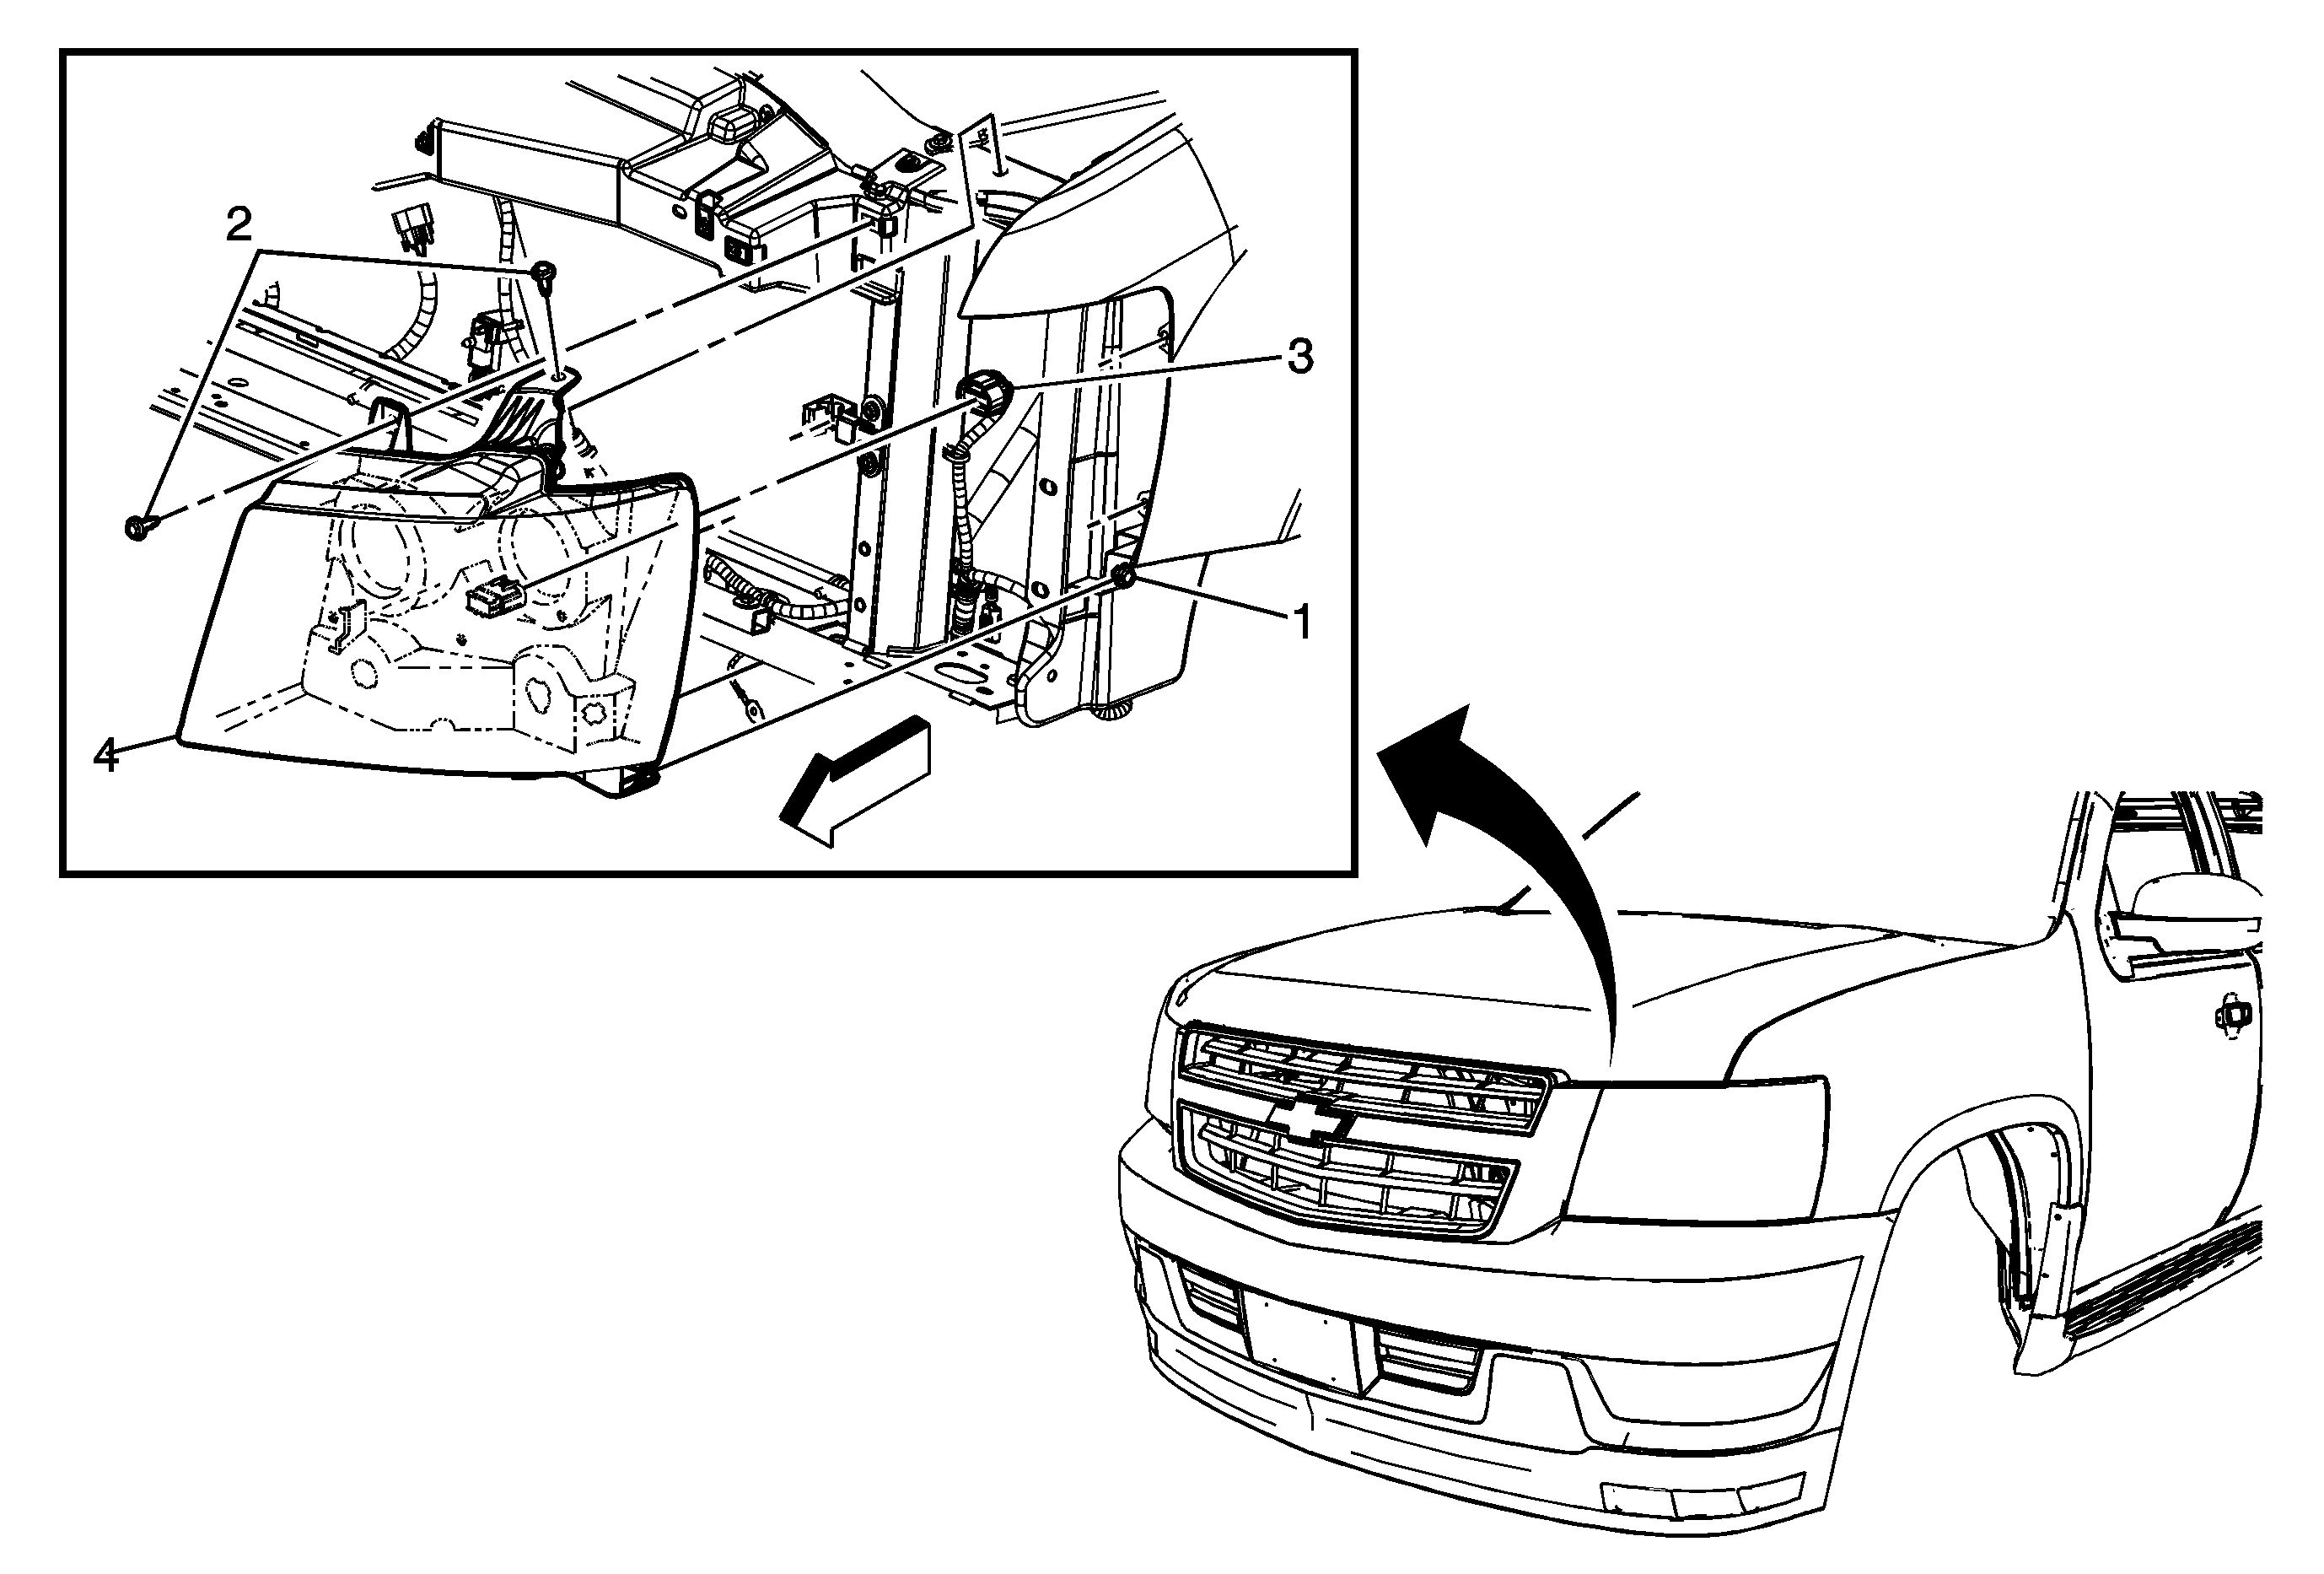

Object Number: 1967871  Size: MF

Callout

Component Name

Preliminary Procedures

  1. Remove the front bumper fascia. Refer to Front Bumper Fascia Replacement .
  2. Remove the 2 upper headlamp bolts.
  3. Grasp the headlamp at the upper inboard and lower outboard side and pull the headlamp forward to disengage the locating pins from the fender panel.
  4. Pull the outboard side of the headlamp forward until the locating pin is disengaged from the radiator support.
  5. Disconnect the electrical harness connector.

1

Headlamp Bolt

Notice: Refer to Fastener Notice in the Preface section.

Tighten
6 N·m (53 lb in)

2

Headlamp Bolts

Tighten
6 N·m (53 lb in)

3

Forward Lamp Harness Electrical Connector

4

Headlamp Assembly

Procedure

  1. Upon re-assembly, align the locating tab along with the outer locating pins prior to applying inward pressure to the headlamp assembly.
  2. Aim the headlamp assembly. Refer to Headlamp Aiming .

Headlamp Replacement GMC Yukon Two-mode Hybrid
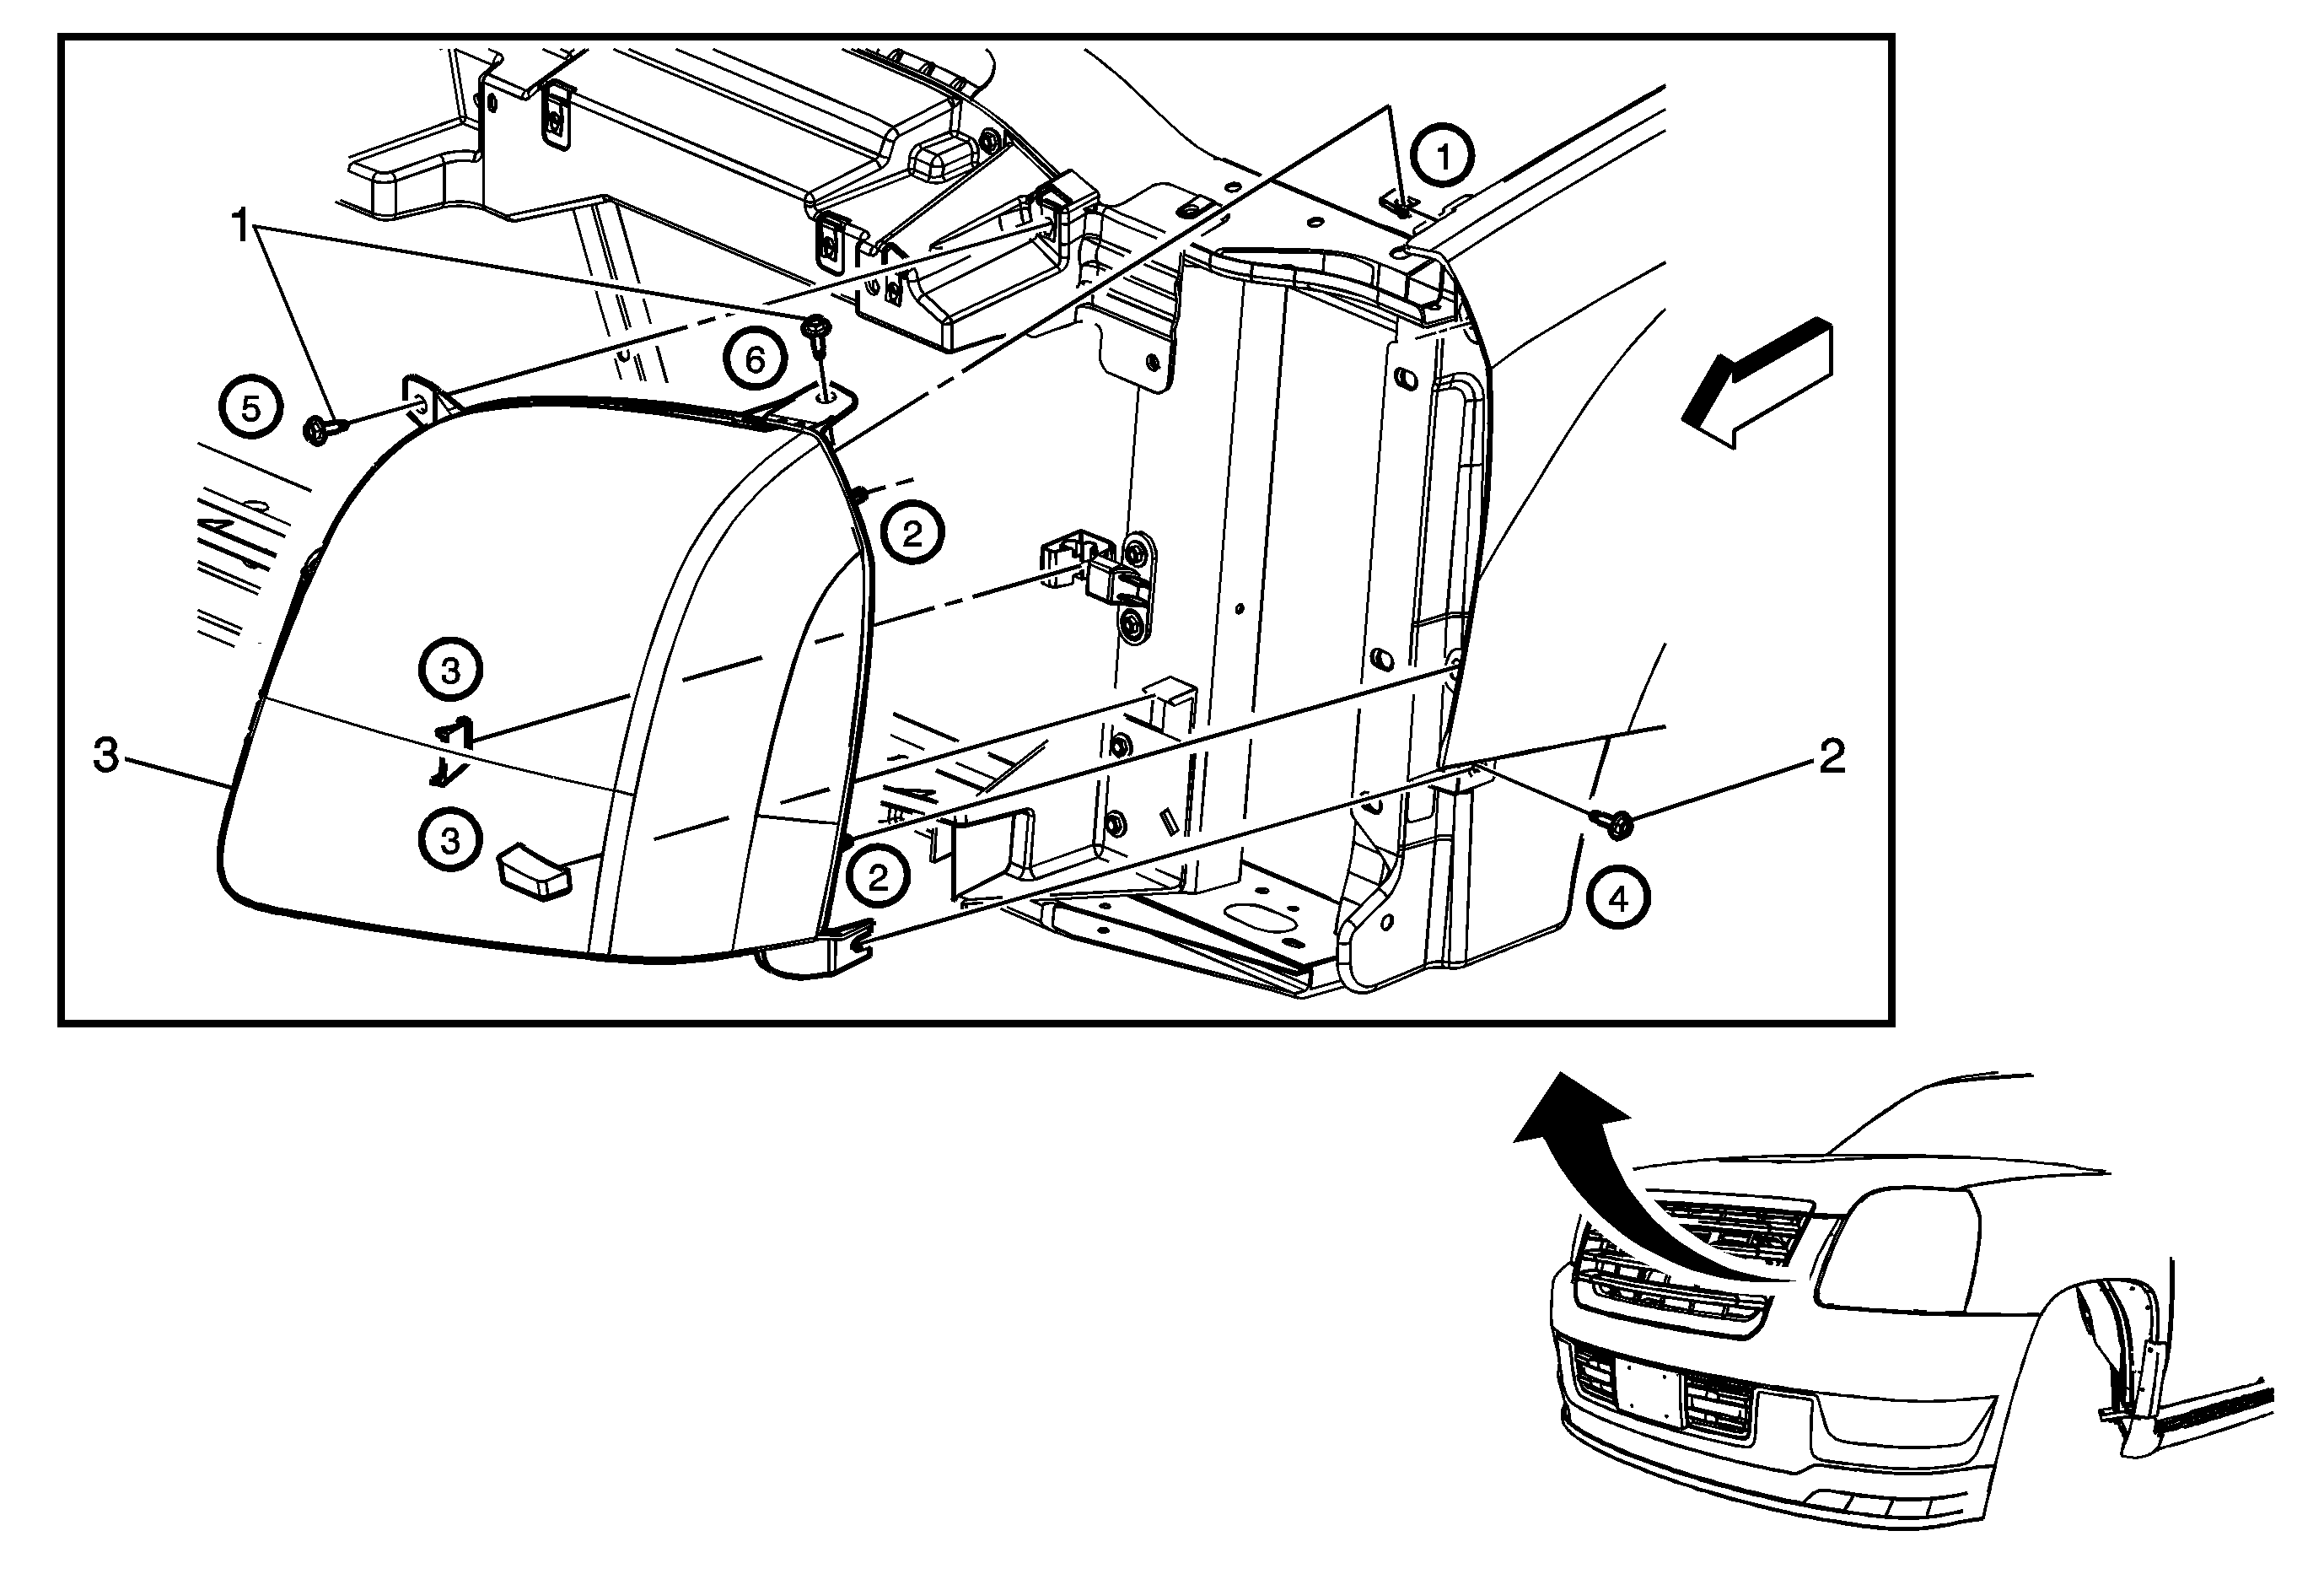

Object Number: 1967870  Size: MF

Callout

Component Name

Preliminary Procedures

  1. Remove the 2 forward wheelhouse liner retainers.
  2. Remove the 2 washer container push pins.
  3. Open the hood.
  4. Remove the 6 upper fascia bolts right to the hood latch mechanism.
  5. Remove the lower rear fascia bolt from the support bracket.
  6. Loosen the 2 fascia to fender bolts from under the fascia.
  7. Pull the outboard end of the front fascia straight outboard until it disengages from the fender attachment bracket.
  8. Pull the fascia forward and downward to allow enough clearance to remove the headlamp assembly.
  9. Loosen the lower outboard attachment bolts.
  10. Remove the 2 upper headlamp bolts.
  11. Grasp the headlamp at the upper inboard and lower outboard side and pull the headlamp forward to disengage the locating tab.
  12. Pull the outboard side of the headlamp forward until the 2 locating pins disengage from the radiator support.
  13. Disconnect the forward lamp harness connector.

1

Headlamp Bolt (Qty: 2)

Notice: Refer to Fastener Notice in the Preface section.

Tip
Secure the headlamp using the sequence as listed.

Tighten
6 N·m (53 lb in)

2

Headlamp Bolt

Tip
Loosen the lower outer fender bolt but do not remove.

Tighten
6 N·m (53 lb in)

3

Headlamp Assembly

Procedure

  1. Upon assembly, align the 2 outer locating pins and one inner alignment tab to the radiator support prior to applying pressure to the lamp in order to seat the lamp.
  2. Aim the headlamp assembly. Refer to Headlamp Aiming