Removal Procedure
Notice: Check the resistance values of all PCM relays, solenoids, and other
output controls before replacing or substituting the Powertrain Control Module
(PCM). Check all the sensor wiring and the PCM output control circuits for
a short to ground before replacing or substituting the PCM. Perform all circuit
repairs or malfunctioning component part replacements before installing a
replacement or substitute PCM. This will prevent damage to the
replacement or substitute PCM.
Notice: In order to prevent possible Electrostatic Discharge damage to the PCM,
Do Not touch the connector pins or the soldered components on the circuit
board.
Notice: Turn the ignition OFF when installing or removing the PCM connectors
and disconnecting or reconnecting the power to the PCM (battery cable, PCM
pigtail, PCM fuse, jumper cables, etc.) in order to prevent internal PCM damage.
Important: The replacement PCM must be programmed.
Caution: Unless directed otherwise, the ignition and start switch must be in the OFF or LOCK position, and all electrical loads must be OFF before servicing
any electrical component. Disconnect the negative battery cable to prevent an electrical spark should a tool or equipment come in contact with an exposed electrical terminal. Failure to follow these precautions may result in personal injury and/or damage to
the vehicle or its components.
- Disconnect the negative battery cable.
- Disable the SIR system. Refer to
Disabling the SIR System
in SIR.
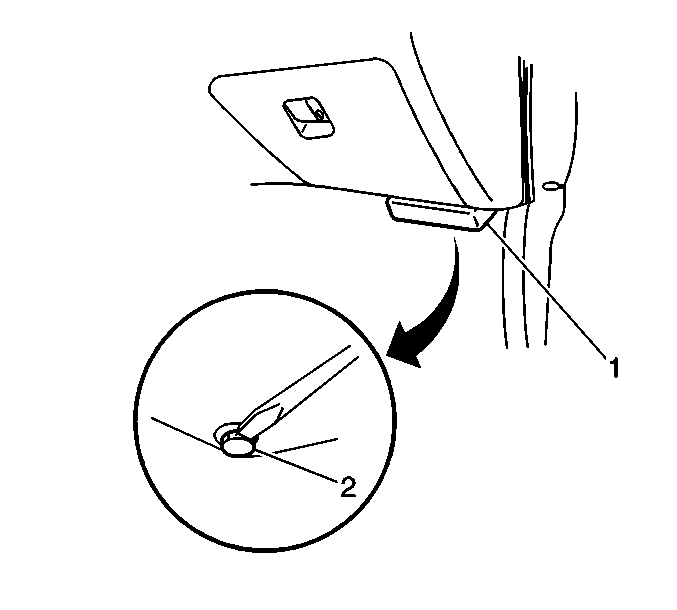
- Release the two plastic retainers (2) with the blade of a screwdriver
and remove the PCM cover (1).
- Disconnect the PCM electrical connectors
as follows:
| • | Disconnect the four PCM electrical connectors (A/T vehicles). |
| • | Disconnect the three PCM electrical connectors (M/T vehicles). |
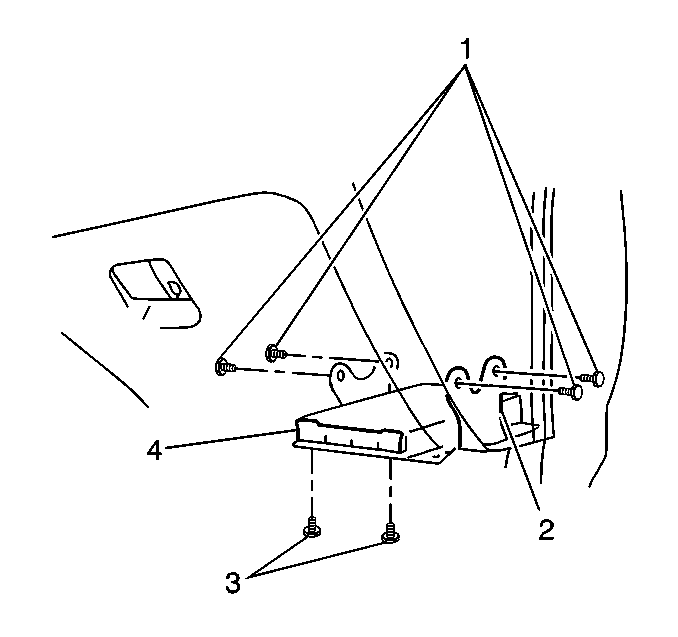
- Remove the two PCM retaining bolts (3).
- Slide the PCM (4) forward and out from the PCM bracket.
- Remove the four PCM bracket bolts (1).
- Remove the PCM bracket (2) from underneath the instrument panel.
Installation Procedure
- Install the PCM bracket (2) underneath
the instrument panel.
Notice: Use the correct fastener in the correct location. Replacement fasteners
must be the correct part number for that application. Fasteners requiring
replacement or fasteners requiring the use of thread locking compound or sealant
are identified in the service procedure. Do not use paints, lubricants, or
corrosion inhibitors on fasteners or fastener joint surfaces unless specified.
These coatings affect fastener torque and joint clamping force and may damage
the fastener. Use the correct tightening sequence and specifications when
installing fasteners in order to avoid damage to parts and systems.
- Secure the PCM bracket (2) with the 4 bolts (1).
Tighten
Tighten the PCM bracket bolts to 6 N·m (54 lb in).
- Install the PCM (4) into the PCM bracket (2).
- Secure the PCM to the PCM bracket with the 2 bolts.
Tighten
Tighten the PCM retaining bolts to 6 N·m (54 lb in).
- Connect the PCM electrical connectors as follows:
| • | Connect the four PCM electrical connectors to the PCM (A/T vehicles). |
| • | Connect the three PCM electrical connectors to the PCM (M/T vehicles). |
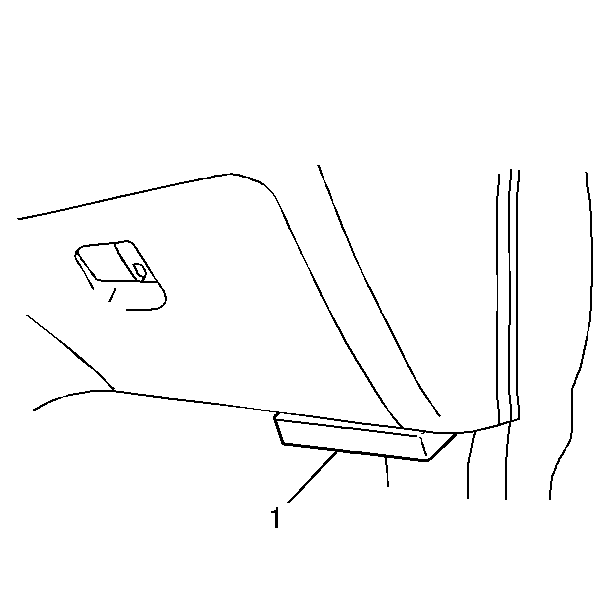
- Install the PCM cover (1) and secure
with the two plastic retainers.
- Enable the SIR system. Refer to
Disabling the SIR System
.
- Connect the negative battery cable.
- Program the PCM before starting the engine and operating the vehicle.
Before Programming a Control Module
Important: Do NOT program a control module unless you are directed by a service procedure
or you are directed by a General Motors Corporation service bulletin. Programming
a control module at any other time will not permanently correct a customers concern.
Ensure the following conditions are met before programming a control module:
| - | There is no charging system concern. All charging system concerns must
be repaired before programming a control module. |
| - | Battery voltage is greater than 12 volts but less than 16 volts.
The battery must be charged before programming the control module if the battery
voltage is low. |
| - | A battery charger is NOT connected to the vehicle's battery. Incorrect
system voltage or voltage fluctuations from a battery charger, may cause programming
failure or control module damage. |
| - | Turn OFF or disable any system that may put a load on the vehicle's battery. |
| • | Daytime running lights (DRL). Applying the parking brake, on most vehicles,
disables the DRL system. Refer to the Owners manual. |
| • | Engine cooling fans etc. |
| • | The ignition switch is in the proper position. The scan tool prompts
you to turn ON the ignition, with the engine OFF. DO NOT change the position of
the ignition switch during the programming procedure, unless instructed to do
so. |
| • | All tool connections are secure. |
| - | The connection at the DLC is secure. |
| - | Voltage supply circuits |
| • | DO NOT disturb the tool harnesses while programming. If an interruption
occurs during the programming procedure, programming failure or control module
damage may occur. |
Remote Programming
The Remote SPS method is a three-step process that involves the following procedures:
- Connecting the Tech 2 to the vehicle and obtaining the information
from the module.
- Connecting the Tech 2 to the terminal and downloading a new calibration
file from the terminal into the Tech 2 memory.
- Reconnecting the Tech 2 to the vehicle and uploading the new calibration
file into the module.
Performing the Remote Procedure
- Connect the Tech 2 to the vehicle and obtain the module information
using the following procedure:
| | Important: Ensure the control module is installed in the vehicle and the battery is fully
charged before programming.
|
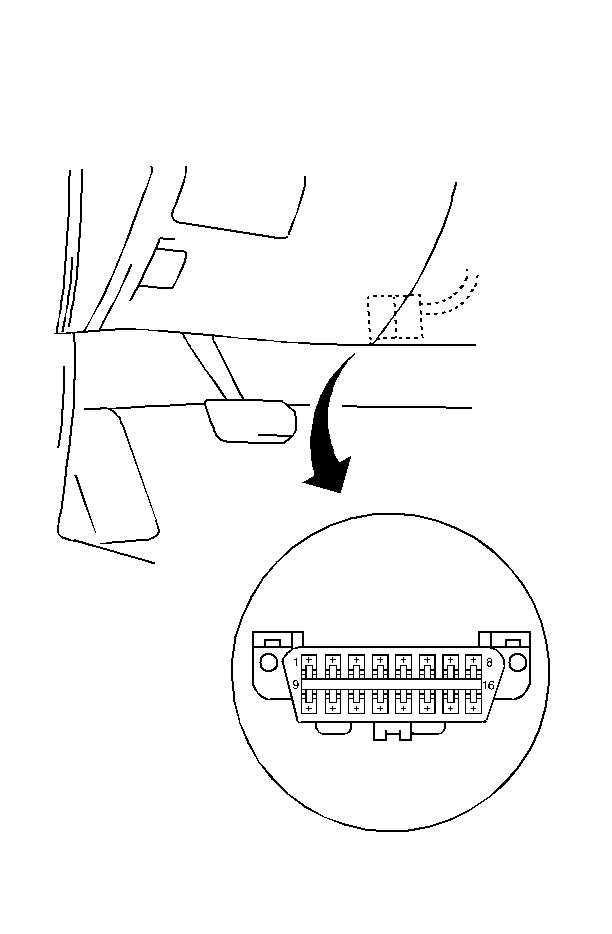
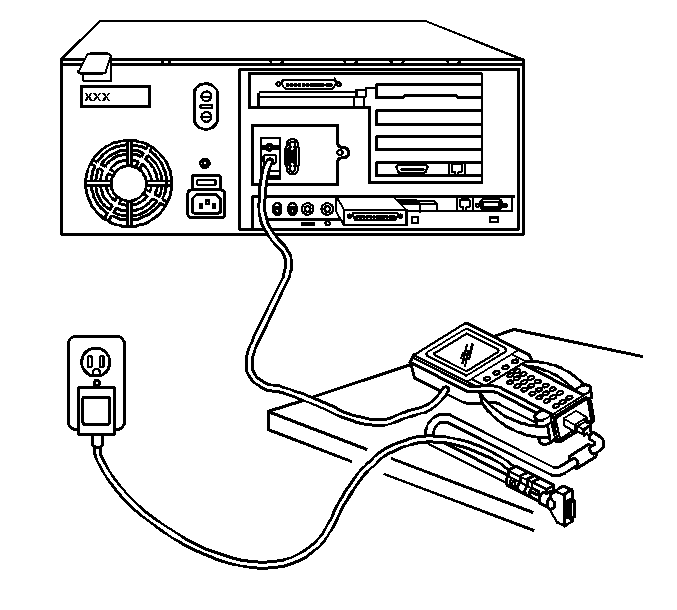
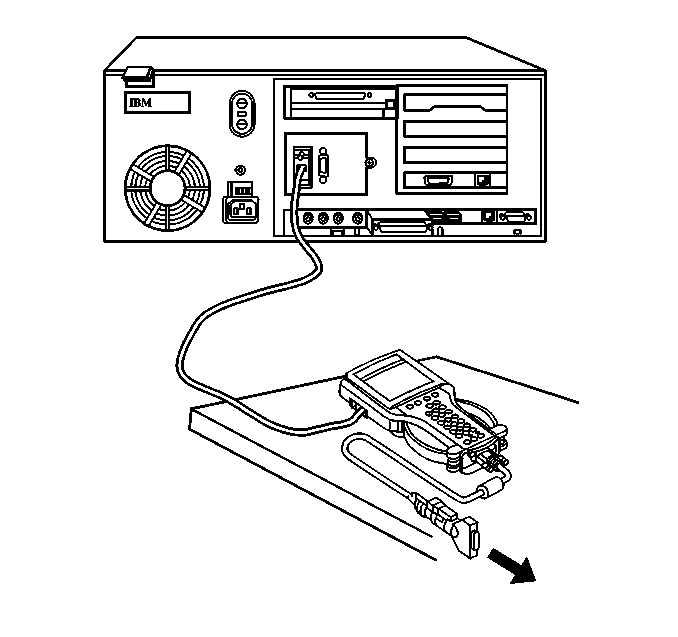
| 1.1. | Connect the Tech 2 to the vehicle data link connector (DLC), with the
engine and the Tech 2 OFF. |
| 1.3. | Press Enter at the title screen. |
| 1.4. | Turn ON the ignition, with the engine OFF. |
| 1.5. | Select Service Programming System at the Main Menu. |
| | Important: Select Request Info Again if a vehicle identification number (VIN) was previously
stored in the Tech 2.
|
| 1.6. | Select Request Info. |
| 1.7. | Enter the vehicle description by following the on-screen instructions. |
| 1.8. | Turn OFF all accessories and select Continue. |
| | Important: The correct VIN must be entered if the vehicle identification number (VIN) does
not appear correctly.
|
| | Important: If the vehicle is equipped with the original factory control module, no VIN
will be stored.
|
| 1.9. | Verify that the correct VIN is entered on the Tech 2 and select Yes. |
- Turn OFF the Tech 2.
- Disconnect the Tech 2 from the vehicle.
- Turn OFF the ignition.
- Transfer the data from the terminal to the Tech 2
using the following procedure:
| 5.1. | Connect the Tech 2 to the terminal. |
| | Important: The TIS supports service programming with the Tech 2 scan tool only.
|
| 5.2. | Launch the TIS application at the terminal. |
| 5.3. | Select the Service Programming System at the main screen. |
| 5.4. | Highlight the following information on the Select Diagnostic Tool and
Programming Process Screen: |
| • | Select Diagnostic Tool--Select Tech 2 |
| • | Select Programming Process--Identify whether an existing module is
being reprogrammed or a module is being replaced with a new one. |
| • | Select ECU Location--Select vehicle |
| 5.6. | Verify the connections and select Next. |
| | Important: You may receive a message stating that the control module could be a service
control module if you selected NO to the VIN being correct. Click OK.
|
| 5.7. | Verify the VIN and select Next. |
| 5.8. | Select the appropriate controller for the vehicle being serviced. |
| | Important: When selecting the vehicle configuration index (VCI) programming type, a valid
VCI number for the vehicle must be entered. This number may be obtained from the Techline
Customer Support.
|
| 5.9. | Select the type of programming to be performed from the following categories: |
| • | Normal--Used for updating an existing calibration or programming
a new controller. |
| • | Vehicle configuration index (VCI)--Used for updating an existing
controller or programming a new controller for newer vehicles whose VINs are not
yet in the database. |
| • | Reconfigure--Used to reconfigure a vehicle for changes in tire size
and axle ratios. |
| | Important: Refer to Service bulletins before service programming is performed if the bulletins
are listed along with the calibration files.
|
| 5.11. | Select the appropriate calibration file for the vehicle being serviced. |
| | Important: Select Cancel if you receive a message stating that the calibration selected
is already the current calibration in the control module and reprogramming with the
same download is not allowed.
|
| 5.13. | Verify your selection on the Summary screen. |
- Close the application and return to the TIS application Selection screen
after the download is complete.
- Turn OFF the Tech 2.
- Disconnect the Tech 2 from the terminal.
- Transfer the data from the Tech 2 to the control module using the
following procedure:
| 9.1. | Connect the Tech 2 to the vehicle DLC, with the engine and the
Tech 2 OFF. |
| 9.3. | Press Enter at the Title screen. |
| 9.4. | Turn ON the ignition, with the engine OFF. |
| 9.5. | Select Service Programming System. |
| 9.6. | Select the Program ECU function on the Tech 2. |
| 9.7. | Verify the VIN and calibration numbers, select Continue. |
| 9.8. | Follow the on-screen instructions and select Continue. |
| 9.9. | Select continue and exit the program after the Tech 2 displays
Programming was Successful. |
- Turn OFF the ignition.
- Turn OFF the Tech 2.
- Disconnect the Tech 2 from the vehicle.
Programming Verification
- Turn OFF the ignition for 30 seconds.
- Attempt to start the engine.
- Repeat the Service Programming procedure if the engine does not start
or has an engine performance concern.
Pass-Thru Programming
Pass-Thru programming allows the scan tool to remain connected to the terminal
and to the vehicle throughout the programming process. The vehicle must be in close
proximity to the terminal while using Pass-Thru.
Performing the Pass-Thru Procedure
Important: The TIS supports service programming with the Tech 2 scan tool only.
- Launch the TIS application at the terminal.
- Select the Service Programming System.
- Highlight the following information on the Select Diagnostic Tool and
Programming Process screen:
| • | Select Diagnostic Tool--Select Pass-Thru |
| • | Select Programming Process--Identify whether an existing module is
being reprogrammed or a module is being replaced with a new one. |
| • | Select ECU Location--Select vehicle |
- Select Next.
- Complete all terminal-directed data on the Preparing for Communication/Determine
Vehicle screen until Next is highlighted.
Important: In order to reduce the potential for signal loss, the RS-232 cable should not
be more than 25 feet long.
- Select Next.
- Follow the instructions on the Preparing for Communication screen.
- Select Next.
Important: The correct VIN must be entered if the vehicle identification number (VIN) does
not appear correctly.
Important: If the vehicle is equipped with the original factory control module, no VIN
will be stored.
- Verify the VIN on the Validate Vehicle Identification Number screen.
- Select Next.
Important:
| • | When selecting the vehicle configuration index (VCI) programming type,
a valid VCI number for the vehicle must be entered. This number may be obtained from
the Techline Customer Support. |
| • | The correct tire size and axle ratio must be highlighted and a valid VCI
number entered if you select Reconfigure for your programming type. |
- If an option screen appears, verify the vehicle configuration and/or RPO information.
- Select Next.
- Highlight the appropriate control module and programming type on the
Supported Controllers screen.
- Select Next.
Important: Select Cancel if you receive a message stating that the calibration selected
is already the current calibration in the control module and reprogramming with the
same download is not allowed.
- Select the proper calibrations on the Calibration Selection screen.
- Ensure all the folder tabs have a green check mark.
- Select Next.
- Verify the current calibrations with the selected calibrations.
- Select Next.
- The Transfer Data screen will appear until the progress bar reaches 100 percent.
This may take up to 30 minutes.
- Complete all of the terminal-directed data on the Programming Complete
screen.
- Turn OFF the Tech 2.
- Disconnect the Tech 2 from the vehicle.
Programming Verification
- Turn OFF the ignition for 30 seconds.
- Attempt to start the engine.
- Repeat the Service Programming procedure if the engine does not start
or has an engine performance concern.
- Inspect the connections of the following components:
- Reprogram the control module.
