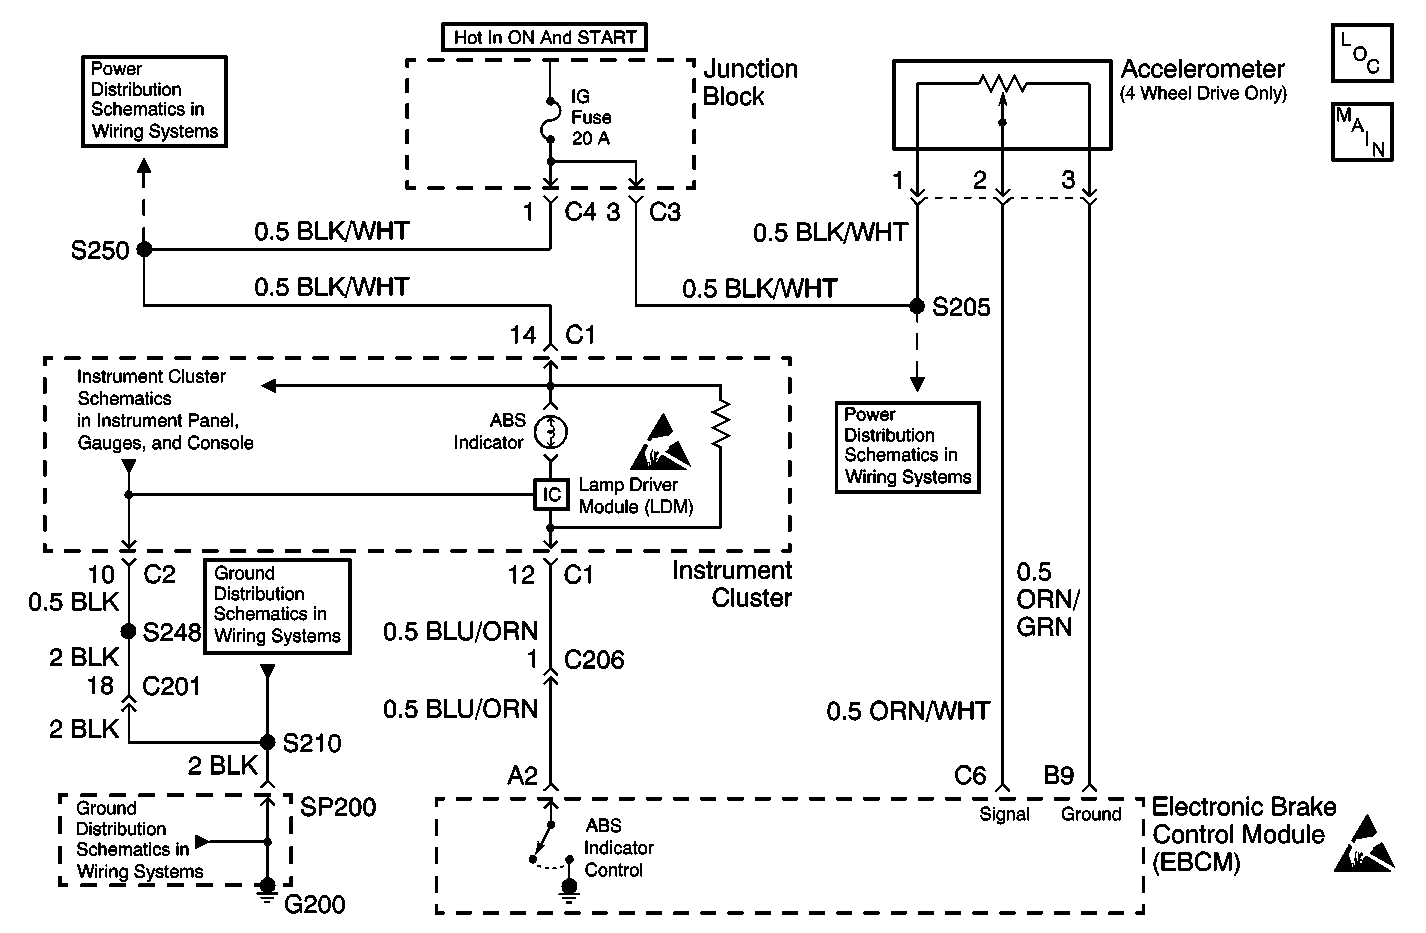
Circuit Description
The IG Fuse provides power (12 volts) to the accelerometer. The accelerometer converts the change in vehicle motion, or inertia, into a voltage signal. This signal is sent to the EBCM.
The accelerometer provides additional vehicle speed reference to the EBCM. The voltage signal ranges, from 2.4 to 2.6 volts at zero speed change (constant motion.) The accelerometer voltage signal drops when the vehicle is under acceleration. The accelerometer voltage signal increases when the vehicle is under deceleration.
Conditions for Running the DTC
| • | Vehicle is in 4WD |
| • | Ignition voltage is greater than 9 volts |
Conditions for Setting the DTC
A malfunction exists if the vehicle is in 4WD and the EBCM detects:
| • | a short to ground in the accelerometer signal circuit |
| • | an open in the accelerometer signal circuit |
| • | the accelerometer voltage is between 0.47 and 1.0 volts with all wheel speeds at zero |
Action Taken When the DTC Sets
| • | ABS is disabled. |
| • | The ABS warning indicator turns ON. |
| • | If failure occurs during an ABS event, ABS is disabled after the completion of the ABS event. |
Conditions for Clearing the DTC
| • | The condition responsible for setting the DTC no longer exists and the Scan Tool Clear DTCs function is used. |
| • | 100 drive cycles pass with no DTCs detected. A drive cycle consists of starting the vehicle, driving the vehicle over 16 km/h (10 mph), stopping and then turning the ignition OFF. |
Diagnostic Aids
Use the enhanced diagnostic function of the Scan Tool in order to measure the frequency of the malfunction.
Any circuitry that is suspected of causing the intermittent complaint should be thoroughly checked for improper mating, improperly formed or damaged terminals, poor terminal to wiring connections, or physical damage to the wiring harness.
Test Description
The number(s) below refer to the step number(s) on the diagnostic table.
-
Tests for the proper operation of the circuit in the high voltage range.
-
Tests for the proper operation of the circuit in the low voltage range. If the fuse in the jumper opens when you perform this test, the signal circuit is shorted to voltage.
Step | Action | Value(s) | Yes | No |
|---|---|---|---|---|
1 | Did you perform the ABS Diagnostic System Check? | -- | Go to Step 2 | |
2 |
Does the scan tool indicate that the Accelerometer Status parameter is OK? | -- | Go to Testing for Intermittent Conditions and Poor Connections | Go to Step 3 |
Does the scan tool indicate that the Accelerometer Status parameter is Open? | -- | Go to Step 6 | Go to Step 4 | |
4 | Does the scan tool indicate that the Accelerometer Status parameter is Shorted to Ground? | -- | Go to Step 8 | Go to Step 5 |
5 | Does the scan tool indicate that the Accelerometer Status parameter is Unreasonably High or Unreasonably Low? | -- | Go to Step 11 | Go to Step 5 |
Does the scan tool indicate that the Accelerometer Status parameter is Shorted to Ground? | -- | Go to Step 11 | Go to Step 7 | |
7 | Test the 12 volt reference circuit of the Accelerometer for an open or high resistance. Refer to Circuit Testing and Wiring Repairs in Wiring Systems. Did you find and correct the condition? | -- | Go to Step 15 | Go to Step 9 |
8 | Test the signal circuit of the Accelerometer for a short to ground. Refer to Circuit Testing and Wiring Repairs in Wiring Systems. Did you find and correct the condition? | -- | Go to Step 15 | Go to Step 11 |
9 | Test the signal circuit of the Accelerometer for a short to voltage, a high resistance, or an open. Refer to Circuit Testing and Wiring Repairs in Wiring Systems. Did you find and correct the condition? | -- | Go to Step 15 | Go to Step 10 |
10 | Test the ground circuit of the Accelerometer for a high resistance or an open. Refer to Circuit Testing and Wiring Repairs in Wiring Systems. Did you find and correct the condition? | -- | Go to Step 15 | Go to Step 12 |
11 | Inspect for poor connections at the harness connector of the accelerometer. Refer to Testing for Intermittent Conditions and Poor Connections and Connector Repairs in Wiring Systems. Did you find and correct the condition? | -- | Go to Step 15 | Go to Step 13 |
12 | Inspect for poor connections at the harness connector of the EBCM. Refer to Testing for Intermittent Conditions and Poor Connections and Connector Repairs in Wiring Systems. Did you find and correct the condition? | -- | Go to Step 15 | Go to Step 14 |
13 | Inspect the accelerometer mounting bracket for damage or proper positioning. If the accelerometer is properly mounted and no damage is present, replace the accelerometer. Refer to Lateral Accelerometer Replacement . Did you complete the replacement? | -- | Go to Step 15 | -- |
14 | Replace the EBCM. Refer to Electronic Brake Control Module Replacement . Did you complete the replacement? | -- | Go to Step 15 | -- |
15 |
Does the DTC reset? | -- | Go to Step 2 | System OK |
