For 1990-2009 cars only
Lower Control Arm Replacement for Chevrolet Tracker - 2WD 2003
Removal Procedure
- Raise and support the vehicle. Refer to Lifting and Jacking the Vehicle in General Information.
- Remove the tire and wheel assembly. Refer to Tire and Wheel Removal and Installation in Tires and Wheels.
- Remove the coil spring. Refer to Front Coil Springs Replacement .
- Remove the control arm bolts and nuts (1,3).
- Remove the control arm (2).
- Remove the control arm bushings if necessary. Refer to Front Lower Control Arm Bushing Replacement .
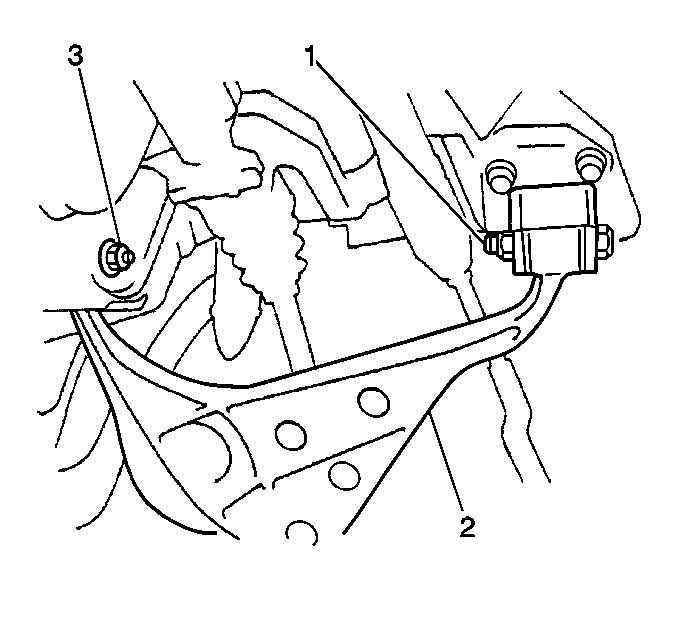
Important: Do not transfer the bushings from an old control arm to a new control arm.
Installation Procedure
- Install the control arm bushings if necessary. Refer to Front Lower Control Arm Bushing Replacement .
- Install the control arm (2) to the chassis.
- Install the control arm bolts and nuts (1,3).
- Install the coil spring. Refer to Front Coil Springs Replacement .
- Install the tire and wheel assembly. Refer to Tire and Wheel Removal and Installation in Tires and Wheels.
- Lower the vehicle.
- Raise the vehicle on an alignment rack.
- Tighten the control arm bolts and nuts.
- Lower the vehicle to the alignment measurement position.
- Measure the alignment. Adjust the alignment if necessary. Refer to Wheel Alignment Measurement in Wheel Alignment.
Important: New control arms do not include bushings. New bushings are available separately.
Important: Do not tighten the nuts or the bolts. The weight of the vehicle must be on the tire and wheel assemblies before tightening the nuts and the bolts.
Notice: Refer to Fastener Notice in the Preface section.
Tighten
| • | Tighten the front bolt and nut (1) to 85 N·m (61.5 lb ft). |
| • | Tighten the rear bolt and nut (3) to 127 N·m (92.0 lb ft). |
