Ignition Key Binds in Accessory Position (Install Slider Repair Kit)

| Subject: | Ignition Key Binds in Accessory Position (Install Slider Repair Kit) |
| Models: | 1999-2001 Chevrolet Tracker -- Built Prior to VIN Breakpoint 16929850 |
| with Automatic Transmission |
Condition
Some owners may comment that the ignition key binds or gets stuck in the accessory position. This condition should not be confused with a torque locked steering wheel when trying to turn the ignition key.
Cause
The AT slider in the ignition switch lock cylinder may be binding.
Correction
Using the following procedure, remove the ignition switch lock cylinder from the vehicle. Disassemble the cylinder, replace the AT slider and add lubricant . Reassemble and reinstall the cylinder in the vehicle. Do NOT replace the ignition switch lock cylinder to correct the above described condition.
- Disable the SIR system. Refer to the SIR sub-section in the Restraints section of the appropriate Service Manual.
- Remove the three phillips head screws and the instrument panel steering column opening trim plate.
- Remove the three screws attaching the lower steering column cover to the upper column cover. Remove the covers.
- Disconnect the ignition switch electrical connectors and remove any plastic ties securing the harness.
- Remove the two 12 mm hex head bolts attaching the upper portion of the steering column to the column support and allow the column to be lowered.
- Remove the phillips head screw attaching the transmission park lock cable housing to the arm on the ignition switch lock cylinder housing.
- Disconnect the transmission park lock cable from the white plastic AT lever located on the ignition switch lock cylinder arm. Do NOT remove the white plastic AT lever from the arm at this time.
- Using a hammer and a small punch or chisel, place a notch in the head of the two bolts located on the top of the ignition switch lock cylinder attaching plate. Continue using the hammer and punch/chisel to walk each bolt loose and remove. Discard the two bolts after removing.
- Remove the three phillips head screws that attach the ignition switch lock cylinder housing to the turn signal switch assembly. To access the three screws, rotate the steering wheel as required.
- Remove the ignition switch lock cylinder from the vehicle.
- Review the contents of the parts contained in the kit. The following parts should be in the kit:
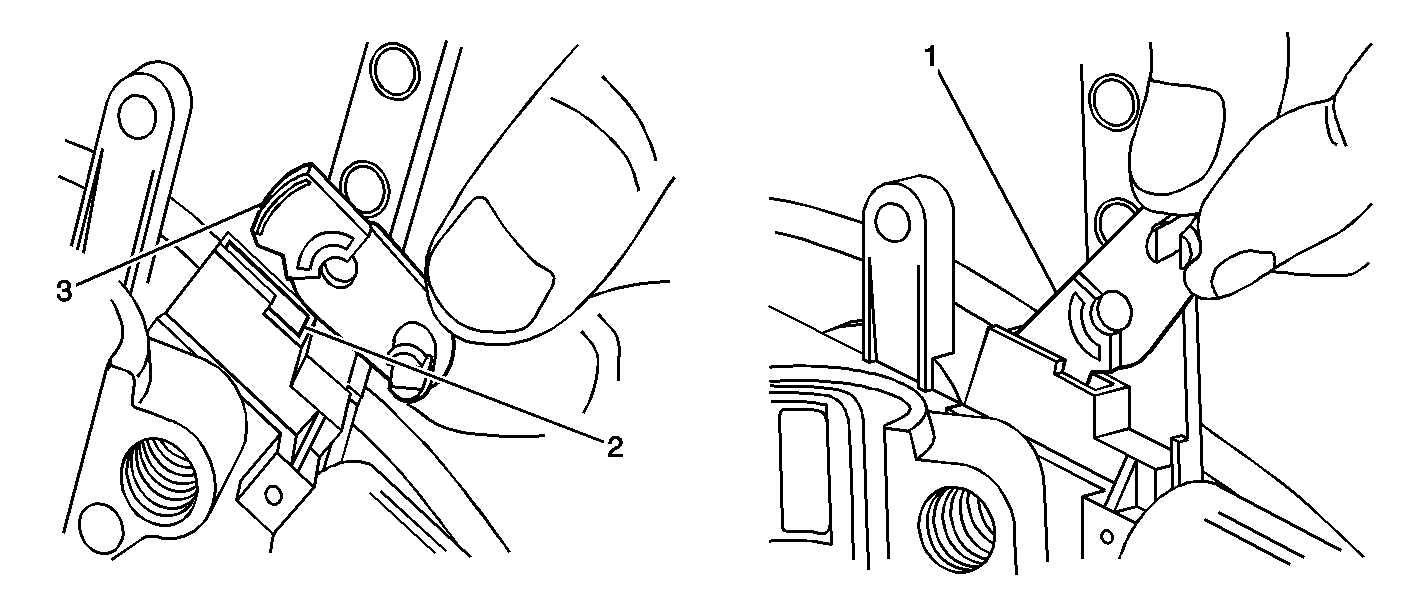
- With the ignition switch lock cylinder on a suitable work surface, review how the AT lever is attached to the lock cylinder assembly and then remove it by squeezing the four retaining tabs (1) together.
- Turn the ignition key to the ON position.
- Starting with the tab (1) located next to the numbers on the cylinder housing, remove the AT cover by breaking off the two retaining tabs using a small flat blade screwdriver (2). The second retaining tab is on the other side of the lock cylinder housing.
- Carefully remove the AT cover from the cylinder housing. The slider and spring should be in the opening on the underside of the AT cover. Discard the AT cover, the slider and the spring.
- If one of the spring pins remain in the cylinder housing after the retaining tabs have been removed, remove it by pulling it straight out using a pair of pliers. Do not attempt to remove it by prying or pulling it sideways. Doing so will deform or enlarge the hole in the cylinder housing and the new pins will not stay retained when installed later in this procedure.
- Using compressed air and a blow gun (2), remove any debris from the hole (1) in the lock cylinder that was covered by the AT cover.
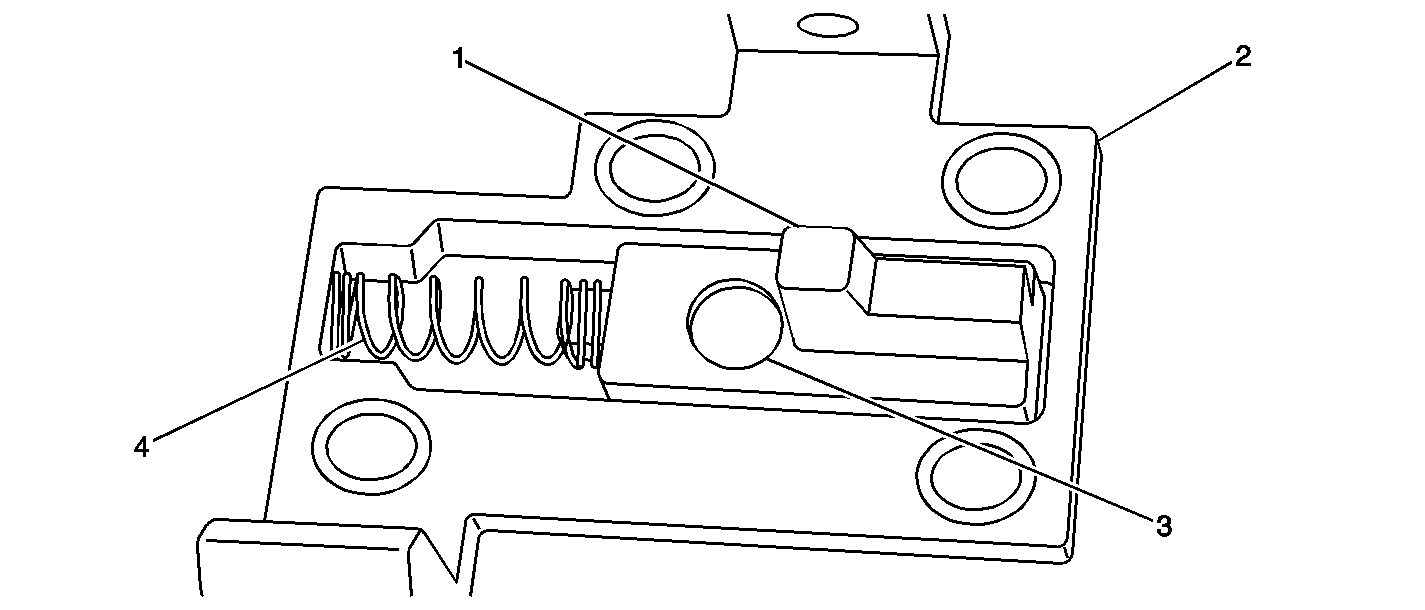
- Remove the AT slider (1) from the small bag making sure it is WELL GREASED and install it in the opening in the underside of the new AT cover (2) as shown. When properly installed, the SMALL CIRCLE MARK (3) ON THE SLIDER MUST BE VISIBLE. If installed with the small circle mark NOT visible, (upside down), the repair procedure will NOT work.
- Install the spring (4) in the AT cover (2) as shown, keeping the amount of grease that gets on it to a minimum. Then, set the assembled AT cover aside.
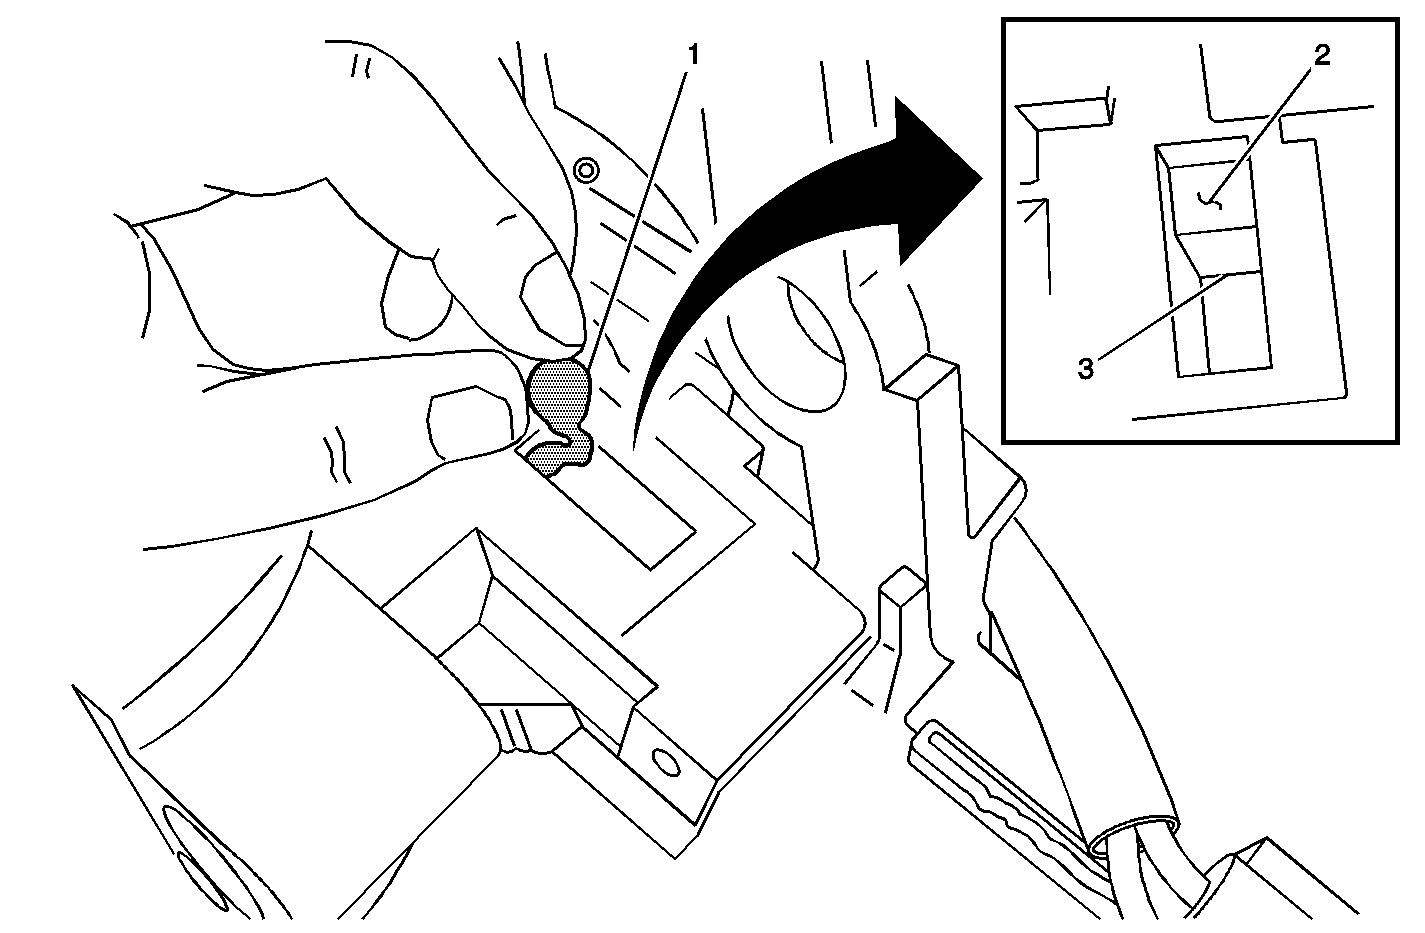
- Turn the ignition key to the LOCK position to expose the leading edge of the internal cam in the opening in the lock cylinder housing.
- Apply about half of the grease (1) remaining in the small bag to the leading edge of the internal cam (2) inside the opening (3). The remaining grease in the small bag will not be used.
- Turn the ignition key to the ON position.
- Place the new assembled AT cover on the lock cylinder housing ensuring that the spring does not fall inside the lock cylinder housing.
- Using a small hammer and punch, push the spring pin located in the two retaining tabs into the lock cylinder housing until they are flush with the top of the tabs.
- Install the new AT lever on the lock cylinder the same way the original lever was before being removed earlier in this procedure.
- With the ignition key in either the ON or ACCESSORY position, by hand, move the AT lever in (1) and out (3) of the slot (2) in the AT cover. Verify that it moves freely in and out of the AC cover slot at least 5 times.
- Install the ignition switch lock cylinder on the steering column.
- Install the three phillips head screws that attach the ignition switch lock cylinder housing to the turn signal switch assembly.
- Install the two new bolts included in the kit that attach the ignition switch lock cylinder to the steering column. Continue tightening the bolts until the heads break off.
- Position the transmission park lock cable housing on the ignition switch lock cylinder and install the phillips head screw.
- Connect the park lock cable to the AT lever.
- Position the steering column to the support and install the two 12 mm hex head bolts.
- Connect the ignition switch lock cylinder wiring harness connectors.
- Install the upper and lower steering column covers and three phillips head screws.
- Install the instrument panel steering column opening trim plate and three phillips head screws.
- Enable the SIR system and verify that the AIR BAG light flashes seven times and goes out. Refer to the SIR sub-section in the Restraints section of the Service Manual.
- Verify that the ignition key does not bind in the ACCESSORY position.
Important: The two bolts referred to in the next step do not have features that allow for the use of standard type tools when removing. To remove these two bolts, create a notch or indentation near the outer edge of the head using a hammer and a small punch or chisel. Once the notch has been created, continue using the hammer and punch/chisel in the notch to walk the head of the bolt around counterclockwise. Once the bolts have broken loose, they can be removed with your fingers.
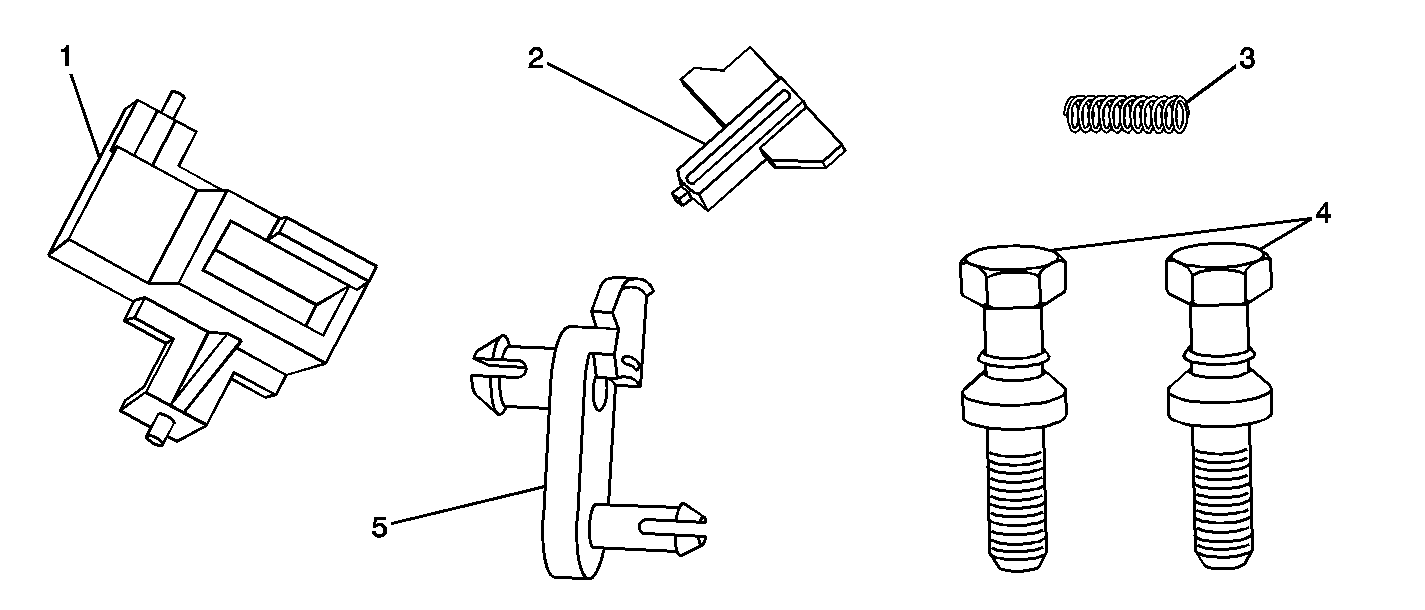
| • | AT cover (1) with spring pins installed |
| • | Greased AT slider (2) |
| • | DO NOT open smaller bag that contains the greased AT slider until instructed. |
| • | Return spring (3) |
| • | Two bolts (4) |
| • | AT lever (5) |
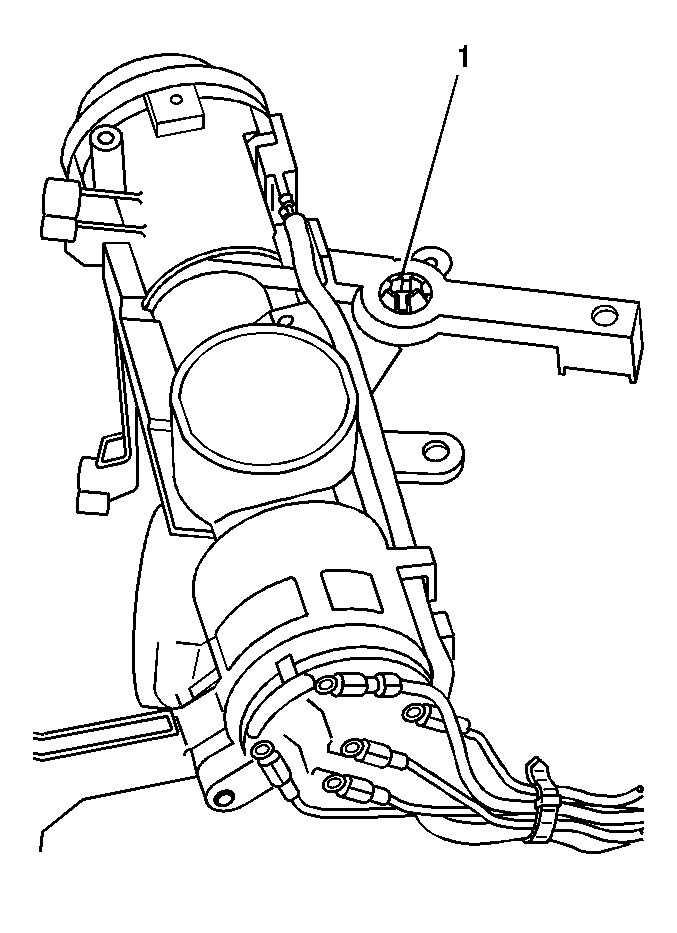
Important: Reviewing how the AT lever is installed on the lock cylinder assembly prior to removal in the next step will make installation easier later in this procedure.
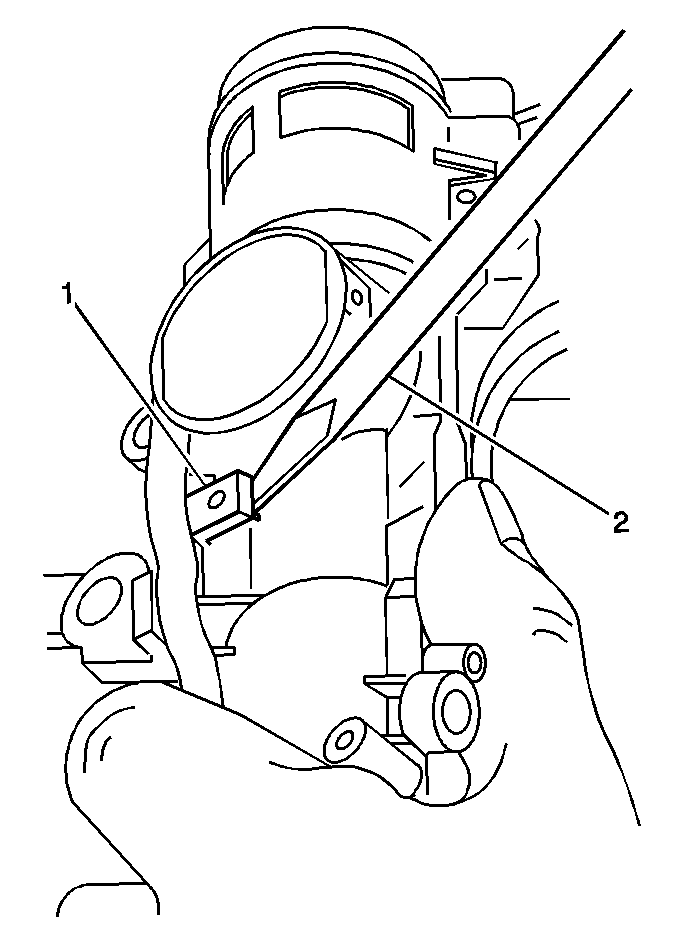
Important: When breaking off the two retaining tabs in the next step, keep the AT cover in place to avoid the slider and spring located on the underside of it from falling inside the cylinder housing. Only remove the AT cover when instructed.
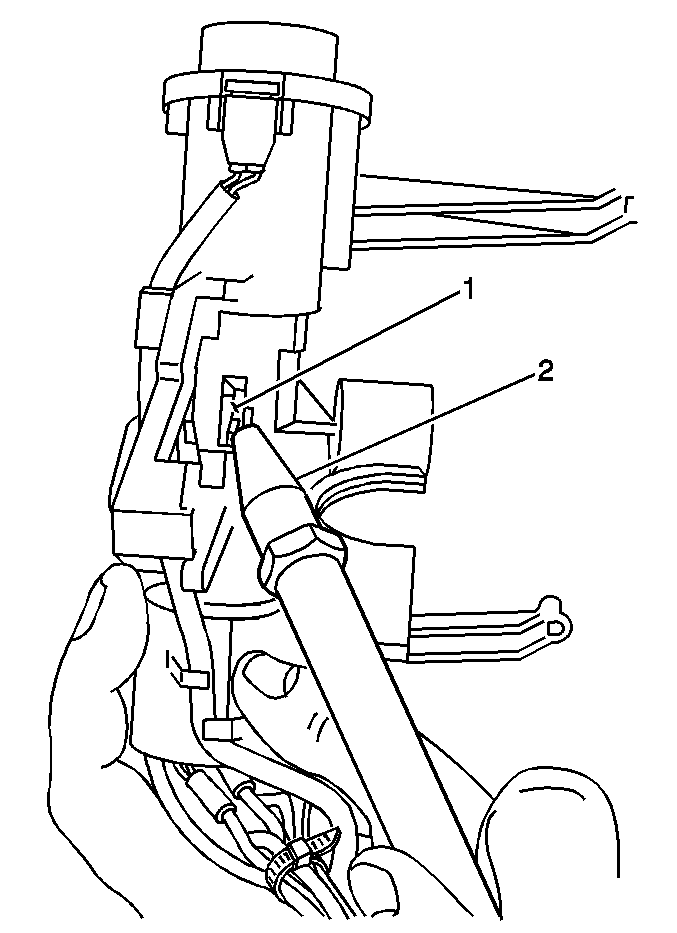
Important: Do NOT discard the small plastic bag after removing the slider from it in the next step. The small amount of grease remaining in the bag will be used later in this procedure. Also, do not install the spring in the AT cover until instructed.
Important: To keep the spring operating smoothly in cold weather, keep the amount of grease on the spring to a minimum.
Tighten
Tighten the screw to 2.2 N·m (19.5 lb in).
Tighten
Tighten the bolts to 23 N·m (17 lb ft).
Parts Information
Part Number | Description | Qty |
|---|---|---|
91176917 | Repair Kit, Ignition Lock Slider | 1 |
Parts are currently available from GMSPO.
Warranty Information
For vehicles repaired under warranty, use:
Labor Operation | Description | Labor Time |
|---|---|---|
N2320 | Ignition Switch -- R & R | 0.6 hr |
Add | To Repair Ignition Switch | 0.2 hr |
