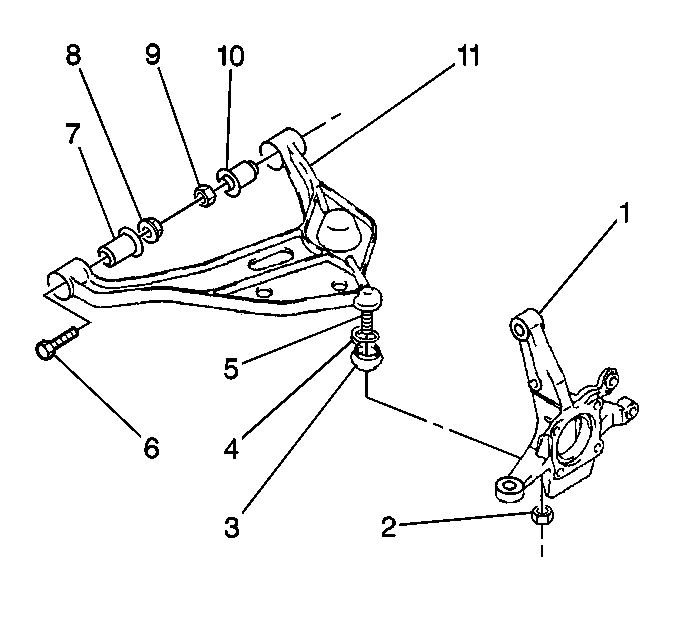
Tools Required
| • | J 35739 Control Arm
Bushing Installer |
| • | Snap-on® A57Q Bushing Remover/Installer Set |
Removal Procedure
- Remove the front suspension lower control arm. Refer to
Lower Control Arm Replacement
.
- Spray penetrating lubricant on the bushings in order to loosen the bushings
from the control arm.

Important: Do not transfer bushings from an old control
arm to a new control arm.
- Use a hydraulic press and adaptors or the following tools in order to remove
the 2 bushings (7,10) from the control arm (11):
| • | The appropriate adaptors |
Installation Procedure

Important: New control arms do not include bushings.
New bushings are available separately.
- Apply Slick 50® One Lube, or an equivalent PTFE lubricant, or soap water,
to the outside of a NEW front bushing (7) and the inside of the control arm
housing.
- Use a hydraulic press, or the following tools, or equivalent tools, in
order to install the front bushing to the control arm:
| • | Snap-on® A57-41 Adaptor |
| • | 2 Snap-on® A57Q Bearings |
| • | 2 Snap-on® A57Q Washers |
- Verify the flange of the bushing contacts the control arm.
- Apply Slick 50® One Lube, or an equivalent PTFE lubricant, or soap
water, to the outside of a NEW rear bushing (10) and the inside of the control
arm housing.
- Use a hydraulic press, or the following tools, or equivalent tools, in
order to install the rear bushing to the control arm:
| • | Snap-on® A57-44 Adaptor |
| • | Snap-on® A57-47 Adaptor |
| • | 2 Snap-on® A57Q Bearings |
| • | 2 Snap-on® A57Q Washers |
- Verify the flange of the bushing contacts the control arm.
- Install the control arm. Refer to
Lower Control Arm Replacement
.


