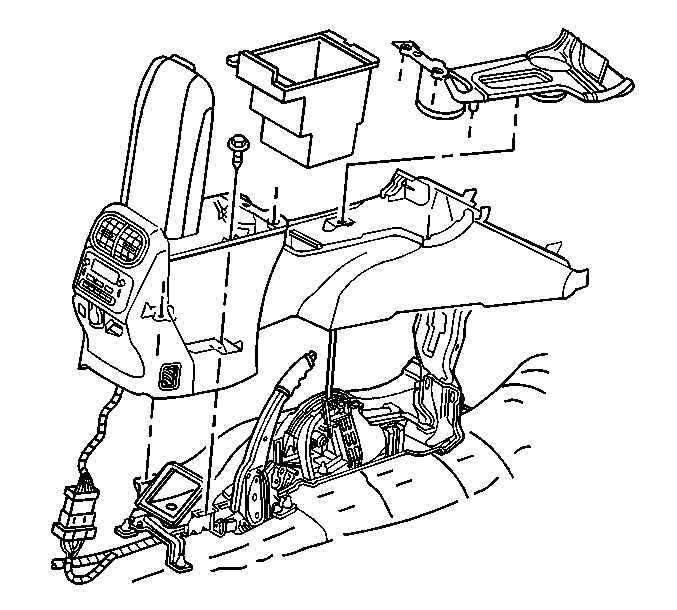
Removal Procedure
- Block the wheels to prevent the vehicle from moving.
- Remove the rubber ash tray inserts and rubber mat from the console.
- Remove the floor shift control knob. Refer to
Floor Shift Control Knob Replacement.
- Remove the console storage compartment. Refer to
Front Floor Console Compartment Replacement.

- Remove the center console retaining screws.
- Adjust the parking brake to the full-up, or fully engaged position.
- Slide the console rearward and raise the rear of the console in order to expose the electrical connectors.
- Disconnect the electrical connectors, as necessary.
- Adjust the parking brake to approximately the halfway position.
- Remove the center console from the vehicle.
- If replacing the floor console base, remove the following and retain for transfer:
| 11.1. | Remove the HVAC control module, if equipped. |
| 11.2. | Remove the armrest. |
| 11.3. | Remove the HVAC module and duct assembly. |
| 11.4. | Remove the cupholder. |
| 11.5. | Remove the HVAC upper duct. |
Installation Procedure

- If replacing the floor console base, install the following:
| 1.1. | Install the HVAC upper duct. |
| 1.2. | Install the cupholder. |
| 1.3. | Install the HVAC module and duct assembly. |
| 1.4. | Install the armrest. |
| 1.5. | Install the HVAC control module, if equipped. |
- Position the center console to the vehicle.
- Adjust the parking brake to the full-up, or fully engaged position.
- Connect the electrical connectors, as necessary.
- Lower the rear of the console and slide the console forward into position.
Caution: Refer to Fastener Caution in the Preface section.
- Install the center console retaining screws.
Tighten
Tighten the screws to 2.5 N·m (22 lb in).
- Install the console storage compartment. Refer to
Front Floor Console Compartment Replacement.
- Install the floor shift control knob. Refer to
Floor Shift Control Knob Replacement.
- Install the rubber ash tray inserts and rubber mat to the console.
- Remove the blocks from the vehicle.


