Fuel Tank Replacement Short Wheel Base
Removal Procedure
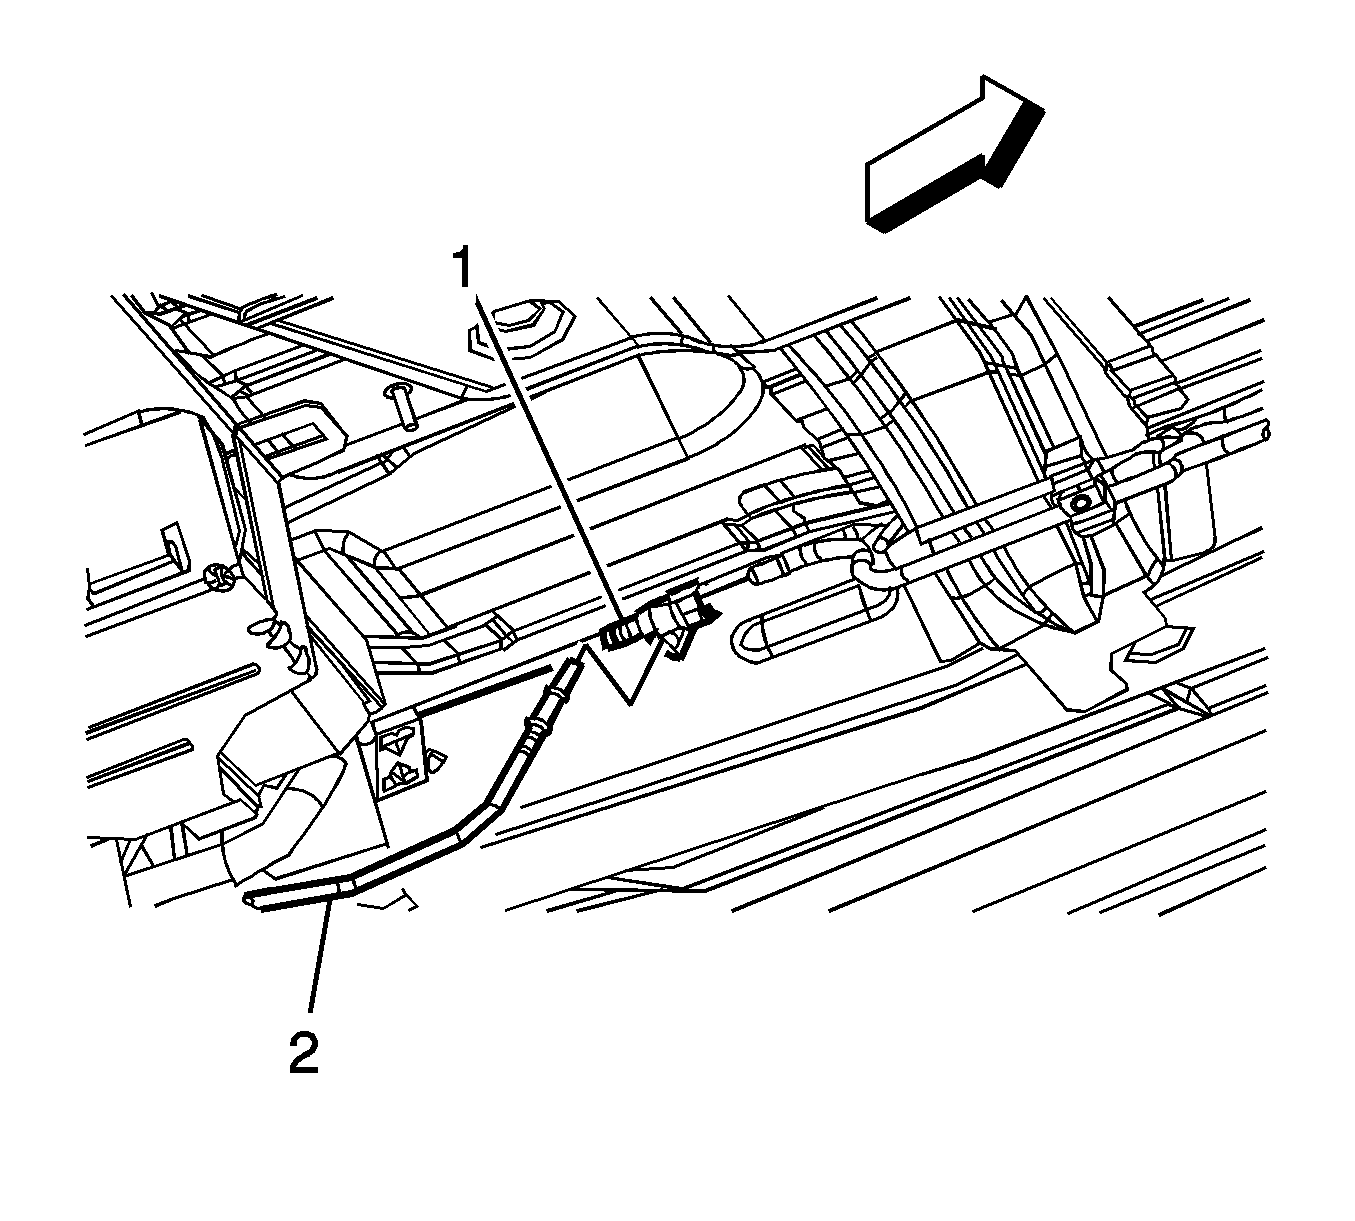
Caution: Do not attempt to straighten any kinked nylon fuel lines. Replace any kinked nylon fuel feed or return pipes in order to prevent damage to the vehicle.
- Relieve the fuel system fuel pressure. Refer to
Fuel Pressure Relief
.
- Drain the fuel tank. Refer to
Fuel Tank Draining
.
- Raise and support the vehicle. Refer to
Lifting and Jacking the Vehicle
.
- Disconnect the fuel feed pipe (1) quick connect fitting. Refer to
Plastic Collar Quick Connect Fitting Service
.
- Disconnect the evaporative emission (EVAP) pipe quick connect fitting. Refer to
Plastic Collar Quick Connect Fitting Service
.
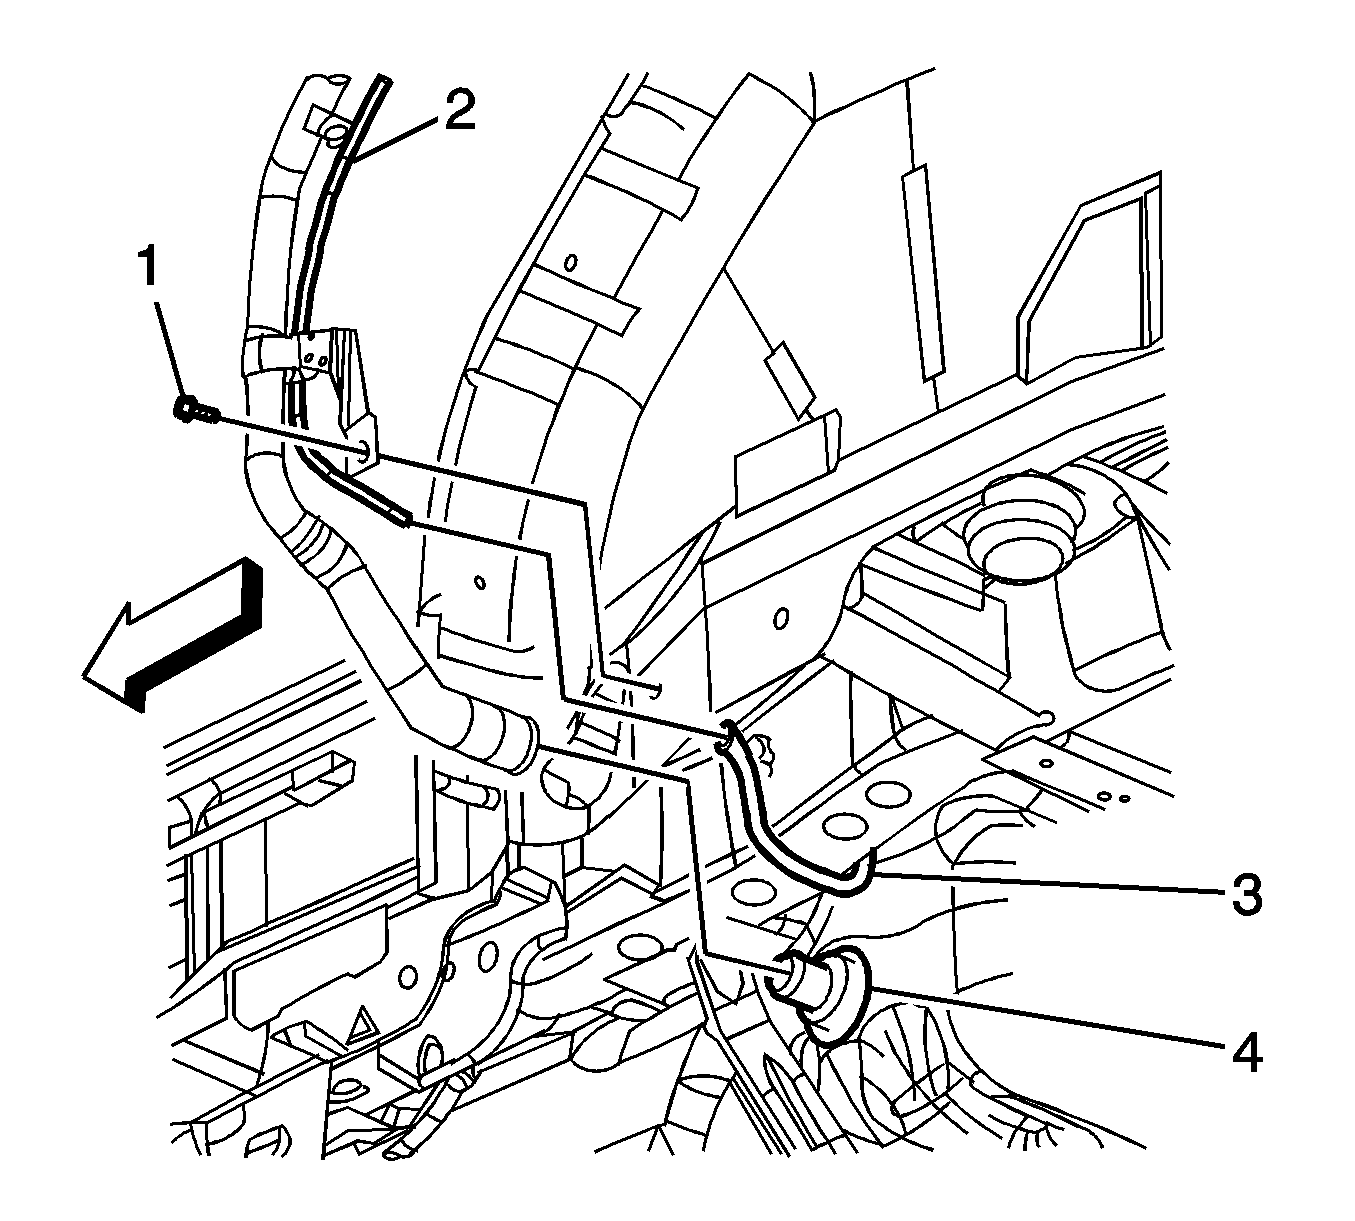
- Disconnect the fuel fill pipe vapor recirculation pipe (2) quick connect fitting from the fuel tank
vapor recirculation hose (3). Refer to
Plastic Collar Quick Connect Fitting Service
.
- Loosen the fuel fill hose clamp (5) at the fuel tank.
- Remove the fuel fill hose from the fuel tank (4).
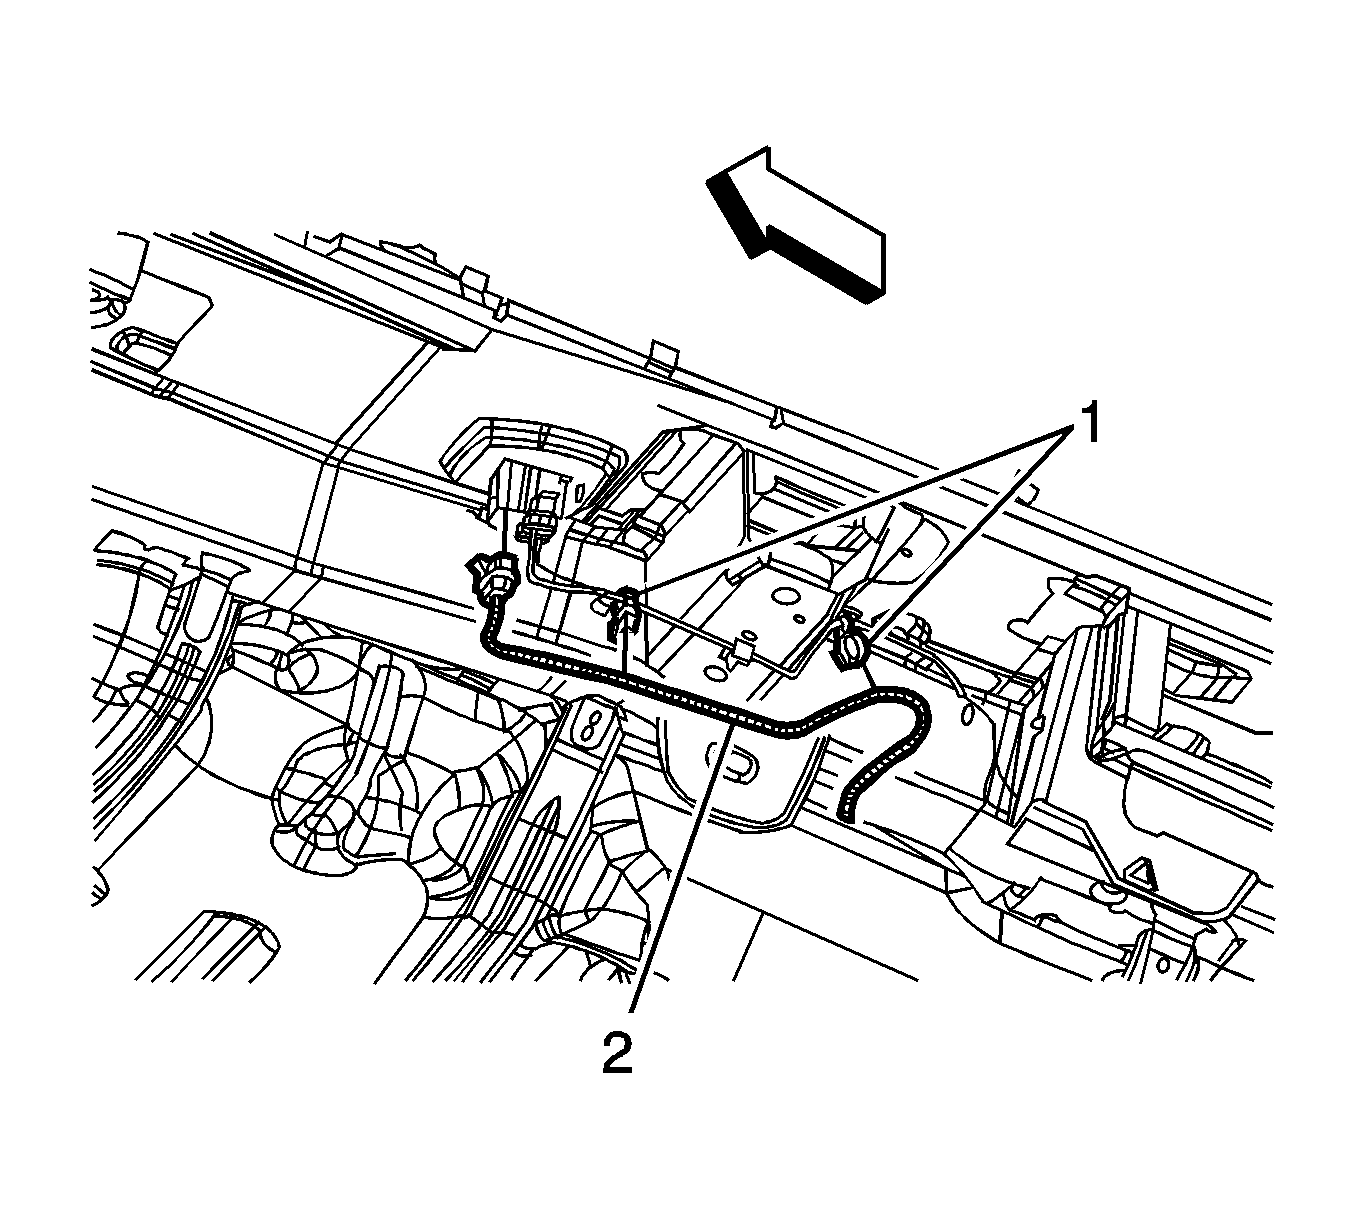
- Disconnect the fuel tank wiring harness (2) electrical connector from the body wiring harness pass-through.
- Remove the fuel tank wiring harness from the electric brake harness clips (1).
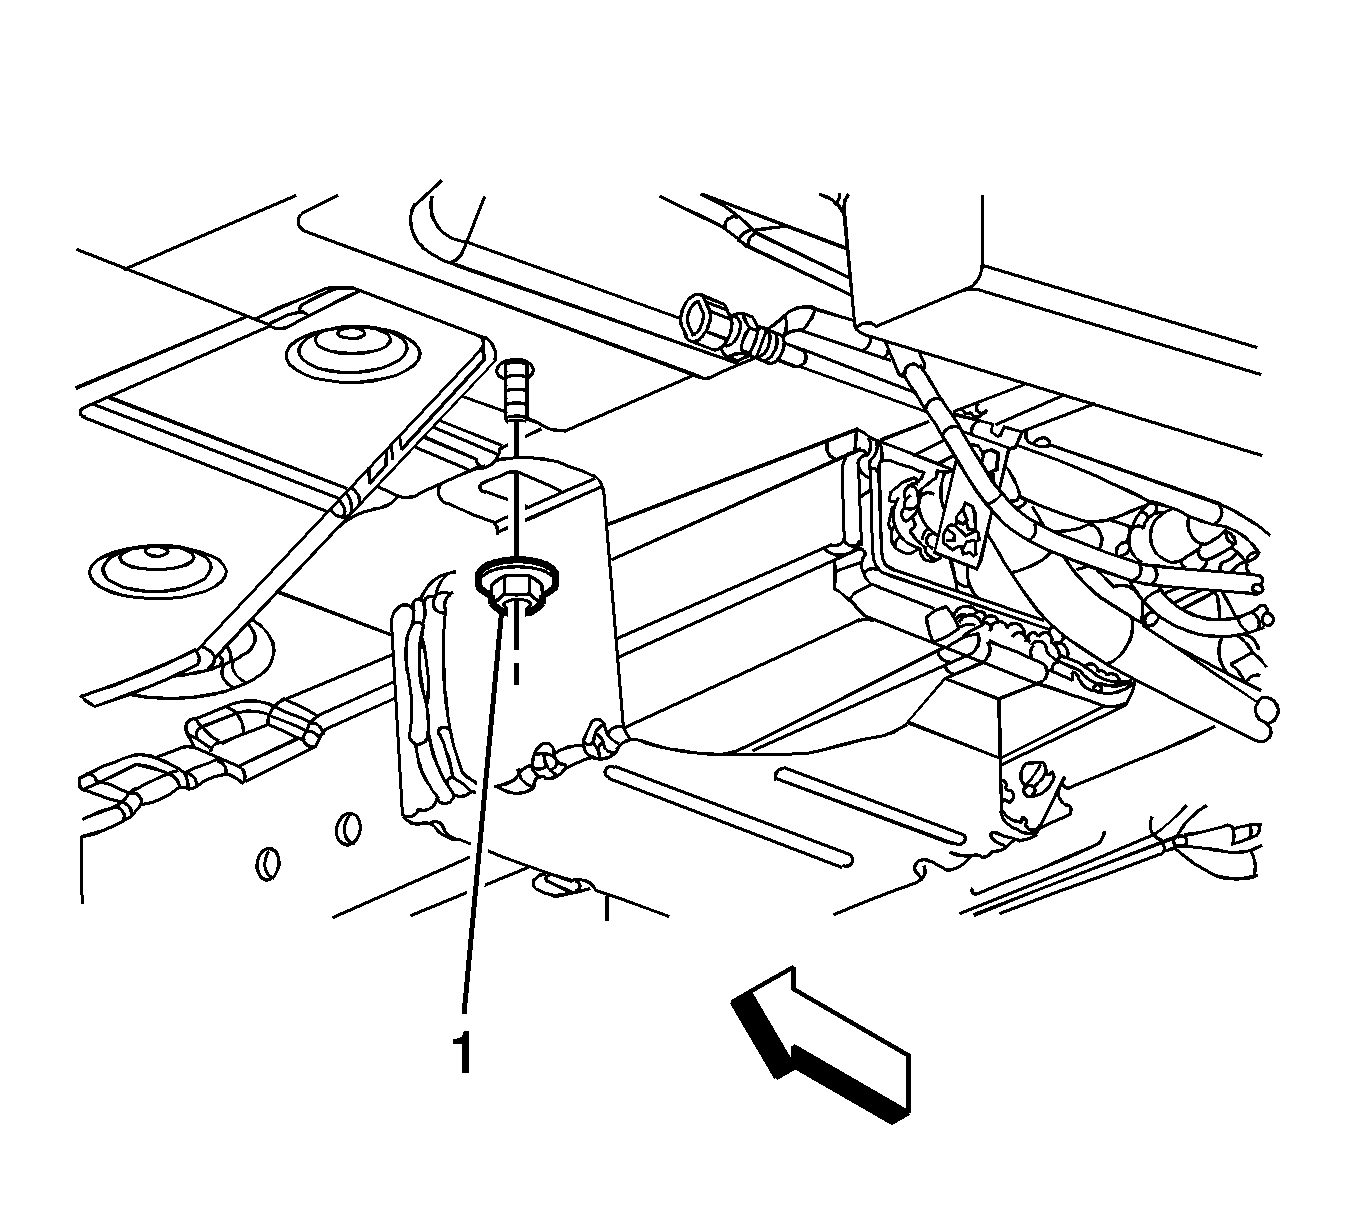
- Center an adjustable jack under the fuel tank.
- Remove the EVAP canister nut (1).
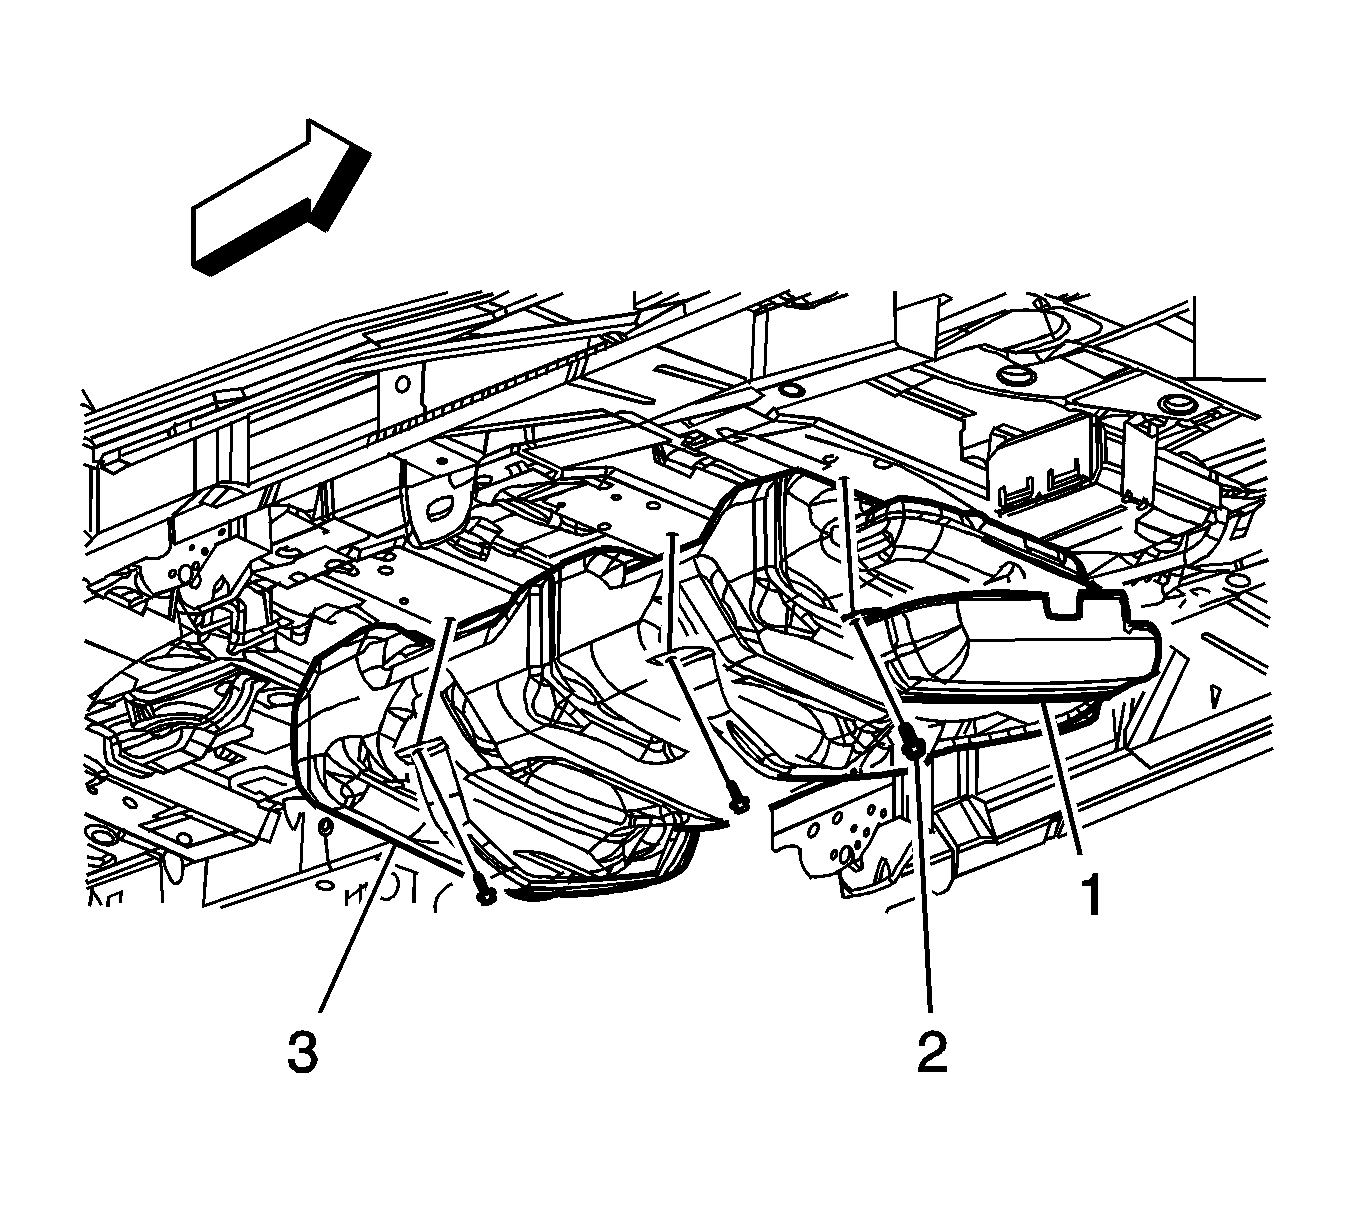
- Remove the fuel tank strap bolts (2), and reposition the fuel tank straps (1).
- With the aid of an assistant, support and lower the fuel tank (3).
- Remove the fuel tank from the adjustable jack and place on a suitable work surface.
- If the fuel tank is not being replaced, proceed to the installation procedure.
Disassembly Procedure
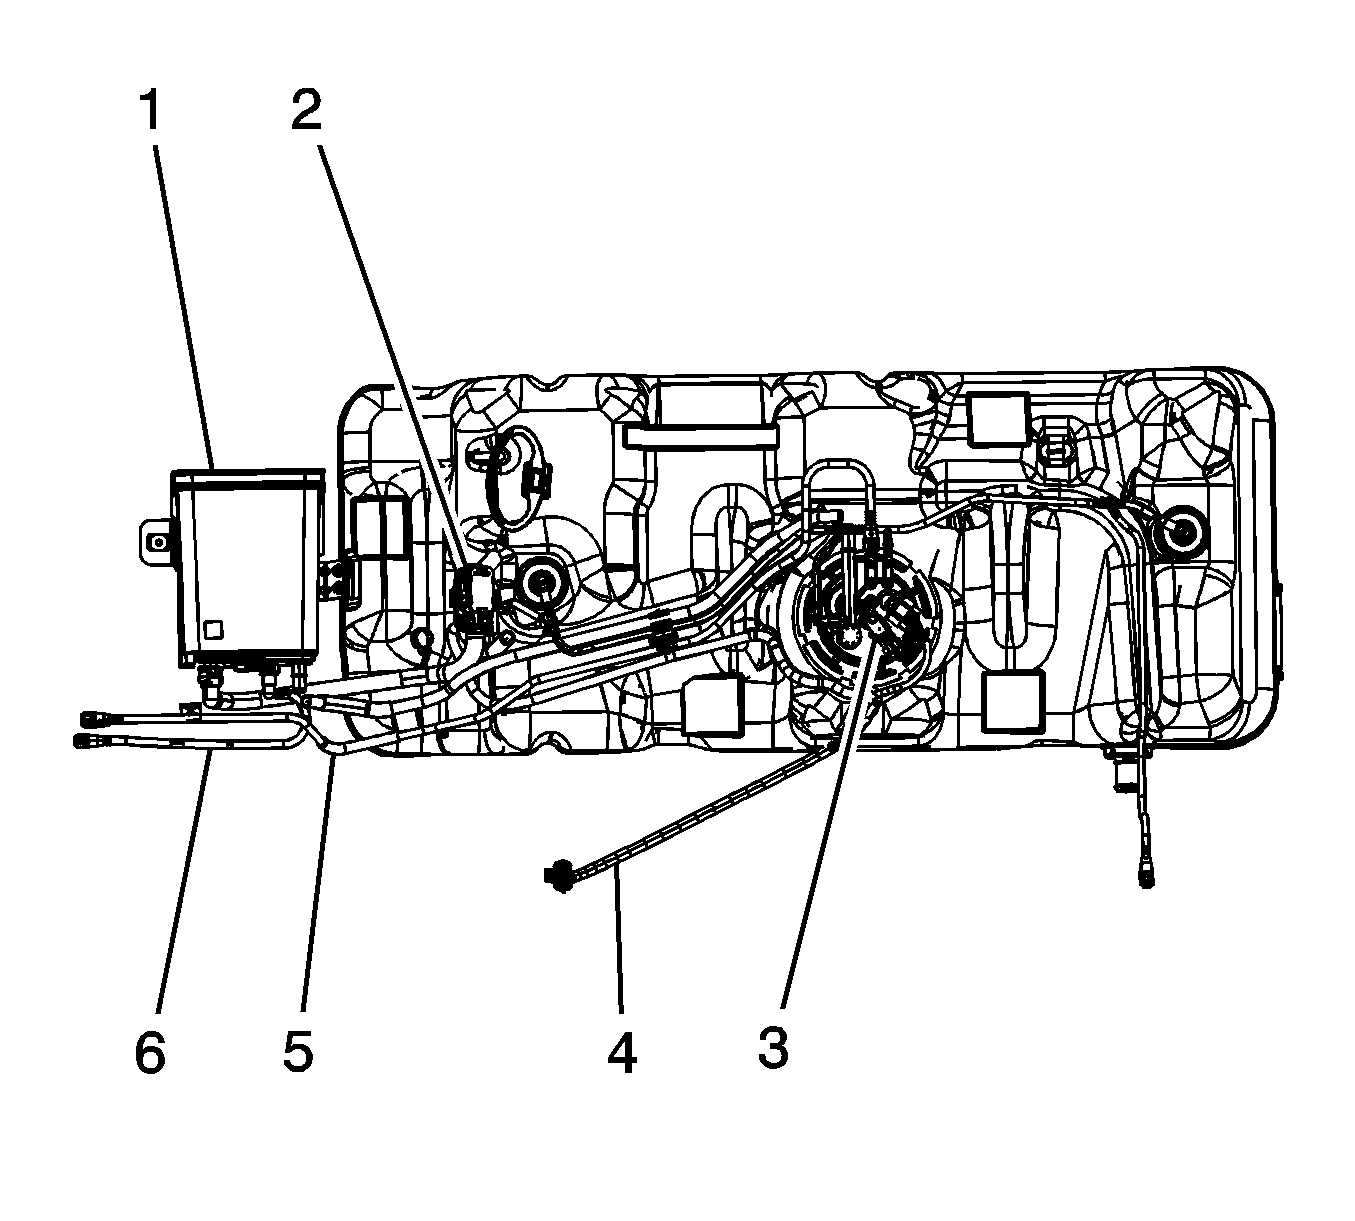
- Remove the EVAP canister (1). Refer to
Evaporative Emission Canister Replacement
.
- Disconnect the fuel feed pipe quick-connect fitting. Refer to
Plastic Collar Quick Connect Fitting Service
.
- Remove the fuel feed pipe (5).
- Remove the EVAP canister vent solenoid (2).
- Remove the EVAP pipe assembly.
- Remove the fuel tank module (3). Refer to
Fuel Tank Module Replacement
.
Assembly Procedure

- Install the fuel tank module (3). Refer to
Fuel Tank Module Replacement
.
- Install the EVAP pipe assembly.
- Install the fuel feed pipe (5).
- Install the EVAP canister vent solenoid (2).
- Connect the fuel feed pipe quick-connect fitting . Refer to
Plastic Collar Quick Connect Fitting Service
.
- Install the EVAP canister. Refer to
Evaporative Emission Canister Replacement
.
Installation Procedure

- With the aid of an assistant, remove the fuel tank from the work surface and place on the adjustable jack.
- With the aid of the assistant, support and install the fuel tank.
Caution: Refer to Fastener Caution in the Preface section.
- Position the fuel tank straps (1) and install the strap bolts (2) and tighten to
47 N·m (35 lb ft)
.
- Remove the adjustable jack.

- Install the EVAP canister nut (1) and tighten to
9 N·m (80 lb ft)
.

- Connect the fuel tank wiring harness (2) electrical connector to the body wiring harness pass-through.
- Install the fuel tank wiring harness to the electric brake harness clips (1).

- Install the fuel fill hose to the fuel tank (4).
- Tighten the fuel fill hose clamp (5) at the fuel tank and tighten to
2.5 N·m (22 lb in)
.
- Connect the fuel fill pipe vapor recirculation pipe (2) quick connect fitting to the fuel tank vapor recirculation hose (3). Refer to
Plastic Collar Quick Connect Fitting Service
.

- Connect the EVAP pipe quick connect fitting. Refer to
Plastic Collar Quick Connect Fitting Service
.
- Connect the fuel feed pipe (1) quick connect fitting. Refer to
Plastic Collar Quick Connect Fitting Service
.
- Lower the vehicle.
- Add fuel to the fuel tank.
- Install the fuel fill cap.
- Connect the negative battery cable. Refer to
Battery Negative Cable Disconnection and Connection
.
- Inspect for fuel leaks using the following procedure:
| 17.1. | Turn ON the ignition, with the engine OFF for 2 seconds. |
| 17.2. | Turn OFF the ignition for 10 seconds. |
| 17.3. | Turn ON the ignition. |
| 17.4. | Inspect the fuel system for fuel leaks. |
- Install the intake manifold cover. Refer to
Intake Manifold Cover Replacement
.
Fuel Tank Replacement Long Wheel Base
Removal Procedure

Caution: Do not attempt to straighten any kinked nylon fuel lines. Replace any kinked nylon fuel feed or return pipes in order to prevent damage to the vehicle.
- Relieve the fuel system fuel pressure. Refer to
Fuel Pressure Relief
.
- Drain the fuel tank. Refer to
Fuel Tank Draining
.
- Raise and support the vehicle. Refer to
Lifting and Jacking the Vehicle
.
- Disconnect the fuel feed pipe (1) quick connect fitting. Refer to
Plastic Collar Quick Connect Fitting Service
.
- Disconnect the evaporative emission (EVAP) pipe quick connect fitting. Refer to
Plastic Collar Quick Connect Fitting Service
.

- Disconnect the fuel fill pipe vapor recirculation pipe (2) quick connect fitting from the fuel tank
vapor recirculation hose (3). Refer to
Plastic Collar Quick Connect Fitting Service
.
- Loosen the fuel fill hose clamp at the fuel tank.
- Remove the fuel fill hose from the fuel tank (4).
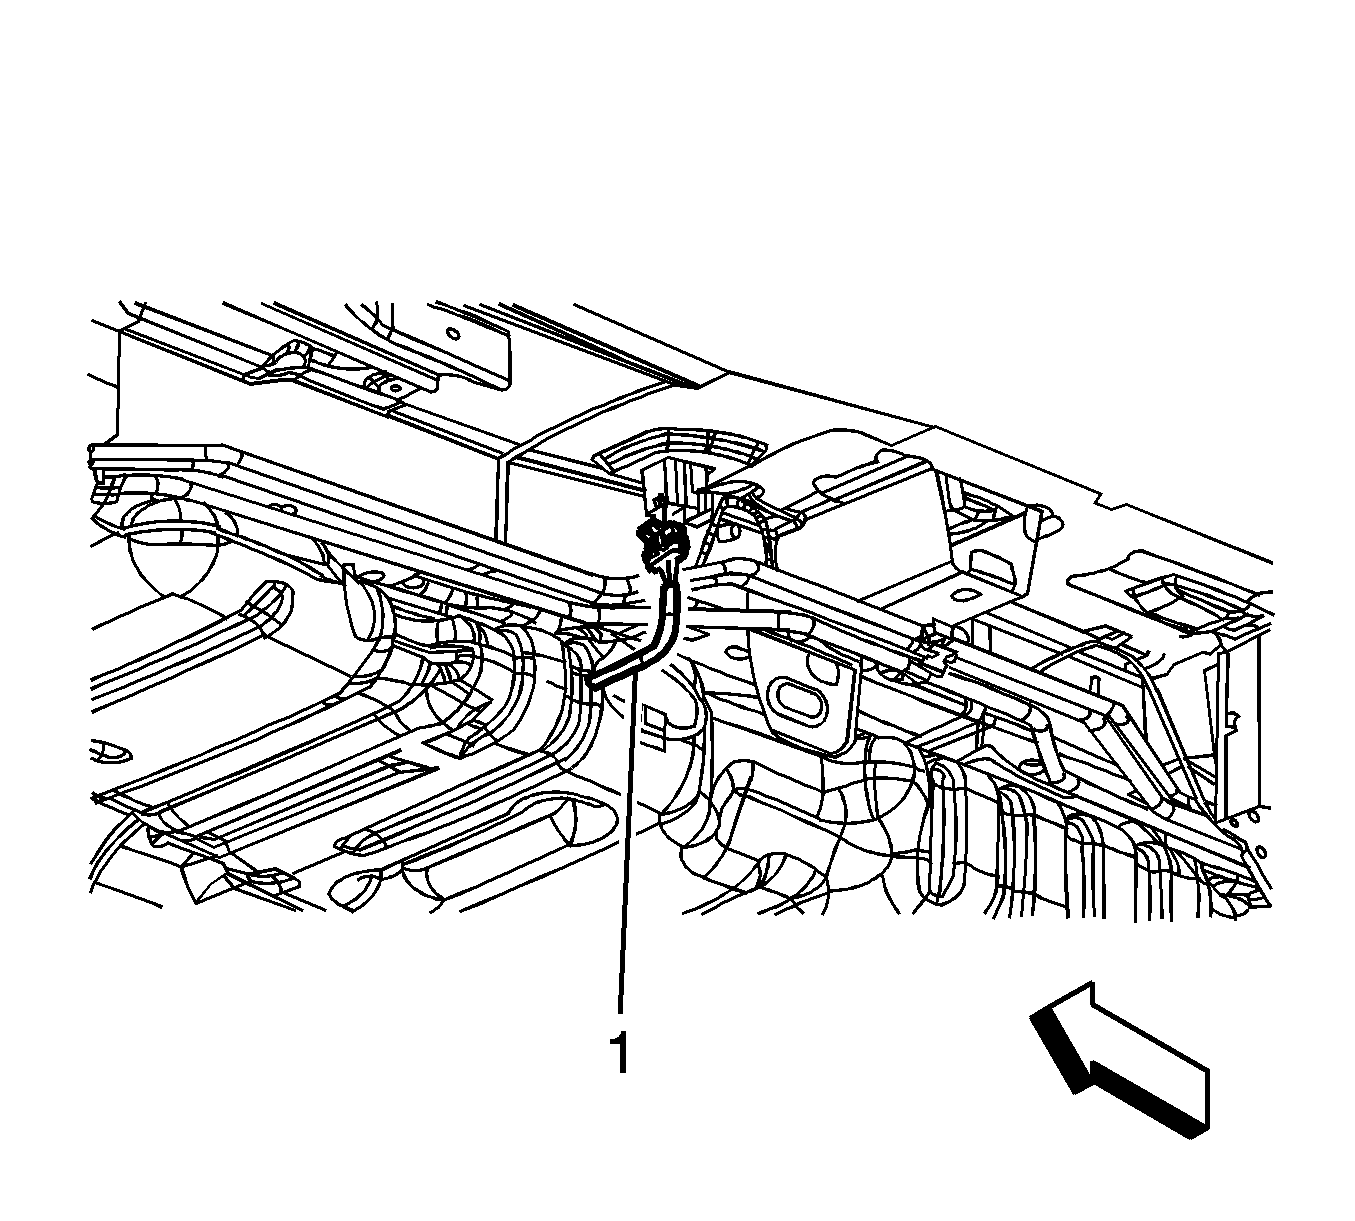
- Disconnect the fuel tank wiring harness (1) electrical connector from the body wiring harness pass-through.
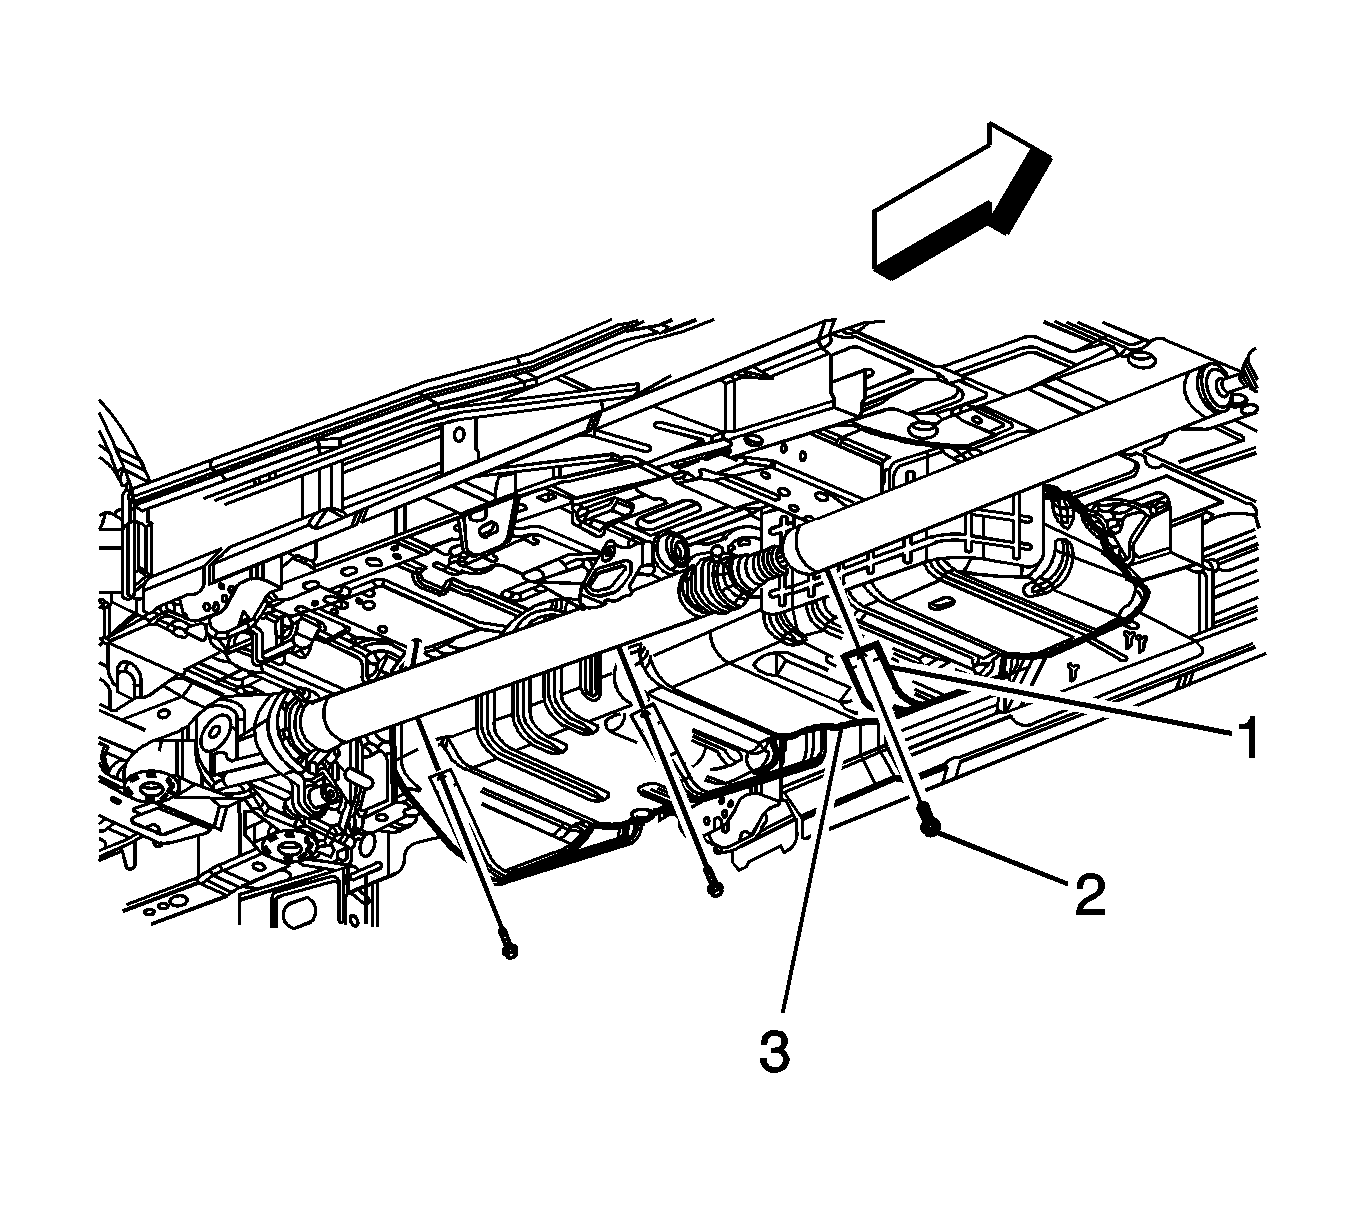
- Center an adjustable jack under the fuel tank.
- Remove the fuel tank shield.
- Remove the fuel tank strap bolts (2), and reposition the fuel tank straps (1).
- With the aid of an assistant, support and lower the fuel tank (3).
- Remove the fuel tank from the adjustable jack and place on a suitable work surface.
- If the fuel tank is not being replaced, proceed to the installation procedure.
Disassembly Procedure
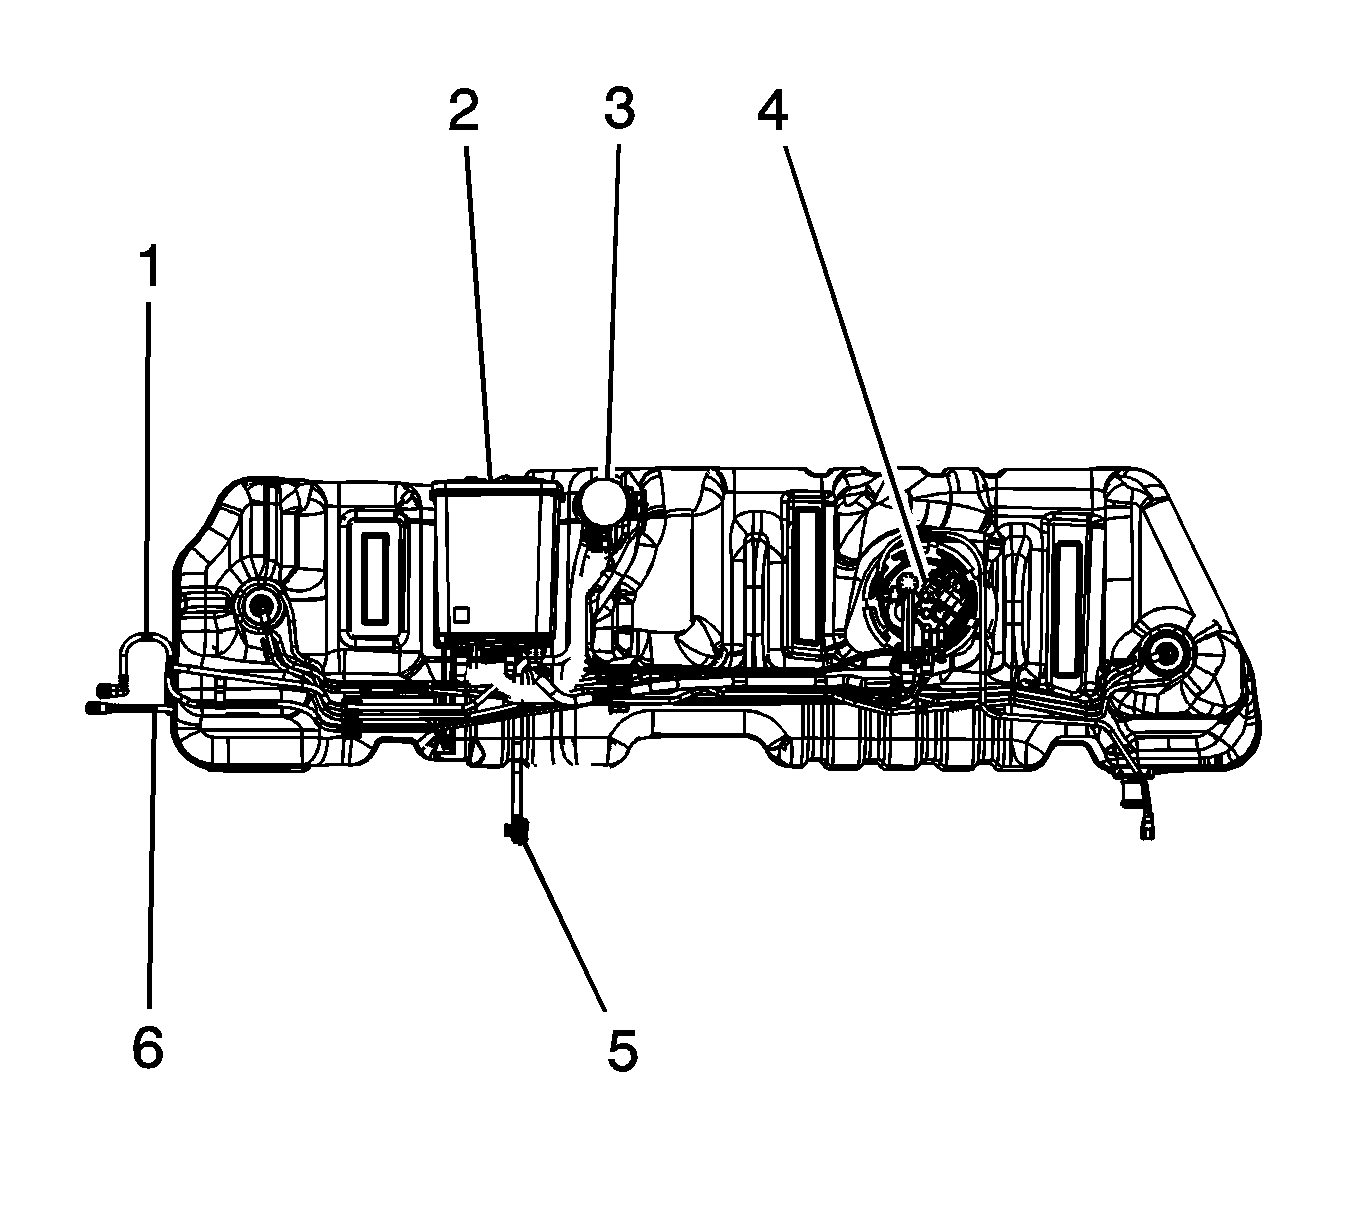
- Remove the EVAP canister (2). Refer to
Evaporative Emission Canister Replacement
.
- Remove the EVAP canister vent valve (3). Refer to
Evaporative Emission Canister Vent Solenoid Valve Replacement
.
- Remove the fuel tank module (4). Refer to
Fuel Tank Module Replacement
.
- Remove the fuel feed pipe (1) from the fuel tank pipe clips.
- Remove the EVAP purge pipe (6) from the fuel tank pipe clip.
Assembly Procedure

- Install the EVAP purge pipe (6) into the fuel tank clip.
- Install the fuel feed pipe (1) into the fuel tank pipe clips.
- Install the fuel tank module (4). Refer to
Fuel Tank Module Replacement
.
- Install the EVAP canister vent valve (3). Refer to
Evaporative Emission Canister Vent Solenoid Valve Replacement
.
- Install the EVAP canister (2). Refer to
Evaporative Emission Canister Replacement
.
Installation Procedure

- Remove the fuel tank from the work surface and place on the adjustable jack.
- Support and install the fuel tank.
Caution: Refer to Fastener Caution in the Preface section.
- Position the fuel tank straps (1) and install the strap bolts (2) and tighten to
47 N·m (35 lb ft)
.
- Remove the adjustable jack.
- Install the fuel tank shield.

- Connect the fuel tank wiring harness (1) electrical connector to the body wiring harness pass-through.

- Install the fuel fill hose to the fuel tank (4).
- Tighten the fuel fill hose clamp at the fuel tank to
2.5 N·m (22 lb in)
.
- Connect the fuel fill pipe vapor recirculation pipe (2) quick connect fitting to the fuel tank vapor recirculation hose (3). Refer to
Plastic Collar Quick Connect Fitting Service
.

- Connect the EVAP pipe quick connect fitting. Refer to
Plastic Collar Quick Connect Fitting Service
.
- Connect the fuel feed pipe (1) quick connect fitting. Refer to
Plastic Collar Quick Connect Fitting Service
.
- Lower the vehicle.
- Add fuel to the fuel tank.
- Install the fuel fill cap.
- Connect the negative battery cable. Refer to
Battery Negative Cable Disconnection and Connection
.
- Inspect for fuel leaks using the following procedure:
| 16.1. | Turn ON the ignition, with the engine OFF for 2 seconds. |
| 16.2. | Turn OFF the ignition for 10 seconds. |
| 16.3. | Turn ON the ignition. |
| 16.4. | Inspect the fuel system for fuel leaks. |
- Install the intake manifold cover. Refer to
Intake Manifold Cover Replacement
.


