For 1990-2009 cars only
Removal Procedure
- Remove the IP compartment latch. Refer to Instrument Panel Compartment Door Latch Replacement .
- Set the IP compartment latch fork bolt in the up position.
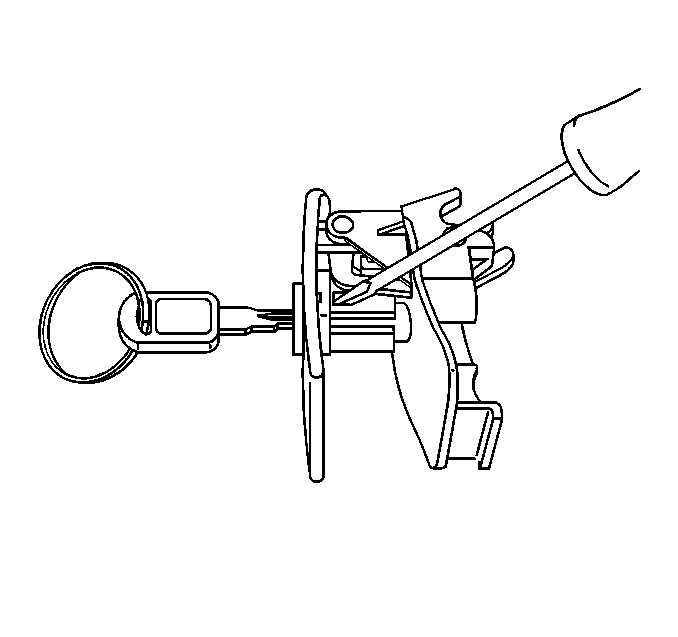
- Insert the key into the IP compartment lock cylinder.
- Rotate the IP compartment lock cylinder clockwise to the 3 o'clock position with the key.
- With the key in position, apply a light load and depress the retainer tumbler through the poke hole at the right hand side of the IP compartment latch.
- Rotate the key until the IP compartment lock cylinder rotates to about the 5 o'clock position.
- Remove the following components from the IP compartment latch:

This will line up the notch at the rear of the IP compartment lock cylinder with the tab in the IP compartment latch housing.
| • | The IP compartment lock cylinder |
| • | The key |
Installation Procedure
- Set the IP compartment latch fork bolt in the up position.
- Grasp the IP compartment lock cylinder. Depress the rear-most, light-colored tumbler that is flush with the IP compartment lock cylinder surface.
- Insert the key.
- Insert the IP compartment lock cylinder, with the key inserted, into the IP compartment latch housing. Ensure that the front projection pin is at the appropriate 8 o'clock position.
- Rotate the key counterclockwise until the key stops.
- Remove the key.
- Install the IP compartment latch. Refer to Instrument Panel Compartment Door Latch Replacement .

All tumblers will now stay depressed.
The IP compartment lock cylinder will drop into place.
The IP compartment lock cylinder is now locked into the IP compartment latch housing.
