GM Service Manual Online
For 1990-2009 cars only

Rear Entertainment System Description

The rear seat entertainment system augments the vehicle's in-dash audio system with:

    • A Digital Video Disk (DVD) player housed in the console below the instrument panel
    • A Video Display Screen in the overhead console (Audio/Video/HVAC control module)
    • Dual Channel Wireless Infrared Headphones for private listening enjoyment
    • An Infrared remote control to operate the video functions of the DVD player
    • Stereo audio and video inputs in the DVD player for playing an auxiliary device

The rear seat entertainment system also integrates the rear climate control and rear seat audio (RSA) functions.

Mid-year Enhancements

The rear seat entertainment system in this vehicle has had some software enhancements during production within the current model year. Vehicles that were built before March 18, 2002 had the initial software and system functionality. Vehicles built after that date have new software and the enhanced functionality.

The easiest way to identify whether the vehicle is equipped with initial functionality or enhanced functionality is to press the Display or Source button on the DVD remote control while a DVD is playing in the player. If an on-screen menu appears, the system is operating with the initial or old software.

Secondly, all new built DVD players with the new software will not have the DVD logo on the player faceplate. When older units with the logo are refurbished, they will be upgraded to the new software, so the presence of the DVD logo is not a good indication of new or old software.

DVD Player

The DVD player is located in the center floor console under the instrument panel. The DVD player can be controlled by the buttons on its face or by the infrared remote control. The player will work while the ignition switch is in the accessory or run position, or while retained accessory power (RAP) is active. The RSE system is only compatible with DVD's authorized for use in the United States and Canada. Re-recorded DVD's may not play in this DVD player. Regular audio CDs can be played by the DVD player. However, some home recorded CDs (CDR) may not play in this DVD player. If an audio CD does not play in the DVD player, try the audio system's CD player instead.

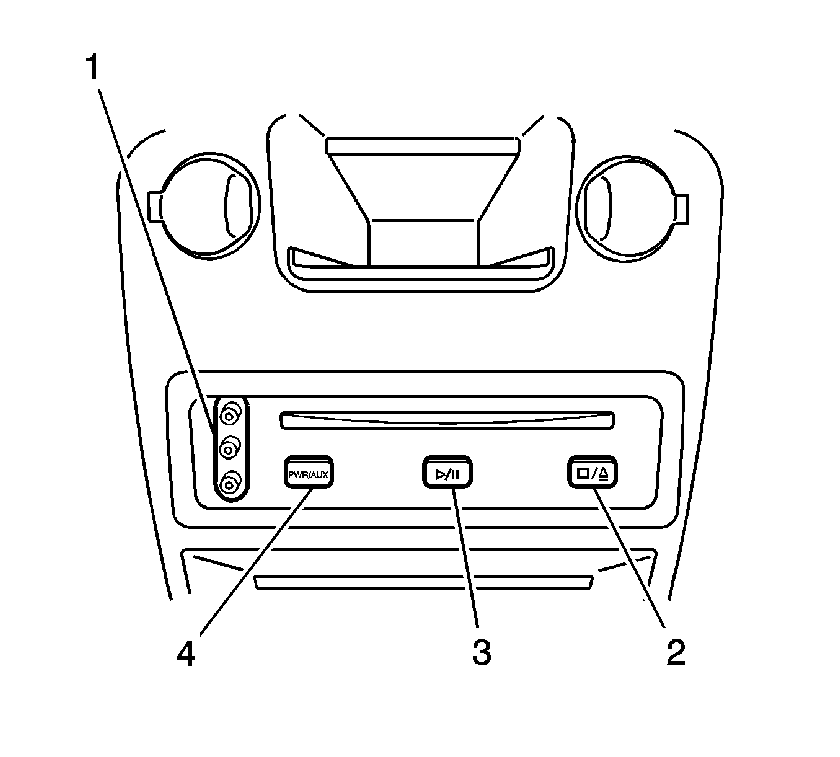
DVD Player


Object Number: 885641  Size: SH
(1)Auxiliary Inputs
(2)Stop / Eject Button
(3)Play / Pause Button
(4)PWR / PWR/AUX / Source Button

DVD Player Buttons

PWR / PWR/AUX or Source: Press this button to select between video disk play or the auxiliary device inputs on the DVD player as the source for the desired view on the RSE system. When the video display screen is in the viewing position, the RSE system will power up with out the presence of a disk in the DVD player. During this time a "TRACK99" message may be displayed on the radio display. This indicates that the RSE system is expecting an input through the auxiliary input jacks to the DVD player. Pressing the PWR / PWR/AUX or Source button will select the DVD play mode and the "TRACK99" message will disappear. With the mid-year enhanced software, this button will only switch to auxiliary device if there is one connected. The "TRACK99" message will appear on the radio while auxiliary device is playing.

(Play/Pause): Press this button to play a DVD. Press this button while a DVD is playing to pause the movie. Press the button again to continue playing the movie.

(Stop/Eject): Press this button to stop play, stop rewind or stop fast forward. Press the button a second time to eject the DVD.

DVD Operation

Playing a DVD with video audio through the vehicle speakers

  1. Lower the video display screen.
  2. Make sure Rear Seat Audio (RSA) is turned off on the overhead console.
  3. Gently insert a DVD (with the label side up) into the loading slot until it stops. The DVD player will continue loading the DVD and the DVD will automatically start playing.
  4. If a DVD is already in the player, simply press the Play/Pause button on the face of the player or on the remote control.
  5. Turn the radio on and adjust the speaker volume with the radio volume control or the remote control.

To listen to DVD audio through the wireless headphones:

  1. Turn the RSA on in the overhead console. The rear speakers will mute.
  2. Turn on the power on the wireless headphones and select channel A.
  3. Adjust the volume on the headset.
  4. If another audio source is playing, that source will play on channel B.

Ejecting a DVD

  1. If the DVD is playing, press the Stop/Eject button on the face of the player to stop it.
  2. With the DVD stopped, press the Stop/Eject button on the face of the player to eject it.
  3. Remove the DVD from the player.

Most DVD's will not allow you to fast forward or skip the copyright notices or previews. These are features recorded onto the DVD's, and they can not be changed by the DVD player. Some DVD's will begin playing right after the previews have finished. Others will require that you press the Play/Pause button on the face of the player or on the remote control before they start playing.

To stop a DVD from playing, press the Stop/Eject button on the DVD player. To resume playback, press the Play/Pause button on the face of the player or on the remote control. As long as you have not ejected the disc, it will resume playback from the point where you stopped it. If the disc has been ejected, the player will begin at the beginning of the disc.

Audio / Video / HVAC Control Module


Object Number: 885643  Size: SH
(1)Infra-Red (IR) Transmitters for the Headphones
(2)Rear Seat Audio (RSA) Controls
(3)Infra-Red (IR) Receiver for the Remote Control
(4)Rear HVAC Controls

Video Screen

The video screen locks up to the overhead entertainment console when not in use. To use the screen, do the following:

  1. Push up on the release button and the screen will drop.
  2. Pull the screen toward you and adjust its position for best picture quality.

When the screen is moved to the stowed position, the screen will turn off, but the DVD player or the AUX input device will continue to play, leaving the audio available to the vehicle speakers or headphones. Note: It is normal for the video screen and its housing to become warm to the touch. Use care when directly touching the video screen, as damage may result.

Infrared (IR) Transmitter and Receiver

The IR receiver window receives input from the remote control. It is located under the overhead entertainment console display, between the right arrow button and the AM/FM button. The IR transmitter windows provide infrared output for wireless dual channel headphones. They are located on either side of the overhead entertainment console display. Both groups of four infra-red transmitting diodes should appear with relatively uniform intensity.
Infra--Red (IR) Headphones


Object Number: 885646  Size: SH
(1)Headphone Volume Control
(2)Headphone Power On/Off Switch
(3)Channel A / Channel B Selector Switch
(4)Power On/Off L.E.D. Indicator

Headphones

The entertainment system includes four cordless headphones. The headphones have an ON/OFF switch, a channel A/B selector switch and a volume control. To use the headphones turn the switch to ON. An indicator power light on the right side indicates that the battery is good. The DVD player and AUX input device are available through headphone channels A and B as long as no other audio source is playing. The radio, cassette tape player and CD player are only available through headphone channel B when RSA is turned on.

The headphones will only work when they are in the RSA system line of sight. If you move too far forward or step out of the vehicle, the headphones will cut out. If the headphones are out of the line of sight or if there is no signal emitted by the RSA for more than three minutes, the headphones will shut off. Be sure the headphone batteries are not discharged, as this will reduce performance. Objects blocking the infrared beam between the overhead entertainment console and the headphones will also reduce or eliminate performance. Keep the headphones out of direct sunlight and away from heat. The headphone battery compartment is on the left side of the headphone. To access the batteries, simply slide open the battery door. Each headphone uses two AAA dry cell batteries. Make sure that the batteries are installed correctly. The positive (+) and negative (-) symbols on the batteries must match the symbols inside the battery compartment.

If the headphones are to be stored for a long period of time, remove the batteries and store them in a cool dry place to prevent damage from leaking batteries.

RSE Remote Control


Object Number: 885645  Size: SH

Remote Control

To use the remote control, aim it at the IR receiver window located under the overhead entertainment console display and press the desired function button. Direct sunlight or very bright light may affect the ability of the IR receiver window to receive signals from the remote control. Be sure the remote batteries are not discharged, as this will affect the function of the remote. Objects blocking the remote infrared beam may also prevent operation. Keep the remote out of direct sunlight and away from heat.

Remote Buttons

Volume (Up/Down Arrow Volume Buttons): Press the up arrow to increase volume. Press the down arrow to decrease volume. You can press repeatedly or press and hold the arrow to scroll. A witness scale on the upper portion of the video screen indicates the volume level. The Up/Down Arrow Volume Buttons only work when the DVD player or AUX input device audio are playing through the vehicle speakers. If another audio input is playing through the vehicle speakers, the buttons will still affect the witness scale on the video screen, but they will have no effect on the speaker volume.

To adjust volume on the headphones, use the volume control on each headphone. At all times, the front radio controls retain priority for volume, balance, fade, bass and treble over the vehicle speakers.

Menu: This button will take you to the media (DVD) menu. The media menu is different on every DVD. Use the up/down (Next/Prev) and left/right (Rev/Fwd) arrow buttons to move the cursor around the media menu. Press the ENTER button to select the choice highlighted by the cursor. Sometimes the DVD may contain a 20 to 30 second sequence leading up to the media menu.

Enter: Use this button to make a selection in the media menu (MENU) or in the display menu (DISPLAY).

Display (initial software): This button will take you to the display menu for the video screen. Pressing DISPLAY once brings up the day/night menu. Use the up/down (Next/Prev) arrow buttons to cycle between day and night display for the screen. Press ENTER to select the highlighted selection and exit the display menu, or DISPLAY to select the highlighted selection and proceed to the next display menu page.

Pressing DISPLAY a second time brings up the display mode menu. You can select from four different display modes:

    • NORMAL: the screen displays the image as it is recorded on the DVD.
    • FULL: the system expands the image to fill the entire screen.
    • ZOOM: the system takes the central two thirds of the picture and expands this to fill the entire screen.
    • CINEMA: the system expands the image to fill the screen in the horizontal direction only. With most DVDs, this will leave black strips at the top and bottom of the screen.

Use the up/down (Next/Prev) arrow buttons to cycle between the display mode options. Press ENTER to select the highlighted selection and exit the display menu, or DISPLAY to select the highlighted selection and proceed to the next display menu page.

Pressing DISPLAY a third time brings up the DVD/AUX menu. Use the up/down (Next/Prev) arrow buttons to cycle between DVD and AUX. Press ENTER or DISPLAY to select the highlighted selection and exit the display menu. This option is useful to switch between DVD and AUX device input without having to turn off the system.

Source (new software): The display button changes to Source with the updated system software. Pressing Source will select between DVD play or the Auxiliary input as the entertainment source for RSE.

(Play/Pause): Press this button to play a DVD. Press this button while a DVD is playing to pause the movie. Press the button again to continue playing the movie. If you press and hold this button for three seconds or more, the system will shut off.

(Left/Right Arrow or Rev/Fwd Buttons): Press the left arrow (Rev) button once to start reversing the DVD. Press the right arrow (Fwd) button once to start fast forwarding the DVD. The left/right arrow (Rev/Fwd) buttons will reverse/fast forward the DVD in small amounts. To stop reverse/fast forward, press the button again. If you press and hold the button, the DVD will reverse/fast forward as long as the button is held down. When you let go of the button, the DVD will resume normal play from the point where you reversed/fast forwarded. These buttons will not work when a DVD is playing the copyright or previews.

(Up/Down Arrow or Next/Prev Buttons): These buttons allow you to skip forward or backward to the next/previous chapter on the DVD. Press the up arrow (Next) button once to move to the next chapter on the DVD and resume normal play from that position. Press the down arrow (Prev) button once to go back to the previous chapter on the DVD and resume normal play from that position. The up/down arrow (Next/Prev) buttons will reverse/fast forward the DVD in large amounts (chapters). If you press and hold the button, the DVD will reverse/fast forward as long as the button is held down. When you let go of the button, the DVD will resume normal play from the point where you reversed/fast forwarded. These buttons will not work when a DVD is playing the copyright or previews.

Battery Installation and Replacement

The battery compartment is on the back of the remote control. To access the batteries, remove the screw and open the battery door. The remote uses two AAA batteries. Before using the remote control, be sure to check that the batteries are installed correctly. The positive (+) and negative (-) symbols on the batteries must match the symbols inside the battery compartment. If the remote control is to be stored for a long period of time, remove the batteries and store them in a cool dry place to prevent damage from leaking batteries.

Auxiliary input jacks

The auxiliary input jacks are located on the face plate of the DVD player. They allow you to hook up a camcorder or your favorite video game unit. To use either a camcorder or a video game unit, simply plug in the device and turn it on.