Sunroof Leaks Water, Wind or Whistles Noise from Sunroof (Determine Source of Leak and Apply Sealant)

| Subject: | Sunroof Leaks Water, Wind or Whistle Noise from Sunroof (Determine Source of Leak and Apply Sealer) |
| Models: | 2005-2008 Chevrolet Colorado |
| 2005-2008 GMC Canyon |
| with RPO CF5 Sunroof |
This bulletin is being revised to add the 2008 model year and update the information. Please discard Corporate Bulletin 07-08-67-001 (Section 08 -- Body & Accessories).
Condition
Some customers may comment on water entering into the vehicle from the sunroof area. Other customers may comment on a wind noise or whistle noise heard from the sunroof area when driving at different speeds.
Design
The sunroof module is designed by Webasto. The sunroof module is designed to be completely sealed at the roof panel to help prevent water from traveling past the glass panel seal. The sunroof glass assembly does not have any glass panel adjustments The sunroof assembly does not contain a water management drain tube system. When operating the sunroof, the glass panel moves rearward and slides up above the roof panel. Therefore, the vehicle must be driven or the exterior dried off sufficiently to remove excessive water prior to opening the sunroof glass. If the water is not sufficiently dissipated, some water may enter inside the vehicle.
Cause
Some earlier built vehicles with the sunroof option did not have any adhesive sealer installed on the upper sunroof frame assembly.
Wind or Whistle Noise Test Procedure
Determine the source of the wind or whistle noise. Refer to Air/Wind Noise in SI.
Water Hose Test Procedure
Perform a water hose test to determine where the leak is entering the sunroof assembly.
Important: Use a water hose without the nozzle attached at a controlled medium volume water flow.
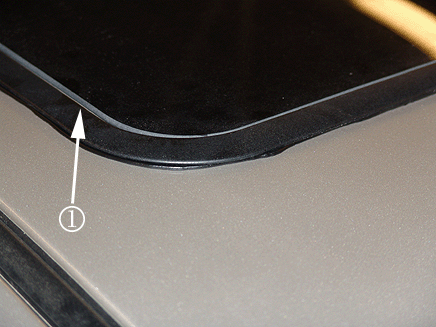
- Visually inspect the sunroof glass. The glass should be flush to the sunroof frame. If the glass (1) like in the graphic above is not flush, make sure no parts are broken or missing from the sunroof module assembly.
- Make sure all seals and tracks are clean and free of debris. Use a dampened lint free cloth with warm water to clean the seals. Use GM™ Glass Cleaner, P/N 89021822 (in Canada, 992727) to clean the tracks.
- Open the sunshade to the full open position.
- Open the sunroof window to the full open position.
- Remove the four outer trim cover screws located outside of the sunroof module.
- Remove the outer trim cover.
- Remove the sunroof front trim cover. Refer to Sunroof Front Trim Cover Replacement in SI.
- Have an assistant inside the vehicle to signal you when the leak is detected.
- Perform a water test to verify the leak concern.
- If a leak is found, try to pinpoint the exact location that the water is entering. It could be any of the following four areas:
- Dry off the sunroof glass, outer sunroof frame and the roof panel.
- Tape off around the entire outside perimeter of the upper sunroof frame assembly and outside the roof panel with masking tape.
- Start water testing at the left front outer roof panel and sunroof frame by removing one inch of tape at a time until the source of the leak can be pinpointed.
- Proceed with the water test while removing the masking tape along the right front outer sunroof frame and roof panel until the complete area has been tested.
- Tape off the entire area around the outside perimeter of the sunroof glass and sunroof frame with masking tape.
- Proceed to water test up to the sunroof glass and sunroof frame.
- Start water testing while removing the masking tape from the left front corner of the sunroof glass; then proceed along to the right front corner of the glass until the complete area has been tested.
- Have an assistant signal you when the leak is detected.
- Note the area you are water testing and mark the entry point of the water.
- The leak could be from more than one area, so determine which conditions apply and follow the recommended corrections below.
| 10.1. | The leak may be entering from the roof panel and upper sunroof frame. |
| 10.2. | The leak may be entering from the upper sunroof frame seal and lower frame. |
| 10.3. | The leak may be entering from the sunroof glass and glass seal. |
| 10.4. | The water may be entering from around the sunroof glass clip holder. |
Condition 1
The leak condition is present between the roof panel (1) and the dry seal on the upper sunroof frame.
Cause 1
The dry foam seal on the upper sunroof frame assembly may have collapsed or has become distorted, causing the leak.
Correction 1
Remove the sunroof module assembly and apply CRL7711 Sealer (a one-part butyl adhesive) to the outer edge of the upper sunroof frame using the procedure listed below:
- Remove the sunroof motor. Refer to Power Sunroof Motor Replacement in SI.
- Remove the six (black) TORX® screws from each side of the lower sunroof frame.
- Remove the eight (gold) TORX® screws from the lower sunroof frame.
- Remove the lower frame from the sunroof module assembly.
- Remove the sunroof module and window from the vehicle and place the glass side down on a clean bench.
- Manually close the sunroof window to the sunroof module assembly.
- Clean the outside area of the upper sunroof frame with GM™ Glass Cleaner for vehicles built without adhesive under the sunroof frame. If the sunroof frame has adhesive applied to the frame, use masking tape to clean the frame and seal.
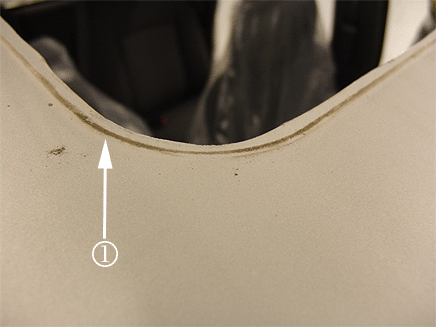
- Clean the outside roof panel area (1) around the sunroof opening with GM™ Glass Cleaner if no adhesive has been used. If adhesive has been used, it may be necessary to use masking tape and a 3M™ General Purpose Adhesive Cleaner, P/N 08984, or equivalent, to clean the roof panel.
- Apply GM Super Lube® with PTFE, P/N 12371287 (in Canada, 10953437) to the outside bare edges of the roof panel opening for the sunroof module. This grease is recommended for use on any bare edges around the sunroof opening. An acid brush can be used to apply the grease.
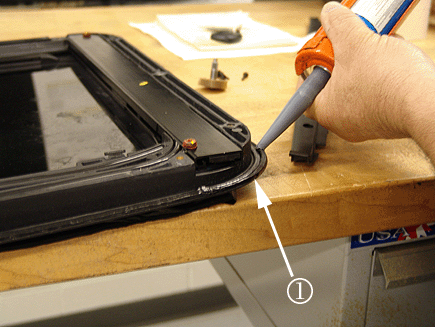
- A caulk gun applicator will be needed to apply the adhesive (1).
- Apply a 2 mm (1/16 in) bead (1) of CRL7711 Sealant around the entire edge of the upper frame assembly and dry seal.
- Install the sunroof module assembly back into the vehicle.
- Install the lower sunroof frame to the sunroof module.
- Install the screws into the lower sunroof frame assembly.
- Tighten the screws in the lower sunroof frame using the cross-tightening sequence.
- Manually push the sunroof window to the full open position. This will allow the window, motors and cables to be timed.
- Install the sunroof motor. Refer to Power Sunroof Motor Replacement in SI.
- Verify the proper operation of the sunroof.
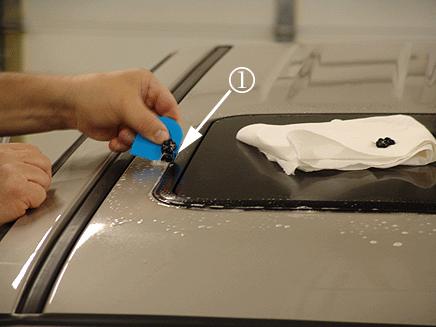
- Clean off any excessive adhesive (1) from the roof panel with a plastic-type scraper/razor blade while using a 3M™ General Purpose Cleaner, P/N 08984, or equivalent, as shown in the graphic above.
- Perform a water test to verify the leak has been fixed.
- Install the sunroof front trim cover. Refer to Sunroof Front Trim Cover Replacement in SI.
- Install the outer trim cover and four screws.
Important: Note the size, color and locations of the lower sunroof frame screws when removing them.
Important: Do Not remove the (red) TORX® screws from the track.
Important: Have a clean workbench with a flat protective cover. The cover will help protect the sunroof glass when the glass is placed face down on the bench.
Tip
The sunroof window can now be manually moved forward or backward.
Tip
You may want to use some disposable gloves to keep the adhesive from getting onto your hands.
Tighten
Tighten the screws to 3 N·m (27 lb in).
Important: A clicking sound can be heard when the retaining clips snap onto the upper frame. Open the sunroof and visually inspect from the roof area that the retaining clips on the front trim cover are installed properly.
Tighten
Tighten the screws to 1 N·m (9 lb in).
Condition 2
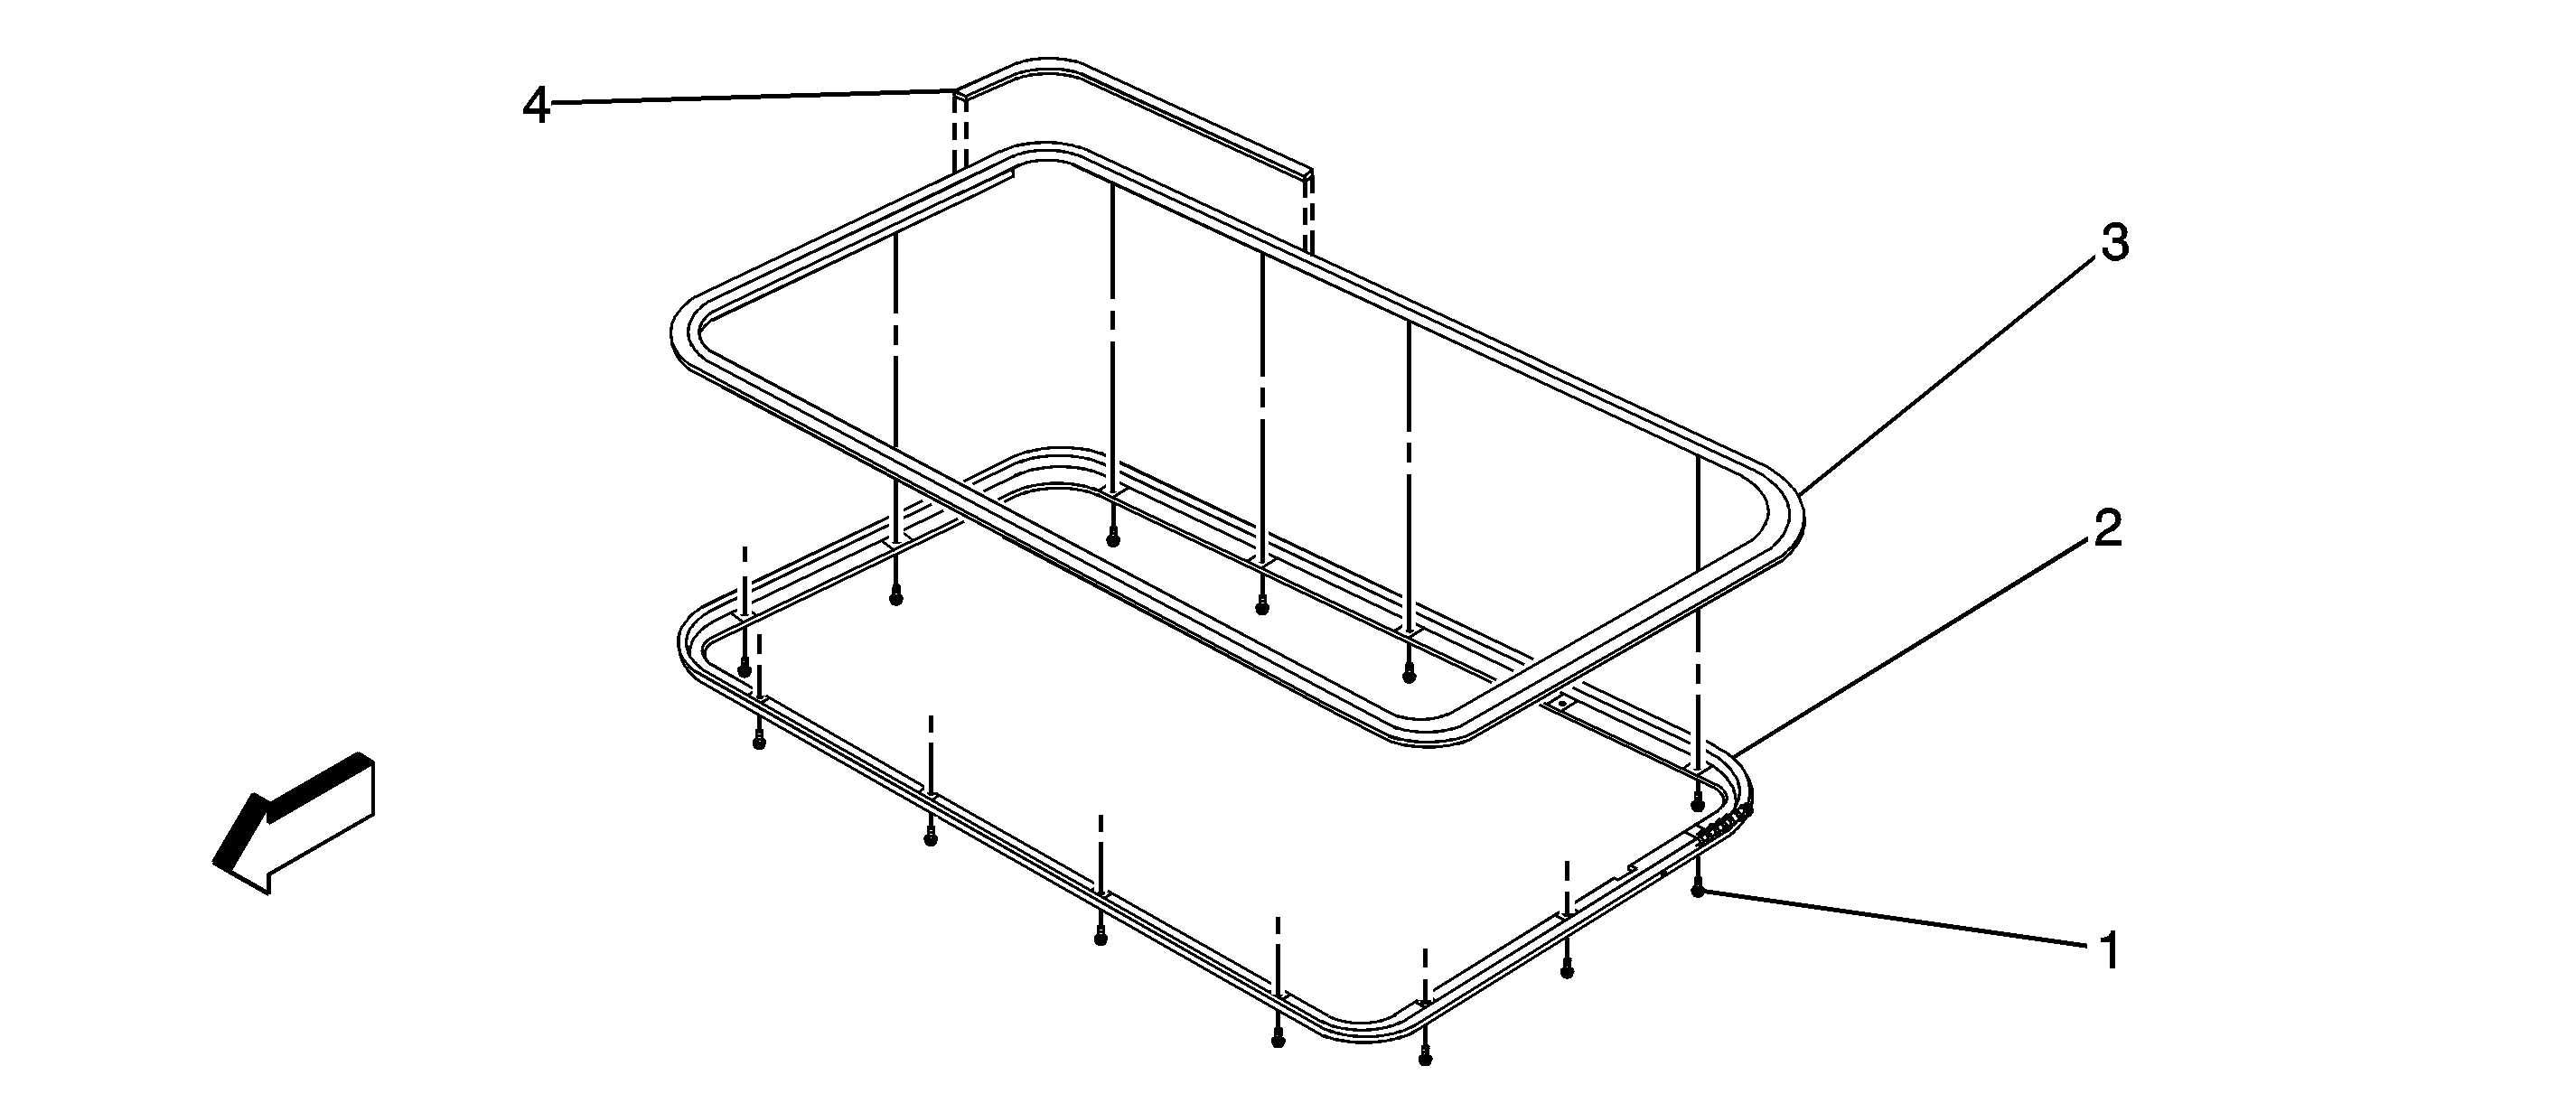
A leak condition between the lower sunroof frame (2) and the upper sunroof frame (3) at the window weather seal (4).
Cause 2
The seal on the upper sunroof frame assembly may not have enough sealant under the seal.
Correction 2
Apply GM™ Weatherstrip Adhesive, P/N 12345097 ((in Canada, 10953479) to the weatherstrip sealing flange located in the upper sunroof frame.
Condition 3
A leak from the sunroof window glass and sunroof window seal.
Cause 3
The sunroof window seal may be deformed or compressed, not allowing the sunroof window glass to seal properly.
Correction 3
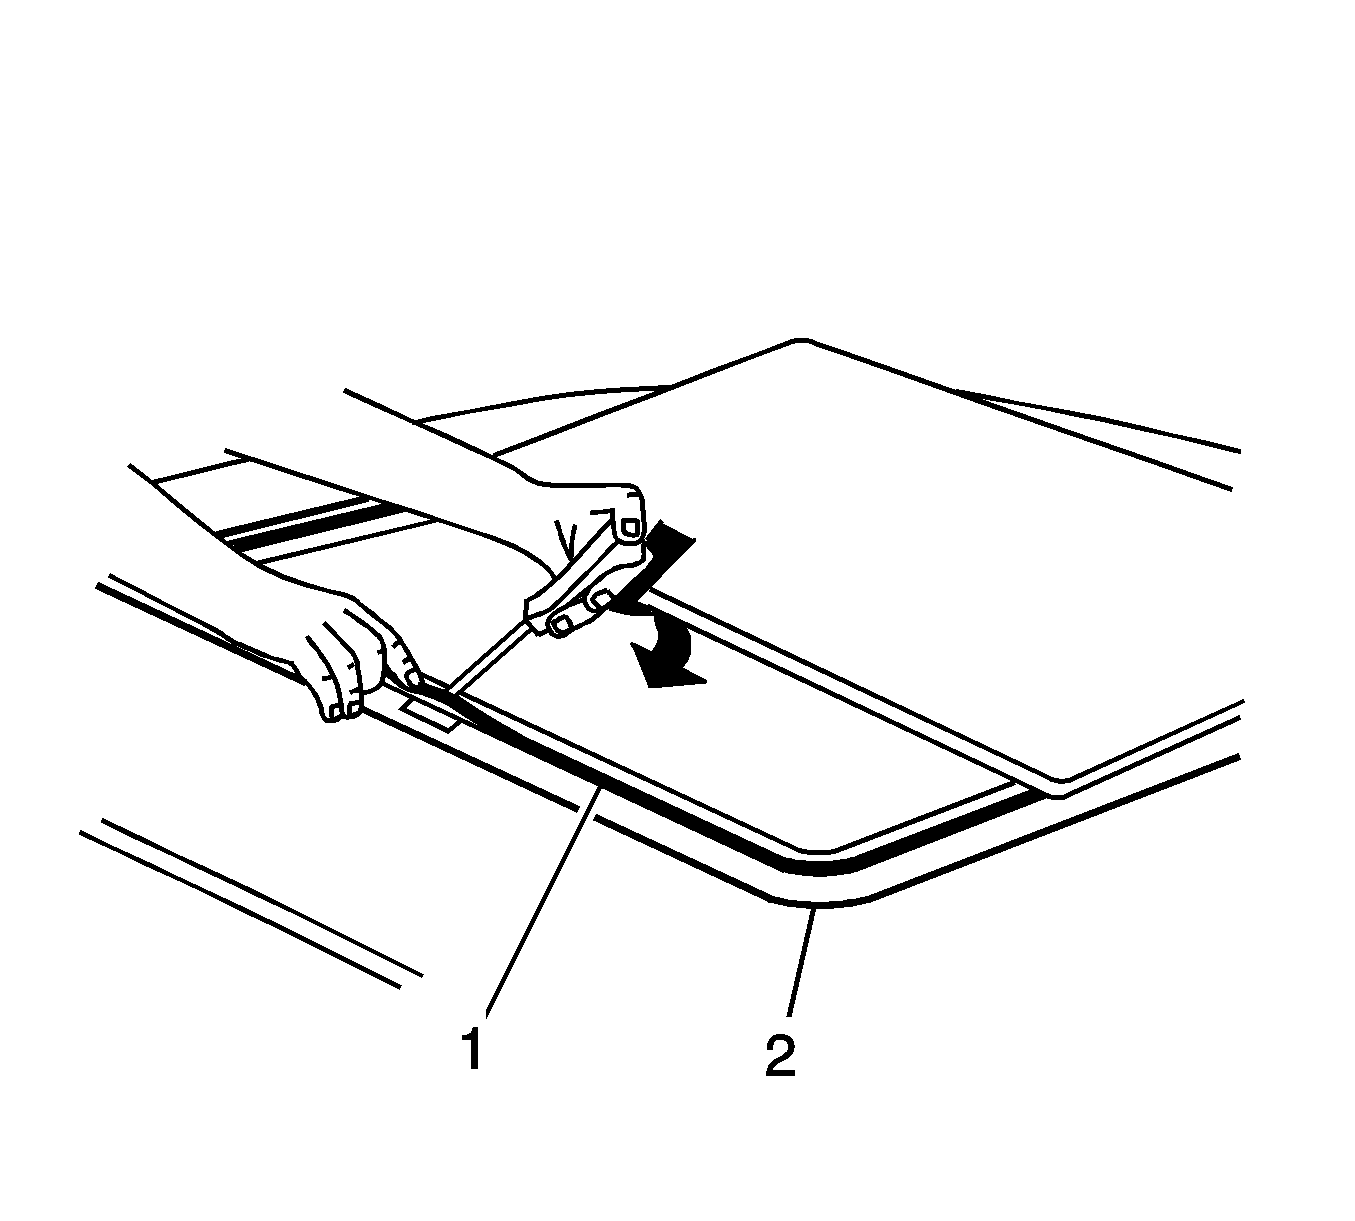
Replace the sunroof window seal following the steps below:
- Open the sunshade to the full open position.
- Remove the old sunroof window seal (1) from the frame (2). Refer to Sunroof Window Seal Replacement in SI.
- Install the new seal. Refer to Sunroof Window Seal Replacement in SI.
Condition 4
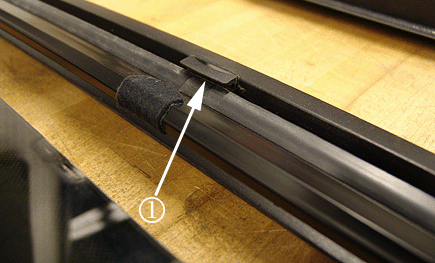
A leak from around the sunroof glass holder clip, known as a"blow out clip" (1).
Cause 4
A lack of adhesive sealant under the sunroof window holder clip.
Correction 4
Remove the sunroof window holder clip and apply a small amount of CRL7711 Sealant in the upper frame clip using the steps below.
- Remove the power sunroof motor. Refer to Power Sunroof Motor Replacement in SI.
- Remove the lower sunroof frame. Refer to Sunroof Frame Replacement-Lower in SI.
- Remove the two screws from the sunroof gear plate.
- Remove the gear plate.
- Remove the gear.
- Remove the two screws for the sunroof glass holder clip.
- Apply a 2 mm (1/16 in) bead of CRL7711 Sealant to the upper sunroof frame clip area.
- Install the glass holder clip.
- Tighten the two screws.
- Install the gear.
- Install the gear plate and two screws.
- Tighten the two screws.
- Install the lower sunroof frame. Refer to Sunroof Frame Replacement-Lower in SI.
- Install the sunroof motor assembly.
- Install the sunroof motor screws and tighten.
- Perform a water test to verify that the leak has been fixed.
- Install the sunroof front trim cover. Refer to Sunroof Front Trim Cover Replacement in SI.
- Install the outer trim cover and four screws.
Tighten
Tighten the two screws to 1 N·m (9 lb in).
Important: The chamfered edge of the gear goes toward the motor when reinstalling the gear.
Tighten
Tighten the screw to 2 N·m (18 lb in).
Tighten
Tighten the screws to 3 N·m (27 lb in).
Tighten
Tighten the screws to 1 N·m (9 lb in).
Waterleak Odor in Vehicle
Important: For elimination of vehicle waterleak odor, refer to Bulletin Number 00-00-89-027D - Eliminating Unwanted Odors in Vehicles.
Dry out any wet components. Refer to Floor Carpet Drying in SI.
Parts Information
To order *CRL7711, contact the distributor CR Laurence Company Toll Free at 1-(800) 421-6144 from U.S. or Canada or access on the web at crlaurence.com to set up a customer account to place orders. The dealer also has the option to complete a referral request form to purchase the product through a local supplier.
*We believe this source and their products to be reliable. There may be additional manufacturers of such products. General Motors does not endorse, indicate any preference for or assume any responsibility for the products from this firm or for any such items which may be available from other sources.
Part Number | Description | Qty |
|---|---|---|
12345097(U.S.) 10953479 (Canada) | GM™ Weatherstrip Adhesive | As Needed |
12371287 (U.S.) 10953437 (Canada) | GM Vehicle Care Super Lube® with PTFE | As Needed |
19168003 | Seal, Sunroof Window | As Needed |
Part Number | Description | Material Allowance |
|---|---|---|
CRL7711 | Windshield Sealant Liquid Butyl | $10.00 (U.S.) $10.20 (Canadian) |
Warranty Information
For vehicles repaired under warranty, use:
Labor Operation | Description | Labor Time |
|---|---|---|
B9808* | Apply Adhesive to Upper Sunroof Frame (Condition 1) | 1.5 hrs |
B9809* | Apply Sealer to Sunroof Window Seal Flange (Condition 2) | 0.5 hr |
B9810* | Seal, Sunroof Glass - Replace (Condition 3) | 0.8 hr |
B9811* | Apply Sealer to Sunroof Window Clip (Condition 4) | 1.0 hr |
*This labor operation number is for bulletin use only. This number will not be published in the Labor Time Guide. | ||
