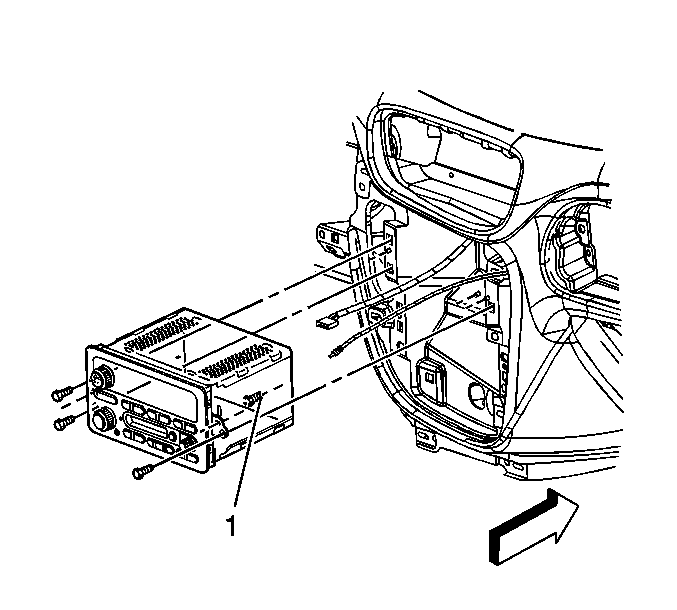
For 1990-2009 cars only
Removal Procedure
- Remove the lower closeout/insulator panel (GMC only). Refer to Instrument Panel Insulator Panel Replacement .
- Remove the accessory trim plate. Refer to Instrument Panel Cluster Trim Plate Bezel Replacement or Instrument Panel Accessory Trim Plate Replacement .
- Remove the 3 screws that retain the radio to the instrument panel (I/P).
- Partially remove the radio disengaging the radio rear alignment locator (1) to gain access to the electrical connectors.
- Disconnect the radio antenna cable.
- Disconnect the electrical connectors to the radio.
- Remove the radio from the vehicle.

Installation Procedure
- Position the radio to the I/P.
- Connect the electrical connectors to the radio.
- Connect the radio antenna cable to the radio.
- Position the radio rear alignment locator (1) into the I/P substrate.
- Install the 3 screws that retain the radio to the I/P.
- Install the accessory trim plate. Refer to Instrument Panel Cluster Trim Plate Bezel Replacement or Instrument Panel Accessory Trim Plate Replacement .
- Install the lower closeout/insulator panel (GMC only). Refer to Instrument Panel Insulator Panel Replacement .
- If a replacement radio is installed, setup the radio. Refer to Control Module References .

Notice: Refer to Fastener Notice in the Preface section.
Tighten
Tighten the screws to 2 N·m (18 lb in).
