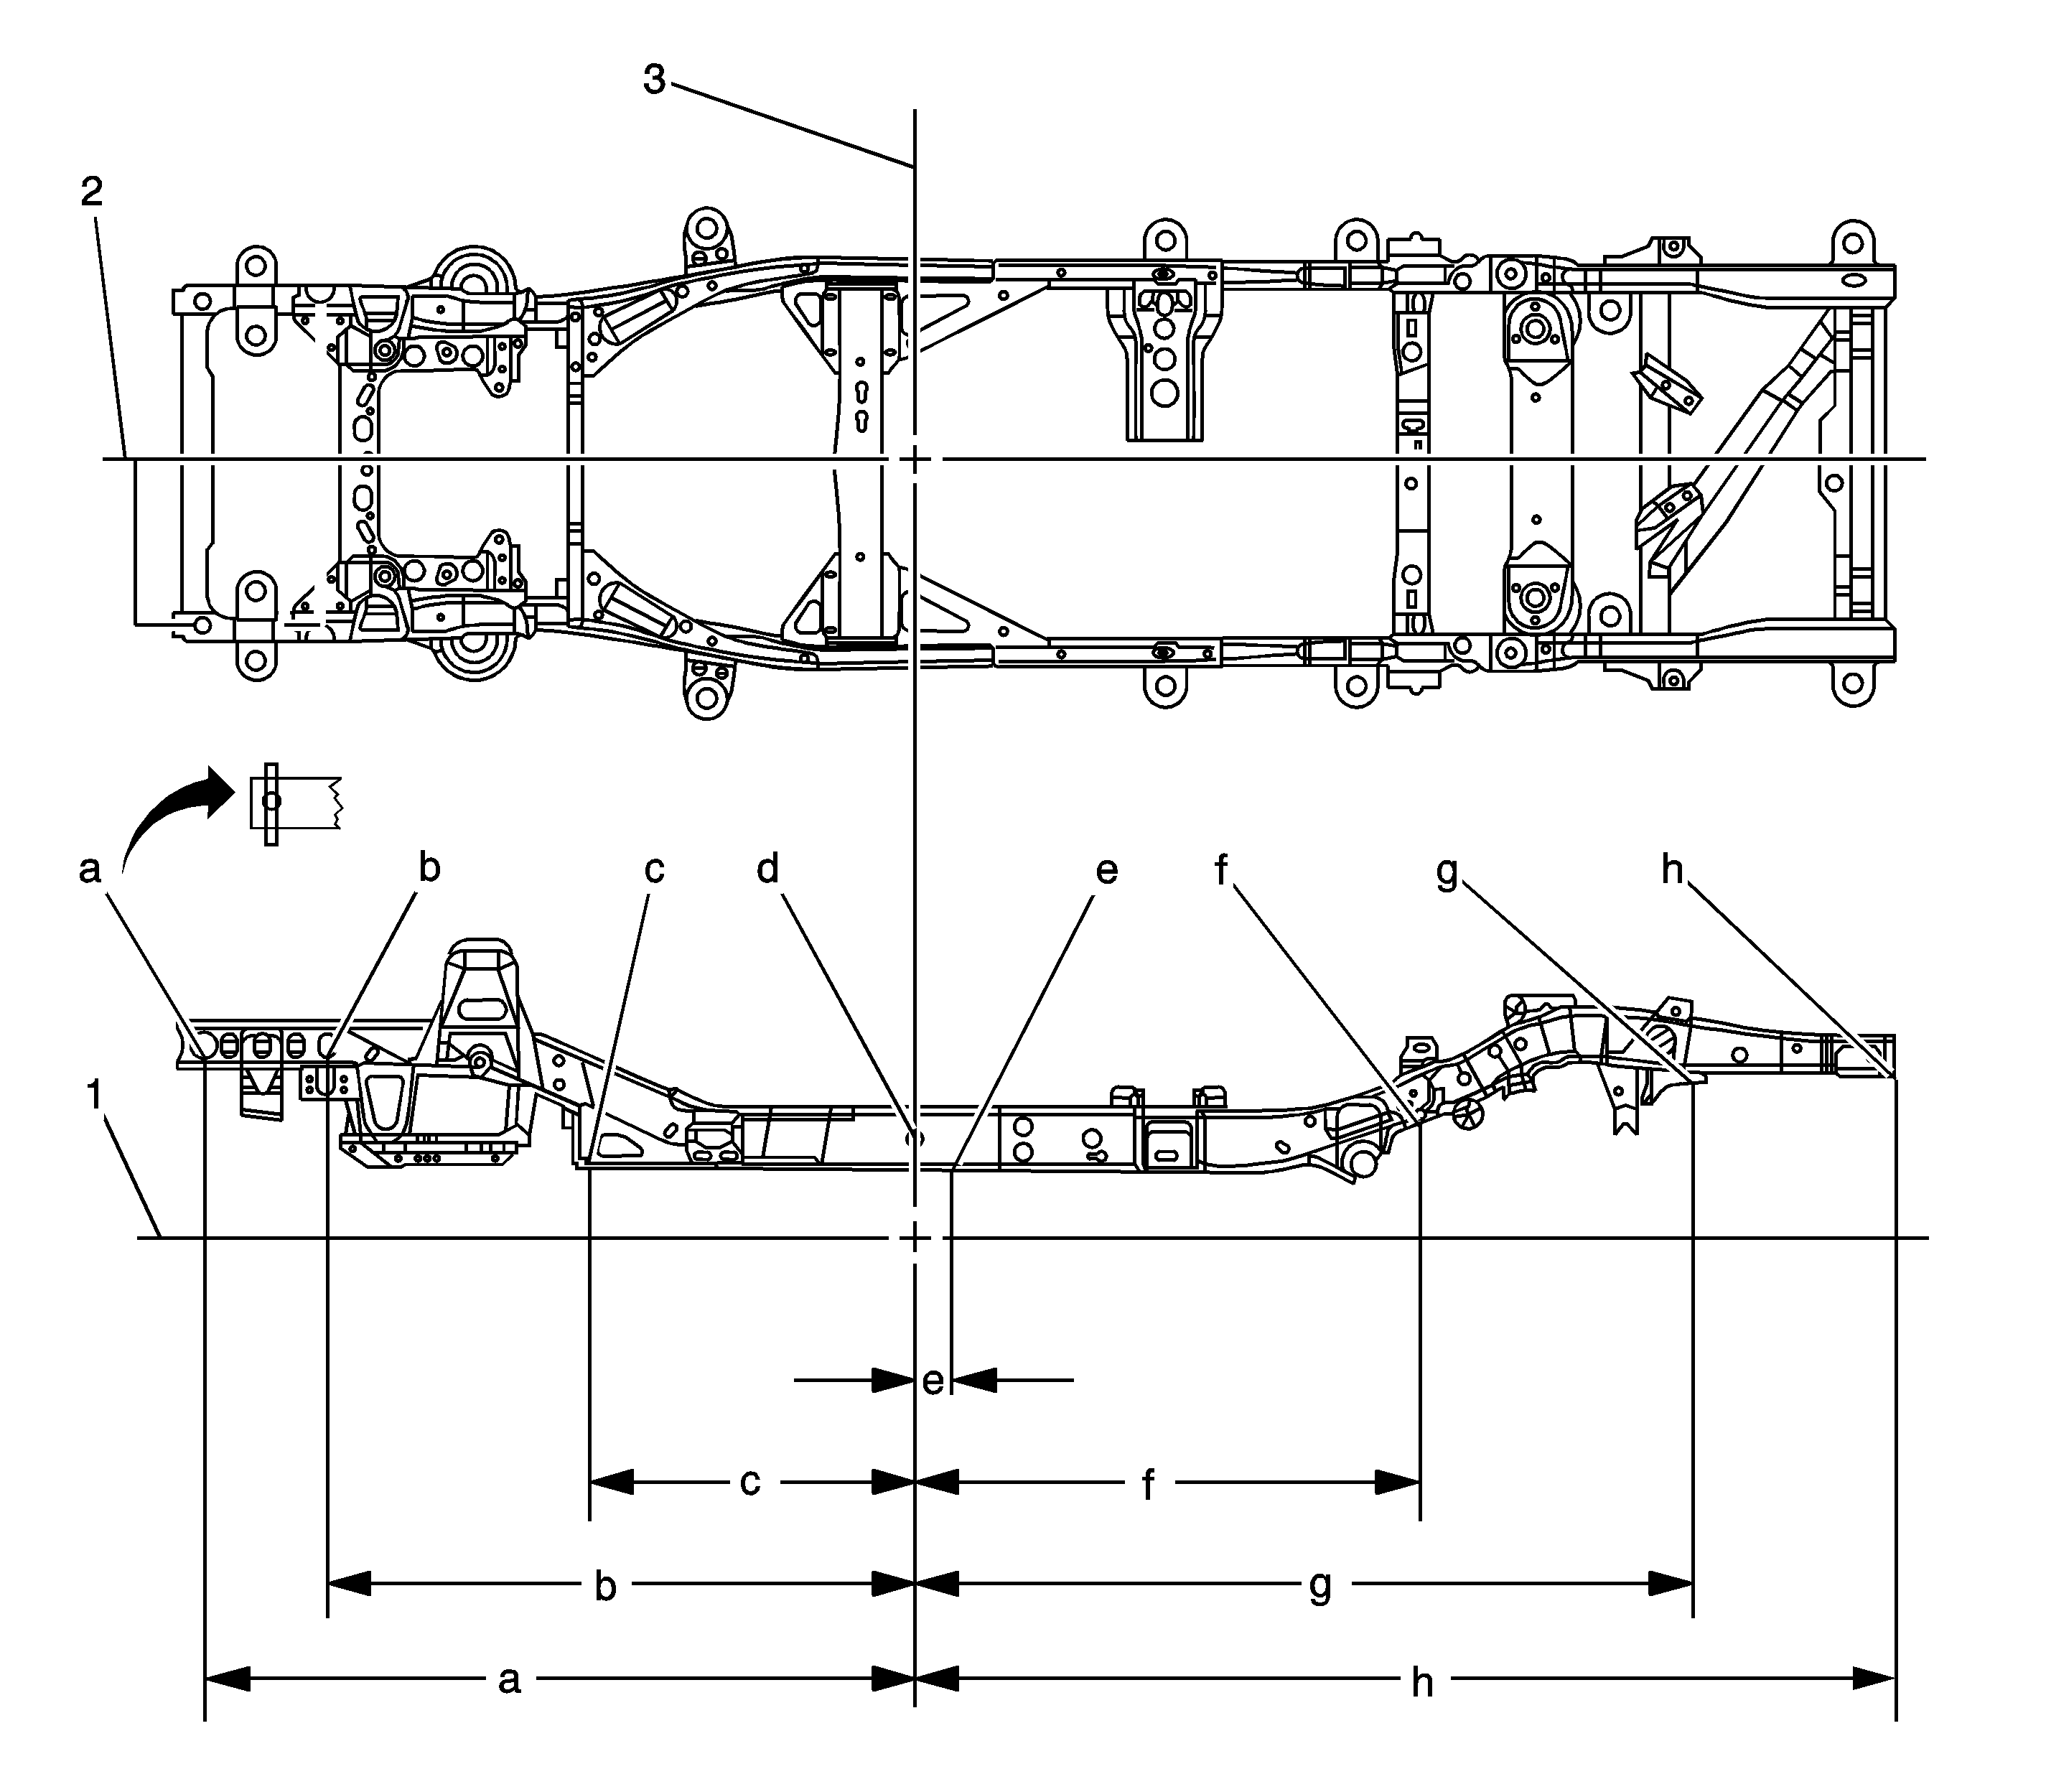
Dimensions - Frame TrailBlazer, Envoy,Bravada
Three-Dimensional Measurements
Three-dimensional measurements are provided in the absences of dimension information from your equipment supplier. Universal 3-dimensional measuring equipment is required to use these numbers. You may need to adjust the height dimensions to match the datum height of your equipment. Only the width dimensions can be used to measure point-to-point. All holes, slots and fasteners are measured from the center.

Location | Description | Length | Width | Height |
|---|---|---|---|---|
1 | Datum Line | 0 | 0 | 0 |
2 | Center Line | 0 | 0 | 0 |
3 | Zero Line | 0 | 0 | 0 |
a | Front Bumper Mounting Hole | 1895 mm | 416 mm | 546 mm |
b | Die Mark Arrow | 1545 mm | 416 mm | 552 mm |
c | Gusset Hole | 837 mm | 322 mm | 295 mm |
d | Gage Hole | 0 mm | 541 mm | 379 mm |
e | Gage Hole | 55 mm | 503 mm | 313 mm |
f | Gage Hole | 1389 mm | 495 mm | 449 mm |
g | Gage Hole | 2100 mm | 497 mm | 569 mm |
h | Side Member Rail RR | 2626 mm | 537 mm | 569 mm |
2WD shown; 4WD dimensions are the same, graphics similar. All dimensions are measured in millimeters, from a zero line, center line, and a common datum. All dimensions are symmetrical, unless otherwise specified. | ||||
Point to Point Measurements
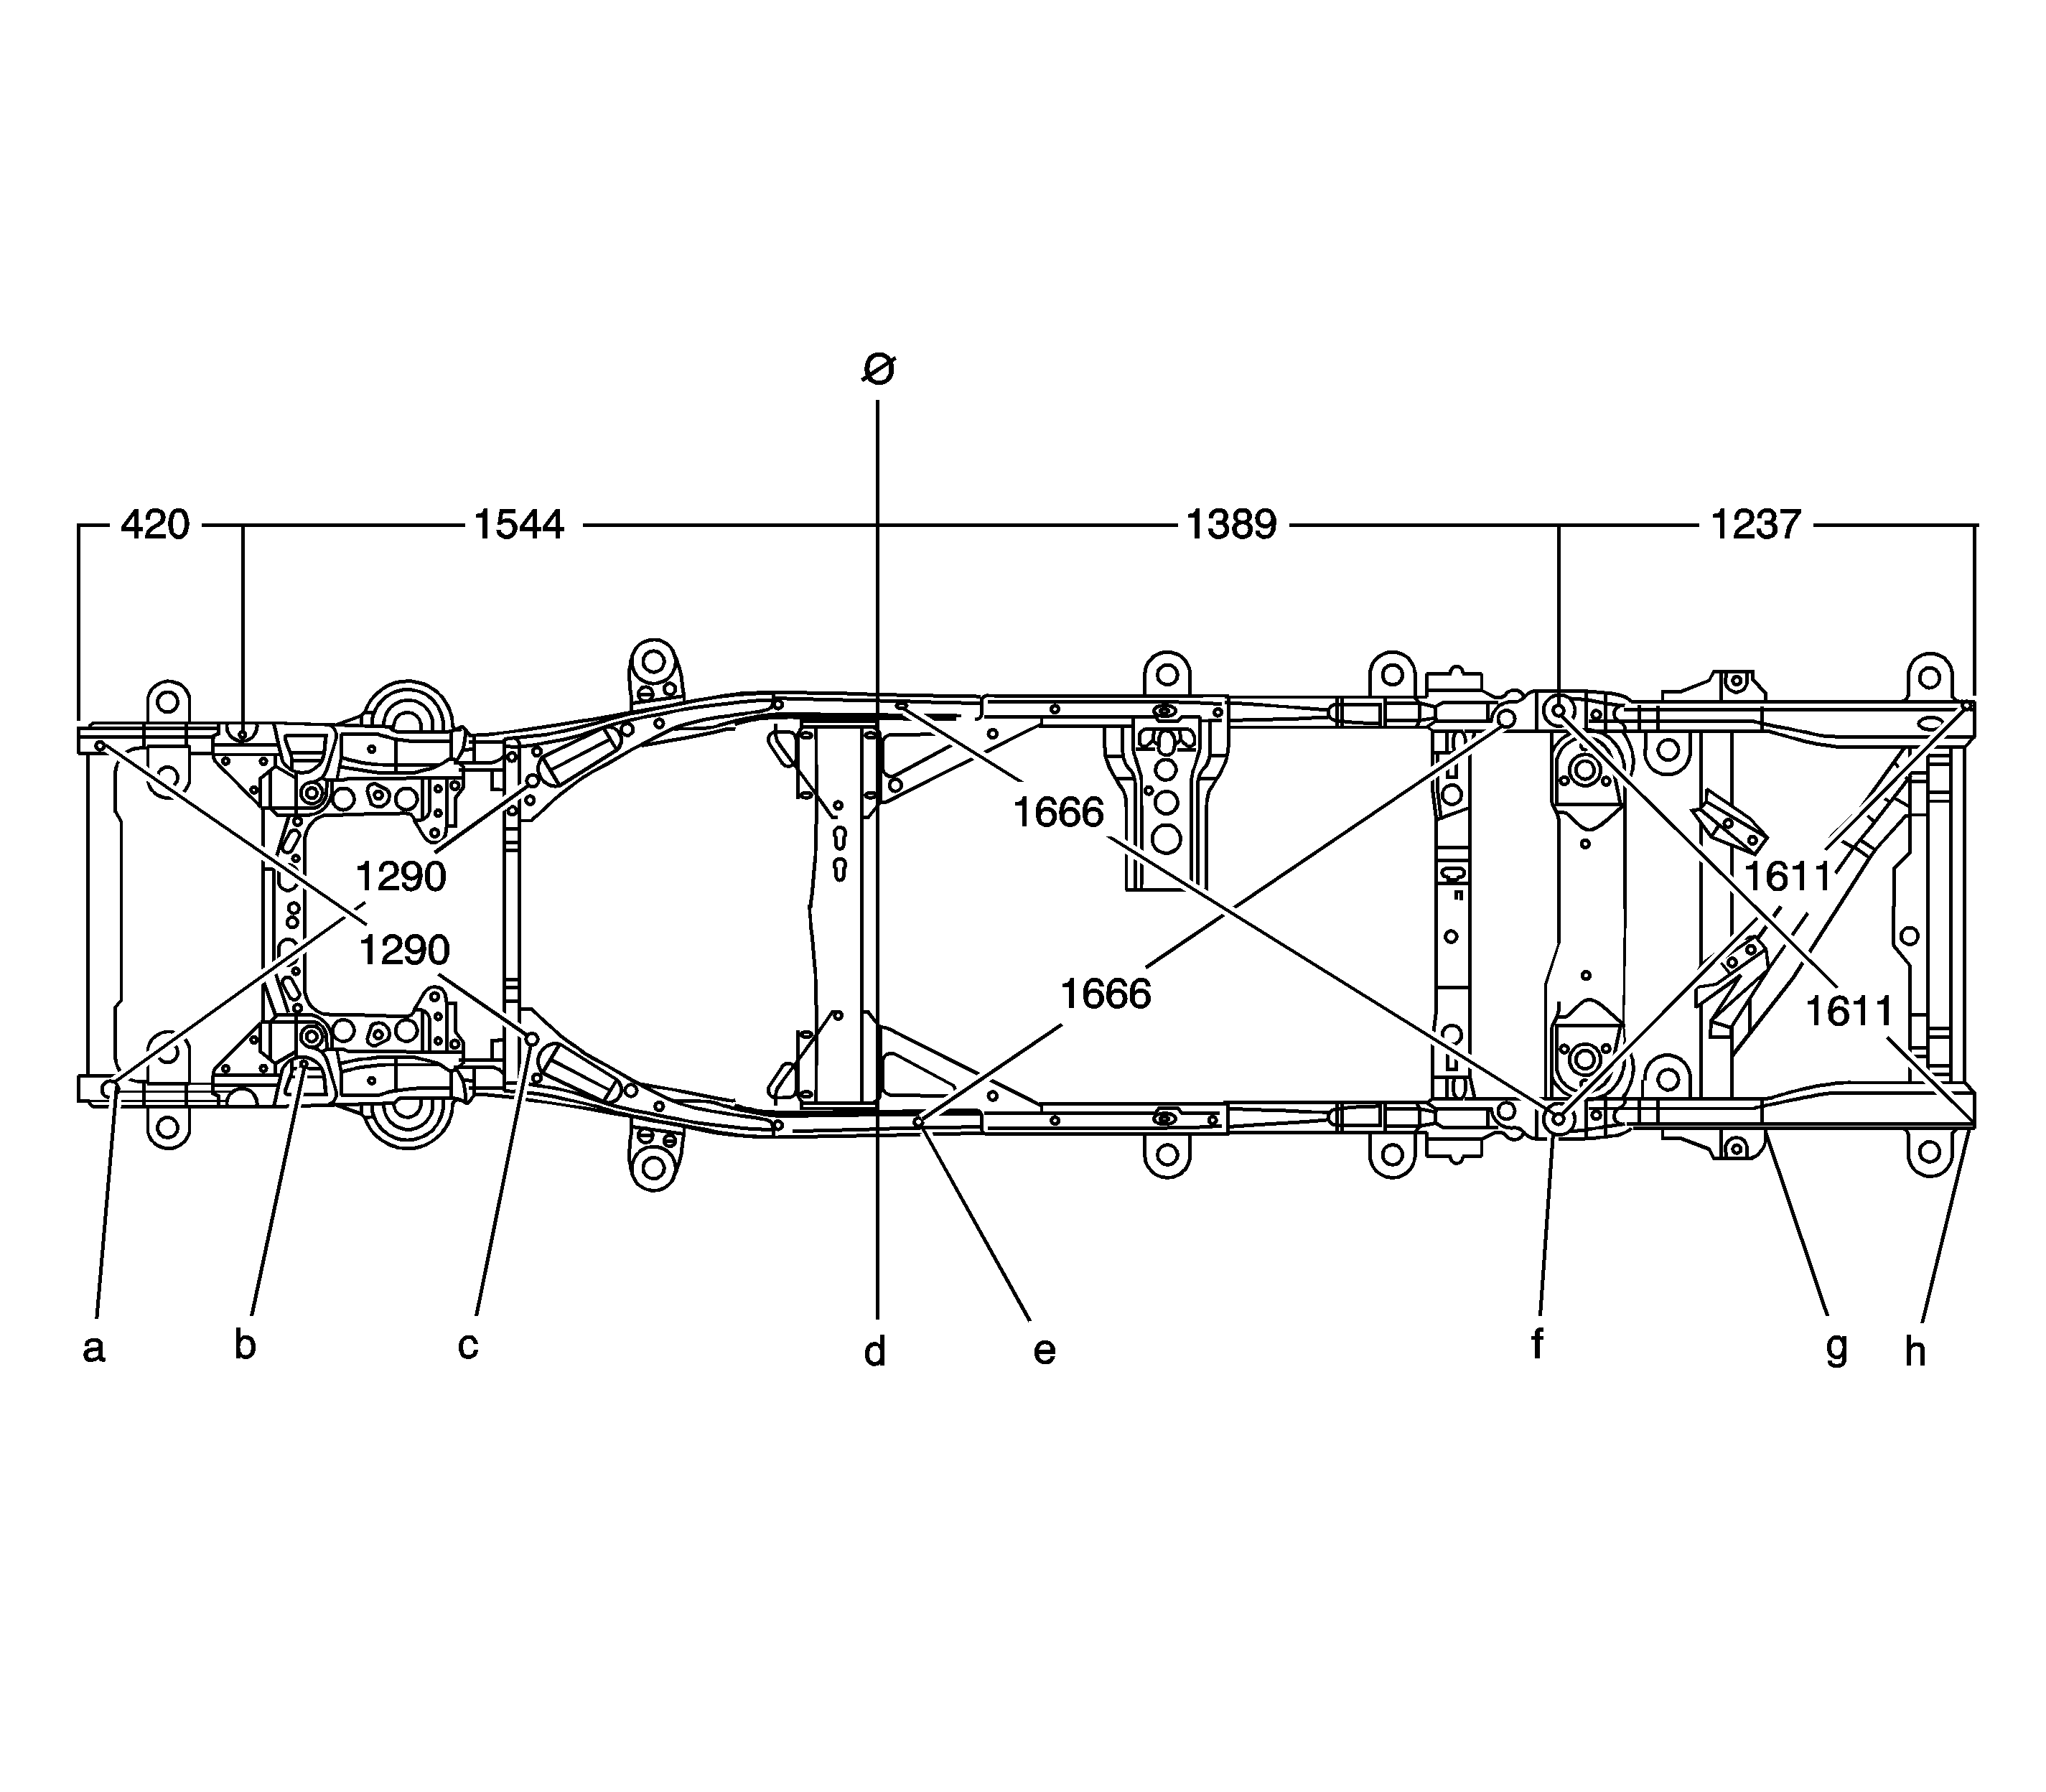
Point-to-point measurements are for reference only. Use these measurements for diagnosis for validating. Point-to-point measurements do not afford the accuracy that 3-dimensional measuring systems have. Point-to-point measurements are duplicated with tram bar pointers set at equal lengths. All holes, slots, and fasteners are measured to the center.

Location | Description | Type |
|---|---|---|
A | Front bumper mounting hole | 16.4 diameter sleeve hole |
B | Die mark arrow | Arrow point |
C | Gusset hole | 30.0 diameter hole |
D | Gage hole | 31.5 x 37.5 diameter slot |
E | Gage hole | 14.0 diameter hole |
F | Gage hole | 17.0 diameter hole |
G | Gage hole | 14.0 diameter hole |
H | Side member rail RR | Bottom outer tangent |
All dimensions are measured in millimeters from a zero line, center line and a common datum. All dimensions are symmetrical unless otherwise specified. | ||
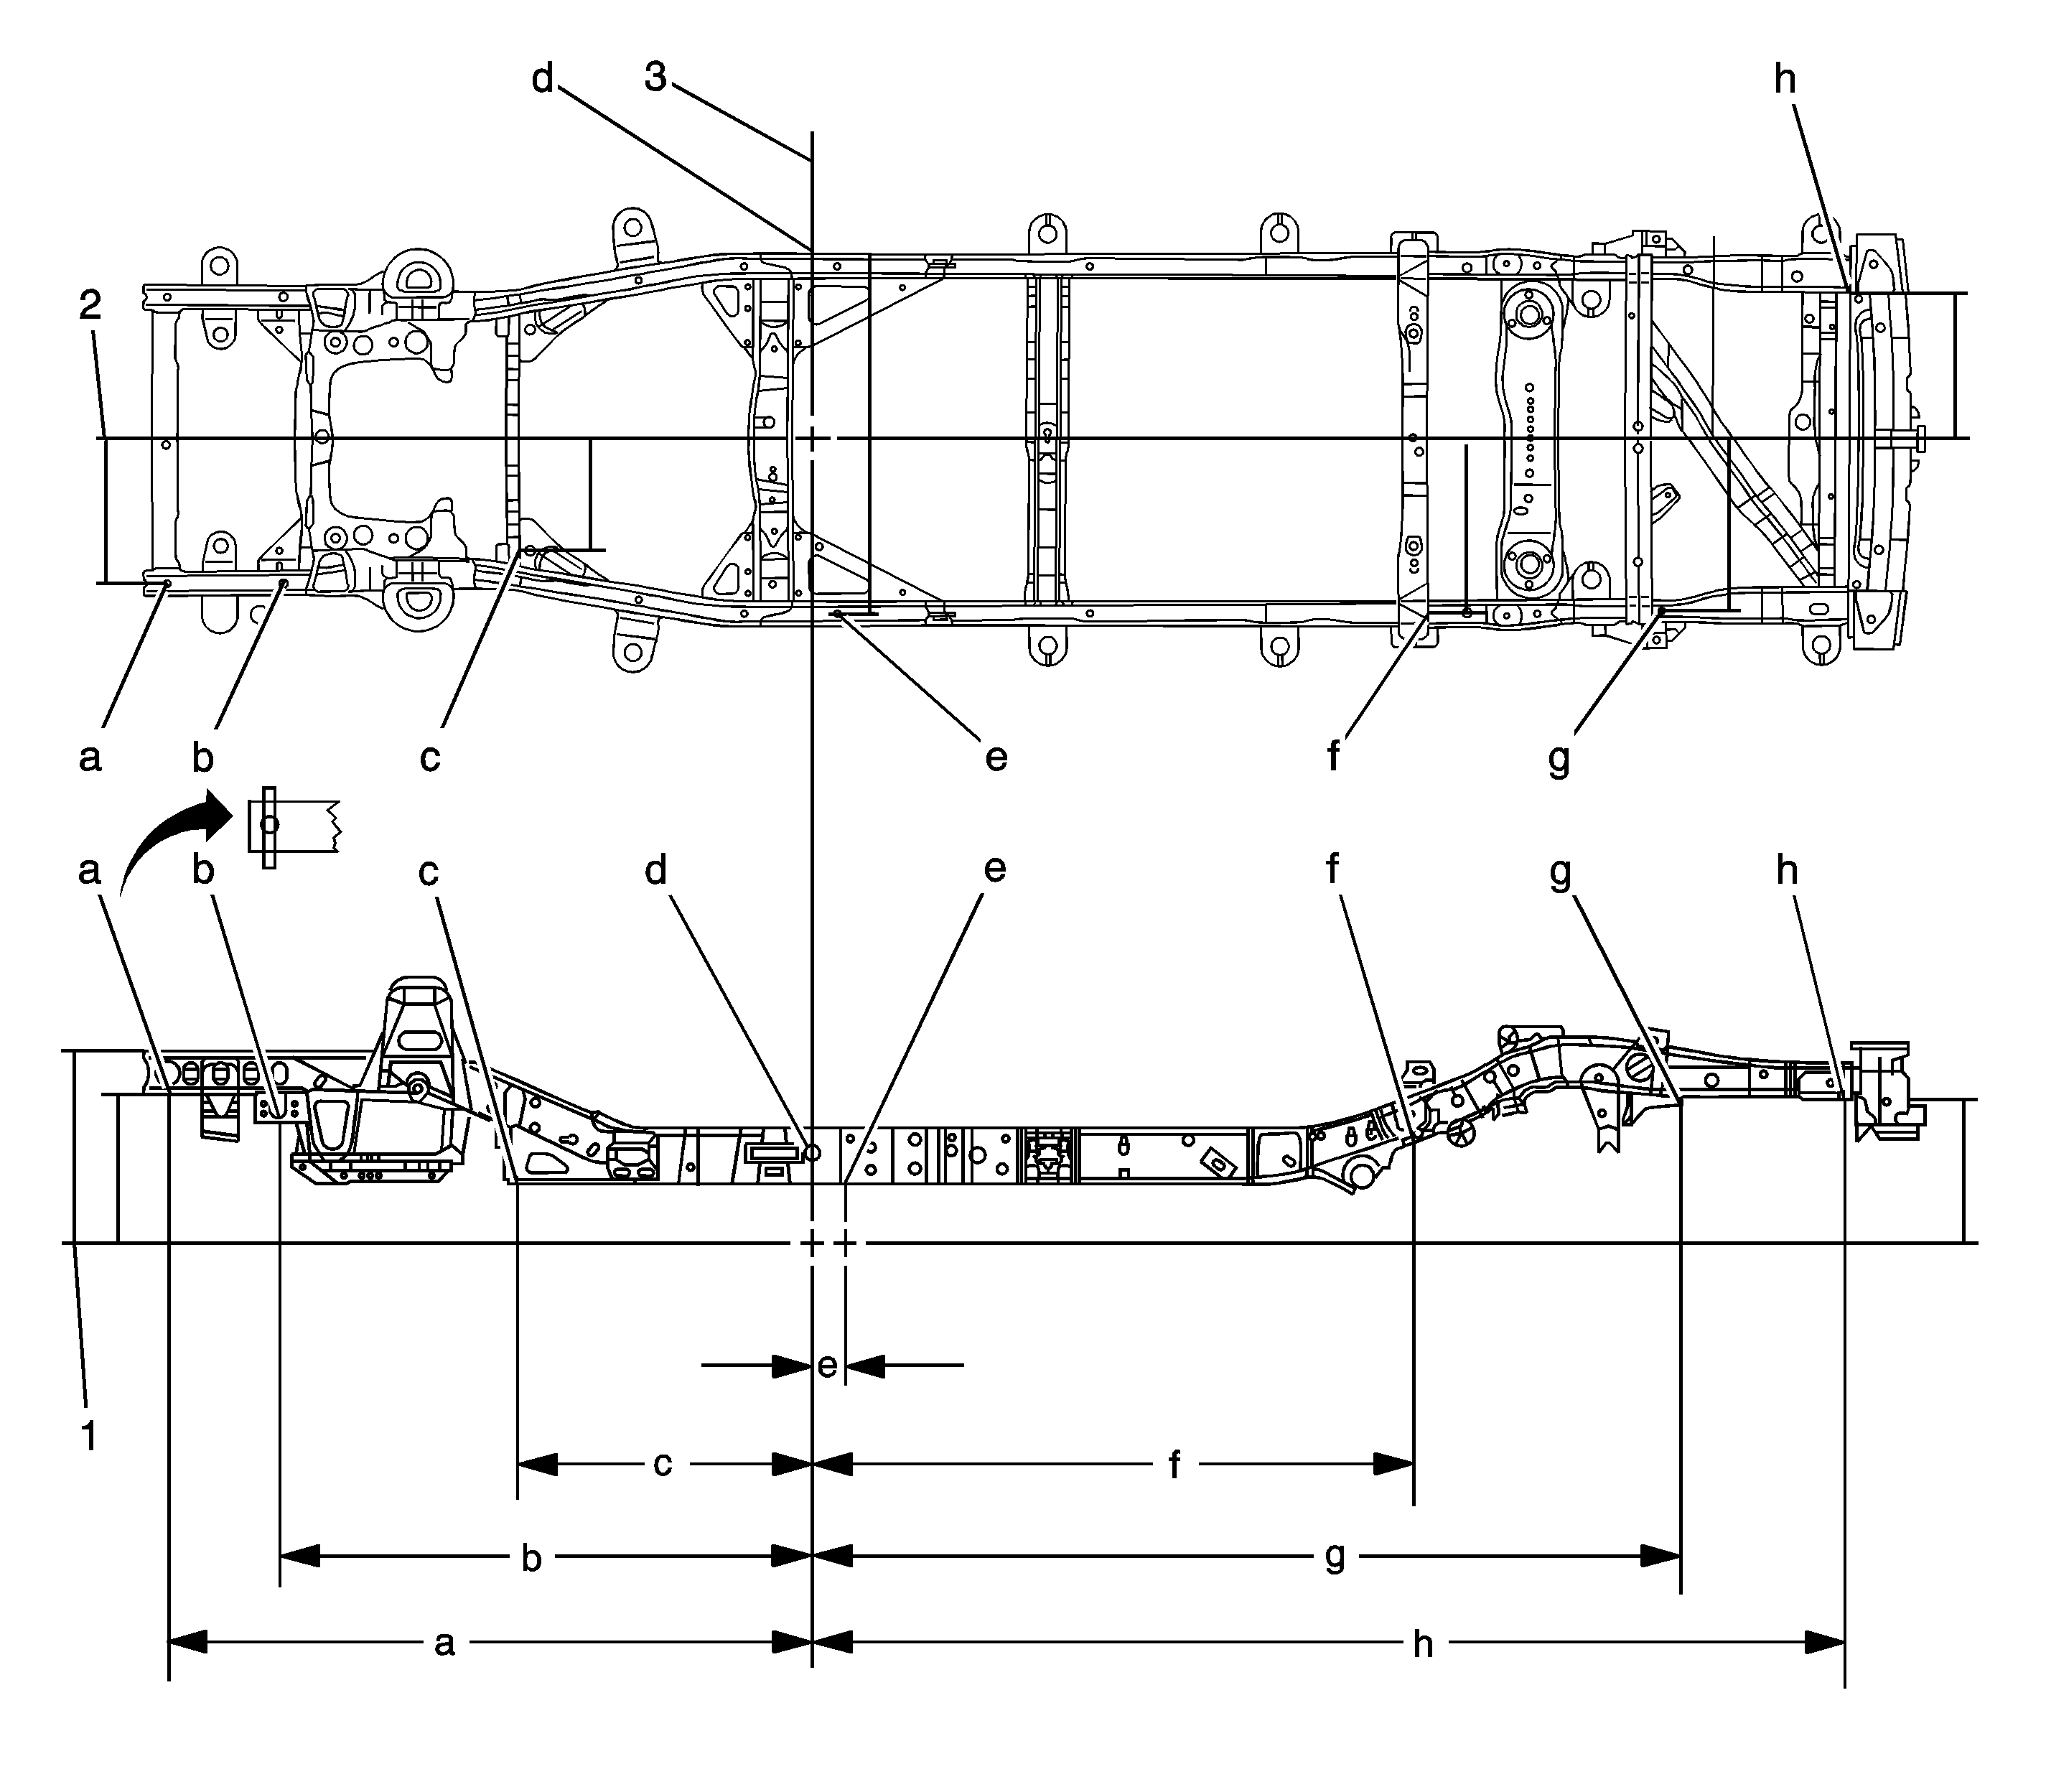
Dimensions - Frame TrailBlazer EXT, Envoy XL
Three-Dimensional Measurements
Three-dimensional measurements are provided in the absences of dimension information from your equipment supplier. Universal three-dimensional measuring equipment is required to use these numbers. You may need to adjust the height dimensions to match the datum height of your equipment. Only the width dimensions can be used to measure point-to-point. All holes, slots and fasteners are measured from the center.

Location | Description | Length | Width | Height |
|---|---|---|---|---|
1 | Datum Line | 0 | 0 | 0 |
2 | Center Line | 0 | 0 | 0 |
3 | Zero Line | 0 | 0 | 0 |
A | Front Bumper Mounting Hole | 1895 mm | 416 mm | 546 mm |
B | Die Mark Arrow | 1544 mm | 416 mm | 552 mm |
C | Gusset Hole | 837 mm | 322 mm | 294 mm |
D | Gage Hole | 0 mm | 540 mm | 379 mm |
E | Draw Hole | 55 mm | 503 mm | 297 mm |
F | 17.0 mm Hole | 1795 mm | 495 mm | 449 mm |
G | Drain Hole | 2506 mm | 497 mm | 569 mm |
H | Side Member Rail RR | 3033 mm | 537 mm | 569 mm |
2WD shown; 4WD dimensions are the same, graphics similar. All dimensions are measured in millimeters, from a zero line, center line, and a common datum. All dimensions are symmetrical, unless otherwise specified. | ||||
Point to Point Measurements
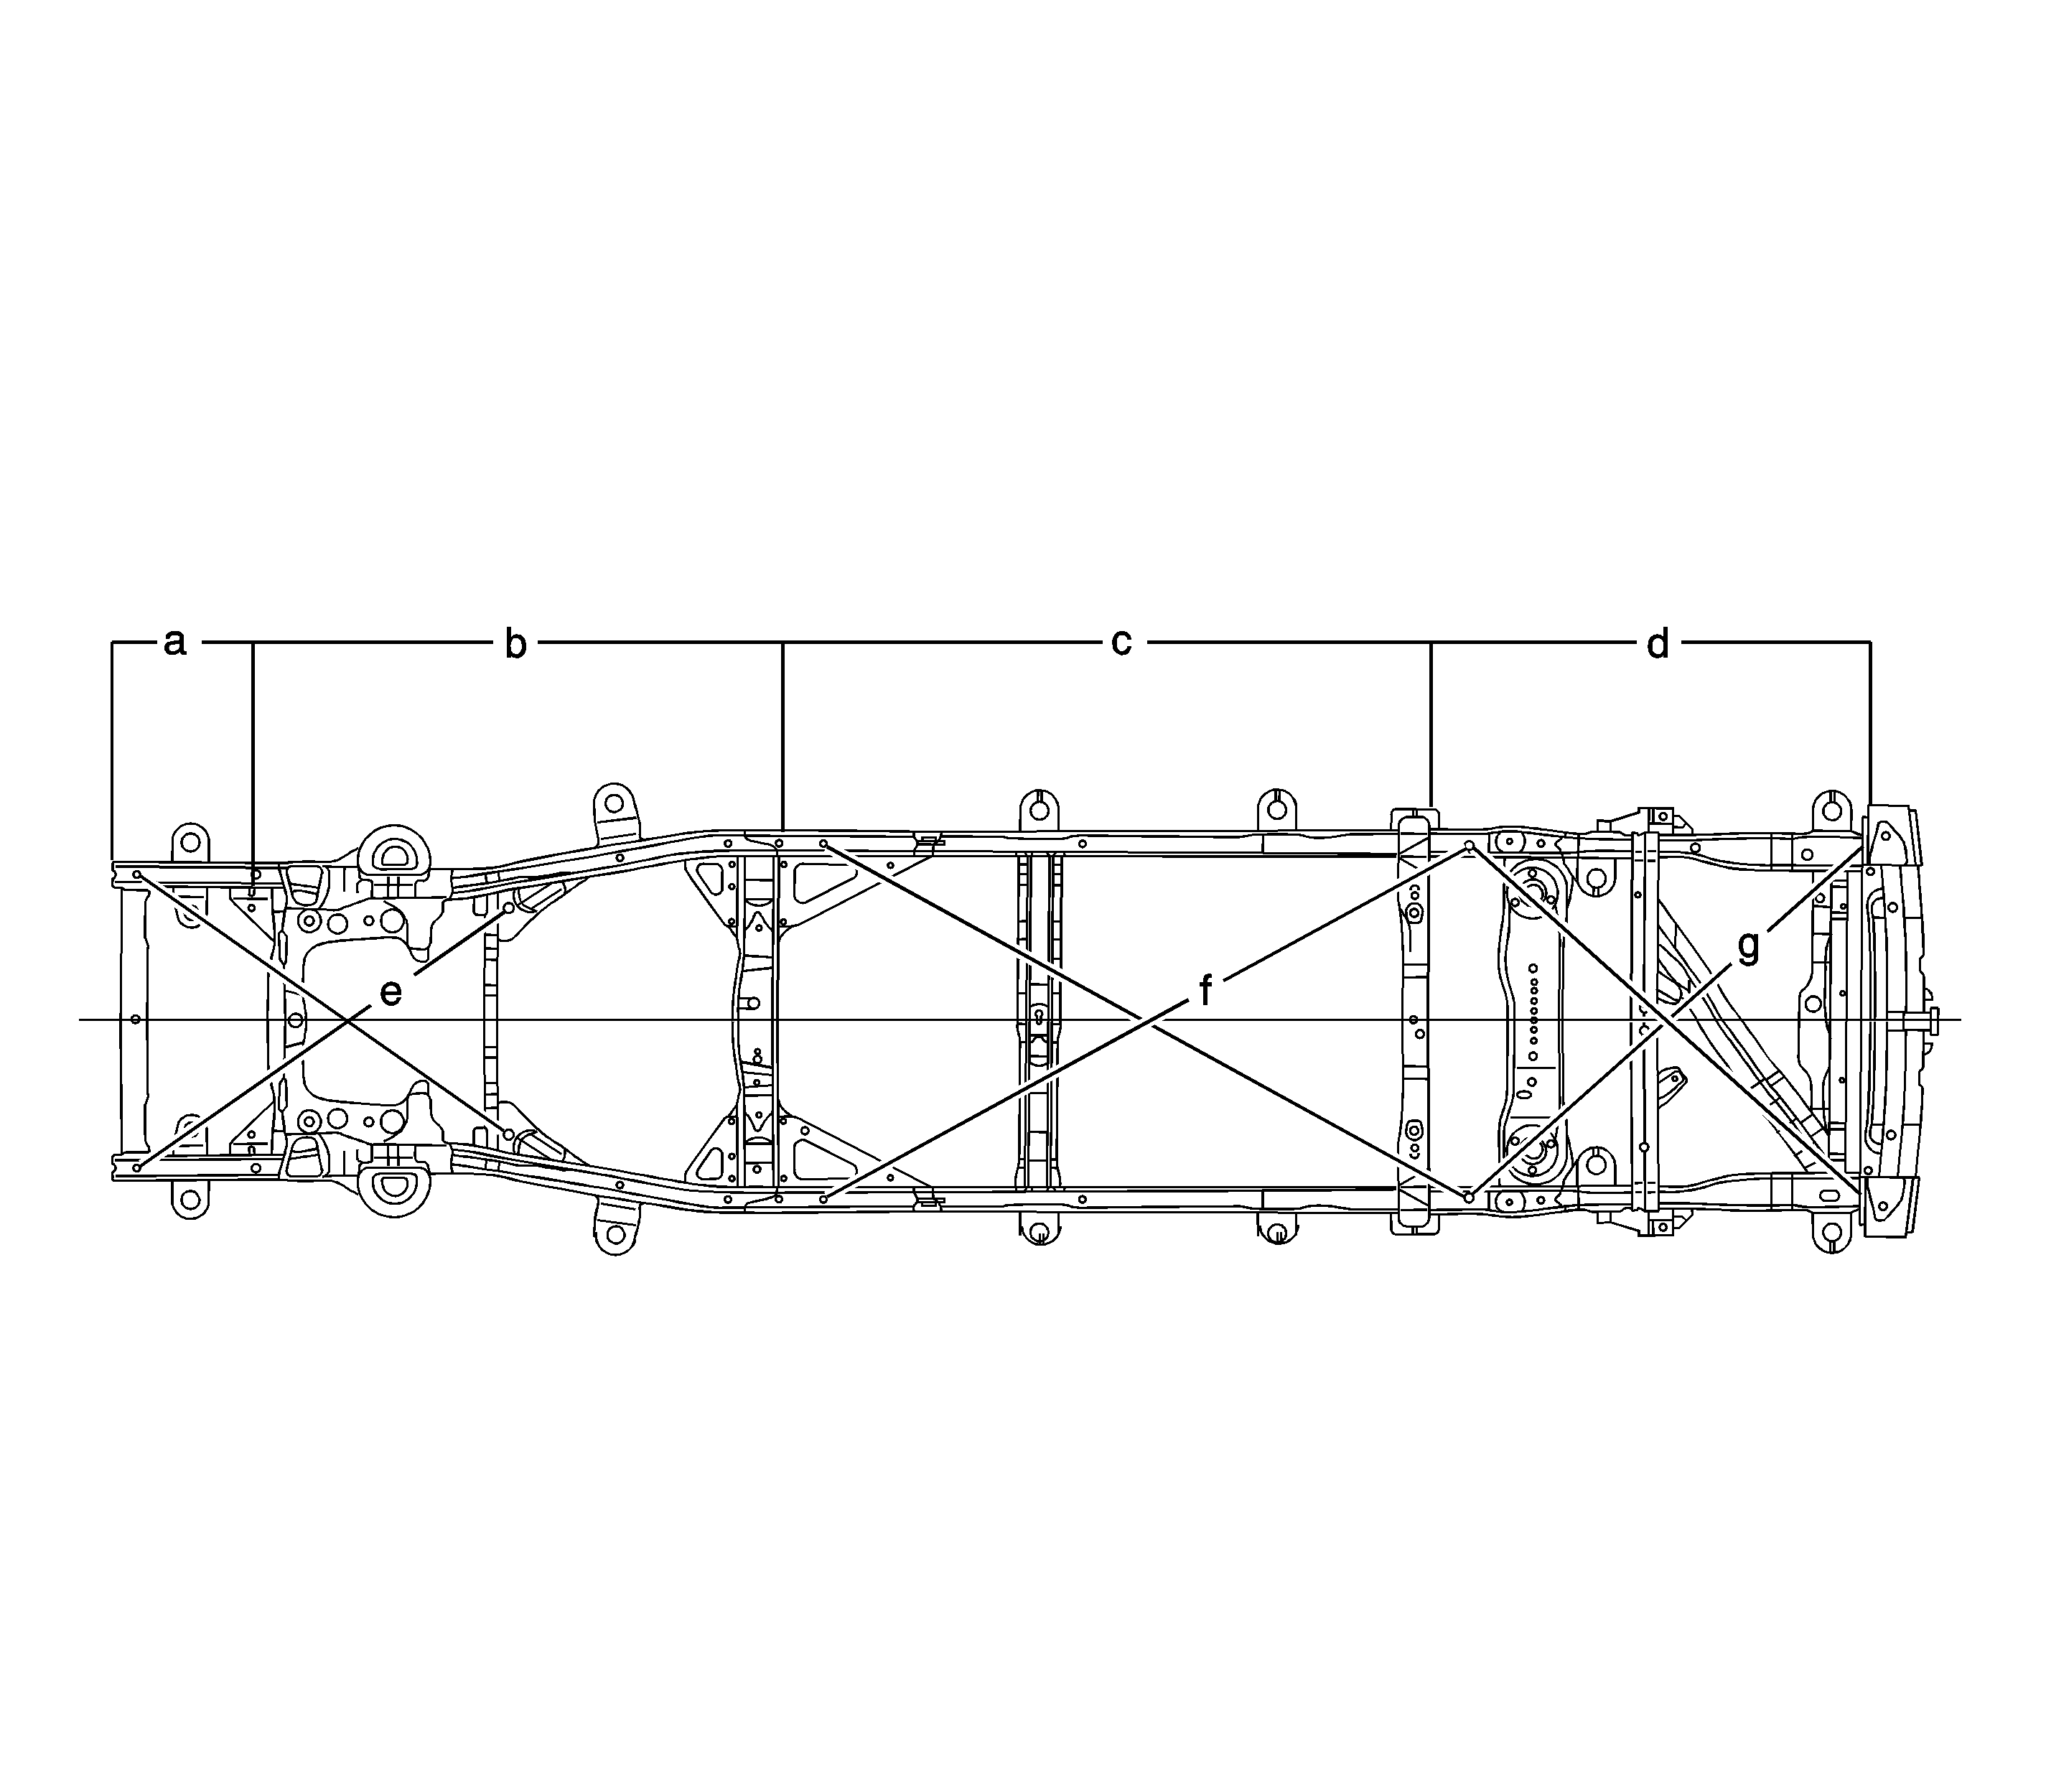
Point-to-point measurements are for reference only. Use these measurements for diagnosis for validating. Point-to-point measurements do not afford the accuracy that 3-Dimensional measuring systems have. Point-to-point measurements are duplicated with tram bar pointers set at equal lengths. All holes, slots and fasteners are measured to the center.

Location | Point to Point |
|---|---|
a | 420 mm |
b | 1544 mm |
c | 1795 mm |
d | 1237 mm |
e | 1290 mm |
f | 2006 mm |
g | 1611 mm |
