NOISE AT FULL STEERING LOCK (PROVIDE ADDITIONAL CLEARANCE)

SUBJECT: NOISE AT FULL STEERING LOCK (PROVIDE ADDITIONAL LOWER CONTROL ARM TO BRAKE ROTOR CLEARANCE)
MODELS: 1988 AND 1992 C TRUCKS
THIS BULLETIN CANCELS AND REPLACES GMC TRUCK SERVICE BULLETIN 88-T-24, DATED JULY 1987 (CORPORATE NUMBER 863301) TO INCLUDE THE 1992 MODEL YEAR. ALL COPIES OF 88-T-24 SHOULD BE DISCARDED.
Some owners of 1988 and 1992 C trucks may experience a condition where the brake rotor comes in contact with the lower control arm. This occurs only when the steering wheel is turned to the full lock position and most often on left hand turns. The interference between the lower control arm and brake rotor will cause a screeching noise as metal rubs metal. A gouge on the inner brake rotor is evidence that an interference condition does exist.
On vehicles with this condition, the nose area of the lower control arm should be ground away to provide additional clearance. If a gouge of greater than 1.5 mm (.060 in.) is found on the inside of the brake rotor, then replacement of the rotor will be necessary.
NOTE: A dime may be used to determine disc brake groove depth. Place a dime in the groove, with Roosevelt's head toward the groove. If the dime goes into the groove beyond the top of his head, the groove exceeds .060 in. and the rotor should be replaced.
VEHICLES INVOLVED
In addition to the 1988 GMC Truck C1 and C2 models, certain GMC Truck 1992 C1 and C2 models built within the following VIN breakpoints are involved:
Plant Beginning Ending ----- --------- ------ Pontiac East 1GDJK34K1NE530561 1GDHK34K2NE535279
Oshawa 2GTEK19K3N1537709 2GTEC19K7N1543686
Fort Wayne 1GTDC14Z9NZ530350 1GTDC14K6NZ531815
Janes- None ville
SERVICE PROCEDURE
1. Inspect brake rotor for signs of contact with the lower control arm.
2. If a gouge is found, replacement of the brake rotor will be necessary.
3. Siphon 2/3 of the brake fluid from the master cylinder.
4. Remove the wheel and tire assembly.
5. Remove the brake caliper from the brake rotor. Suspend the caliper assembly with a wire hook away from the work area.
6. Remove wheel bearing cap and nut from the spindle.
7. Remove the brake rotor and discard if a gouge is found. Care should be used so that the outer bearing and spindle threads are not damaged. Save the bearings.
8. Remove the brake splash shield and gasket.
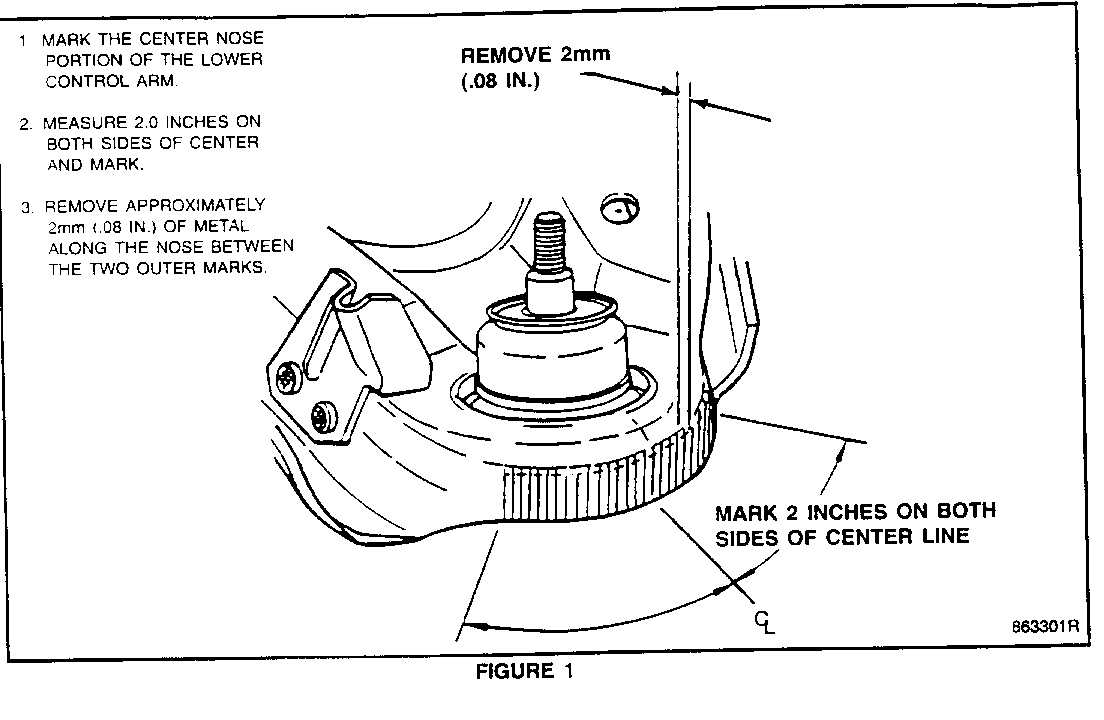
9. Mark the center nose portion of the lower control arm. Place another mark 2 inches on either side of center (Figure No. 1).
10. Using a die grinder or equivalent, take care not to remove more than 2 mm (.08 inches) of metal from the control arm nose to obtain clearance between the control arm and brake rotor.
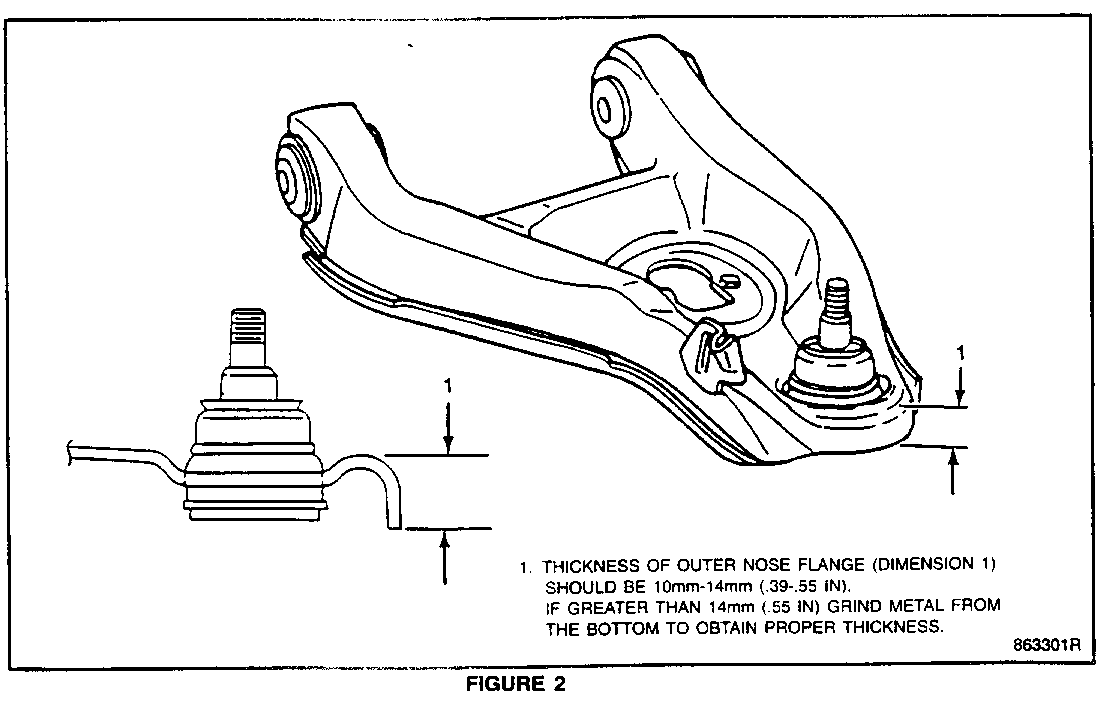
11. Inspect the outer nose of the control arm for the flange thickness. The thickness should be 10 mm - 14 mm (.39 -.55 inches). (Figure No. 2).
12. If the flange thickness is greater than 14 mm (.55 inches), use a die grinder or equivalent to remove excessive metal from the bottom to obtain the proper thickness.
13. Clean the unfinished metal, then paint black.
14. Reinstall gasket and splash shield. Torque bolts to 16 Nm (12 lb. ft.)
15. Install inner bearing to the brake rotor. Apply an additional amount of an approved high temperature front wheel bearing grease outboard of the inner bearing.
16. Install a new wheel seal using a flat plate to press the seal down flush with the hub. Apply a film of wheel bearing grease to lubricate the seal.
17. Install brake rotor to the spindle.
18. Apply grease to the outboard side of the outer bearing. Reinstall outer bearing to the brake rotor.
19. Reinstall nut and washer to the spindle. Tighten nut to 16 Nm (12 lb. ft.) while turning the brake rotor assembly forward by hand. This will seat the bearings. Adjust the nut to a "just loose" position by hand, then back the nut off until the hole in the spindle aligns with a slot in the nut. Do not back the nut off more than 1/2 flat. Install new cotter pin.
20. Reinstall cap to the brake rotor.
21. Check for control arm to rotor clearance in the straight ahead position and in a full right and left hand turn.
22. Reinstall brake caliper. Torque caliper mounting bolts to 51 Nm (38 lb.ft.)
23. Reinstall wheel and tire assembly. Torque nuts to 160 Nm (120 lb.ft.)
24. Refill the master cylinder with Delco Supreme II fluid, Part Number 1052535, or Dot 3, and bleed brake system if required.
WARRANTY INFORMATION
Labor time to perform this procedure is:
Labor Operation Description Time --------- ----------- ---- T7405 One Side .7 hr. T7410 Both Sides 1.1 hrs.


General Motors bulletins are intended for use by professional technicians, not a "do-it-yourselfer". They are written to inform those technicians of conditions that may occur on some vehicles, or to provide information that could assist in the proper service of a vehicle. Properly trained technicians have the equipment, tools, safety instructions and know-how to do a job properly and safely. If a condition is described, do not assume that the bulletin applies to your vehicle, or that your vehicle will have that condition. See a General Motors dealer servicing your brand of General Motors vehicle for information on whether your vehicle may benefit from the information.
