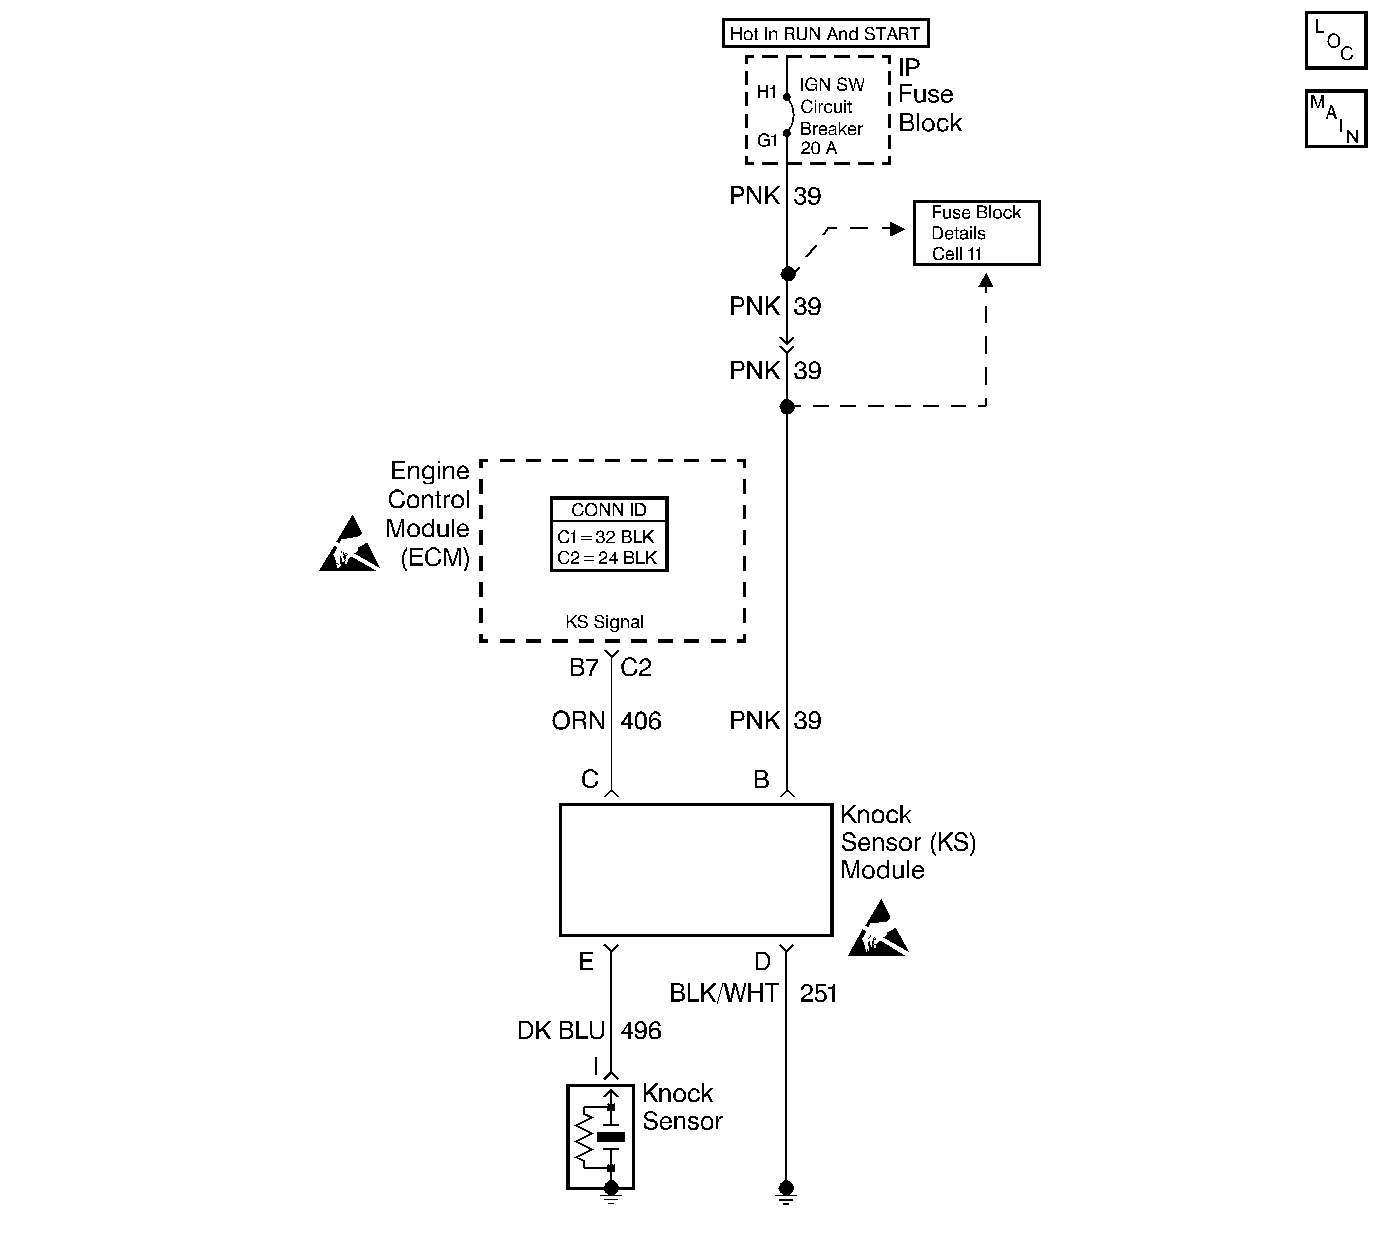
Circuit Description
A module that sends a voltage signal to the ECM accomplishes the Knock Sensor (KS) system control. As the KS detects an engine knock, the voltage from the KS module to the ECM drops. This signals the ECM to retard the timing. The ECM will retard the timing when a knock is detected and RPM is above about 900 RPM.
The ECM continually monitors the voltage on a knock sensor signal circuit terminal B7 if a knock signal (low voltage) is detected but for less than 5 seconds the KS system is considered operational.
Conditions for Setting
The ECM detects a low voltage at knock sensor signal circuit terminal B7 for longer than 5 seconds with the engine running.
Or
Once per start up if a low signal voltage is detected for more than 5 seconds or a signal voltage remains high, a functional check will be performed. In order to perform this, the ECM advances the spark timing when the engine coolant temperature is above 95°C (194°F) and the engine is under heavy load (near WOT). The ECM then checks the signal voltage at B7 in order to see if a knock is detected. If no knock is detected, the MIL will remain ON until the ignition is turned OFF or until a knock signal is detected.
Action Taken When the DTC Sets
The Malfunction Indicator Lamp (MIL) will illuminate.
Conditions for Clearing the MIL/DTC
The conditions for the fault are no longer present and 50 ignition cycles have passed with no further faults or the ignition switch is turned OFF and the battery feed voltage is removed for 10 seconds.
Diagnostic Aids
If you can hear a knock, repair the internal engine problem.
A faulty connection at the knock sensor at the KS module or at the ECM can cause a DTC 43. Also check the knock sensor signal circuit for a possible open or a short to a ground.
Refer to Intermittent Conditions .
Test Description
The numbers below refer to the step numbers on the Diagnostic Table.
-
If the conditions for a DTC 43 exist, the scan tool will always display Yes. There should not be a knock at idle unless an internal engine problem or a system problem exists.
-
This test will determine if the system is functioning at this time. Usually a knock signal can be generated by tapping on the right exhaust manifold. If no knock signal is generated, try tapping on the block close to the area of the sensor.
-
This step checks the ground circuit to the module. An open ground will cause the voltage on the knock sensor signal circuit to be about 12 volts which would cause the DTC 43 functional test to fail.
-
Connecting the knock sensor circuit with a test lamp to 12 volts should generate a knock signal. This will determine if the KS module is operating correctly.
-
Because a DTC 43 sets when the signal voltage on the knock sensor signal circuit remains low, this test should cause the signal on the knock sensor signal circuit to go high. The ECM should see the 12 volts signal as no knock if the ECM and wiring are OK.
-
This test will determine if the knock signal is being detected on the knock sensor circuit or if the KS module is at fault.
Step | Action | Value(s) | Yes | No |
|---|---|---|---|---|
1 | Did you perform the On-Board Diagnostic (OBD) System Check? | -- | ||
Does the scan tool indicate a knock signal? | -- | |||
Does the scan tool indicate a knock signal indicated? | -- | Go to Diagnostic Aids | ||
Is the test lamp ON? | -- | |||
Is a knock signal indicated each time the test lamp is connected to the knock sensor circuit? | -- | |||
Does the scan tool indicate a knock signal after the specified value? | 5 seconds | |||
7 |
Is the test lamp ON? | -- | ||
Does the scan tool indicate a knock signal? | -- | Go to Diagnostic Aids
| ||
9 |
Did you find a problem? | -- | ||
10 |
Did you find a problem? | -- | ||
11 |
Was a problem found? | -- | ||
12 |
Did you find a problem? | -- | ||
13 |
Did you find a problem? | -- | ||
14 | Repair the open in the knock sensor module ground circuit. Refer to Wiring Repairs in Wiring Systems. Is the action complete? | -- | -- | |
15 | Repair the open in the ignition feed circuit. Refer to Wiring Repairs in Wiring Systems. Is the action complete? | -- | -- | |
16 | Replace the knock sensor. Refer to Knock Sensor Replacement . Is the action complete? | -- | -- | |
17 | Replace the knock sensor module. Refer to Knock Sensor Module Replacement . Is the action complete? | -- | -- | |
18 |
Did you find a problem? | -- | ||
19 |
Did you find a problem? | -- | ||
20 | Replace the ECM. Refer to Engine Control Module Replacement . Is the action complete? | -- | -- | |
21 |
Did the DTC reset? | -- | ||
22 | Are any DTCs stored which you have not diagnosed? | -- | Go to the Applicable DTC Table | System OK |
