Fuel Injection Fuel Rail Assembly Replacement KL6
Tools Required
J 45878 Combustible Gas Detector
Removal Procedure
- Relieve the CNG fuel system pressure. Refer to Fuel Pressure Relief .
- Relieve the gasoline fuel system pressure. Refer to Fuel Pressure Relief in Engine Controls in the C/K Pickup service manual.
- Disconnect the negative battery cable. Refer to Battery Negative Cable Disconnection and Connection in Engine Electrical in the C/K Pickup service manual.
- Before removal, clean the fuel rail assemblies with a spray type engine cleaner, GM X-30A or equivalent, if necessary. Follow the package instructions. Do not soak fuel rails in liquid cleaning solvent.
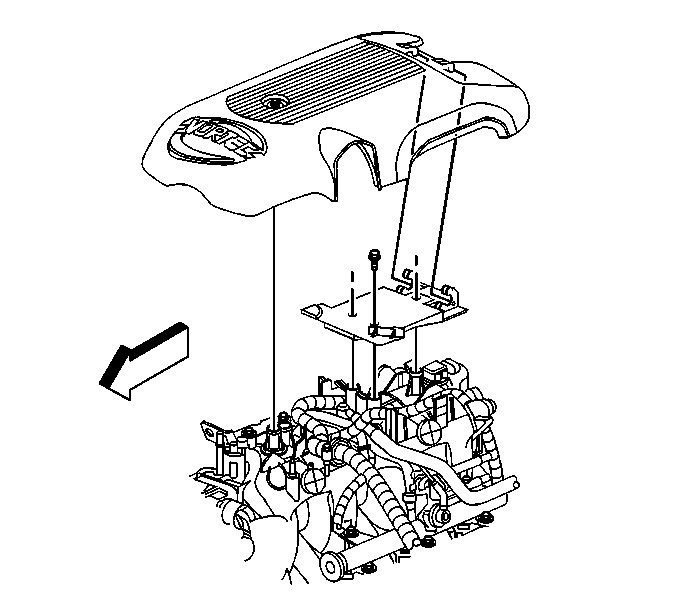
- Remove the engine sight shield. Refer to Upper Intake Manifold Sight Shield Replacement in Engine Mechanical in the C/K Pickup service manual.
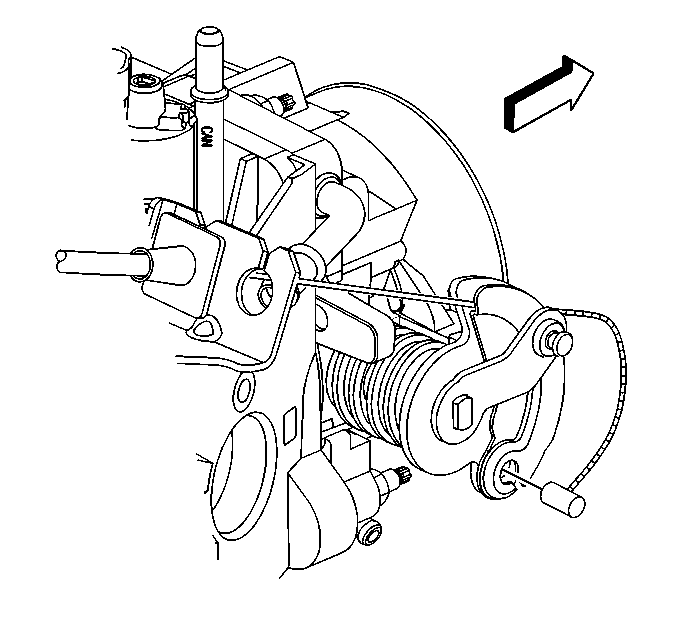
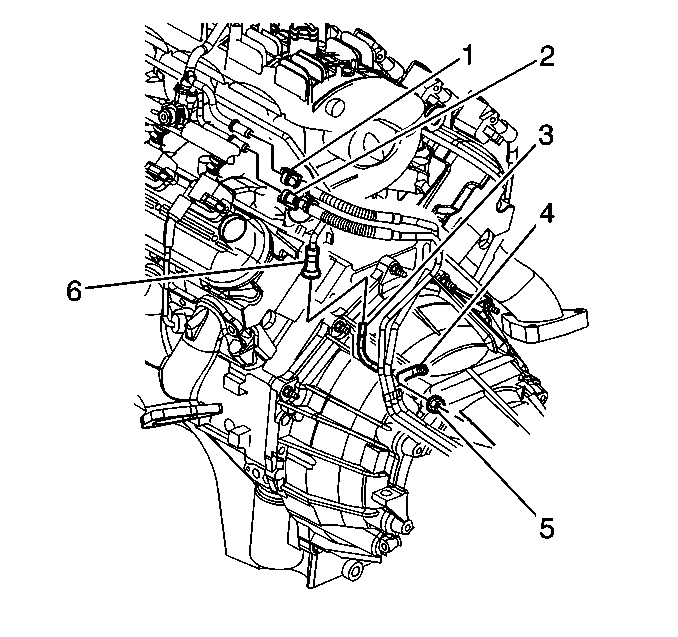
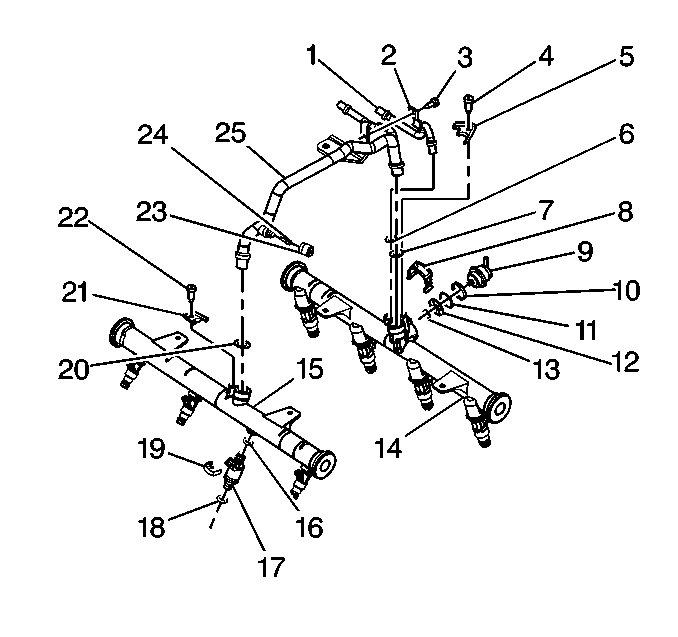
- Loosen and remove the fuel line to rail clamps (9).
- Remove the fuel line retainers (7).
- Disconnect the fuel lines (5, 8) from the fuel rails (1, 10).
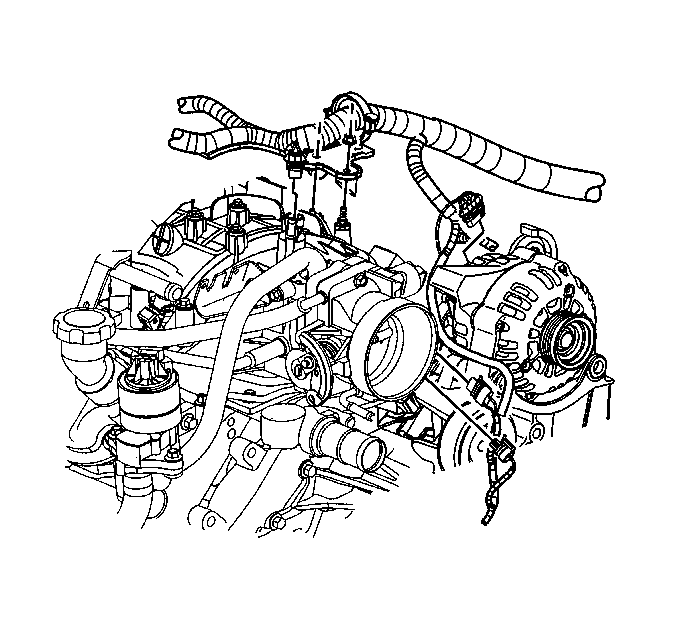
- Disconnect the fuel rail temperature and pressure sensor electrical connectors (7, 2).
- Disconnect the 8 CNG fuel injector electrical connectors (6).
- Disconnect the accelerator control cable and the cruise control cable from the cable bracket (if equipped).
- Disconnect the accelerator control cable and the cruise control cable from the throttle body (if equipped).
- Remove the upper engine wire harness retainer nut.
- Disconnect the evaporative emission (EVAP) purge valve harness connector.
- Reposition the upper engine wire harness aside.
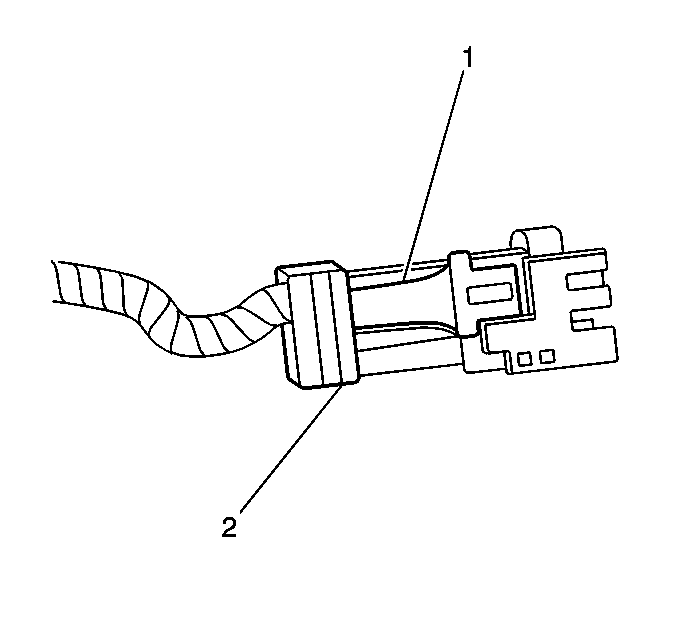
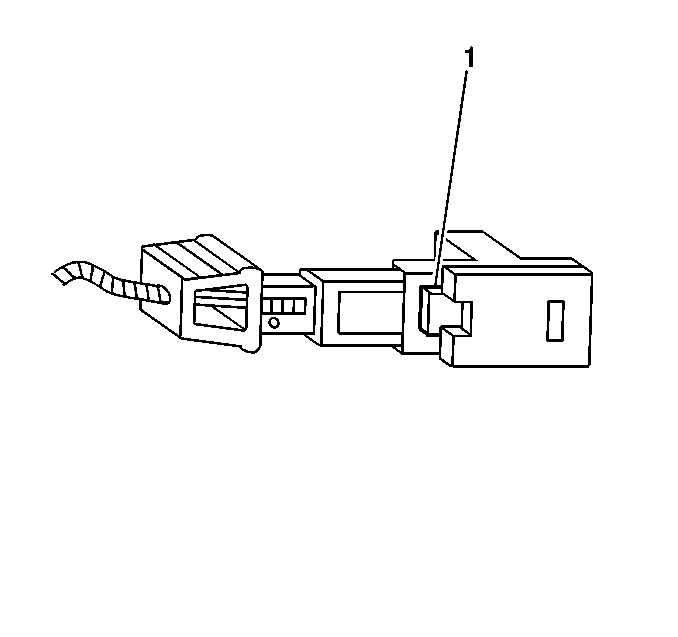
- Pull the top portion (2) of the injector connector up. Do not pull the top portion of the connector past the top of the white portion (1).
- Push the tab (1) on the lower side of the injector connector in order to release the connector from the injector.
- Repeat Step 16 and Step 17 for each gasoline injector connector.
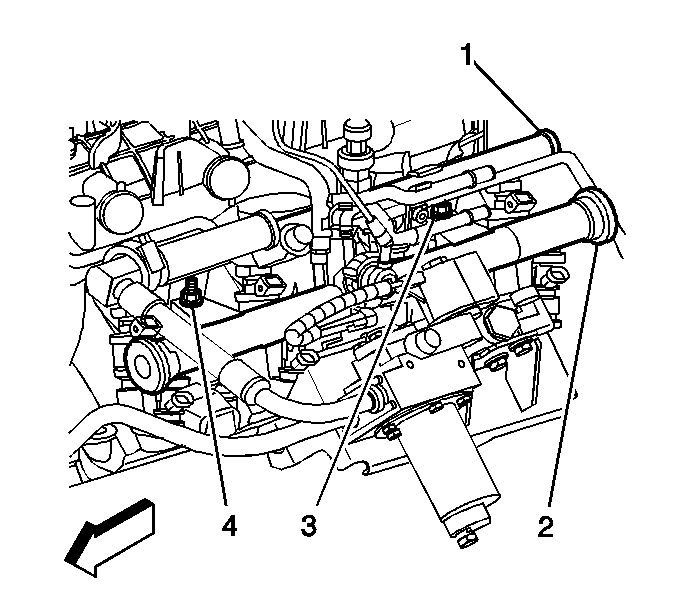
- Disconnect the fuel feed and return pipes (1, 2) from the fuel rail.
- Disconnect the fuel pressure regulator vacuum line.
- Loosen the crossover tube (3) to right fuel rail retainer screw.
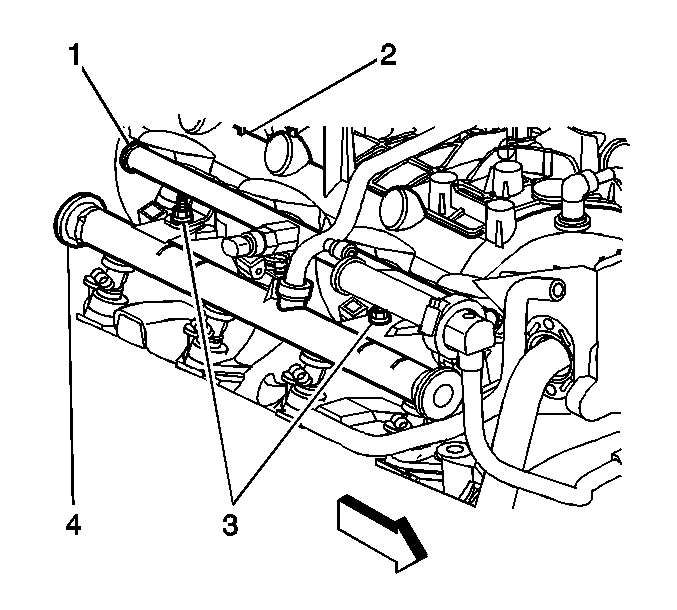
- Remove the left fuel rail attaching bolts (3, 4).
- Remove the right fuel rail attaching bolts (3).
- Remove the gasoline and CNG fuel rails (1,8,4,5) as an assembly.
Caution: Natural gas is highly flammable. In order to reduce the risk of fire and personal injury, keep sparks, flames, and smoking materials away from the vehicle while you perform the Compressed Natural Gas (CNG) fuel system service.
Caution: The Compressed Natural Gas (CNG) system operates at pressures up to 24820 kpa (3600 psi). Relieve the CNG fuel system pressure before servicing CNG fuel system components in order to reduce the risk of fire and personal injury.
Important: Indentify the injector connectors to their corresponding engine cylinder to ensure correct sequential injector firing order after reassembly.
Important: Identify the connectors to their corresponding gasoline injectors to ensure correct sequential injector firing order after reassembly.
Notice:
• Remove the fuel rail assembly carefully in order to prevent damage
to the injector electrical connector terminals and the injector spray tips.
Support the fuel rail after the fuel rail is removed in order to avoid damaging
the fuel rail components. • Cap the fittings and plug the holes when servicing the fuel system
in order to prevent dirt and other contaminants from entering open pipes and
passages.

Dissassembly Procedure
- Remove the crossover tube (3) rail retainer screws.
- Remove the crossover tube.
- Remove the CNG injectors (7) from the gasoline fuel injector adapters (6).
- Seperate the CNG fuel rail from the gasoline fuel rail.
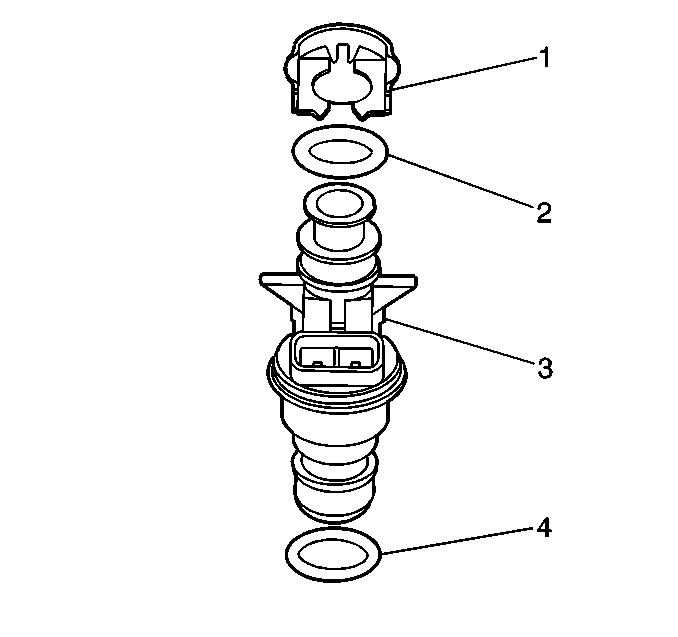
- Remove the fuel injector retaining clip.
- Remove the injector from the fuel rail with a pulling and twisting motion.
- Remove the fuel injector adaptor (6) from the gasoline fuel injector.
- Repeat steps 5, 6 and 7 for the remaining fuel injectors.
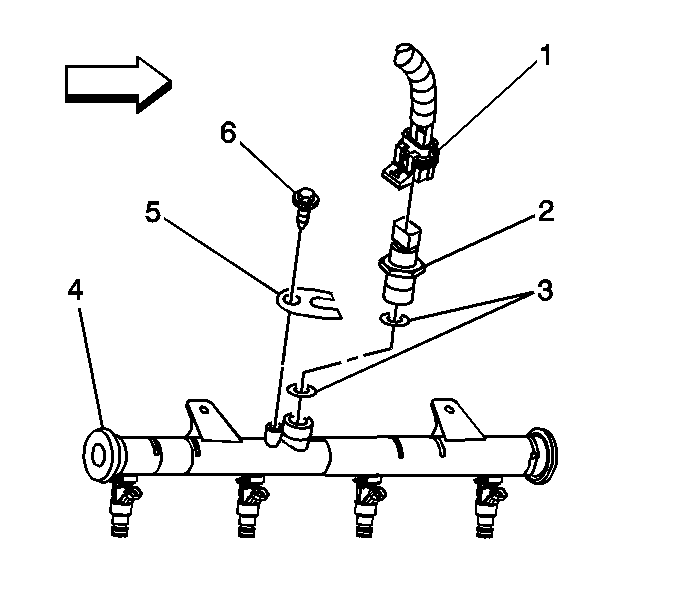
- Remove the CNG fuel rail pressure sensor or the temperature sensor hold down bolt (6).
- Remove the sensor (2) from the fuel rail (4).
- Remove and discard any remaining O-rings from the fuel rail.
Assembly Procedure
- Install the CNG fuel rail pressure sensor or the temperature sensor (2) into the fuel rail (4) with new O-rings (3). Lubricate the new O-rings with petroleum jelly.
- Install the fuel rail pressure sensor or the temperature sensor hold down (5) and bolt (6).
- Install the CNG fuel injector (5) into the fuel rail (3, 4) with a new O-ring. Lubricate the new O-ring with petroleum jelly.
- Install the fuel injector retainer clip.
- Lubricate the new injector tip O-ring with clean engine oil.
- Repeat steps 3, 4 and 5 for the remaining CNG fuel injectors.
- Lubricate the new lower injector O-ring seals (4) with clean engine oil.
- Install the new O-ring seals (4) on the spray tip end of each fuel injector (3).
- Install the gasoline fuel injector into the fuel rail.
- Install the fuel injector retainer clip.
- Install the CNG fuel injector adapter to the end of the injector.
- Repeat steps 7, 8, 9, 10 and 11 for the remaining injectors.
- Assemble the CNG fuel rail (1, 4) injectors into the CNG fuel injector adapters (6).
- Install new O-rings on the crossover tube (25).
- Lubricate the new O-rings with clean engine oil.
- Install the crossover tube (25) into the fuel rails (14, 15).
- Loosely install the crossover tube fuel rail retainers (5, 21).
Caution: Natural gas is stored under high pressure. If a leak occurs, the high pressure could cause a personal injury. In order to prevent Compressed Natural Gas (CNG) fuel leaks, always replace the CNG fuel system O-rings during service.
Notice: Use the correct fastener in the correct location. Replacement fasteners must be the correct part number for that application. Fasteners requiring replacement or fasteners requiring the use of thread locking compound or sealant are identified in the service procedure. Do not use paints, lubricants, or corrosion inhibitors on fasteners or fastener joint surfaces unless specified. These coatings affect fastener torque and joint clamping force and may damage the fastener. Use the correct tightening sequence and specifications when installing fasteners in order to avoid damage to parts and systems.
Tighten
Tighten the bolt to 3.8 N·m (34 lb in).
Installation Procedure
- Install the fuel rail assembly into the intake manifold.
- Apply a 5 mm (0.020 in) band of GM P/N 1234382 threadlock, or equivalent, to the threads of all of the fuel rail attaching bolts.
- Install the right fuel rail attaching bolts (3).
- Install the left fuel rail attaching bolts (3, 4).
- Tighten the gasoline crossover pipe retainer.
- Connect the fuel injector electrical connectors to the corresponding engine cylinder injector for both gasoline and CNG.
- Connect the CNG fuel rail pressure sensor and temperature sensor electrical connectors.
- Connect the fuel pressure regulator vacuum line.
- Connect the gasoline fuel feed and return pipes (1, 2) to the fuel rail.
- Install the CNG fuel lines (5, 8) into the fuel rails (1, 10) with new O-rings. Lubricate the O-rings with petroleum jelly.
- Install the fuel line to rail retainers (7) and clamps (9).
- Position the upper engine wire harness in place.
- Connect the EVAP purge solenoid connector.
- Install the retainer nut to the upper engine wire harness.
- Connect the accelerator control cable and the cruise control cable to the throttle body (if equipped).
- Connect the accelerator control cable and the cruise control cable to the cable bracket (if equipped).
- Install the negative battery cable. Refer to Battery Negative Cable Disconnection and Connection in Engine Electrical in the C/K Pickup service manual.
- Start the vehicle and inspect for CNG fuel leaks at the serviced fittings with the J 45878 or an equivalent leak detector.
- With a scan tool command a switch-over to gasoline and inspect for gasoline fuel leaks.
- Install the engine sight shield. Refer to Upper Intake Manifold Sight Shield Replacement in Engine Mechanical in the C/K Pickup service manual.
Notice: Use the correct fastener in the correct location. Replacement fasteners must be the correct part number for that application. Fasteners requiring replacement or fasteners requiring the use of thread locking compound or sealant are identified in the service procedure. Do not use paints, lubricants, or corrosion inhibitors on fasteners or fastener joint surfaces unless specified. These coatings affect fastener torque and joint clamping force and may damage the fastener. Use the correct tightening sequence and specifications when installing fasteners in order to avoid damage to parts and systems.
Tighten
Tighten the bolts to 10 N·m (89 lb in).
Tighten
Tighten the bolts to 10 N·m (89 lb in).
Tighten
Tighten the screws to 3.8 N·m (34 lb in).
Tighten
Tighten the clamps to 2 N·m (18 lb in).
Tighten
Tighten the nut to 5.5 N·m (49 lb in).
