GRILLE MOUNTING TABS BREAK (APPLY SEALER TO BOLTS)

SUBJECT: LH GRILLE MOUNTING TABS BREAK (APPLY SEALER TO BOLT)
MODELS: 1991 AND PRIOR G-VANS
Some 1991 and prior model year G1, G2, and G3 vans may experience cracking of the upper left grille mounting tab. Investigation has shown that the primary cause can be attributed to brake fluid contamination at the mounting tab.
The master cylinder provides a drip path to the radiator tie bar, which is in close proximity to the upper left grille tab mount. A recess in the radiator tie bar allows any spilled brake fluid to accumulate and drip through the fastener hole onto the grille tab.
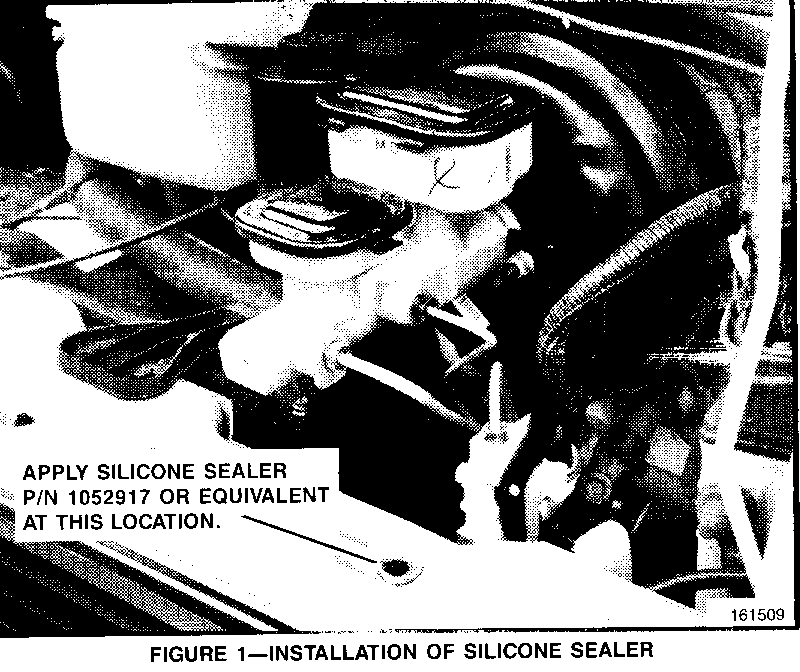
This causes the grille material to deteriorate and may result in a broken mounting tab at this location. To correct this condition it is necessary to remove the upper left tab mounting screw and apply a small quantity of silicone sealer (P/N 1052917) or equivalent under the washer. A new screw, with the sealer already installed, has been released for 1992 production. This will prevent brake fluid from dripping down onto the grille mounting attachment (figure 1). The sealer should also be applied when any G-van comes in for brake service.
If the mounting tab is found to be broken, the complete grille assembly will have to be replaced, and sealer must be added to the upper left tab mounting screw.
The service technician should always be careful to fill the master cylinder according to specifications and avoid spillage. In the event of brake fluid spillage, thoroughly clean the tie bar. See section 5A of the G-van service manual for on-vehicle brake service.
Notice: Brake fluid can damage electrical connections and painted surfaces. Use shop cloths, suitable containers, and fender covers to prevent brake fluid from contacting these areas. Always reseal and wipe off brake fluid containers to prevent spills.
SERVICE PROCEDURE:
To install silicone sealant: 1. Remove upper left tab mounting screw. 2. Apply silicone sealer (P/N 1052917) or equivalent to mounting screw (figure 1). 3. Reinstall tab mounting screw. Torque to 27 N-m (20 lbs. ft.).
To remove and install grille assembly:
1. Raise and support the hood. 2. Remove negative battery cable. 3. Remove headlamp bezels. 4. Remove radiator tie bar to grille bolts. 5. Remove grille to lower front end panel bolts. 6. Remove grille from vehicle. 7. Clean the top and bottom surface of the tie bar below the master cylinder to remove any accumulated brake fluid. 8. Install new grille (see Service Parts Information below for part numbers). 9. Install grille to lower front end panel bolts. Torque bolts to 27 N-m (20 lbs. ft.). 10. Install radiator tie bar grille bolts. Torque to 27 N-m (20 lbs. ft.). 11. Apply silicone sealant to upper left tab mounting screw. 12. Install headlamp bezels. 13. Connect negative battery cable. 14. Lower hood.
SERVICE PARTS INFORMATION
Part Description Number Qty. ------------------------------ ------- ----- Sealer, Silicone (2.8 oz. Tube) 1052917 1 Grille, Radiator (1985 - 1991 GMC) 15553637 1 Grey
Note: see the appropriate parts catalog for grille part numbers prior to 1985.
Parts are currently available from GMSPO.
WARRANTY INFORMATION
For vehicles repaired under warranty, use:
Description Labor Labor Time Operation ------------ --------- ------------- Grille Assy. B1308 * Replace
* For vehicles that require a complete grille replacement, see the Labor Time Guide for appropriate labor time.
* If only sealer was installed Labor Time = 0.1 hrs.

General Motors bulletins are intended for use by professional technicians, not a "do-it-yourselfer". They are written to inform those technicians of conditions that may occur on some vehicles, or to provide information that could assist in the proper service of a vehicle. Properly trained technicians have the equipment, tools, safety instructions and know-how to do a job properly and safely. If a condition is described, do not assume that the bulletin applies to your vehicle, or that your vehicle will have that condition. See a General Motors dealer servicing your brand of General Motors vehicle for information on whether your vehicle may benefit from the information.
