Notice: Failure to flush out the oil cooling system or the engine cooling system
may result in premature failure of the replacement engine.
If the engine is damaged internally and a new engine is installed, make
sure that all foreign material is completely flushed out of the cooling system.
The oil cooler system should also be flushed out (if equipped).
- Disconnect the negative battery cable. Refer to
Caution: Unless directed otherwise, the ignition and start switch must be in the OFF or LOCK position, and all electrical loads must be OFF before servicing
any electrical component. Disconnect the negative battery cable to prevent an electrical spark should a tool or equipment come in contact with an exposed electrical terminal. Failure to follow these precautions may result in personal injury and/or damage to
the vehicle or its components.
in General Information.
- Drain the cooling system. Refer to Draining and Filling the Cooling
System in Cooling and Radiator.
- Remove the engine cover. Refer to Engine Cover Replacement in
Interior Trim.
- Remove the engine coolant reservoir. Refer to Coolant Reservoir
Replacement in Engine Cooling.
- Remove the air cleaner assembly and duct. Refer to Air Cleaner (Assembly)
.
- Remove the grill assembly. Refer to Grill Replacement in Sheet
Metal.
- Remove the radiator support assembly. Refer to Radiator Support
Replacement in Sheet Metal.
- The radiator support assembly will include:
| • | A/C condenser (if equipped). Evacuate the A/C system. Refer to
Heater, Ventilation, and Air Conditioning. |
- Remove the front bumper. Refer to Front Bumper Replacement in
Frame and Bumpers.
- Remove the engine cooling fan. Refer to Engine Cooling Fan Replacement
in Cooling and Radiator.
- Remove the heater hoses at the engine.
- Remove the engine wiring harness and connectors.
- Remove the accelerator and cruise control cables (if equipped).
Refer to Accelerator Controls (Cable)
in
Engine Controls.
- Remove the A/C compressor and bracket (if used). Refer to Heater,
Ventilation, and Air Conditioning.
- Remove the generator and bracket. Refer to Charging System.
- Remove the intake manifold. Refer to
Intake Manifold Replacement
.
- Remove the fuel lines and the bracket at the rear of the engine.
- Remove the transmission oil level indicator tube.
- Remove the transmission shift cable connector.
- Remove the exhaust pipes from the manifolds. Refer to Exhaust
Pipe Replacement in Exhaust System.
- Remove the starter. Refer to Starter Replacement in Engine Electrical.
- Remove the starter opening shield.
- Remove the torque converter from the flywheel.
- Remove the transmission oil cooler lines from the transmission.
- Remove the transmission to engine bolts.
- Lower the vehicle.

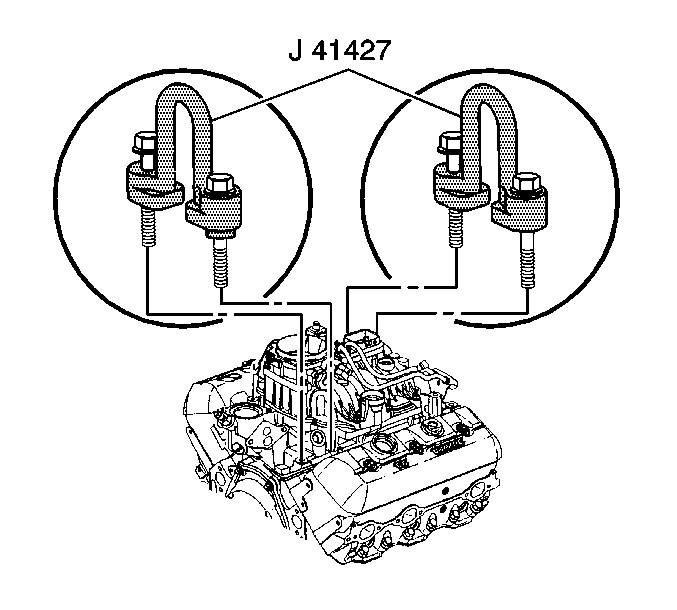
- Install the J 41427
using
the following procedure:
| 27.1. | Disconnect the spark plug wires. Refer to Spark Plug Wiring and
Boots in Ignition System. |
| 27.2. | Remove the distributor cap. Refer to Distributor Disassembly in
Distributor. |
| 27.3. | Remove the two right rear lower intake manifold bolts. |
| 27.4. | Install the J 41427
marked RIGHT REAR. |
| 27.5. | Install the retaining bolts. |
Tighten
Tighten the retaining bolts to 15 N·m (11 lb ft).
Notice: Use the correct fastener in the correct location. Replacement fasteners
must be the correct part number for that application. Fasteners requiring
replacement or fasteners requiring the use of thread locking compound or sealant
are identified in the service procedure. Do not use paints, lubricants, or
corrosion inhibitors on fasteners or fastener joint surfaces unless specified.
These coatings affect fastener torque and joint clamping force and may damage
the fastener. Use the correct tightening sequence and specifications when
installing fasteners in order to avoid damage to parts and systems.
| 27.6. | Remove the air conditioning compressor and the accessory drive
bracket. Refer to A/C Compressor Replacement in Heater, Ventilation, and Air
Conditioning. |
| 27.7. | Disconnect the EGR tube from the intake manifold. |
| 27.8. | Remove the two left front lower intake manifold bolts. |
| 27.9. | Install the J 41427
marked LEFT FRONT with the arrow pointing to the front of the engine. |
| 27.10. | Install the retaining bolts |
Tighten
Tighten the retaining bolts to 15 N·m (11 lb ft).
- Remove the engine mounting through bolts.
- Remove the mounts from the engine and the frame. Refer to
Engine Mount Replacement
.
- Remove the engine from the vehicle.


