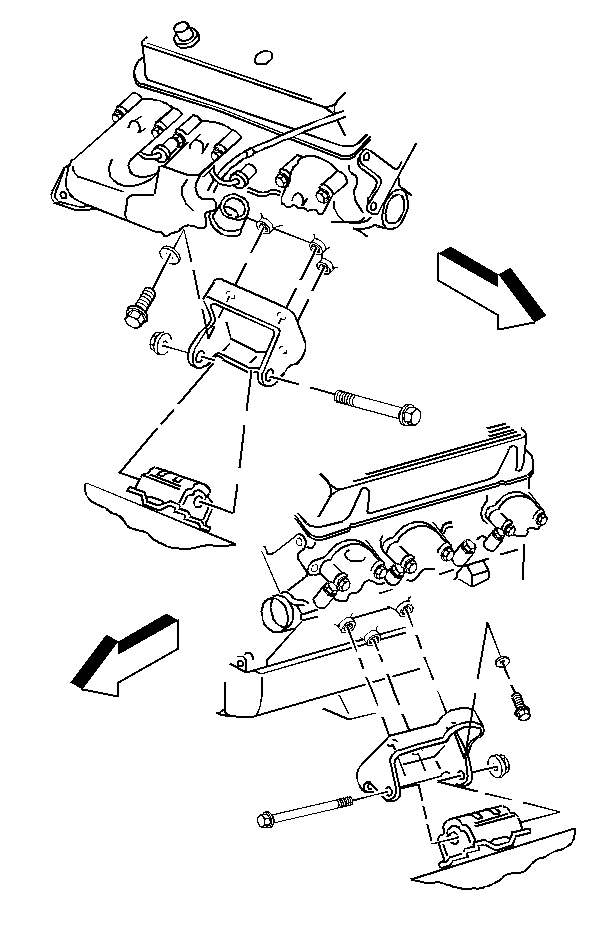
Removal Procedure
The 4.3L engine uses hollow, Loctite® coated engine mount bolts in order to retain the engine mount bracket to the engine block. The purpose of these hollow bolts is to allow the engine assembly to break free of its mounts in a very extreme frontal collision situation.
Important: If the vehicle has been in a collision, inspect the hollow mount bolts for signs of cracking or sheering.
Important: Do not reuse hollow engine mount bolts. They are coated with Loctite® and must be replaced when removed for any reason.
- Support the engine with a suitable lifting fixture, such as a cherry picker. Do not load the engine mounting.
- Remove the engine mounting through-bolt and nut.
- Raise the engine only enough to permit removal of the engine mounting bracket.
- Check for interference between the rear of the engine and the dash panel.
- Remove the engine mounting bracket hollow bolts and the washers.
- Remove the engine mounting bracket.
- Remove the engine mounting bracket bolts and the washers.
Notice: Do not use air tools to remove the hollow engine mount bracket bolts. This will snap the bolt head off, requiring removal of the thread portion of the bolt from the engine block. If necessary, heat may be used to soften the loctite.

Notice: Do not use air tools to install the hollow engine mount bracket bolts. This will damage the bolts.
Installation Procedure
The 4.3L engine uses hollow, Loctite® coated engine mount bolts in order to retain the engine mount bracket to the engine block. The purpose of these hollow bolts is to allow the engine assembly to break free of its mounts in a very extreme frontal collision situation.
Important: Vehicles that have been in a collision should have their hollow mount bolts inspected for signs of cracking or sheering.
Important: Do not reuse hollow engine mount bolts. They are coated with Loctite® and must be replaced when removed for any reason.
- Install the engine mounting bracket.
- Install the engine mounting bracket, hollow bolts and the washers.
- Tighten the hollow bolts initially in a clockwise sequence to 10 N·m (7 lb ft).
- Tighten the hollow bolts thereafter in a clockwise sequence in 7 N·m (5 lb ft). increments until a final torque of 38 N·m (28 lb ft) is reached.
- Lower the engine until the engine mounting through-bolt can be inserted. Install the through-bolt.
- Install the nut.

Notice: Do not use air tools to install the hollow engine mount bracket bolts. This will damage the bolts.
Important: The hollow engine mount bracket bolts are pre-coated with Loctite®. Do the tightening sequence quickly (within 10 minutes) so the Loctite® will be effective. Do not retighten after the tightening sequence is complete. Retightening would cause the Loctite® to be ineffective.
Tighten
Notice: Use the correct fastener in the correct location. Replacement fasteners must be the correct part number for that application. Fasteners requiring replacement or fasteners requiring the use of thread locking compound or sealant are identified in the service procedure. Do not use paints, lubricants, or corrosion inhibitors on fasteners or fastener joint surfaces unless specified. These coatings affect fastener torque and joint clamping force and may damage the fastener. Use the correct tightening sequence and specifications when installing fasteners in order to avoid damage to parts and systems.
Tighten
| • | Tighten the through-bolt to 100 N·m (74 lb ft). |
| • | Tighten the nut to 68 N·m (50 lb ft). |
