Seat Cushion Trim Cover and Pad Replacement Bucket
Removal Procedure
- Remove the seat from the vehicle. Refer to Front Seat Replacement - Bucket .
- Lift the lower seatback cover.
- Remove the power seat adjuster switch, if equipped. Refer to Power Seat Adjuster .
- Remove the recliner release handle. Refer to Driver Seat and Passenger Seat Recliner Handle Replacement .
- Disconnect electrical connectors, if equipped.
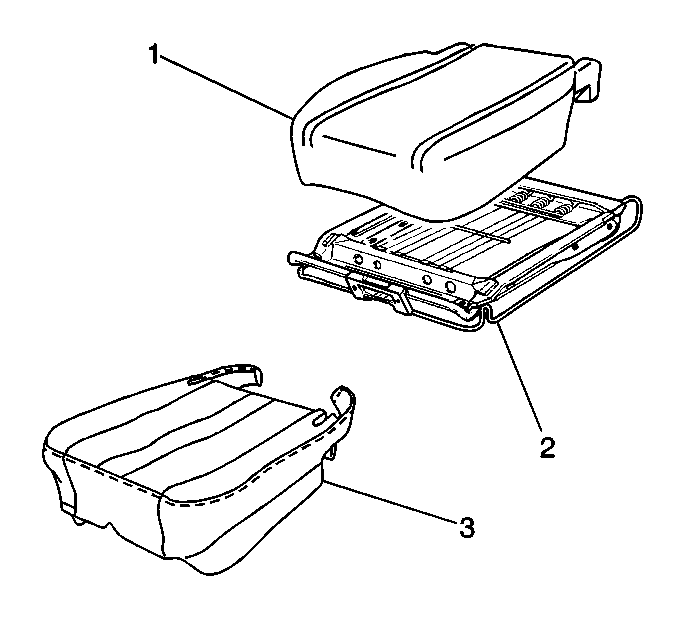
- Release the seat cushion cover (3) retainers from the seat frame (2).
- Remove the seat cushion cover (3) from the foam pad (1).

Installation Procedure
- Install the seat cushion cover (3) to the foam pad (1).
- Engage the hook and loop strips retaining the seat cushion cover (3) to the seat cushion foam pad.
- Install the seat cushion cover retainers to the seat cushion frame (2).
- Connect the electrical connectors, if equipped.
- Install the recliner handle. Refer to Driver Seat and Passenger Seat Recliner Handle Replacement .
- Install the power seat adjuster switch, if equipped. Refer to Power Seat Adjuster .
- Secure the lower seatback cover.
- Install the seat from the vehicle. Refer to Front Seat Replacement - Bucket .

Seat Cushion Trim Cover and Pad Replacement Split Bench
Removal Procedure
- Remove the recliner handle. Refer to Driver Seat and Passenger Seat Recliner Handle Replacement
- Remove the power seat adjuster switch, if equipped. Refer to Front Seat Adjuster Replacement
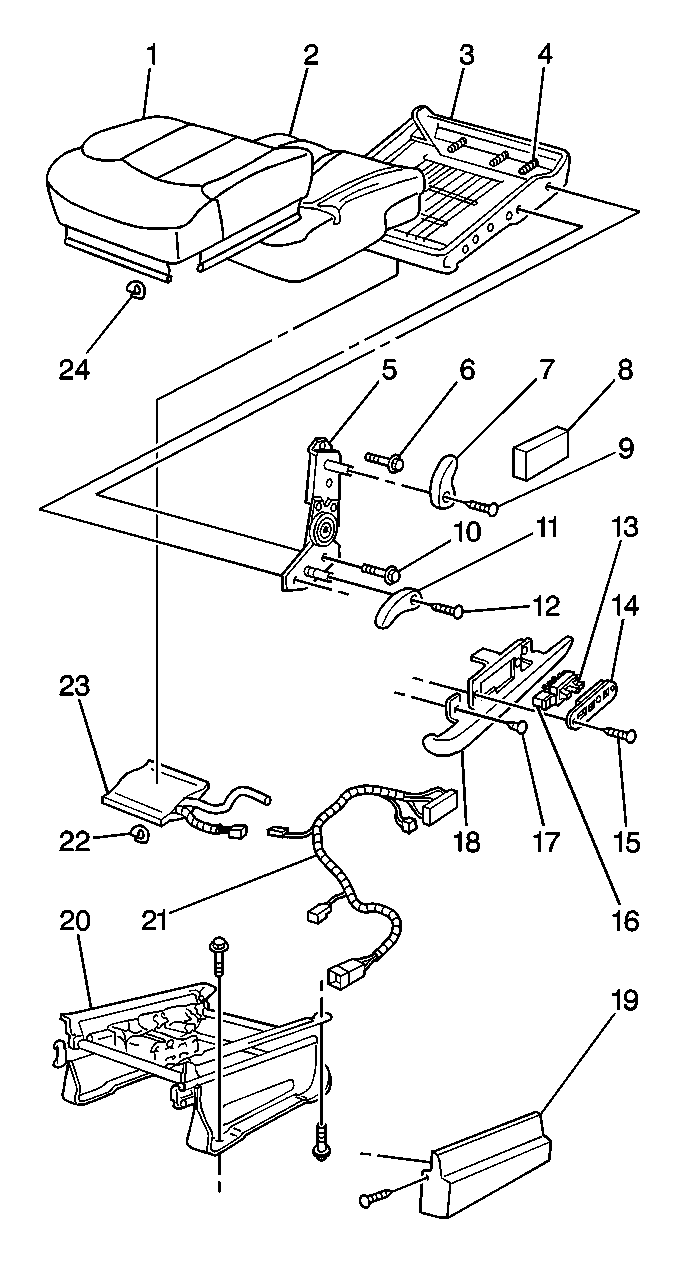
- Release the seat cushion cover retainers (24) from the seat frame (3).
- Release the hook and loop strips retaining the seat cushion cover (1) to the seat cushion foam pad (2).
- Remove the seat cushion cover (1) from the foam pad (2).

Installation Procedure
- Install the seat cushion cover (1) to the foam pad (2).
- Engage the hook and loop strips retaining the seat cushion cover to the seat cushion foam pad.
- Install the seat cushion cover retainers (24) to the seat cushion frame (3).
- Install the power seat adjuster switch, if equipped. Refer to Front Seat Adjuster Replacement .
- Install the recliner handle. Refer to Driver Seat and Passenger Seat Recliner Handle Replacement .

Seat Cushion Trim Cover and Pad Replacement Bench Seat
Removal Procedure
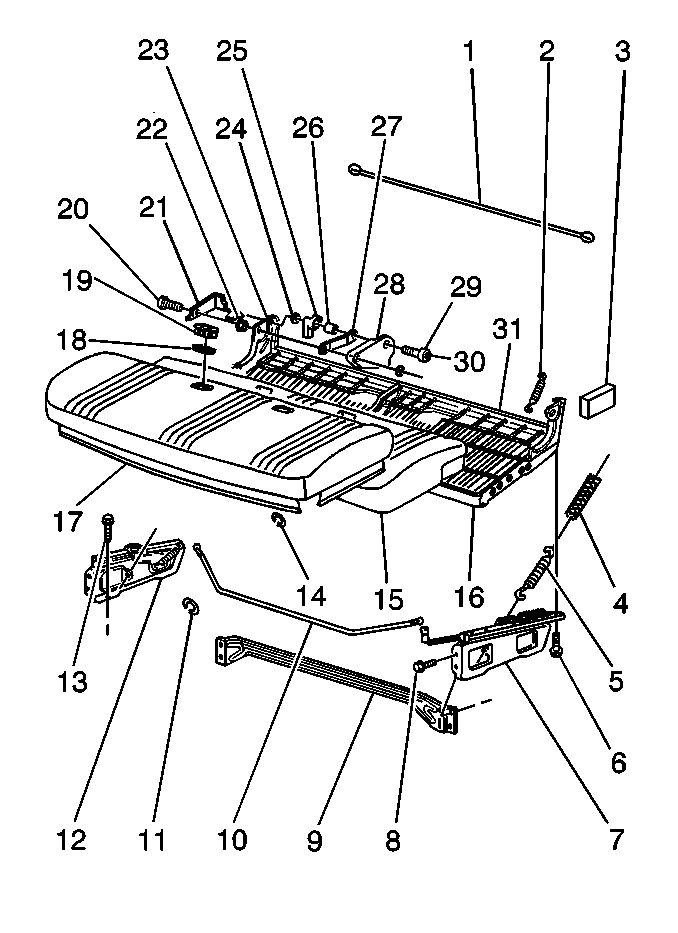
- Remove the seat retaining bolts (13).
- Remove the right and left seat belt bolts from the floor.
- Pull the seat belts through the seat.
- Remove the seat from the vehicle.
- Remove the bolts (6) and seat riser (7) from the seat.
- Remove the push pins and rods from the seat material and frame.
- Release the springs from the bottom of the seat adjuster.
- Remove the bolts and trim from the sides of the seat.
- Remove the seat back frame from the seat frame.
- Remove the seat cover (17) from the seat.
- Remove the foam pad (15) from the seat.

Installation Procedure
- Install the foam pad (15) to the seat.
- Install the seat cover (17) to the seat.
- Install the seat back frame to the seat frame.
- Install the bolts and trim to the sides of the seat.
- Install the springs to the bottom of the seat adjuster.
- Install the push pins and rods to the seat material and frame.
- Install the bolts (6) and seat riser (7) to the seat.
- Install the seat belts through the seat.
- Install the seat to the vehicle.
- Install the right and left seat belt bolts to the floor.
- Install the seat retaining bolts (13).

Notice: Use the correct fastener in the correct location. Replacement fasteners must be the correct part number for that application. Fasteners requiring replacement or fasteners requiring the use of thread locking compound or sealant are identified in the service procedure. Do not use paints, lubricants, or corrosion inhibitors on fasteners or fastener joint surfaces unless specified. These coatings affect fastener torque and joint clamping force and may damage the fastener. Use the correct tightening sequence and specifications when installing fasteners in order to avoid damage to parts and systems.
Tighten
Tighten the bolts to 55 N·m (41 lb ft).
Tighten
Tighten the bolts to 55 N·m (41 lb ft).
Seat Cushion Trim Cover and Pad Replacement Luxury, Limited-Z-71 Tahoe
Removal Procedure
- Remove the seat. Refer to Front Seat Replacement - Bucket
- Remove the 6-way power seat switch panel (14) and screws.
- Remove the recliner release handle (11).
- Remove the power seat track.
- Disconnect the seat heater electrical connector.
- Remove the seat cushion cover (1).
- Remove the seat cushion (2).

Lift the lower edge of the seatback cover to access the recliner bolts and hinge.
Installation Procedure
- Install the seat cushion (2).
- Install the seat cushion cover (1).
- Connect the seat heater electrical connector.
- Install the power seat track.
- Install the recliner release handle (11).
- Install the 6-way power seat switch panel (14) and screws.
- Install the seat to the vehicle. Refer to Front Seat Replacement - Bucket

