Removal Procedure
- Drain the coolant. Refer to Cooling System Draining and Filling in Engine Cooling.
- Remove the instrument panel storage compartment. Refer to Instrument Panel Storage Compartment Replacement in Instrument Panel, Gauges and Console.
- Disconnect the electrical connectors, as necessary.
- Remove the center floor air distribution duct.
- Remove the hinge pillar trim panels. Refer to Body Hinge Pillar Trim Panel Replacement in Interior Trim.
- Remove the blower motor cover.
- Remove the blower motor. Refer to Blower Motor and Fan Replacement .
- Remove the steering column. Refer to Steering Column Replacement in Steering Wheel and Column -- Standard or Steering Column Replacement in Steering Wheel and Column-Tilt.
- Roll back the instrument panel. Refer to Instrument Panel Assembly Replacement in Instrument Panel, Gauges and Console.
- Remove the coolant recovery reservoir. Refer to Coolant Recovery Reservoir Replacement in Engine Cooling.
- Remove the heater hoses. Refer to Heater Hoses Replacement .
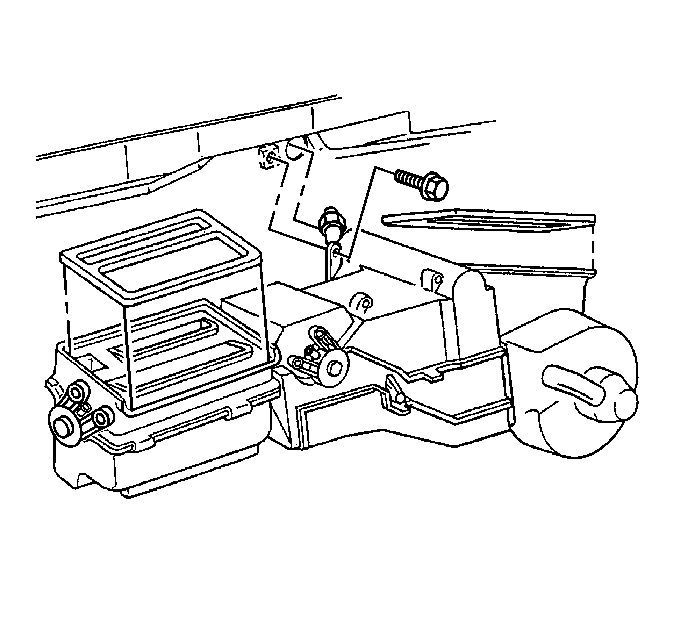
- While holding the heater case to the cowl, remove the screw on the interior side of the cowl, near the evaporator pipe, if equipped.
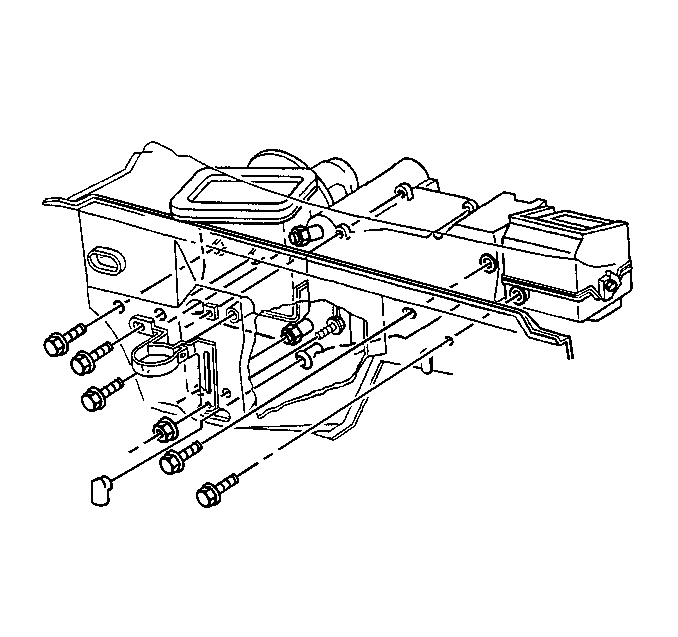
- On the engine side of the cowl, remove the 4 screws that hold the heater case to the cowl.
- On the engine side of the cowl, remove the 2 nuts that hold the heater case to the cowl.
- Remove the heater case.
- Remove the 7 screws that hold the heater cover to the heater case.
- Remove the heater cover.
- Remove the heater core from the retainer.


Ask an assistant for help, if necessary.

Installation Procedure
- Install the heater core into the retainer.
- Install the 7 screws that hold the heater cover to the heater case. Replace the seals.
- Install the heater cover.
- Install the heater case.
- On the engine side of the cowl, install the nuts that hold the heater case to the cowl.
- On the engine side of the cowl, install the 4 screws that hold the heater case to the cowl.
- On the interior side of the cowl, install the screw.
- Tighten the following fasteners:
- Install the heater hoses. Refer to Heater Hoses Replacement .
- Install the coolant recovery reservoir. Refer to Coolant Recovery Reservoir Replacement in Engine Cooling.
- Roll forward the instrument panel. Refer to Instrument Panel Assembly Replacement in Instrument Panel, Gauges and Console.
- Install the steering column. Refer to Steering Column Replacement in Steering Wheel and Column -- Standard or Steering Column Replacement in Steering Wheel and Column-Tilt.
- Install the blower motor. Refer to Blower Motor and Fan Replacement .
- Install the blower motor cover.
- Install the hinge pillar trim panels. Refer to Body Hinge Pillar Trim Panel Replacement in Interior Trim.
- Install the center floor air distribution duct.
- Connect the electrical connectors, as necessary.
- Install the instrument panel storage compartment. Refer to Instrument Panel Storage Compartment Replacement in Instrument Panel, Gauges and Console.
- Add the engine coolant. Refer to Cooling System Draining and Filling in Engine Cooling.
- Inspect the system for leaks.

Verify that the heater cover is properly sealed.
If necessary, ask an assistant for help.


Notice: Use the correct fastener in the correct location. Replacement fasteners must be the correct part number for that application. Fasteners requiring replacement or fasteners requiring the use of thread locking compound or sealant are identified in the service procedure. Do not use paints, lubricants, or corrosion inhibitors on fasteners or fastener joint surfaces unless specified. These coatings affect fastener torque and joint clamping force and may damage the fastener. Use the correct tightening sequence and specifications when installing fasteners in order to avoid damage to parts and systems.
Tighten
| • | Tighten the screws on the engine side of the cowl to 1.9 N·m (17 lb in). |
| • | Tighten the two nuts to 2.8 N·m (25 lb in). |
| • | Tighten the screw on the interior side of the cowl to 11 N·m (97 lb in). |
