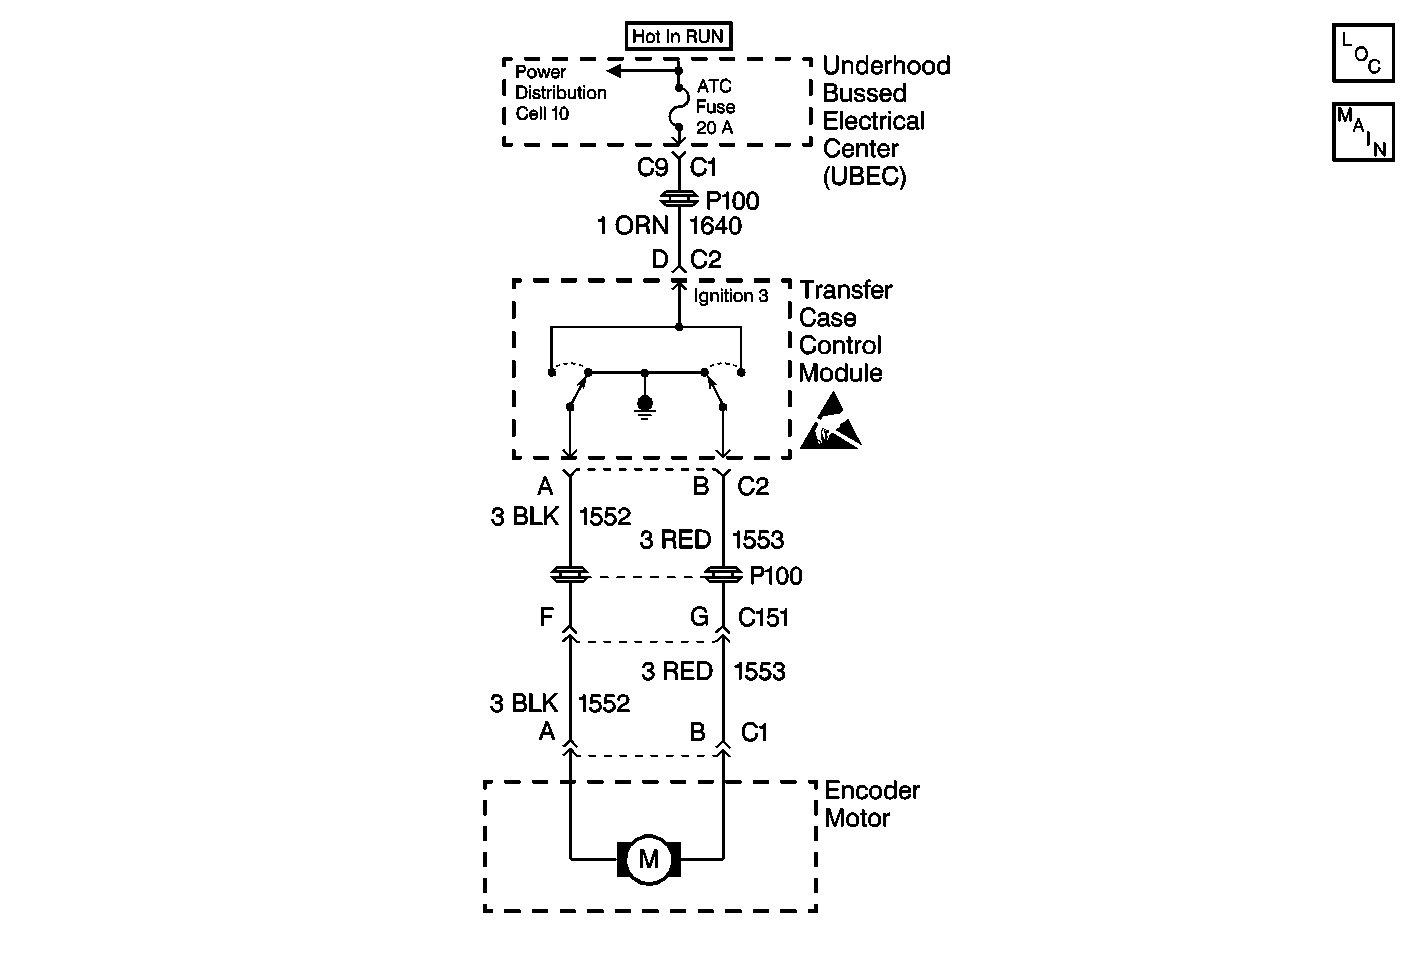
Circuit Description
The Transfer Case Motor is a bi-directional, permanent magnet, D.C motor. When energized, (through circuits 1552, 1553 , and the ground circuit 150, the module utilize for motor control), the motor, through a series of gears, rotates a shaft which moves the mode and range forks to shift the Transfer Case between 4H, AUTO (Adapt), 2H, N, and 4L ranges.
This DTC detects an open on circuits 1552 and 1553, or an open motor.
Conditions for Setting the DTC
| • | The system will test the motor circuits by checking for unwanted voltage. |
| • | Then, the system supplies voltage on each of the motor circuits and reads the voltage back on the other circuit. |
| • | If the system detects a problem with the circuits, the DTC is logged. The Auto Transfer Case (ATC) Control Module senses a low voltage return on circuits 1552 or 1553 when a high voltage is expected. |
Action Taken When the DTC Sets
| • | All shifting will be disabled. |
| • | The SERVICE indicator (4WD/AWD) lamp will be latched on for the remainder of the current ignition cycle. |
Conditions for Clearing the DTC
| • | The Auto Transfer Case (ATC) Control Module will clear the DTC if the condition for setting the DTC no longer exists. |
| • | A history DTC will clear after 100 consecutive ignition cycles without a fault present. |
| • | History DTCs can be cleared using a scan tool. |
Test Description
The number(s) below refer to the step number(s) on the diagnostic table.
Step | Action | Value(s) | Yes | No |
|---|---|---|---|---|
1 | Was the Transfer Case Diagnostic System Check performed? | -- | Go to Step 2 | |
2 |
Are the terminals damaged or corroded? | -- | Go to Step 8 | Go to Step 3 |
3 | Test the resistance across the motor. Were the resistance values within the specified range? | 0.5-35 ohms | Go to Step 4 | Go to Step 7 |
Is the resistance measured within the specified values? | 0-2 ohms | Go to Step 5 | Go to Step 9 | |
Measure the resistance between the transfer case shift control module harness connector C2 terminal B and the encoder motor harness connector terminal B. Is the resistance measured within the specified values? | 0-2 ohms | Go to Step 6 | Go to Step 10 | |
6 | Replace the transfer case shift control module . Refer to Transfer Case Shift Control Module Replacement . Is the repair complete? | -- | Go to Step 11 | -- |
7 | Replace the transfer case encoder motor. Refer to Motor/Encoder Replacement . Are the repairs complete? | -- | Go to Step 11 | -- |
8 | Repair the harness connector. Refer to Connector Repairs in Wiring Systems. Are the repairs complete? | -- | Go to Step 11 | -- |
9 | Repair open in CKT 1552. Refer to Wiring Repairs in Wiring Systems. Are the repairs complete? | -- | Go to Step 11 | -- |
10 | Repair open in CKT 1553. Refer to Wiring Repairs in Wiring Systems. Are the repairs complete? | -- | Go to Step 11 | -- |
11 |
Have all the ATC components been reconnected and properly mounted? | -- | Go to Step 12 | -- |
12 | Clear all ATC DTCs. Have all the ATC DTCs been cleared? | -- | -- |
