Front Door Rattle Upon Closing (Replace Door Window Regulator Bolts)

| Subject: | Front Door Rattle Upon Closing (Replace Door Window Regulator Bolts) |
| Models: | 1999-2000 Chevrolet and GMC C/K Pickup Models (Silverado and Sierra) |
| Built Prior to the following VIN Breakpoints: |
Plant | VIN Breakpoint |
|---|---|
Fort Wayne, IN | YZ150388 |
Pontiac East, MI | YE153092 |
Oshawa, ON | Y1137638 |
Condition
Some owners may comment on a rattle noise when closing either of the front doors. This noise may be more noticeable when the window is in the down position.
Cause
Loose door window regulator bolts may cause this condition.
Correction
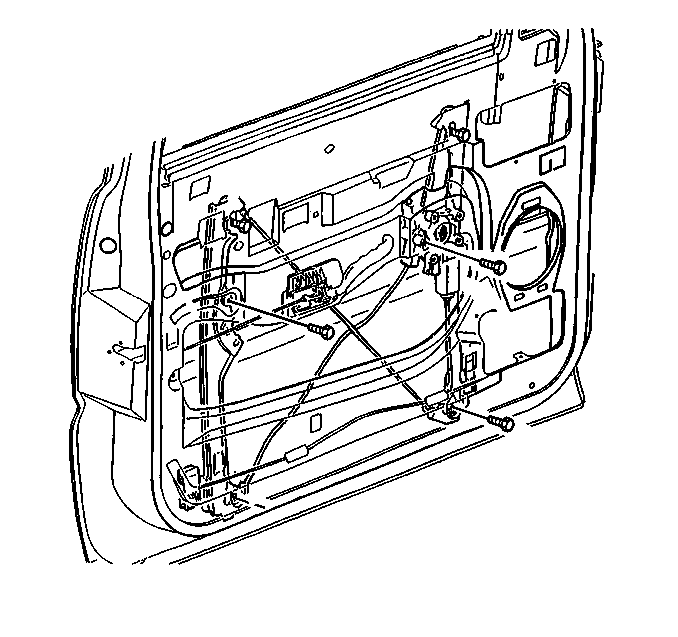
A revised door window regulator bolt has been developed to correct this condition. This new bolt features a thicker washer that should reduce bending during tightening. A new adhesive patch has also been added to the bolt threads to prevent loosening. Replace the door window regulator bolts (quantity of 6) on affected vehicles. Use the following procedure and the part number listed below.
- Raise the window glass. Support the glass.
- Remove the door handle bezel.
- Remove the window regulator handle (manual windows only).
- Remove the power accessory switch panel.
- Remove the trim panel screws.
- Remove the trim panel upper extension by unsnapping the extension from the door.
- Remove the trim panel from the door. Carefully slide the trim panel up in order to release the panel from the retainers.
- Disconnect the courtesy light connector, if necessary.
- Remove the water deflector by separating the deflector from the door. Pressure sensitive adhesive is used on the deflector.
- Remove the window regulator attaching bolts (quantity of 6). Do not remove the bolts (quantity of 2) that clamp the regulator to the glass. These bolts do not get replaced as part of this bulletin.
- Install the new regulator attaching bolts (quantity of 6).
- Attach the water deflector to the door. If necessary, use waterproof tape, or 3M™ 777, or equivalent, to attach the water deflector to the door.
- Connect the courtesy light connector, if disconnected.
- Install the door trim panel by carefully aligning and sliding the panel down into the retainers.
- Install the window regulator handle (manual windows only).
- Install the trim panel screws.
- Install the power accessory switch panel if necessary.
- Install the upper trim panel extension by pushing the extension into place on the door.
- Install the door handle bezel by snapping the handle bezel into place in the door trim panel.
- Remove the window support. Verify the operation of the window.
| 2.1. | Insert a flat-bladed tool between the bezel and the handle. |
| 2.2. | Carefully bend the retaining clips outward while pulling up the bezel. |
| • | Remove the window handle using the J 9886-01 Door Handle Remover. |
| • | Keep the retainer clip on the back side of the handle. |
| 4.1. | Using a flat-bladed tool, pry the accessory mounting panel from the trim panel. The clip location is indicated by screwdriver slots in the mounting panel. |
| 4.2. | Remove the switch mounting panel. |
| 4.3. | Disconnect the power accessory electrical connectors from the switches and the speaker if necessary. |

Notice: Use the correct fastener in the correct location. Replacement fasteners must be the correct part number for that application. Fasteners requiring replacement or fasteners requiring the use of thread locking compound or sealant are identified in the service procedure. Do not use paints, lubricants, or corrosion inhibitors on fasteners or fastener joint surfaces unless specified. These coatings affect fastener torque and joint clamping force and may damage the fastener. Use the correct tightening sequence and specifications when installing fasteners in order to avoid damage to parts and systems.
Tighten
Tighten the bolts to 9 N·m (80 lb in).
| • | Ensure that the retainer engages. |
| • | Verify the operation of the window handle. |
Tighten
Tighten the screws to 2 N·m (18 lb in).
| 17.1. | Connect the accessory electrical connectors to the switches as necessary. |
| 17.2. | Snap the switch mounting panel in place. |
Parts Information
Part Number | Description | Qty |
|---|---|---|
11518297 | Bolt/Screw - Frt. Side Dr. WDO Rgtr. | 6 |
Parts are currently available from GMSPO.
Warranty Information
For vehicles repaired under warranty, use:
Labor Operation | Description | Labor Time |
|---|---|---|
C0180/C0181 | Regulator, Front Door Window (Manual Right or Left) - R&R or Replace | 0.5 hr |
C0182/C0183 | Regulator, Front Door Window (Power Right or Left) - R&R or Replace | 0.5 hr |
