For 1990-2009 cars only
Removal Procedure
Tools Required
J 43181 Heater Line Quick Connect Release Tool
- Drain the cooling system. Refer to Cooling System Draining and Filling in Engine Cooling in the C/K Pickup Service Manual.
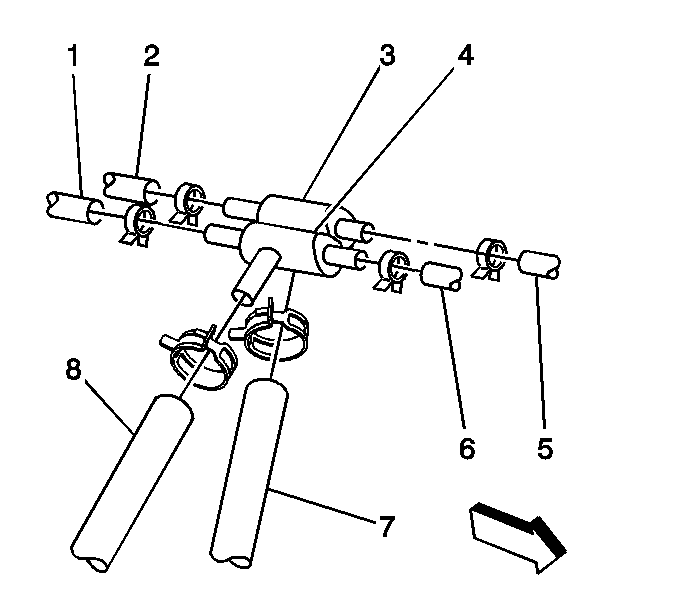
- Loosen the hose clamps enough to move the clamps away from the tee fitting.
- Remove the outlet heater hose (6) from the tee fitting (4).
- If replacing the tee fitting disconnect the tee fitting from the heater core hose (1).
- If replacing the tee fitting disconnect the high pressure regulator (HPR) coolant hose (8) at the tee fitting (4).
- If replacing the heater core hose remove the quick disconnect from the heater core by performing the following:
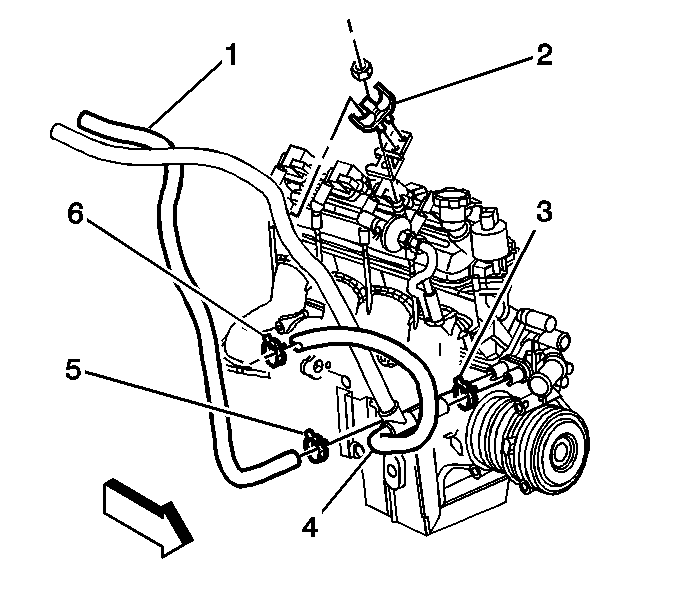
- Loosen the heater hose clamp (3) enough to move the clamp away from the water pump fitting.
- Loosen the heater hose clamp (6) enough to move the clamp away from the surge tank fitting.
- Remove the heater hose (4) from the water pump.
- Remove the heater hose (4) from the surge tank.
- Remove the outlet heater hose from the vehicle.
Caution: Unless directed otherwise, the ignition and start switch must be in the OFF or LOCK position, and all electrical loads must be OFF before servicing any electrical component. Disconnect the negative battery cable to prevent an electrical spark should a tool or equipment come in contact with an exposed electrical terminal. Failure to follow these precautions may result in personal injury and/or damage to the vehicle or its components.

| • | Install the J 43181 to the heater core pipe. |
| • | Close the tool around the heater core pipes. |
| • | Firmly pull the tool into the quick connect end of the heater hose. |
| • | Firmly grasp the heater hose. Pull the heater hose forward in order to disengage the hose from the heater core. |

Installation Procedure
- Install the outlet heater hose (4) into the vehicle.
- Connect the outlet hose (4) onto the water pump fitting.
- Tighten the outlet hose clamp (3) ensuring that the clamp fastens the hose to the water pump fitting.
- Connect the outlet hose (4) onto the surge tank fitting.
- Tighten the outlet hose clamp (6) ensuring that the clamp fastens the hose to the surge tank fitting.
- Connect the outlet heater hose (6) onto the tee fitting (4).
- Tighten the outlet hose clamp ensuring that the clamp fastens the hose to the tee fitting.
- If replacing the tee fitting connect the tee fitting (4) on to the heater core hose (1).
- Tighten the heater hose clamp ensuring that the clamp fastens the hose to the tee fitting.
- If replacing the tee fitting connect the high pressure regulator (HPR) coolant hose (8) onto the tee fitting (4).
- Tighten the HPR coolant hose clamp ensuring that the clamp fastens the hose to the tee fitting.
- If replacing the heater core hose connect the hose to the heater core by firmly pushing the quick connect on to the heater core pipe until you hear an audible click.
- Fill the cooling system. Refer to Cooling System Draining and Filling in Engine Cooling in the C/K Pickup Service Manual.
- Inspect the cooling system for leaks. Refer to Loss of Coolant in Engine Cooling in the C/K Pickup Service Manual.


