Front Door Hinge Pin/Bushing Wear, Front Door Sags or Door Chucking Movement (Service Procedures, Teflon bushings/Severe Usage Service Kit Released)

| Subject: | Front Door Hinge Pin/Bushing Wear, Front Door Sags, or Door Chucking Movement (Service Procedures, Teflon Bushings/Severe Usage Service Kit Released) |
| Models: | 1988-1998 Chevrolet and GMC C/K 1500/2500 Series (Classic) Pickup Models |
| 1988-2000 Chevrolet and GMC C/K 3500 Series (Classic) Pickup Models |
| 1990-2002 Chevrolet and GMC H Model C-Series Conventional Medium Duty Models (Topkick, Kodiak) |
This bulletin is being revised to add model and parts information and additional Service Procedure information. Please discard Corporate Bulletin Number 26-16-03 (Section 10 -- Body).
Condition
Some customers may comment on front door hinge pin bushing wear, front door sag, or door chucking movement in extreme operating conditions. Hinge pin and bushing wear or damage is commonly found on vehicles that operate where there is a very high number of door opening or closing cycles per day (over 100 times) or in an extremely dusty or dirty environment. If this wear is not addressed early, the door hinge may separate from the sheet metal.
Cause
The condition may be caused from excessive force on the bushing at the door stop. Worn or damaged hinge pins or bushings may cause the door to sag. This may prevent the door from closing properly. If the hinge pin bushings are worn, and this condition is not corrected, the hinge pin may wear through the bushing and into the metal of the hinge.
Correction
Three situations have been identified with the appropriate correction listed below.
Situation 1 -- The hinge bushings, the hinge pins, or the door stop check pin are worn or damaged.
- If necessary, replace the door stop check pin.
- If necessary, replace the hinge bushings and the stop pins.
- Add a door trim strap assembly.
- Install a severe service kit, P/N 15025840 with new Teflon® bushings and anti-chucking spacer.
- Lubricate the door hinge. Lubricate the door hinge at each oil change as part of ongoing preventative maintenance.
Situation 2 -- The door hinges are damaged in the bushing area and new replacement hinges are needed.
- Refer to the appropriate Service Manual for instructions on replacing the hinges. Use the studs and conical nuts provided in the hinge kits.
- Install a severe service kit, P/N 15025840 with new Teflon® bushings and anti-chucking spacer.
- Add a door trim strap assembly.
- Lubricate the door hinge. Lubricate the door hinge at each oil change as part of ongoing preventative maintenance.
Situation 3 -- Minor cracks in the sheet metal around the door hinge area, and the bushings are worn or damaged. New replacement hinges are needed.
- Refer to the appropriate Service Manual for instructions on replacing the hinges.
- Install backing plates in order to reinforce the service hinges. Use bolts and nuts to attach both plates and hinges. Order backing plates and attach hardware separately. Refer to the parts information.
- Install a severe service kit, P/N 15025840 with new Teflon® bushings and anti-chucking spacer.
- Add a door trim strap assembly.
- Lubricate the door hinge. Lubricate the door hinge at each oil change as part of ongoing preventative maintenance.
History
There were production changes made to address these situations. The following lists the production changes and the time the change went into effect at the assembly plants.
- Lubricant released for hinge bushings, March 1991.
- Molybdenum disulfide coating added to the hinge pin for improved lubrication, February 1992.
- Cab door frame reinforcement redesigned for 1.5 mm (0.06 in) to 2 mm (0.08 in) thickness and darts added, February 1992.
- Retaining groove added to the hinge pin, March 1992.
- Tapered check pin replaced the non-tapered check pin, October 1992.
- Non-serrated bronze bushings replaced stainless bushings, November 1992.
- Door hinge Z reinforcement added, April 1993.
- Teflon® bushings released for service only. Also included in kit P/N 15025840, July 1996. Both teflon and bronze bushings are now available separately.
- Reinforcement plates removed from door hinge kits, February 1999.
- Hinge studs and conical nuts added, February 1999.
Service Procedures
The service procedures listed below may vary for each vehicle, depending on the severity of the damage. The technician should evaluate each case in order to determine the extent of the modifications required.
Replacing Hinge Pin or Hinge Bushing (Bushings Worn, Hinges OK)
- Refer to the Doors subsection in the appropriate Service Manual for door removal and hinge pin replacement procedures.
- For Medium Duty vehicles, refer to the Doors subsection in the appropriate Medium Duty Service Manual for hinge bushing replacement procedures.
Parts Information
P/N | Description | Qty/Door |
|---|---|---|
15025842 | Bushing (Lwr Hinge, Lwr, Upper Hinge, Upper) (Teflon)* | 2 |
15025841 | Bushing (Lwr Hinge, Upper, Upper Hinge, Lwr) (Teflon) | 2 |
16632193 | Bushing (Lwr Hinge, Lwr, Upper Hinge, Upper) (Bronze) | 2 |
16632192 | Bushing (Lwr Hinge, Lwr, Upper Hinge, Upper) (Bronze) | 2 |
88891731 | Hinge Pin | 2 |
88891766 | Hinge Spring | 1 |
25640501 | Hinge Pin Retainer | 2 |
15025840 | Kit, Severe Service, Frt Door Hinge** | 1 |
*Also Included in Severe Service Kit, P/N 15025840. Not installed in service hinge assemblies. | ||
**Includes Teflon® bushings, anti-chucking spacer, spacer fasteners and instructions. | ||
Parts are currently available from GMSPO.
Replacing Door Stop Check Pin (Check Pin Damaged)
Refer to the Doors subsection in the appropriate Medium Duty Service Manual for door stop check pin replacement procedures.
Parts Information
Part Number | Description | Qty/Door |
|---|---|---|
12540326 | Pin, Door Stop Check | 1 |
Parts are currently available from GMSPO.
Installing Backing Plates and Reinforcing Service Hinges (Pillar Cracked)
- Refer to the Doors subsection in the appropriate Service Manual for hinge replacement procedures.
- Use a spot weld drill or 1/2" rotabroach bit in order to remove the factory hinge welds. When installing backing plates, tack-weld the four nuts to the backing plates before installing them to the cowl. When installing backing plates, order the plates, the attaching bolts and the nuts separately. Refer to the Parts Information.
- Using a hammer, lightly tap the pins in order to secure the pins in the hinge.
- Apply a small amount of LOCTITE™ or equivalent to the head of the pins.
Parts Information
Part Number | Description | Qty |
|---|---|---|
15523209 | Backing Plate, Frt, Dr Side (Lower) - R/L | 1 |
15521605 | Backing Plate, Frt Body Side (Upper) - R/L | 2 |
15521608* | Backing Plate, Frt Dr Side (Upper) - R/L | 2 |
15521606 | Backing Plate, Frt Body Side (Lower) - R/L | 3 |
11514766 | Bolt, Hex M8 x 1.25 | 4 |
11516071 | Nut, Prevailing Torque M8 | 4 |
*May require slight modification for clearance on 1998 and newer vehicles. | ||
Parts are currently available from GMSPO.
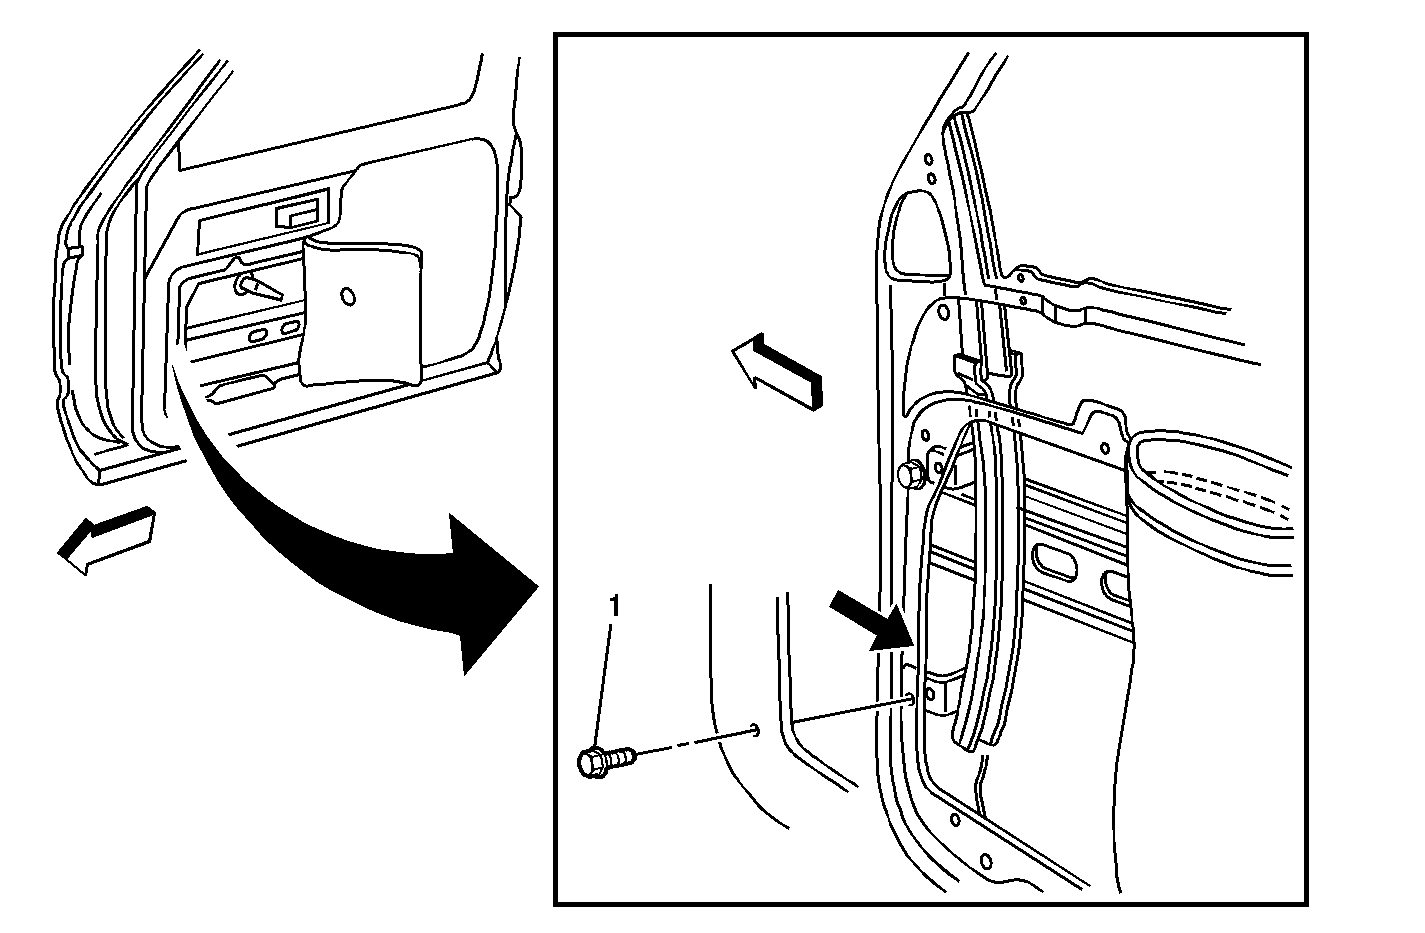
Installing Door Trim Strap Kit (1988-1995 C/K and All 1990-02 Medium Duty Vehicles with Former Instrument Panel Design)
- Roll the window down completely. Remove the cowl kick trim panel.
- Remove the window regulator handle, the door handle trim plate, and the two armrest screws in order to remove the door trim panel. Refer to the Door subsection of the appropriate Service Manual for door trim panel removal information.
- Partially peel back the tar paper from the area nearest the door hinge.
- Roll up the window completely.
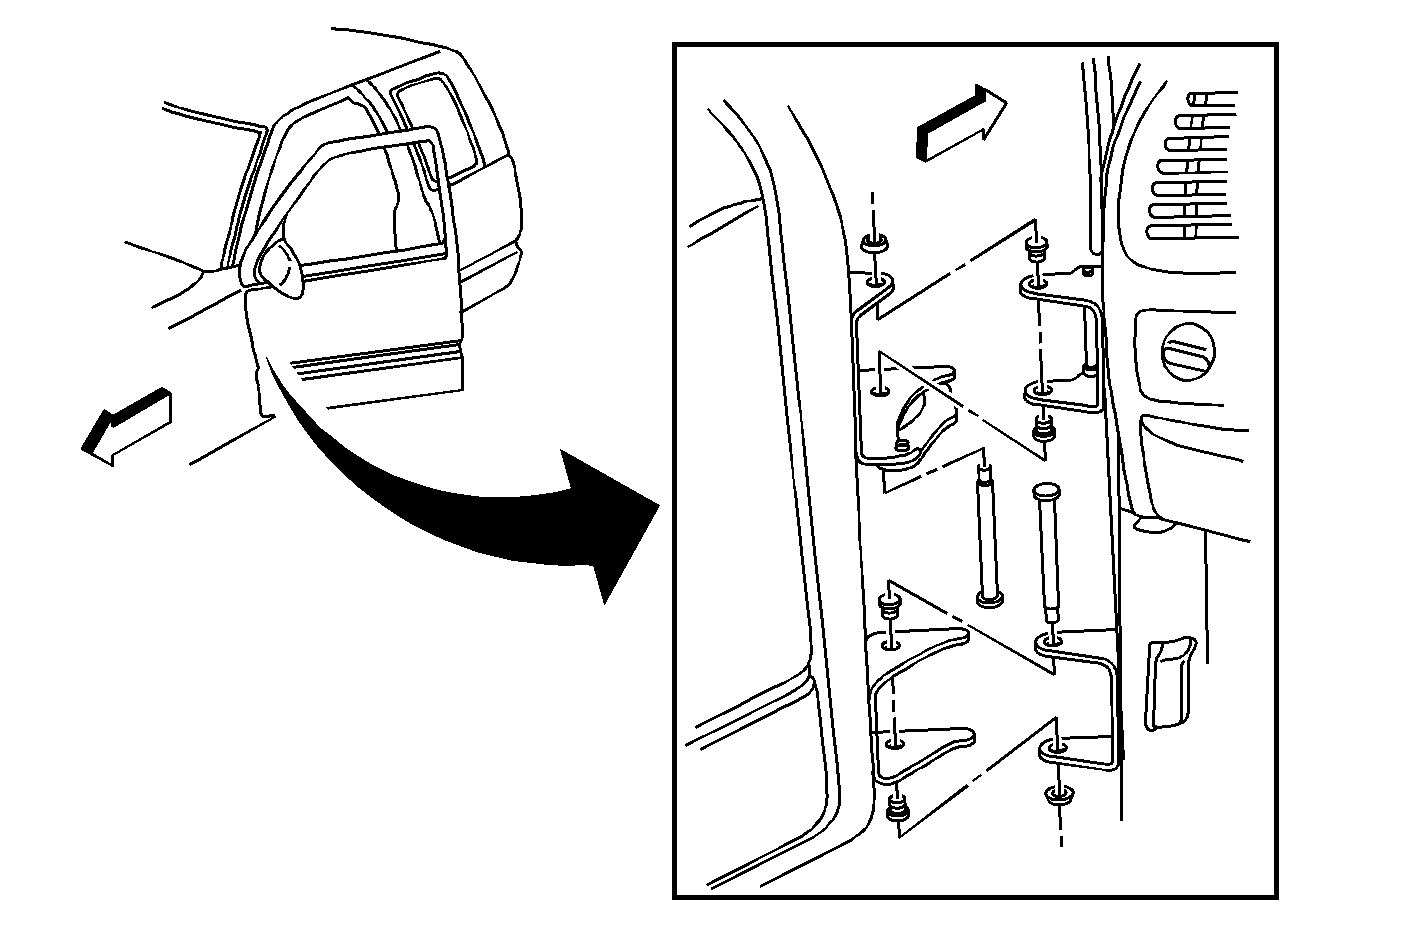
- Bolt the lower part of the door trim strap bracket to the door at the vacant hole (upper window run channel bolt hole). Refer to Figure 2 for the correct placement of the bracket to the vehicle.
- Attach the top part of the door trim strap bracket with a bolt, a washer and a nut.
- Install the screw assembly in the bottom hole of the door trim strap bracket.
- Remove the sill plate and the cowl kick panel in order to attach the door trim strap assembly in the cowl kick trim panel area.
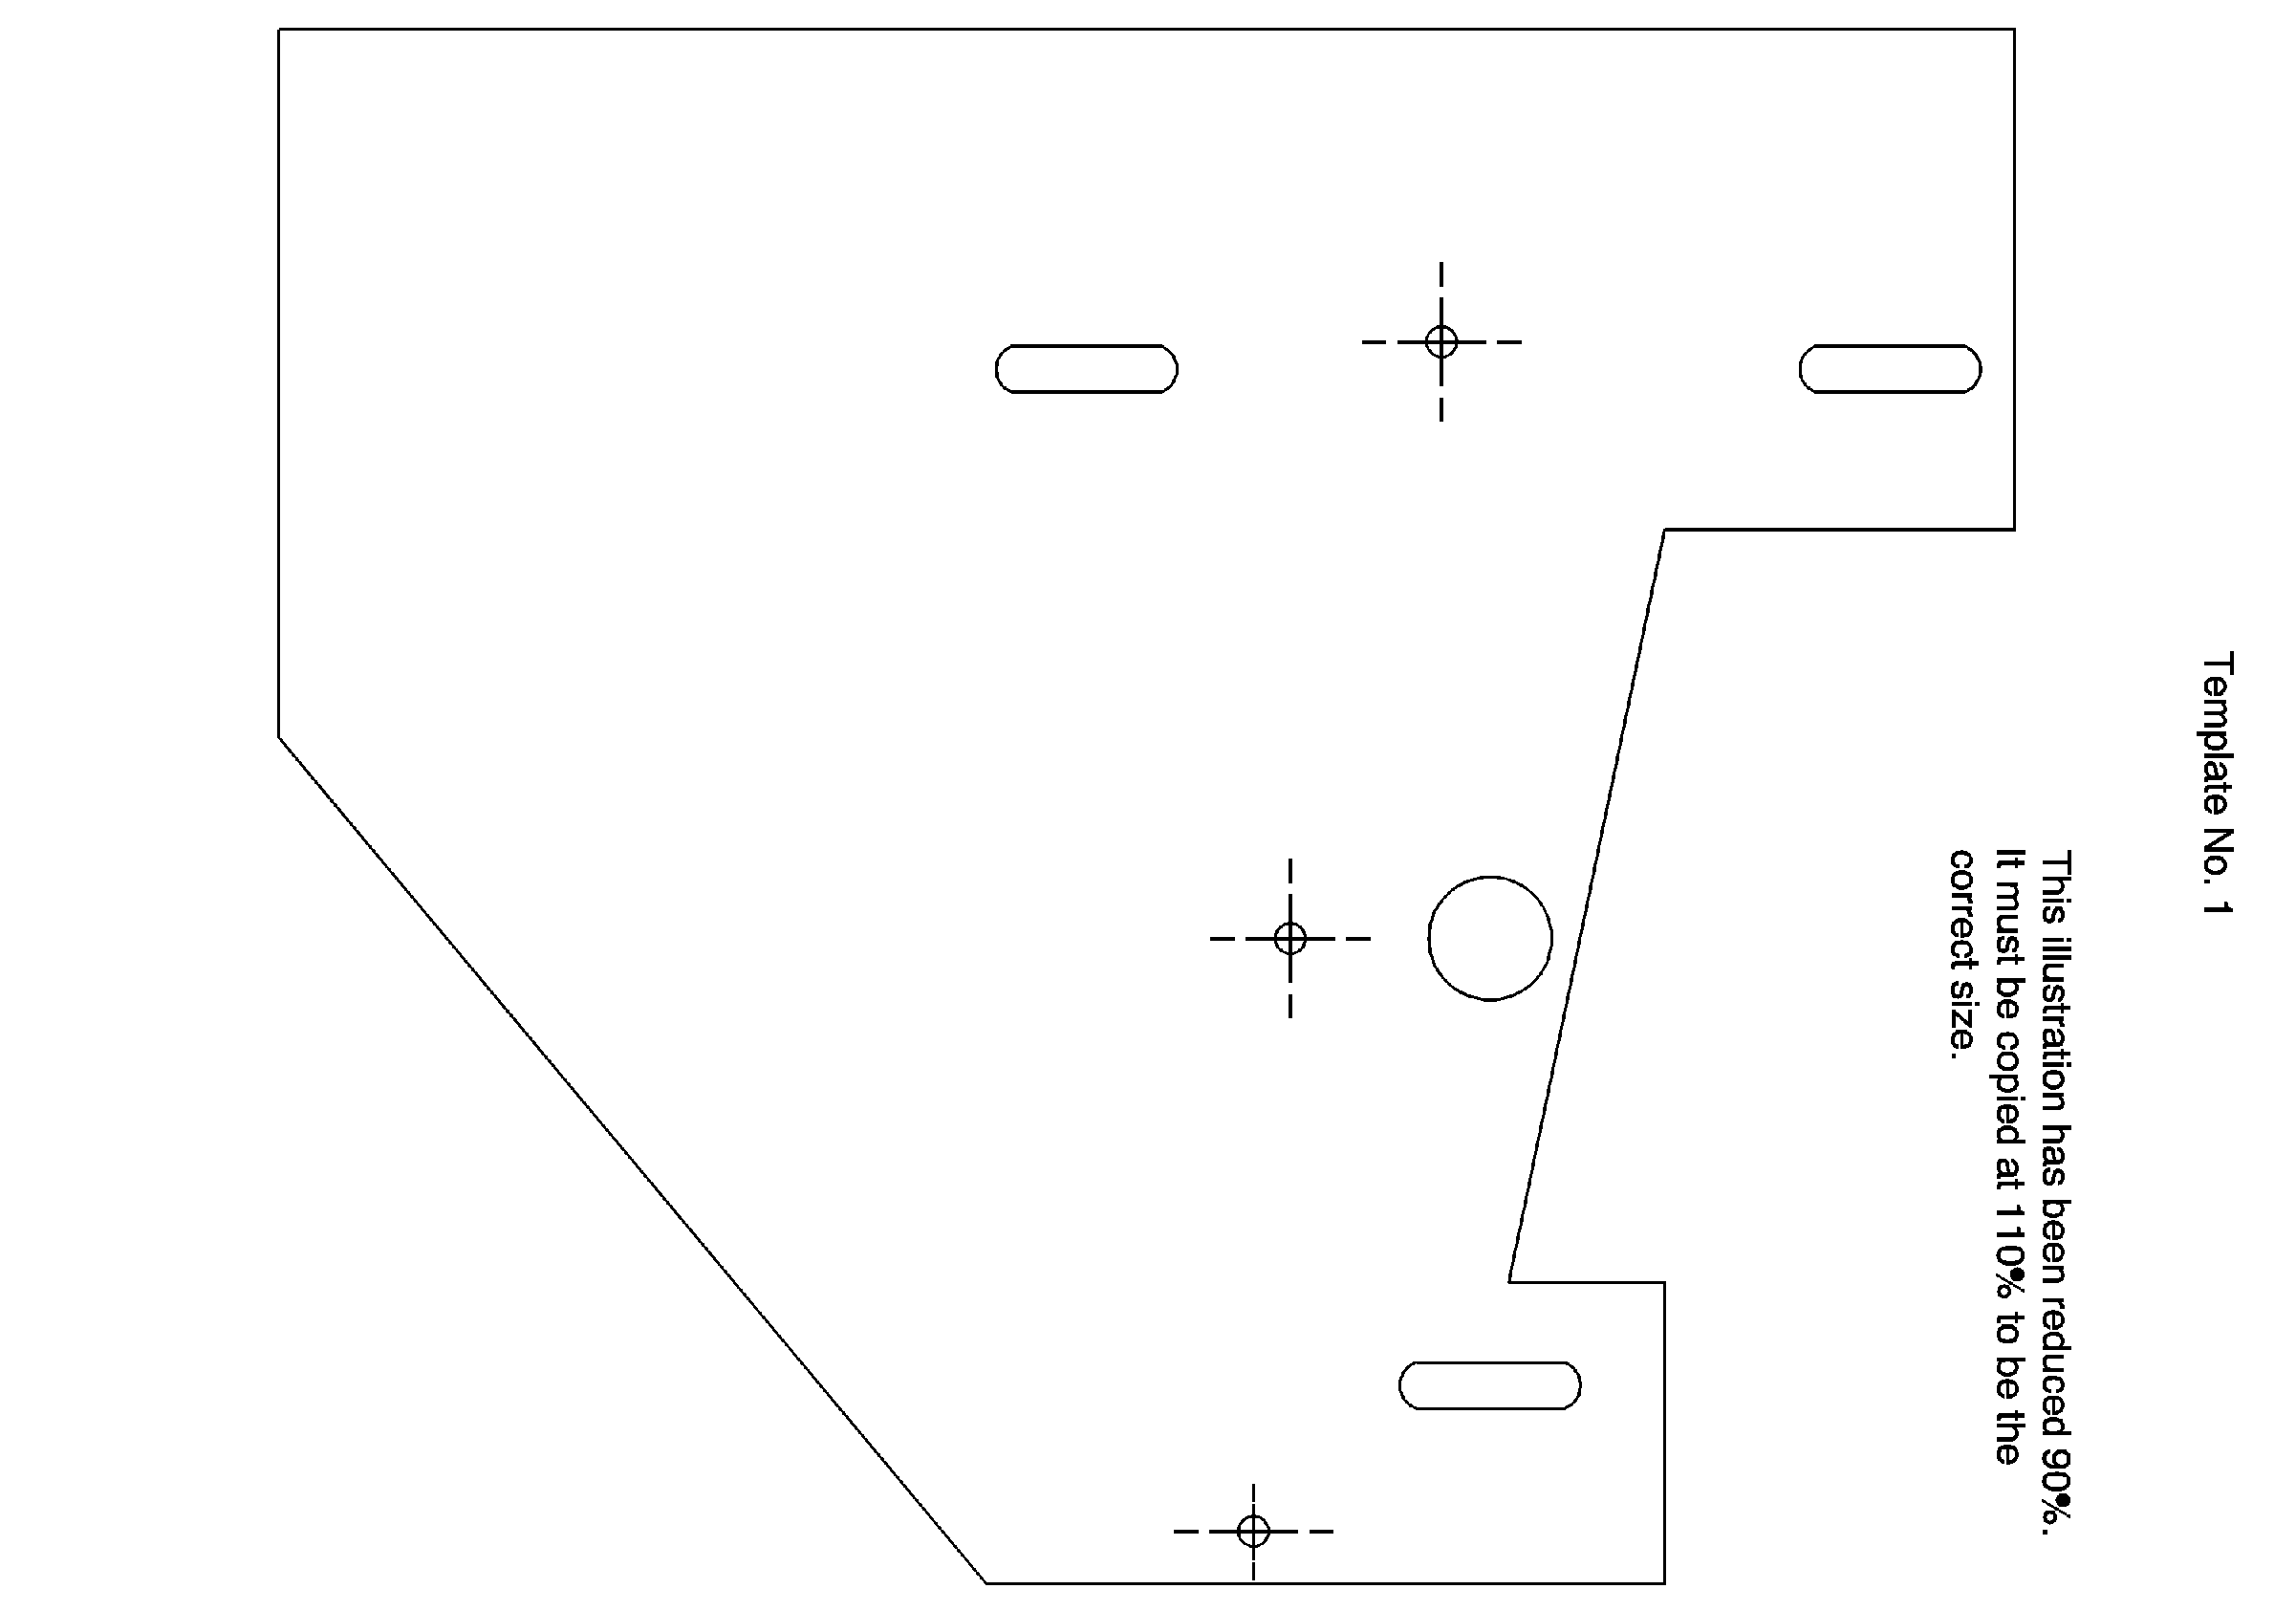
- Using template #1, mark two drill locations and one self-tapping screw location with a center punch.
- Drill two 9 mm (23/64 in) holes in the two locations closest to the door hinge. Do no drill the third location.
- Bolt the door trim strap anchor bracket to the kick panel area using two bolts, two washers and two nuts.
- Install the self-tapping screw to the third hole of the anchor bracket. Install the door trim strap at this time.
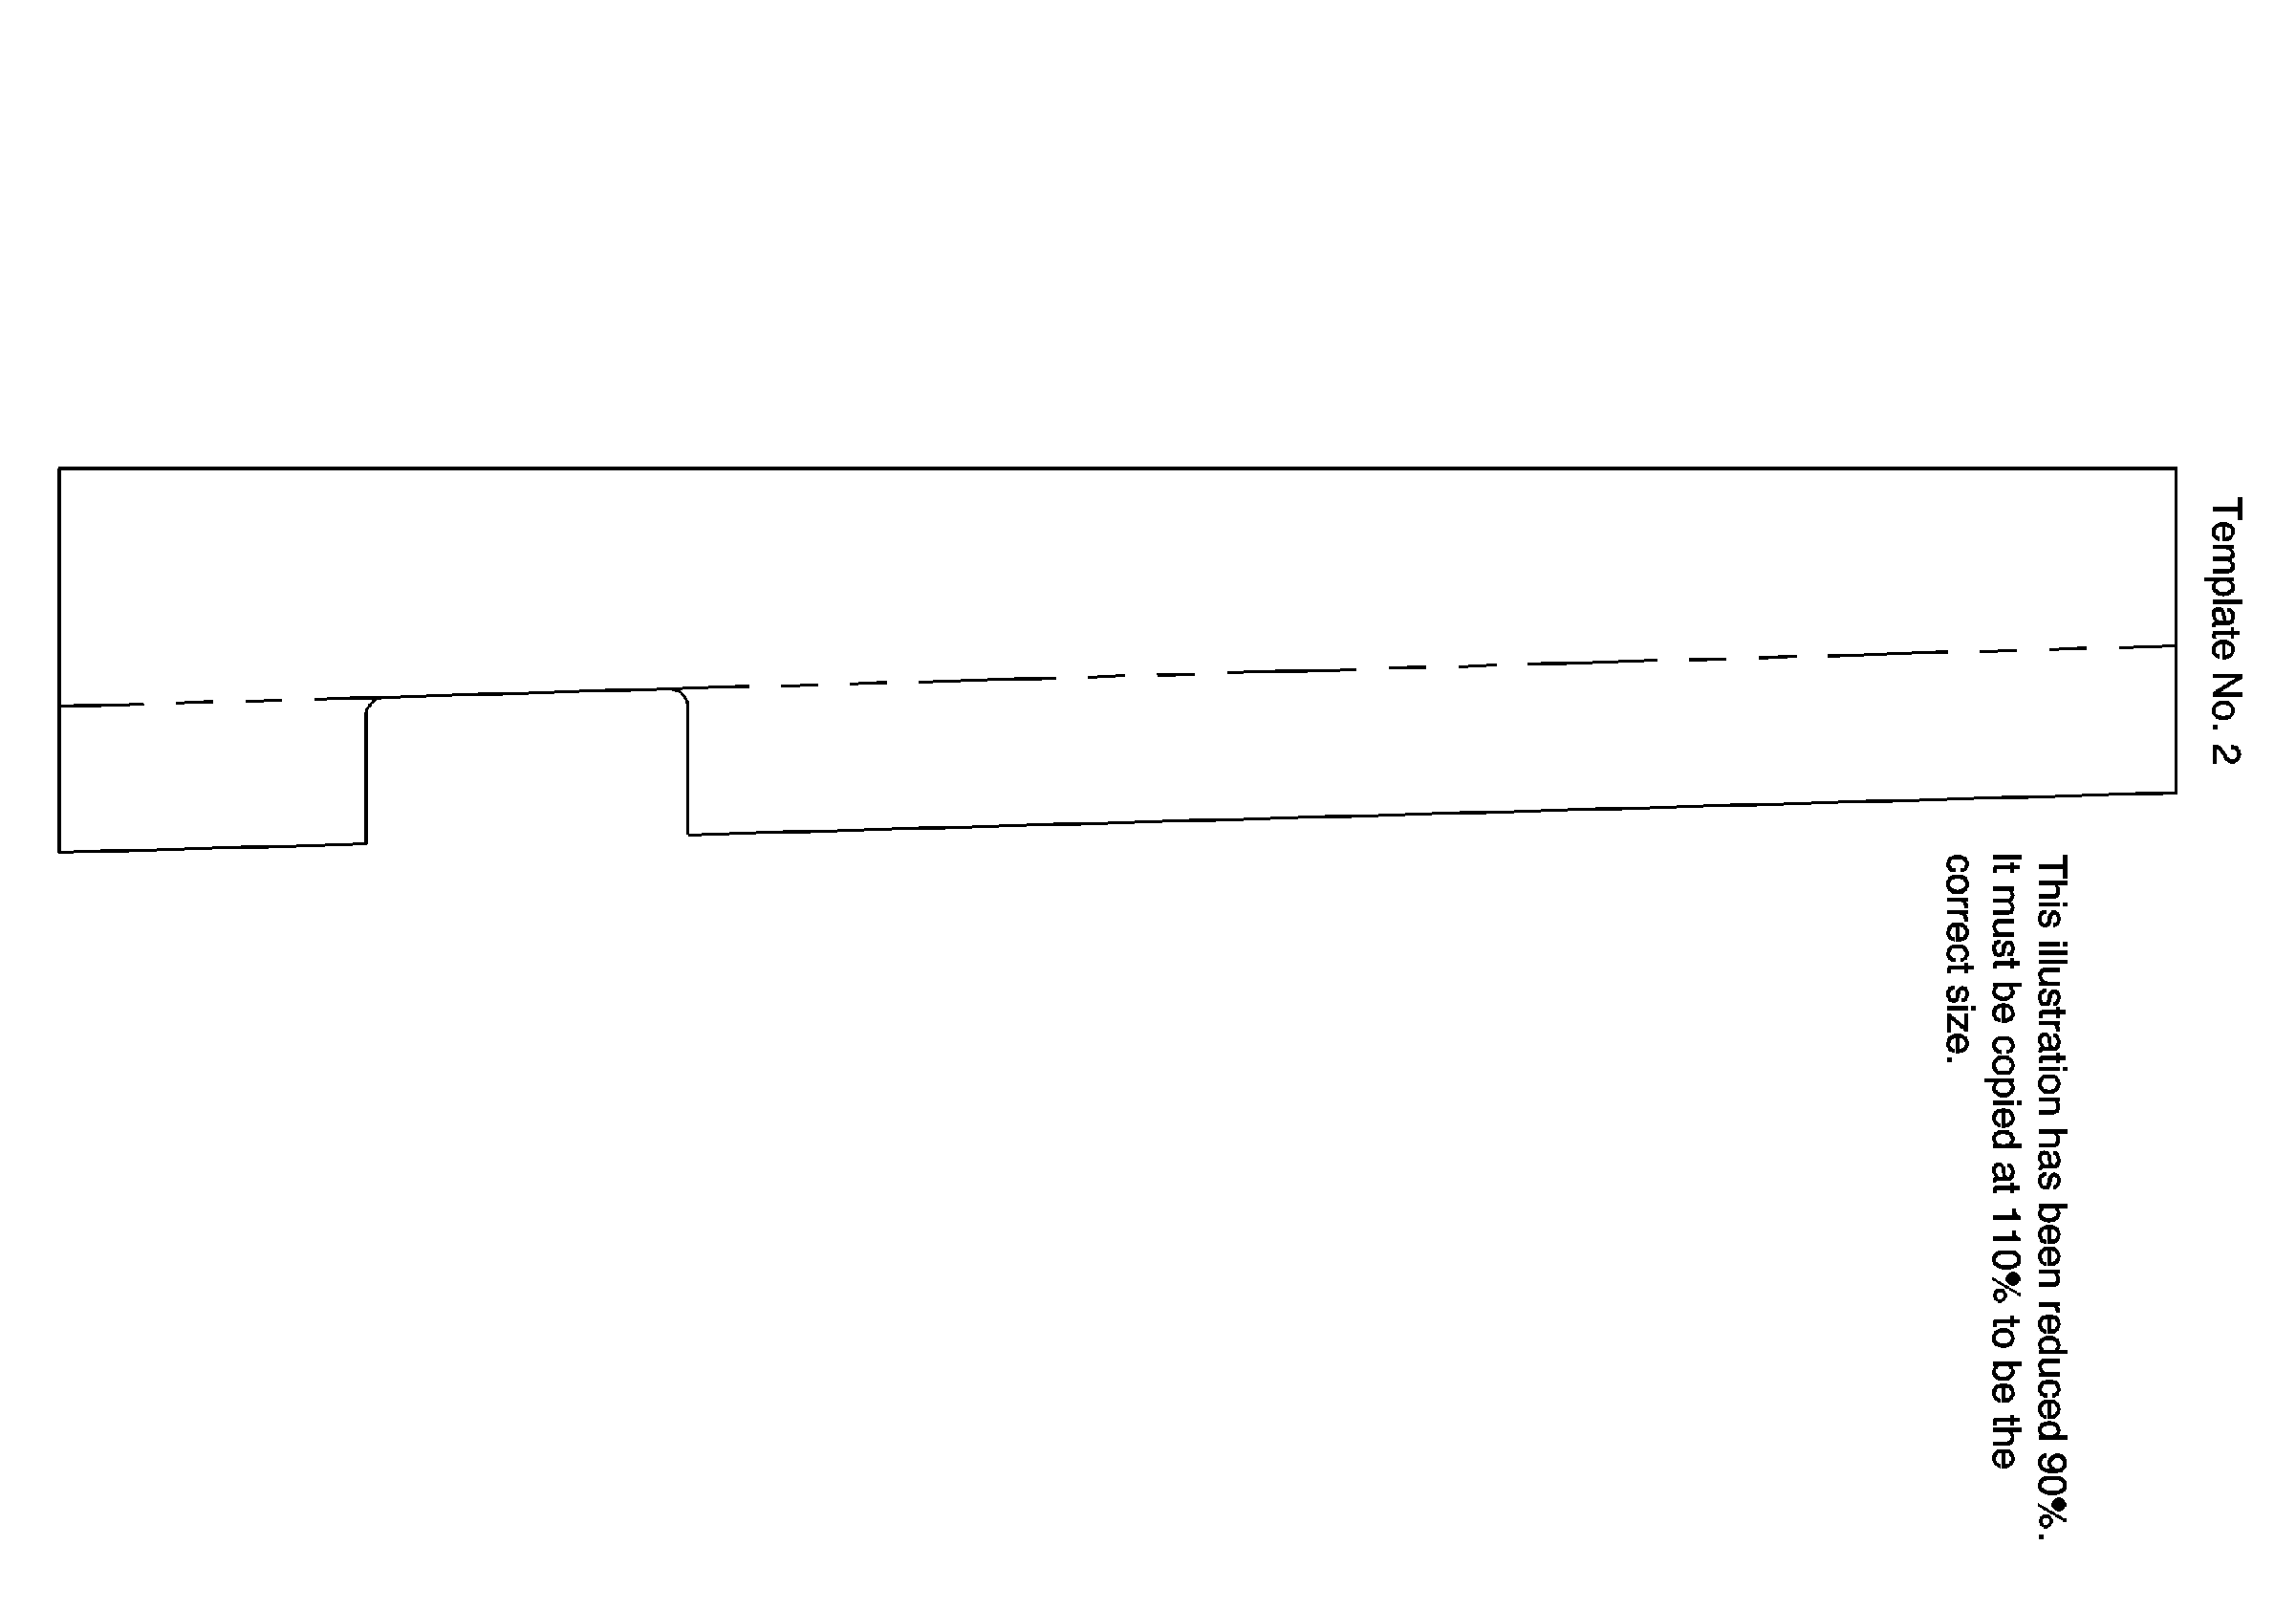
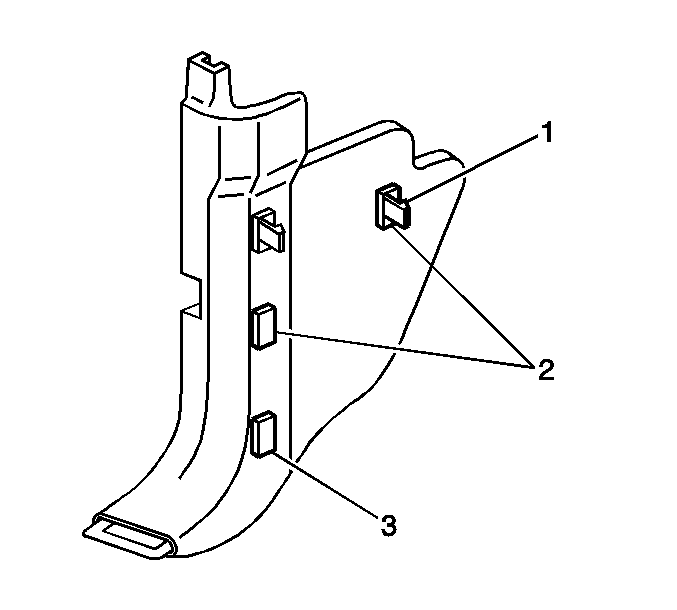
- Using template #2, mark a notch area on the cowl kick panel. This will prevent interference with the door trim strap kit. Cut the plastic cowl kick panel with an air saw, a hack saw, or a pocket knife.
- Cut off two of the four retainer blades. One of the cut off blades has a retainer clip. Refer to Figure 3.
- Install the cowl kick trim panel.
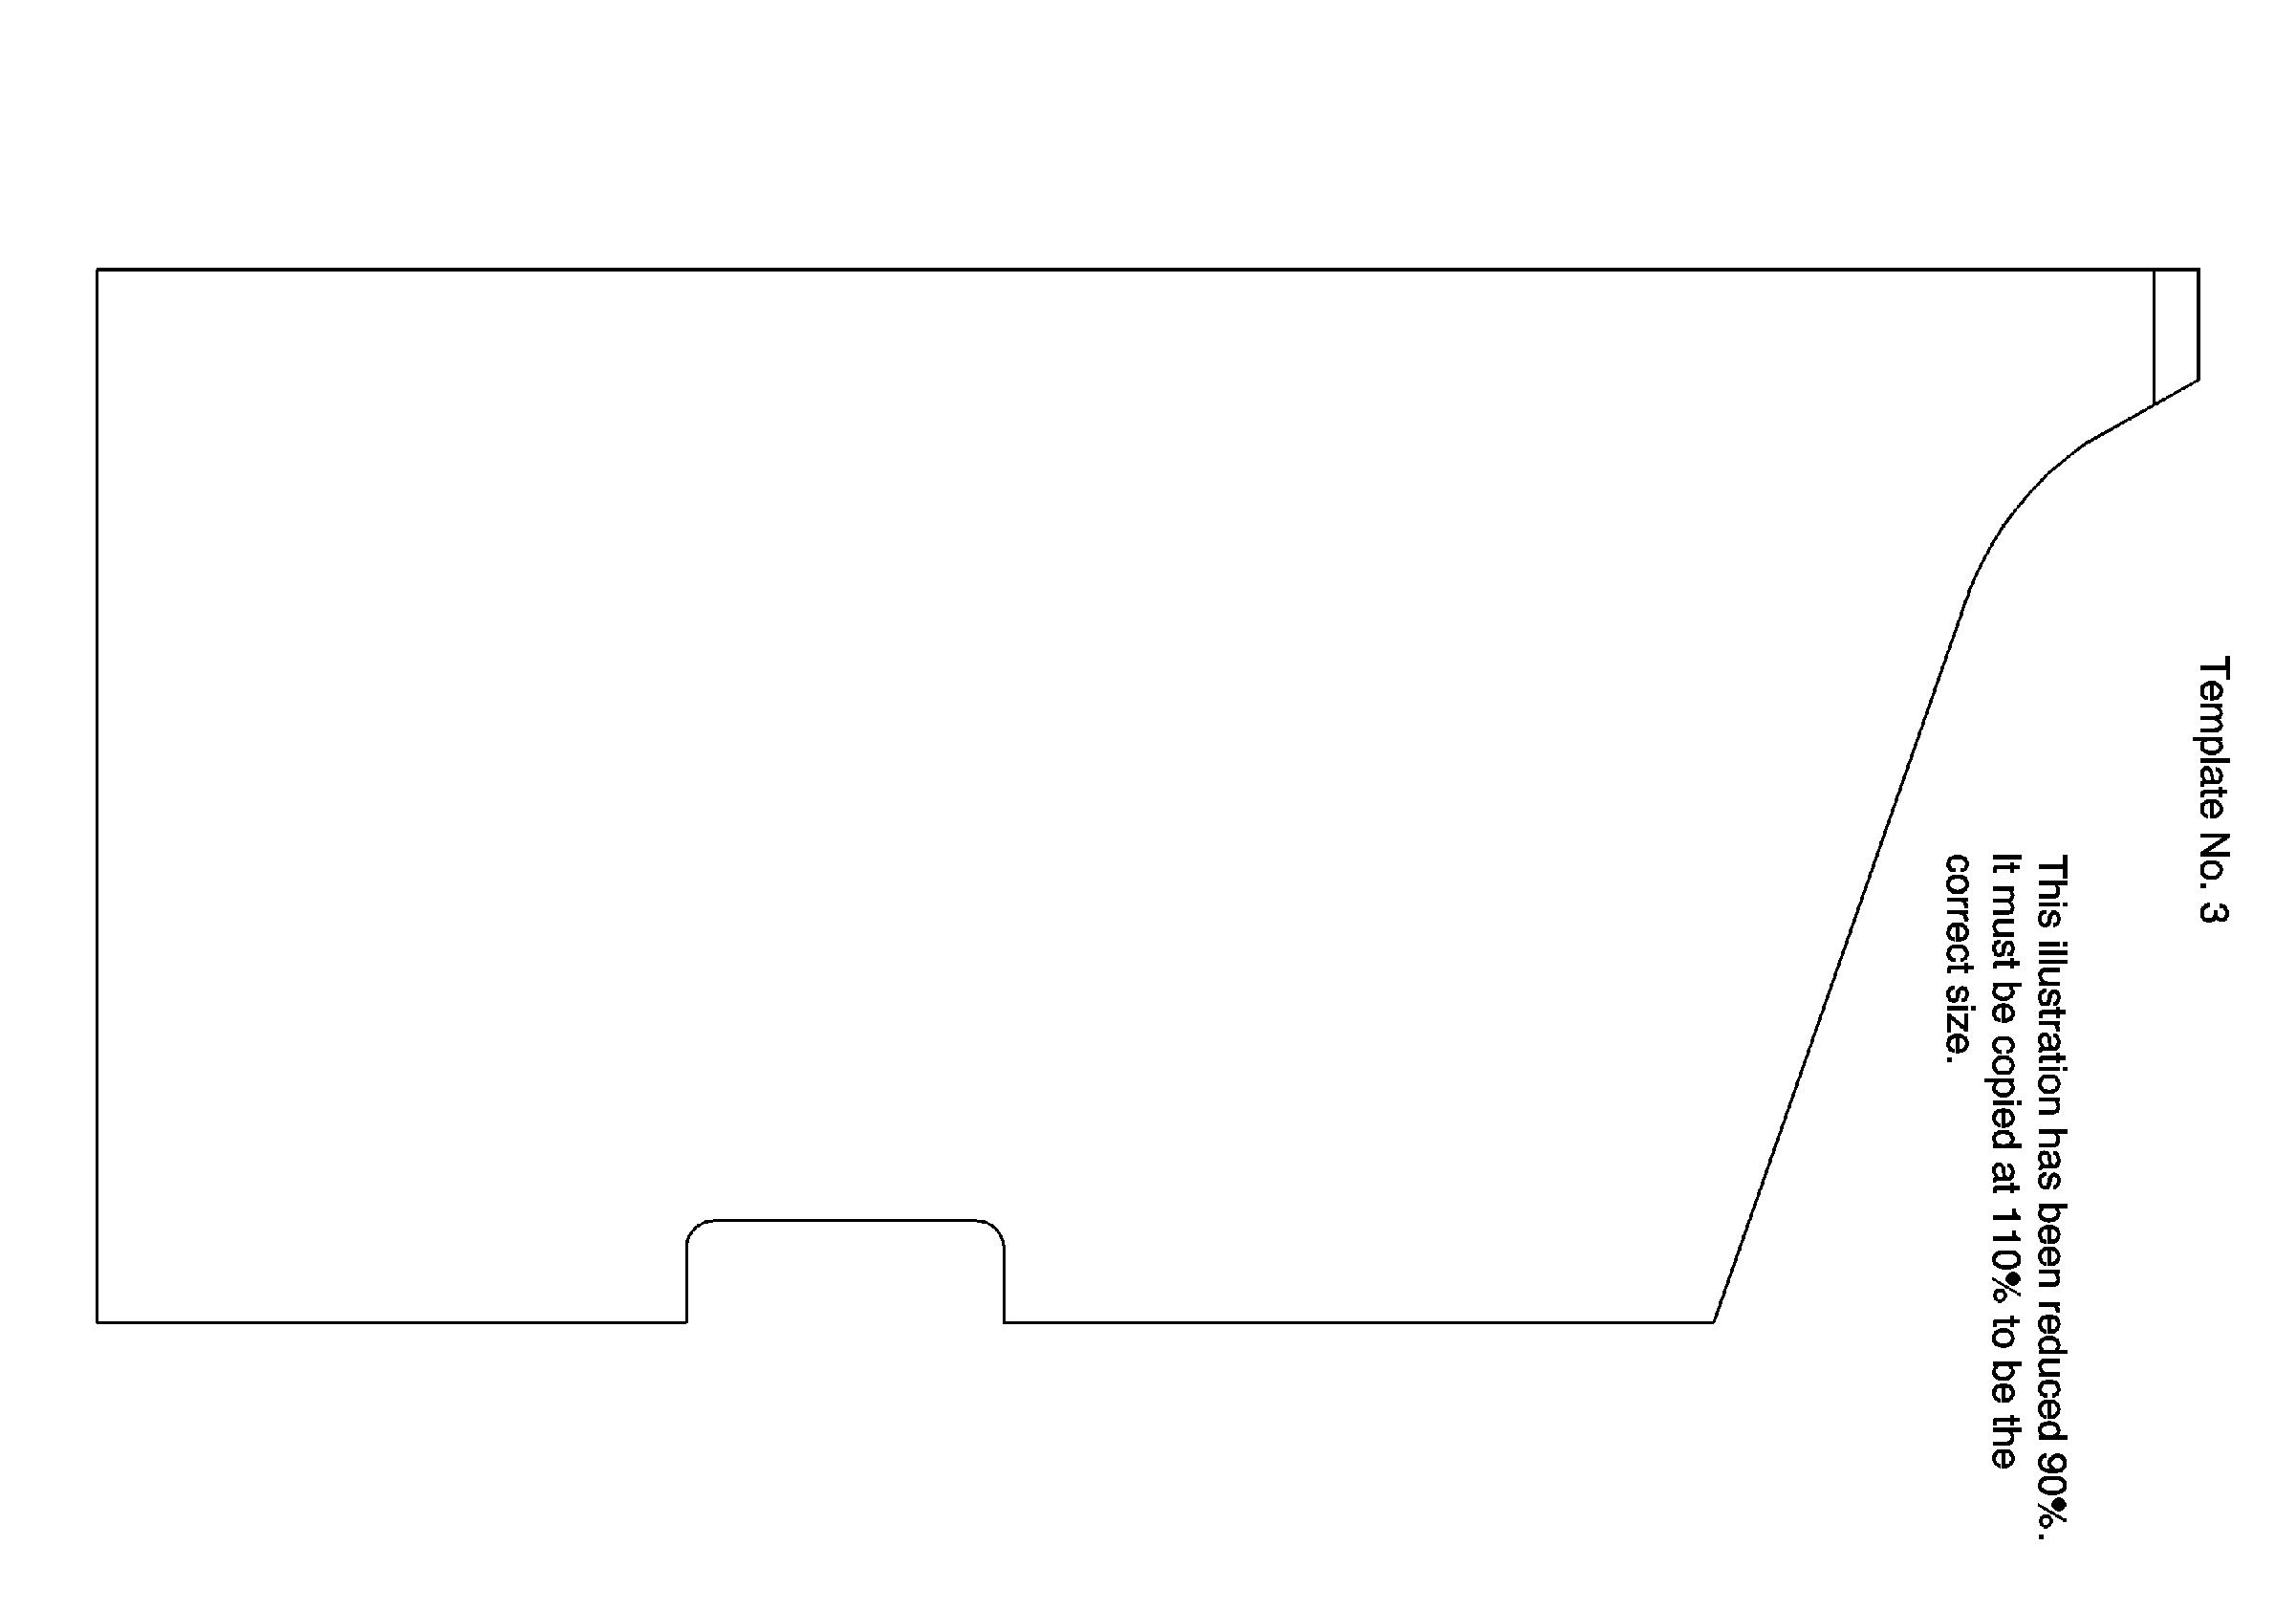
- Using template #3, mark a notch area on the door trim panel. This will prevent interference with the door trim strap kit. Cut a notch in the plastic door trim panel with an air saw, a hack saw, or a pocket knife.
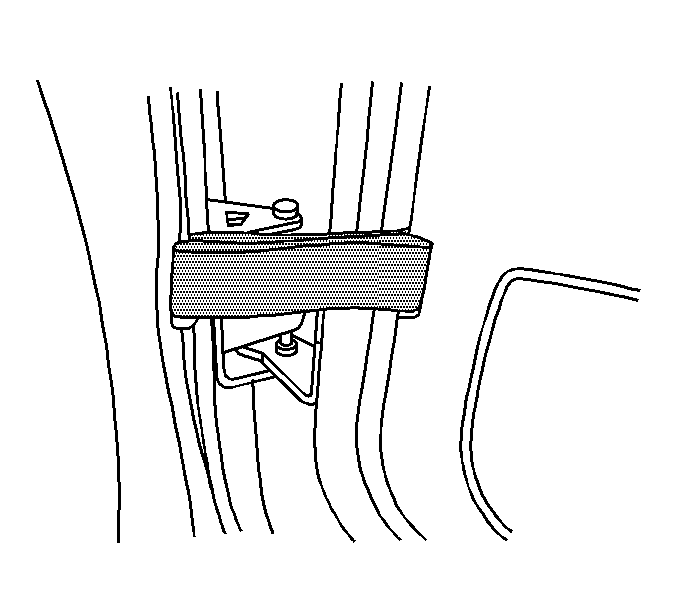
- Install the door trim panel. Refer to the above illustration showing the installed door trim strap kit.
Figure 1
| 4.1. | Remove the lower bolt and the washer from the door window run channel. |
| 4.2. | Discard the bolt (1) and the washer. |
Figure 2

| 5.1. | Mark the drilling location for the upper part of the door stop bracket with a punch (refer to the arrow in Figure 1). |
| 5.2. | Hit the punch with the tip through the hole in the check bracket. |
| 5.3. | Using a 9 mm (23/64 in) drill bit, drill a hole through the hole in the check bracket. |
Figure 3
| 14.1. | Remove the retainer clip (1) from the cut off blade. |
| 14.2. | Cut two of the four plastic blades (2). |
| 14.3. | Reinstall the clip on the remaining blade (3) of the cowl kick trim panel. |
Figure 4
Parts Information
Part Number | Description | Qty |
|---|---|---|
12549139 | Kit, Door Trim Strap (LH) | 1 |
12549140 | Kit, Door Trim Strap (RH) | 1 |
Parts are currently available from GMPSO.
Replacing Door Hinge
- Refer to the Doors subsection of the appropriate Service Manual for door hinge replacement procedures.
- Use a spot weld drill of 1/2" rotabroach bit in order to remove the factory hinge welds. Use the studs and conical nuts included with the hinge kits unless reinforcing plates are required. If reinforcing plates are required, attach the service hinges with the bolts and the standard nuts. Refer to the Parts Information.
- Using a hammer, lightly tap the pins in order to secure the pins in the hinge.
- Apply a small amount of LOCTITE™ or equivalent to the head of the pins.
Parts Information
Part Number | Description | Qty |
|---|---|---|
12475681 | Hinge Kit, Frt Body Side Upper (LH) | 1 |
12475682 | Hinge Kit, Body Side Upper (RH) | 1 |
12475677 | Hinge Kit, Frt Body Side Lower (LH) | 1 |
12475678 | Hinge Kit, Frt Body Side Lower (RH) | 1 |
Part Number | Description | Qty |
|---|---|---|
12475075 | Hinge Kit, Side Dr Upper (LH) | 1 |
12475076 | Hinge Kit, Side Dr Upper (RH) | 1 |
12475077 | Hinge Kit, Side Dr Lower (LH) | 1 |
12475078 | Hinge Kit, Side Dr Lower (RH) | 1 |
These kits include hinges, locator, template, special conical nuts, studs and an instruction sheet. These kits do not include reinforcing plates or bolts and standard attaching nuts. Order the plates, bolts and nuts separately if the sheet metal is cracked around the door hinge area.
Parts are currently available from GMSPO.
Installing Anti-chucking Spacer Block (included in Severe Service Kit, P/N 15025840) 1988-1998 C/K (Classic) and All 1990-2002 Medium Duty Vehicles (Topkick, Kodiak)
- Before installing the spacer block, make sure the door sill is clean and dry.
- Lay the spacer block (2) on the front side door frame sill approximately 325 mm (12.75 in) forward of the door latch mounting wall (1) so that the spacer block lies forward of the door plug located on the bottom inner side of the side door panel.
- Fasten the spacer block to the sill using self-tapping screws (3) provided in the kit (qty of 2) (Fully driven and not stripped).
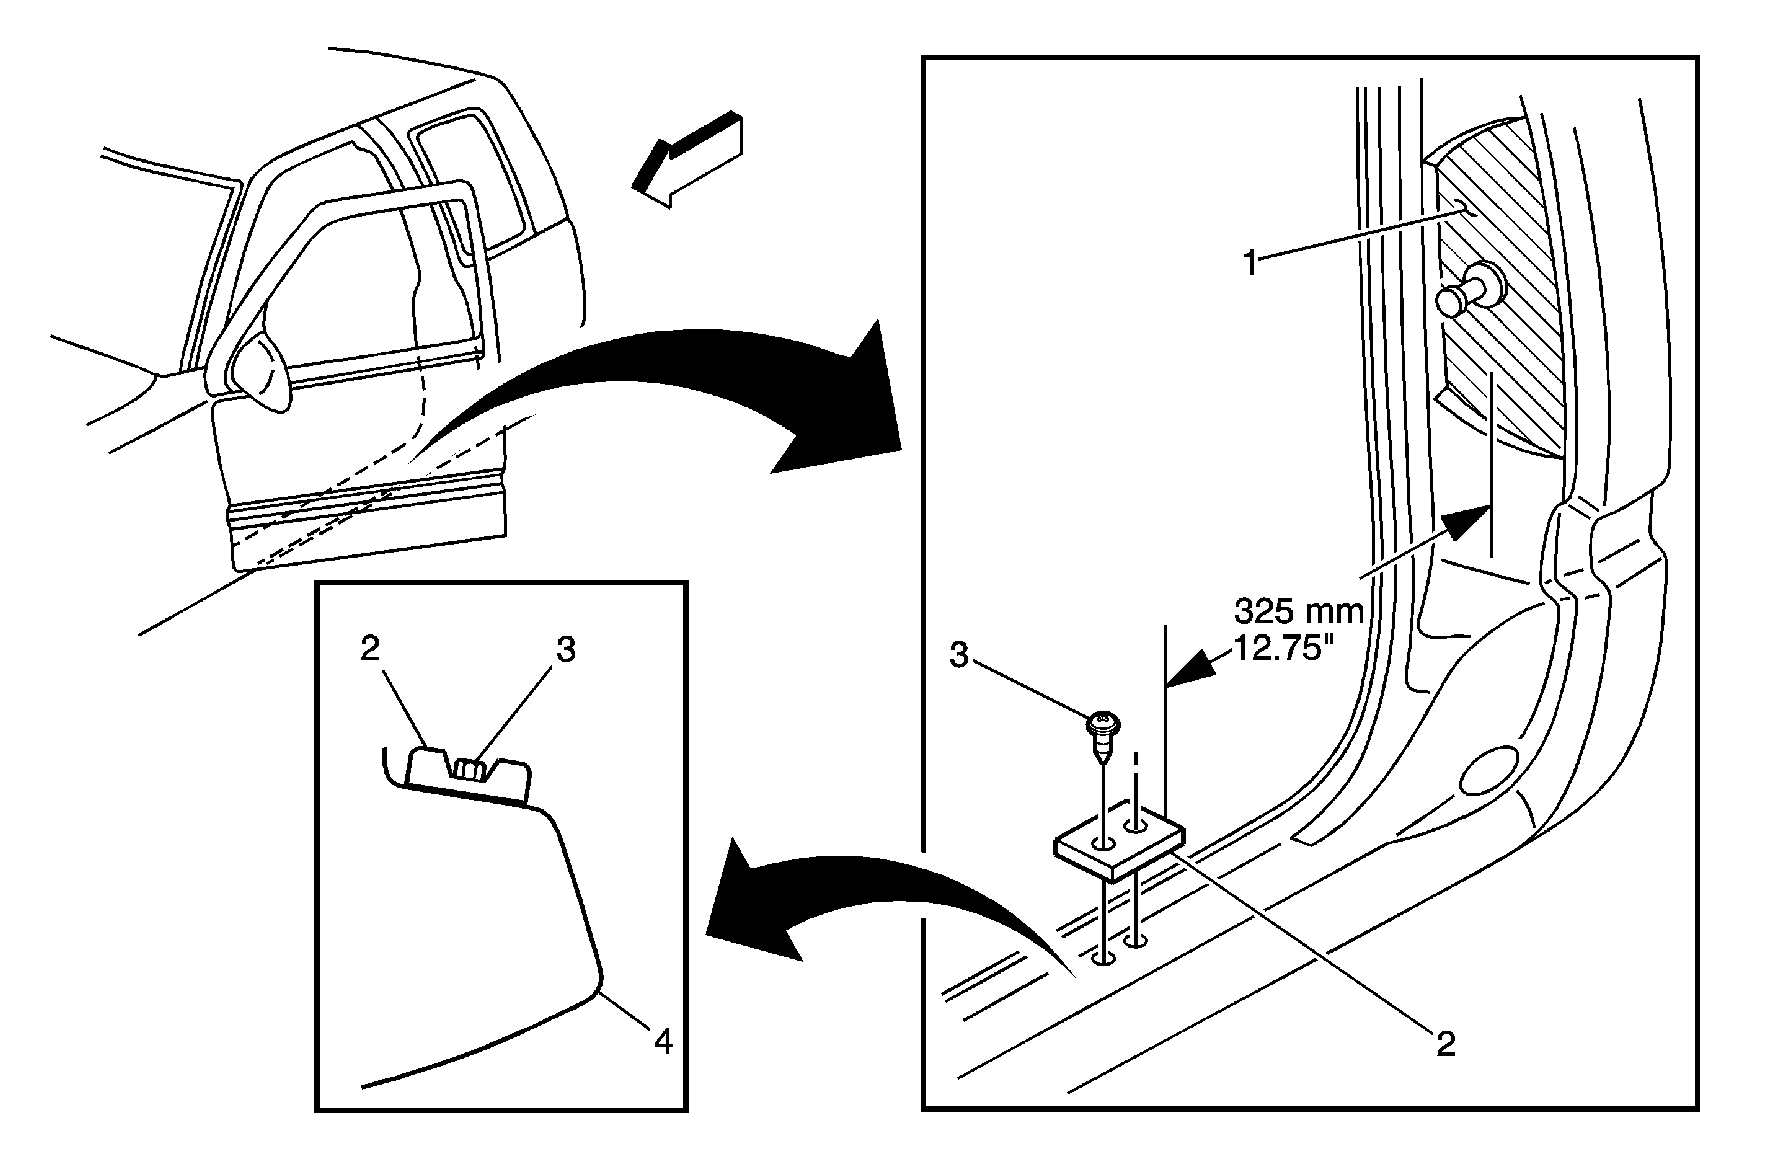
Important: The spacer block must be positioned inboard of the door frame outer surface (4).
Warranty Information
For vehicles repaired under warranty, use:
Labor Operation | Description | Labor Time |
|---|---|---|
B4052 (Right Upper) B4053 (Right Lower) | Hinge Pin and/or Hinge Bushing - Replace | Use published labor operation time |
B4054 (Left Upper B4055 (Left Lower) | ||
B4050 (Right) B4051 (Left) | Door Stop Check Pin - Replace | |
B4022 (Right Upper) B4023 (Left Upper) | Door Hinge (Door Side) - Replace | |
B4024 (Right Lower) B4025 (Left Lower) | ||
B4032 (Right Upper) B4033 (Left Upper) | Door Hinge (Body Side) - Replace | |
B4034 (Right Lower) B4035 (Left Lower) | ||
*B4047 (Right) *B4048 (Left) | Door Trim Strap Kit Assembly - Install | 1.2 hrs |
Add | To Install Door Anti-Chucking Spacer (One or Both) | 0.2 hr |
*These labor operations are for use only with this bulletin. These numbers will not be published in the Labor Time Guide.