INFO. ON CLUTCH ADJUSTMENT RELEASE BEARING LUBE PROCEDURE

SUBJECT: INFORMATION ON CLUTCH ADJUSTMENT AND RELEASE BEARING LUBRICATION PROCEDURES
MODELS: 1990-93 TOPKICK/KODIAK VEHICLES
Clutch slippage, overheating, harsh engagement and soft clutch pedal effort are all comments that may be the result of improper clutch adjustment. Clutch pedal "free play" must be checked on a regular basis. Clutch "free play" provides clearance so clutch wear and cab to powertrain movement are absorbed without the release yoke tips contacting the release bearing.
IMPORTANT
IMPROPER CLUTCH "FREE-PLAY" IS THE MOST COMMON CAUSE OF PREMATURE CLUTCH FAILURE.
SERVICE PROCEDURE
Clutch Adjustment:
1. Block the vehicle to prevent movement and set the park brake.
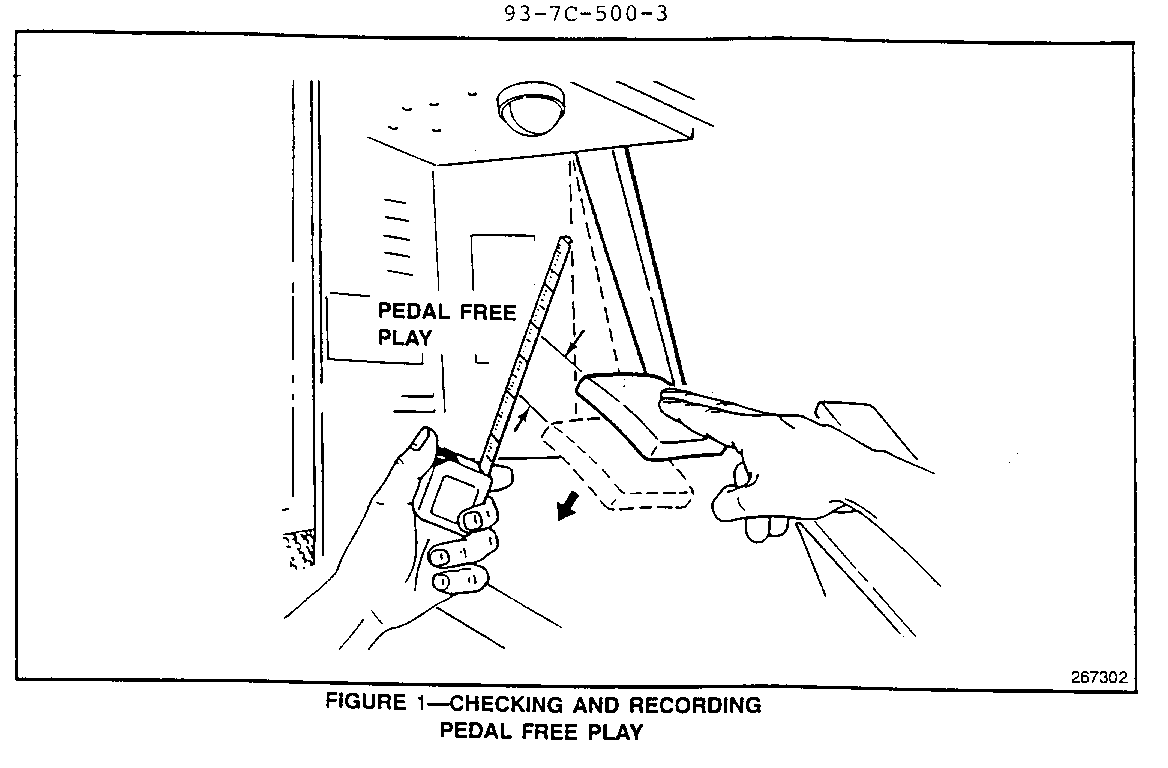
2. Check and measure clutch pedal free play by using two fingers (Figure 1). Clutch pedal free play should be approximately 1-1/2 inch.
IMPORTANT
DO NOT USE THE PALM OR FOOT TO CHECK CLUTCH PEDAL FREE PLAY.
If the clutch pedal requires greater force than can be applied with two fingers, remove the clutch housing inspection cover and check free play clearance between the release yoke and release bearing. Also check linkage pivot points and release yoke shaft bushings for possible binding.
3. Loosen the release bearing locknut using two spanner wrenches. Thread it toward the transmission a small distance to ensure that it will not interfere with the adjustment process.
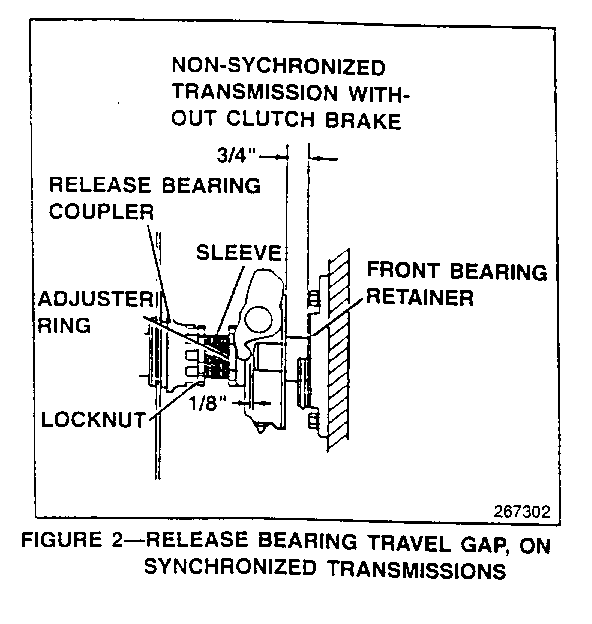
4. Thread the release bearing into or out of the release bearing coupler to obtain 3/4 inch between the release bearing and front cover (Figure 2). If the threaded sleeve is difficult to turn, disconnect the external linkage.
IMPORTANT
WHEN MEASURING RELEASE BEARING TRAVEL GAP, USE SLIGHT PRESSURE TO HOLD THE RELEASE BEARING REARWARD. THIS WILL REMOVE END PLAY IN THE BEARING ASSEMBLY.
5. Thread the release bearing locknut forward by hand, toward the release bearing coupler, as far as it will go (Figure 2).
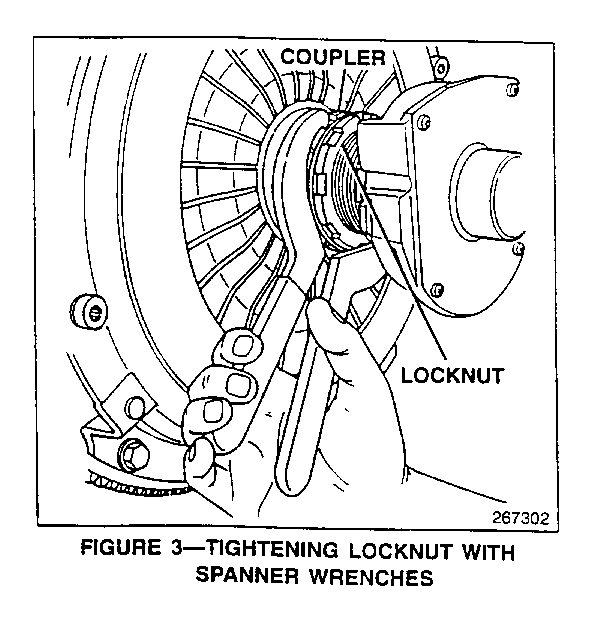
6. Using two spanner wrenches, place one on the notches of the release bearing coupler and the other on the release bearing locknut. Use the first wrench to prevent the coupler from rotating while using the second wrench to tighten the locknut against the coupler as a jamnut. Final tightening can be performed by placing the two spanner wrenches in notches that will result in the wrench handles diverging slightly from one another (Figure 3).
7. Verify that the release bearing to transmission gap is 3/4 inch. If not, loosen the locknut and repeat the adjustment procedure.
8. After a 3/4 inch release bearing to transmission gap is obtained, a 1/8 inch gap between the release yoke tips and release bearing contact pads should automatically result (Figure 2). If not, adjust the external linkage by shortening or lengthening to obtain the desired 1/8 inch dimension. Refer to section 7C in the medium duty service manual if the external linkage needs adjustment.
9. Confirm a clutch pedal free play of approximately 1-1/2 inch. Refer to step 2 above.
Release Bearing Lubrication:
Clutch release bearings operate in an extremely harsh environment and require lubrication at regular intervals. Many standard chassis lubricants cannot handle high temperatures and use of these lubricants will result in bearing failures. Use a grease such as GM P/N 1051344, GMSPO 12345740, or a grease meeting NLGI Automotive Service Grease Category GC.
IMPORTANT
DO NOT OVER GREASE DUE TO THE RISK OF CONTAMINATING THE CLUTCH FRICTION SURFACES.


General Motors bulletins are intended for use by professional technicians, not a "do-it-yourselfer". They are written to inform those technicians of conditions that may occur on some vehicles, or to provide information that could assist in the proper service of a vehicle. Properly trained technicians have the equipment, tools, safety instructions and know-how to do a job properly and safely. If a condition is described, do not assume that the bulletin applies to your vehicle, or that your vehicle will have that condition. See a General Motors dealer servicing your brand of General Motors vehicle for information on whether your vehicle may benefit from the information.
