CAMPAIGN: FUEL TANK LEAK NEW TANK & CUSHION MOUNTS

Models: 1986-1989 B6P042 and S7T042 School Bus Chassis with Gasoline Engines LF5 (5.7L) , L86 (6.0L) or LSO (6.0L TBI)
DEFECT INVOLVED:
General Motors of Canada has determined that a defect which relates to motor vehicle safety exists in certain 1986-1989 B6/S7 School Bus chassis. A crack adjacent to the fuel tank seam weld attaching the tank end cap may develop. This crack can manifest itself as either a damp spot on the tank or a slight dripping. It was determined that the seam cracks were caused by oil canning of the bottom of the fuel tank.
To correct this condition, it will be necessary to install cushion mounts on the tank support brackets. Additionally, the fuel tank will be inspected for cracks and replaced if necessary. It is estimated that approximately 5% of involved school buses will require tank replacement due to seam cracking.
VEHICLES INVOLVED:
Involved are certain 1986-1989 B6P042 and S7T042 School Bus chassis with gasoline engines LF5, L86 or LSO and built within the following VIN breakpoints:
Model Year Model From Through --------- ------------- ---- ------ 1986 GMC/Chevrolet SOP EOP
1987 GMC/Chevrolet SOP EOP
1988 GMC/Chevrolet SOP EOP
1989 GMC SOP KV517539 Chevrolet SOP KV112137
All affected vehicles have been identified by the VIN listing provided to involved Dealers with this bulletin. Any Dealer not receiving a listing was not shipped any of the affected vehicles.
DEALER CAMPAIGN RESPONSIBILITY:
Dealers are to service all vehicles subject to this campaign at no charge to owners, regardless of mileage, age of vehicle, or ownership, from this time forward.
Whenever a vehicle subject to this campaign is taken into your new or used vehicle inventory, or it is in your Dealership for service in the future, you should take the steps necessary to be sure the campaign correction has been made before reselling or releasing the vehicle.
Owners of vehicles recently sold from your new vehicle inventory are to be contacted by the Dealer, and arrangements made to make the required modification according to instructions contained in this bulletin.
CAMPAIGN PROCEDURE:
Refer to Section 4 of the Service Policies and Procedures Manual for the detailed procedure on handling Product Campaigns. Dealers are requested to complete the campaign on all transfers as soon as possible.
OWNER NOTIFICATION:
All owners of record at the time of campaign release are shown on the attached computer listing and have been notified by first class mail from General Motors. The listings provided are for campaign activity only and should not be used for any other purpose.
PARTS INFORMATION:
Parts required to complete this campaign should be ordered through regular channels, as follows:
Part Number Description Quantity/Vehicle ----------- -------------- 15648845 Cushion, Outer 2 With 60 Gal. Tank 2 With 30 Gal. Tank
15648844 Cushion, Inner 2 With 60 Gal. Tank 1 With 30 Gal. Tank
11501033 Nut 4 With 60 Gal. Tank 3 With 30 Gal. Tank
The following parts are "AS REQUIRED" and should be ordered accordingly.
Part Number Description Quantity ----------- ----------------- 15617724 Fuel Tank, 60 Gal. AR
15617725 Fuel Tank, 30 Gal. AR
22515965 Gasket, Fuel Gauge AR
PARTS AND LABOUR CLAIM INFORMATION:
Credit for the campaign work performed will be paid upon receipt of a properly completed campaign claim card, RAPID terminal or DCS transmission in accordance with the following:
Repair Code Description Time Allowance ----------- ---------------------------- -------------- 2A Inspect Fuel Tank for Cracks No Cracks, Install Cushions - 60 Gal. Tank 1.0 - 30 Gal. Tank 1.0
3A Inspect Fuel Tank for Cracks Cracks Found, Install New Tank and Cushions - 60 Gal. Tank 3.5 - 30 Gal. Tank 2.9
Time allowance includes 0.1 hour for Dealer administrative detail associated with this campaign. Parts credit will be based on Dealer net plus 30% to cover parts handling.
SERVICE PROCEDURE:
A. INSPECTION OF FUEL TANKS FOR CRACKS/FUEL LEAKAGE
Prior to installing cushion mounts, the existing fuel tank on the vehicle must be inspected to determine if the tank has developed leaks at the seams on the ends of the tank. If cracks are found, the tank must be replaced. See Section C for instructions on tank removal and replacement. The tank should be inspected carefully, as leakage may be hard to detect. It may be necessary to clean the seams of all dirt and other contaminants that can obscure leakage detection. Proceed to Section B.
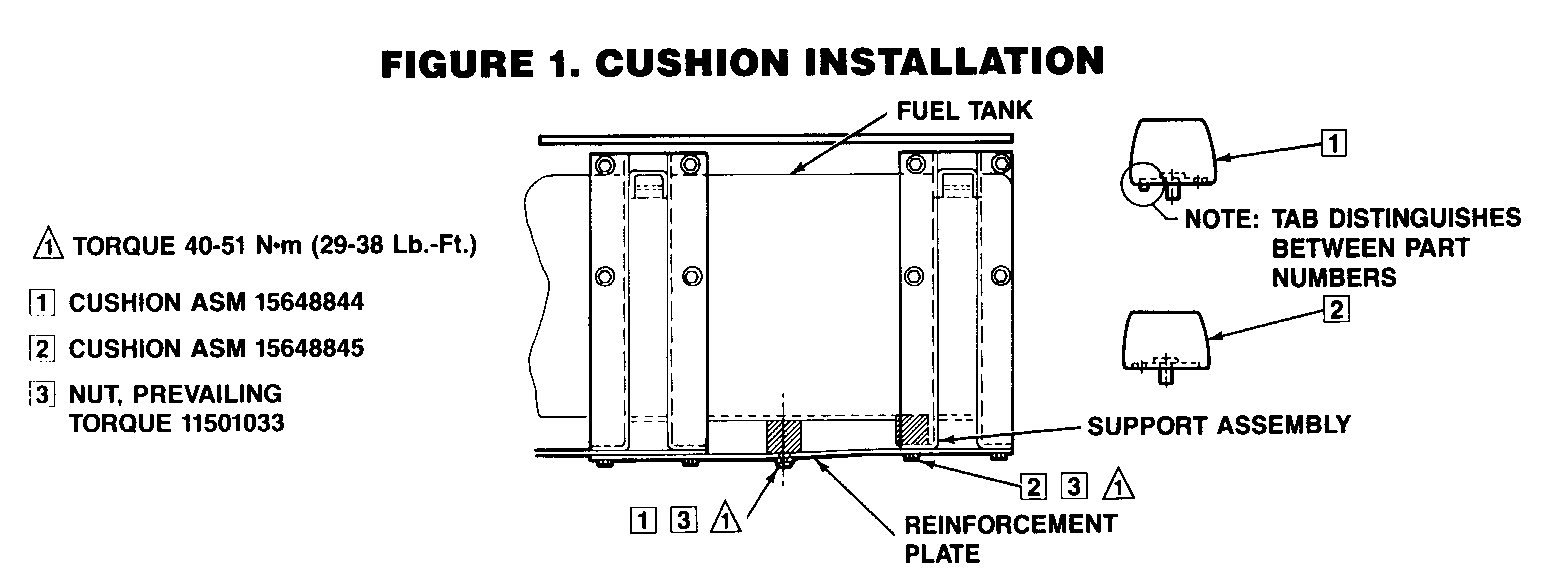
B. INSTALLATION OF CUSHION MOUNTS (FIGURE #1)
If inspection reveals no leaks or new fuel tank installation is required due to leakage, cushion mounts must be installed between the fuel tank and the tank mounting brackets and reinforcements. Three (3) cushions are required for 30-gallon tanks and four (4) are required for 60-gallon tanks.
1. Block wheels and apply brakes.
2. Disconnect negative battery cable.
3. Remove nuts and washers from tank hold-down straps (2 straps for 30-gallon tanks and 4 straps for 60-gallon tanks). Pull straps to a loose position.
4. Place floor jack under tank. Install a wooden block on jack to protect tank.
5. Jack tank up clear of support assemblies sufficiently to allow installation of cushion assemblies (approximately 2-1/4 inches).
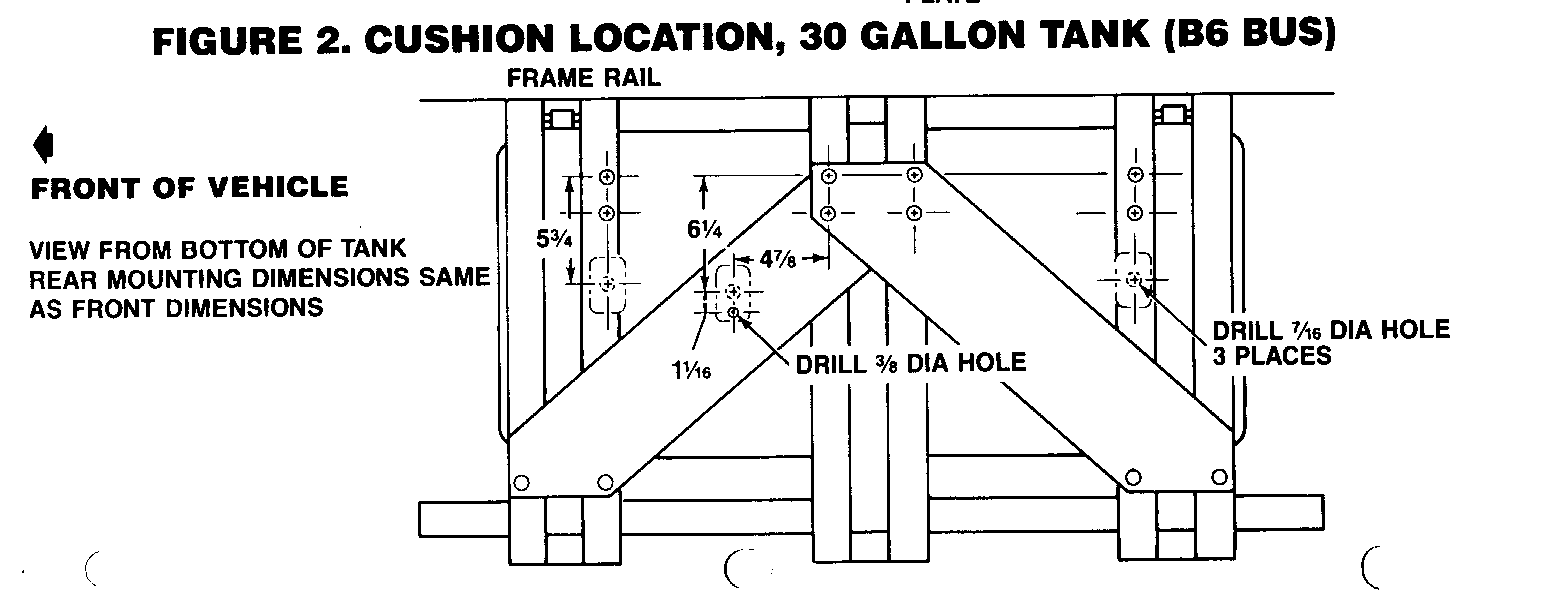
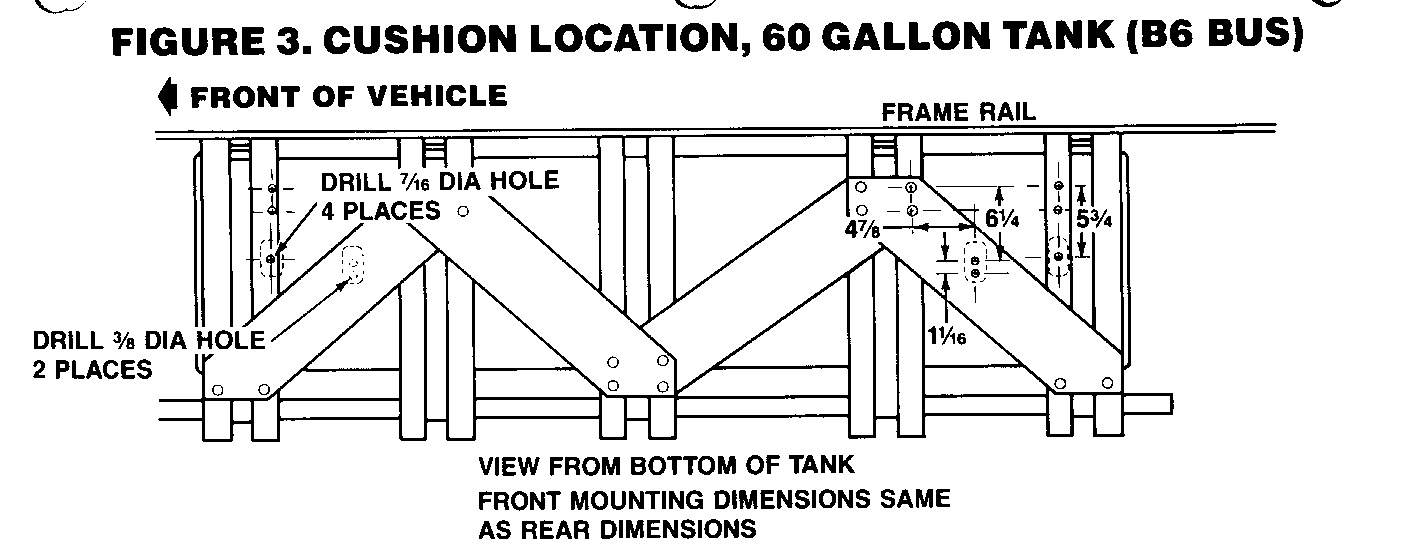
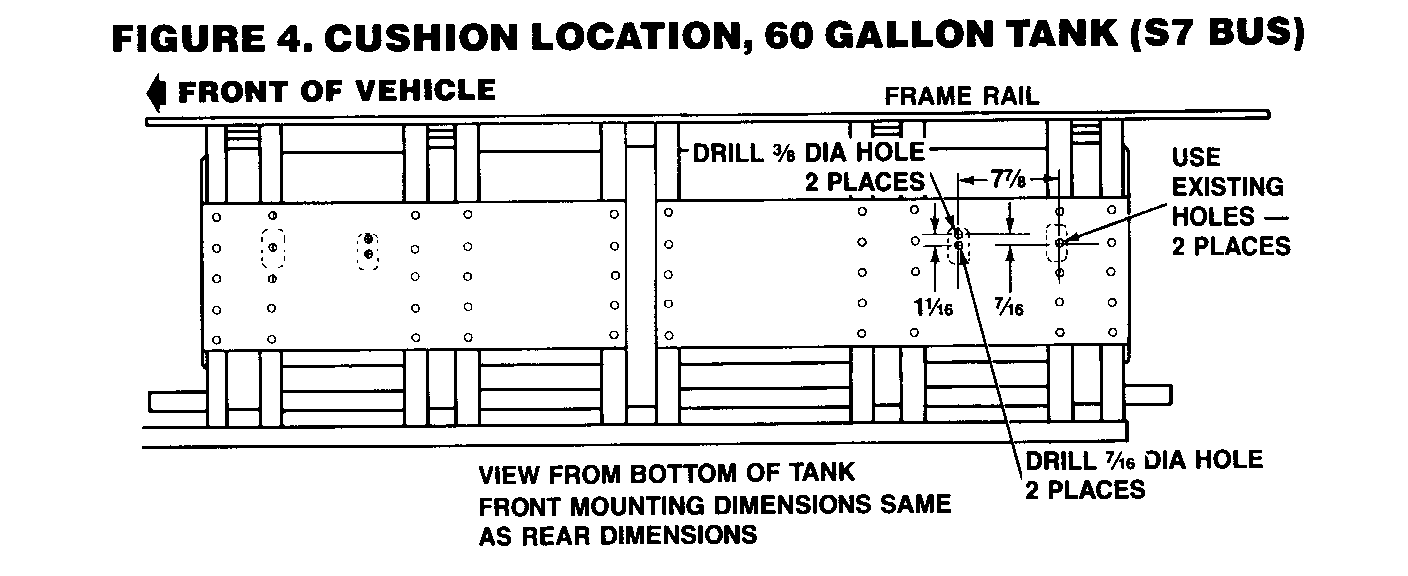
6. Drill cushion mounting holes (7/16" diameter) in two support assemblies. See Figures #2, #3 and #4 for location of holes for each type of tank. A template has been supplied to locate the holes. De-burr holes to allow cushions to completely seat.
7. Drill cushion mounting holes (one 3/8" diameter and one 7/16" diameter) in two reinforcements for 60-gallon tanks and one reinforcement for 30-gallon tanks. See Figures #2, #3, and #4 for location of holes for each type of tank. The template described in Step 6 locates these holes also. De-burr holes to allow cushions to completely seat.
8. Install cushion assemblies in position and torque down nuts to 40-51 N.m (29-38 lb. ft.) (See Figure #1).
NOTE: The tank can be balanced on the jack to gain extra installation room. If space problem still exists, the reinforcement bolts may need to be loosened or removed to install cushions.
9. Lower fuel tank onto cushion assemblies.
10. Reinstall nuts and washers on tank hold-down straps. Torque nuts to 39-50 N.m (29-37 lb. ft.).
11. Check vent hose connections.
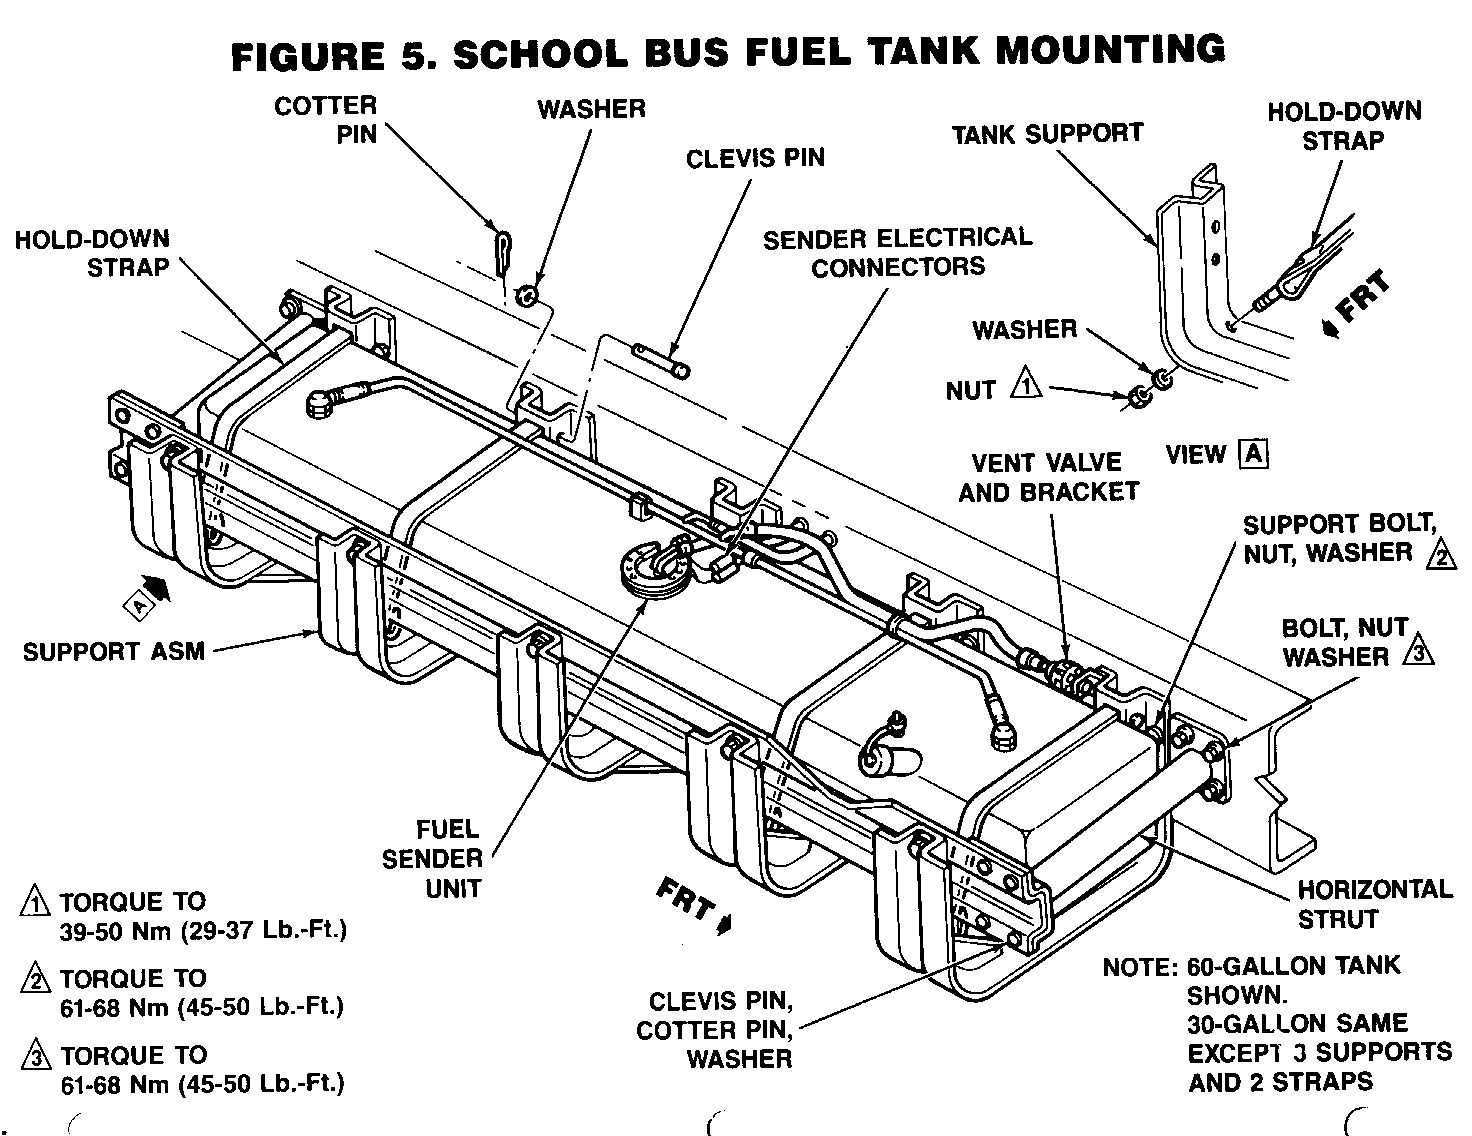
C. FUEL TANK REMOVAL AND INSTALLATION (FIGURE #5)
It is recommended that vehicle front and rear tires be driven up on 2-inch or 4-inch blocks to facilitate removal and sliding tank out from under the vehicle body. Otherwise, clearance will be marginal.
1. Disconnect battery ground cable.
2. Drain the fuel. Refer to Service Manual for proper procedures and precautions. Tank must be empty of all fuel to allow safe and easy removal.
3. Remove fuel line brackets, tie straps, and grommets in frame at fuel sender location.
NOTE: On vehicles with in-tank fuel pumps, fuel lines are connected with threaded fittings and cannot be pulled through frame. Tank must be partially lowered first, before fittings can be accessed and disconnected.
4. Pull lines through frame until clamps are accessible. Remove clamps and disconnect hoses.
5. Install a jack and wooden blocks under tank for support. Centre tank properly for balance on the jack.
6. Remove and retain the four (4) nuts, bolts, and washers holding the horizontal mounting struts to the frame at the front and rear of the tank.
7. Remove and retain the four (4) nuts, bolts, and washers holding the fuel tank mounting brackets to the frame. There are three brackets for the 30-gallon tank and five brackets for the 60-gallon tank. Remove vent valve bracket with the front mounting bracket.
8. Lower tank sufficiently to gain access to fuel sender unit.
9. Disconnect fuel sender unit and fuel pump feed wires at tank unit. Also disconnect fuel line fittings if they could not be removed in Step 4.
10. Slide fuel tank outboard from frame for access to fuel sender unit and vent lines.
11. Remove fuel tank mounting straps.
12. Replace fuel tank.
13. Install cushions on supports and reinforcements. Refer to Section B, Steps 6 through 8 for procedures.
14. If tank is to be replaced, remove sender by removing seven (7) mounting screws from sender. Retain screws.
15. Remove sender and gasket and discard gasket. Also remove vent lines, fittings, valve, and fuel cap.
16. Clean gasket mounting area on new tank thoroughly and install new gasket. Reinstall sender and mounting screws.
17. Reinstall vent lines, fittings, valve, and fuel cap. Apply sealer to fitting threads before installation.
18. Reconnect sender and fuel pump connectors on engine harness to sender connectors.
19. Reinstall mounting straps and torque nuts to 39-50 N.m (29-37 lb. ft.).
20. Centre tank in proper mounting position before rolling it back under vehicle.
21. Jack up tank and mounting brackets to proper height for mounting.
22. Reconnect fuel lines, fuel line bracket, and reinstall grommets.
23. Reattach mounting support brackets and horizontal struts to frame with existing hardware. Torque nuts to 61-68 N.m (44-50 lb. ft.).
INSTALLATION OF CAMPAIGN IDENTIFICATION LABEL
Clean surface of radiator upper mounting panel and apply a Campaign Identification Label. Make sure the correct campaign number is inserted on the label. This will indicate that the campaign has been completed.
Dear General Motors Customer:
General Motors of Canada has determined that a defect which relates to motor vehicle safety exists in certain 1986-1989 B6/S7 School Bus chassis. A crack adjacent to the fuel tank seam weld attaching the tank end cap may develop. This crack can manifest itself as either a damp spot on the tank or a slight dripping. It was determined that the seam cracks were caused by oil canning of the bottom of the fuel tank.
To correct this condition, it will be necessary to install cushion mounts on the tank support brackets. Additionally, the fuel tank will be inspected for cracks and replaced if necessary. It is estimated that approximately 5% of involved school buses will require tank replacement due to seam cracking. This service will be performed for you at no charge.
Instructions for performing this service have been sent to your GM dealer. Please contact your dealer to arrange a service date. The labour time necessary to perform this correction may vary from 1 hour to 3-1/2 hours. Please ask your dealer how much additional time will be needed to process your vehicle.
This letter identifies your vehicle. Presentation of this letter to your dealer will assist their Service personnel in completing the necessary correction to your vehicle in the shortest possible time.
Further assistance, if required, may be obtained from the General Motors Zone Office nearest you. Your vehicle Owner's Manual provides the location and phone number of each respective Zone Office.
We are sorry to cause you this inconvenience; however, we have taken this action in the interest of your continued satisfaction with our products.
General Motors bulletins are intended for use by professional technicians, not a "do-it-yourselfer". They are written to inform those technicians of conditions that may occur on some vehicles, or to provide information that could assist in the proper service of a vehicle. Properly trained technicians have the equipment, tools, safety instructions and know-how to do a job properly and safely. If a condition is described, do not assume that the bulletin applies to your vehicle, or that your vehicle will have that condition. See a General Motors dealer servicing your brand of General Motors vehicle for information on whether your vehicle may benefit from the information.
