Removal Procedure
Tools Required
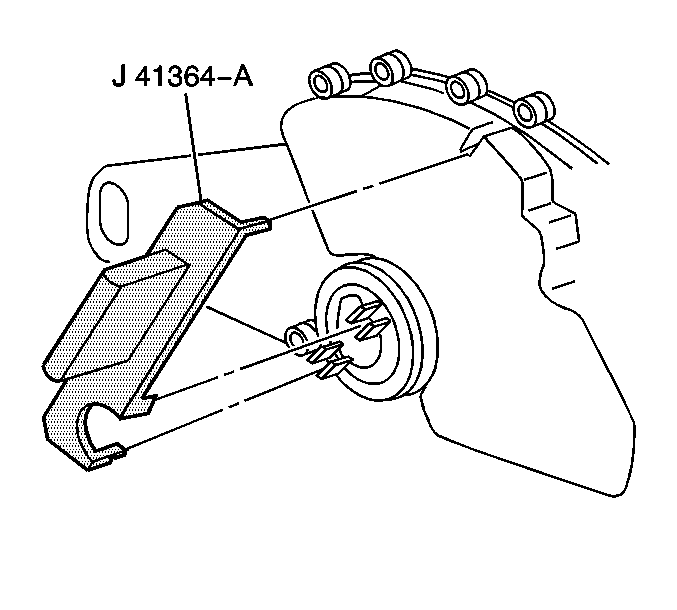
J 41364-A Neutral Position Adjustment Tool
- Apply the parking brake.
- Disconnect the negative battery cable.
- Shift the transmission into neutral.
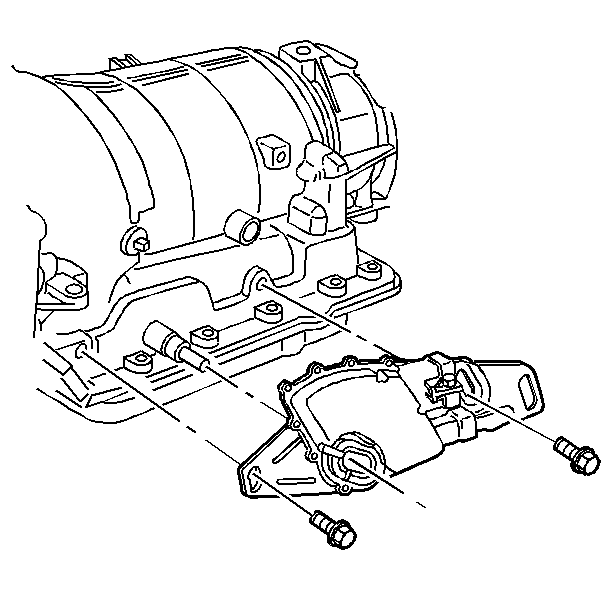
- Remove the nut that secures the manual shaft to the transmission.
- Disconnect the wiring harness from the switch.
- Remove the two bolts that secure the switch to the transmission.
- Remove the switch from the manual shaft.
- Lightly file the outer edge of the manual shaft to remove any burrs from the shaft if the switch does not slide off of the manual shaft.
Caution: Unless directed otherwise, the ignition and start switch must be in the OFF or LOCK position, and all electrical loads must be OFF before servicing any electrical component. Disconnect the negative battery cable to prevent an electrical spark should a tool or equipment come in contact with an exposed electrical terminal. Failure to follow these precautions may result in personal injury and/or damage to the vehicle or its components.

Important: Position the transmission into the mechanical neutral position prior to performing this procedure. Position the transmission control lever into the mechanical neutral position by rotating the control lever clockwise until it reaches its full stop position, and then by moving the shift control lever counter-clockwise two detents.

Installation Procedure
- Position the J 41364-A onto the park/neutral position switch.
- Ensure that the two slots on the switch (where the manual shaft is inserted) are lined up with the lower two tabs on the tool.
- Rotate the tool until the upper locator pin on the tool is lined up with the slot on the top of the switch. Do not remove the J 41364-A from the park/neutral switch during switch installation.
- Install the switch to the transmission manual shaft by using the following procedure:
- Install the two bolts that secure the switch to the transmission.
- Remove the J 41364-A from the switch.
- Install the wiring harness connectors to the switch.
- Install the nut that secures the manual shaft to the transmission.
- Lower the vehicle.
- Connect the negative battery cable. Refer to Battery Replacement .
- Check the switch for proper operation. The engine must start in the P (park) or N (neutral) positions only.
- Adjust the switch if necessary by using the following procedure:


| • | Lightly file the outer edge of the shaft to remove any burrs before sliding the switch onto the shaft. |
| • | Align the switch hub flats with the manual shaft flats. |
| • | Slide the switch onto the transmission manual shaft until the switch mounting bracket contacts the mounting bosses on the transmission. |
Notice: Use the correct fastener in the correct location. Replacement fasteners must be the correct part number for that application. Fasteners requiring replacement or fasteners requiring the use of thread locking compound or sealant are identified in the service procedure. Do not use paints, lubricants, or corrosion inhibitors on fasteners or fastener joint surfaces unless specified. These coatings affect fastener torque and joint clamping force and may damage the fastener. Use the correct tightening sequence and specifications when installing fasteners in order to avoid damage to parts and systems.
Tighten
Tighten the bolts that secure the park/neutral position switch to 28 N·m
(21 lb ft).

Important: Hold the manual shaft while tightening the nut to prevent internal transmission damage.
Tighten
Tighten the transmission manual shaft nut to 28 N·m (21 lb ft).
| 12.1. | Loosen the switch retaining bolts and rotate the switch slightly. |
| 12.2. | Tighten the bolts and check the switch for proper operation. |
